
Incredible attention to detail. The rebuild of the starter motor is outstanding. Thanks for sharing the process.
We noticed you are blocking ads. DO THE TON only works with community supporters. Most are active members of the site with small businesses. Please consider disabling your ad blocking tool and checking out the businesses that help keep our site up and free.
You are using an out of date browser. It may not display this or other websites correctly.
You should upgrade or use an alternative browser.
You should upgrade or use an alternative browser.
1973 CB350G Canadian Noob Build (Gotta start somewhere!)
- Thread starter Saturdays Wrench
- Start date
Tune-A-Fish
BOTM LOSER Proudly Deplorable
Well done, I would of got a new one... But not always available or in the budget so this is a super nice write up on a reman job.
Me thinks pull the starter reman segment and post it up in motors n shit as a starter specific how to
TAF
Me thinks pull the starter reman segment and post it up in motors n shit as a starter specific how to
TAF
Saturdays Wrench
Been Around the Block
JadusMotorcycleParts said:Incredible attention to detail. The rebuild of the starter motor is outstanding. Thanks for sharing the process.
Thanks! Apexspeed's post was crucial to the rebuild.
Saturdays Wrench
Been Around the Block
Tune-A-Fish said:Well done, I would of got a new one... But not always available or in the budget so this is a super nice write up on a reman job.
Me thinks pull the starter reman segment and post it up in motors n shit as a starter specific how to
TAF
Apexspeed's post on Hondatwins was definitely a big help, but I appreciate the kind words!
Saturdays Wrench
Been Around the Block
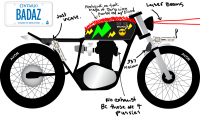
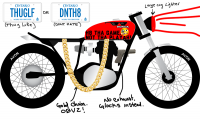
I've been working hard on some designs for the bike and wanted to get the forums opinion on these. Be honest.. Good feedback, negative feedback, I take it all.
Thanks!
Thanks!
Attachments

snmavridis
Gettin my life together. One bolt. At a time.
Get out of here and never come back.
CALfeRacer
Fat man on a little bike
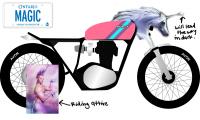
With "MAGIC" as an option, I don't see how the other three even have a chance.
Saturdays Wrench
Been Around the Block
OBBBBBBBviously that was a huge joke. Thought I would have some fun with you guys. No one commented on the cigarette lighter headlight?! I think I need to patent that!!
Annnnnnyways, back to business!
Here is what has been going on with the good old CB350 build:
Rear sprocket spacing issue has been sorted, finally! I called the manufacturer of the sprocket, Sprocket Specialists in California, to ask if the gap was normal. He admitted that he had not dealt with a 350 in a long time and proceeded to tell me that they forgot to send me a spacer that was supposed to be installed behind the sprocket! It's called a 181 spacer for whatever reason and it is in the mail! It will sit behind the sprocket where the drive pins are, pushing the sprocket outwards, aligning it with the driver sprocket in the front. I am pleased with this solution as it will be a lot more safe than the washers I have in there now.
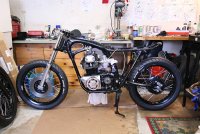
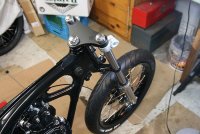
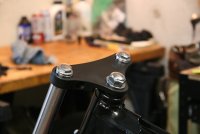
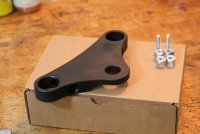
Top clamp came back from machining and anodizing from Cognito Moto and looks awesome! Fits a lot better now and I was able to get a good torque on the top clamp nut. I believe the torque spec on that is 50-80 ft/lbs. I also installed the front wheel for now and the old shocks just so I can see what it looks like.. was so impressed. Things are really starting to come together now and getting pretty fun!
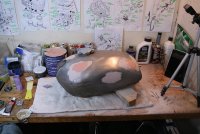
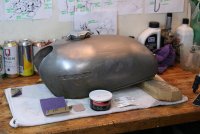
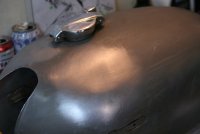
Tank is cleaned inside & out, ready for paint! I'll go through the process in a separate post. I used a small dent repair kit from Bondo to fill out a few small dents in the tank and even though I had ZERO experience doing this before the instructions were straight forward enough and the results were really good.
It took me a few weeks and a couple revisions but I managed to come up with a nice little design for the electronics tray under the seat. I'll also go into more detail about that when I explain the gas tank process.
I ordered my rear shocks and rear sets, which are also in the mail. I decided on the IKON Dial-a-ride shocks after some deliberation and lots of research. There were a few factors which swayed my decision. The first being that adjustability of the shock, second being the reputation and third was the quality and colour combination. They are being made to my particular specifications and will fit my bike perfectly. I'll go into more detail in a later post when I get to installing them. As for the rear sets I decided on a set from Bullit Custom Cycles. The quality and price range were PERFECT & they are local so shipping was like $5 and no import/duty/exchange fees. I looked into Moto Bits and it was going to cost me about $450 CDN... For foot pegs!!!! Ummm.. no.
I also figured out the front wheel axel spacing issue. In a previous post I had stated that there was some extra room in the front wheel axel. Well.. I had the dang axel cap bolt on the wrong way! The hex side of it goes in towards the wheel. Anyway I realized this after carefully looking through my reference photos of the bike before I took it apart. I'll say this again, take lots and lots of photos before you disassemble! I don't know how I didn't see it on the fiche either. Anyway, that is sorted! Wheel is spinning straight and all is good.
So here is where I am currently at:
- Battery box is off getting welded, should get that this wk then I can start on electronics -- that will be a big challenge for me but looking forward to it
- seat is currently being upholstered, hopefully picking that up this wk also
- spacer for rear sprocket is also on it's way, hoping to get that sorted soon and can then install the chain
- tank is ready for paint, still undecided about paint design and may actually just fit the raw tank on for now to see how everything runs before getting it touched up
- once rear sets have shown up and are installed I can then properly set up my riding position, then I will know handle bar positions and can drill into them for button wiring
- I also need to start thinking about the front and rear fenders, my plan is to clean and slightly chop up the old ones to get a more custom and polished look
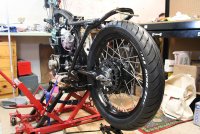
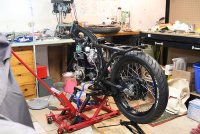
That's pretty much it for now. I've got a dang ROLLER on my hands! Woo!
https://www.youtube.com/watch?v=HQIR5SAA37I
Annnnnnyways, back to business!
Here is what has been going on with the good old CB350 build:
Rear sprocket spacing issue has been sorted, finally! I called the manufacturer of the sprocket, Sprocket Specialists in California, to ask if the gap was normal. He admitted that he had not dealt with a 350 in a long time and proceeded to tell me that they forgot to send me a spacer that was supposed to be installed behind the sprocket! It's called a 181 spacer for whatever reason and it is in the mail! It will sit behind the sprocket where the drive pins are, pushing the sprocket outwards, aligning it with the driver sprocket in the front. I am pleased with this solution as it will be a lot more safe than the washers I have in there now.
Top clamp came back from machining and anodizing from Cognito Moto and looks awesome! Fits a lot better now and I was able to get a good torque on the top clamp nut. I believe the torque spec on that is 50-80 ft/lbs. I also installed the front wheel for now and the old shocks just so I can see what it looks like.. was so impressed. Things are really starting to come together now and getting pretty fun!
Tank is cleaned inside & out, ready for paint! I'll go through the process in a separate post. I used a small dent repair kit from Bondo to fill out a few small dents in the tank and even though I had ZERO experience doing this before the instructions were straight forward enough and the results were really good.
It took me a few weeks and a couple revisions but I managed to come up with a nice little design for the electronics tray under the seat. I'll also go into more detail about that when I explain the gas tank process.
I ordered my rear shocks and rear sets, which are also in the mail. I decided on the IKON Dial-a-ride shocks after some deliberation and lots of research. There were a few factors which swayed my decision. The first being that adjustability of the shock, second being the reputation and third was the quality and colour combination. They are being made to my particular specifications and will fit my bike perfectly. I'll go into more detail in a later post when I get to installing them. As for the rear sets I decided on a set from Bullit Custom Cycles. The quality and price range were PERFECT & they are local so shipping was like $5 and no import/duty/exchange fees. I looked into Moto Bits and it was going to cost me about $450 CDN... For foot pegs!!!! Ummm.. no.
I also figured out the front wheel axel spacing issue. In a previous post I had stated that there was some extra room in the front wheel axel. Well.. I had the dang axel cap bolt on the wrong way! The hex side of it goes in towards the wheel. Anyway I realized this after carefully looking through my reference photos of the bike before I took it apart. I'll say this again, take lots and lots of photos before you disassemble! I don't know how I didn't see it on the fiche either. Anyway, that is sorted! Wheel is spinning straight and all is good.
So here is where I am currently at:
- Battery box is off getting welded, should get that this wk then I can start on electronics -- that will be a big challenge for me but looking forward to it
- seat is currently being upholstered, hopefully picking that up this wk also
- spacer for rear sprocket is also on it's way, hoping to get that sorted soon and can then install the chain
- tank is ready for paint, still undecided about paint design and may actually just fit the raw tank on for now to see how everything runs before getting it touched up
- once rear sets have shown up and are installed I can then properly set up my riding position, then I will know handle bar positions and can drill into them for button wiring
- I also need to start thinking about the front and rear fenders, my plan is to clean and slightly chop up the old ones to get a more custom and polished look
That's pretty much it for now. I've got a dang ROLLER on my hands! Woo!
https://www.youtube.com/watch?v=HQIR5SAA37I
Attachments
-
 IMG_4002.jpg313.3 KB · Views: 263
 -
 IMG_3992.jpg231.6 KB · Views: 260
 -
 IMG_3986.jpg264.4 KB · Views: 247
 -
 IMG_3981.jpg270.7 KB · Views: 254
 -
 IMG_3976.jpg151.7 KB · Views: 238
 -
 IMG_3973.jpg189.6 KB · Views: 241
 -
 IMG_3769.jpg631.6 KB · Views: 255
 -
 IMG_3765.jpg588.2 KB · Views: 252
 -
 IMG_3759.jpg660 KB · Views: 242
snmavridis
Gettin my life together. One bolt. At a time.
So shiny.
Saturdays Wrench
Been Around the Block
Time for another update!
Rear Sprocket Spacing issue CONTINUES:
The spacer for my rear sprocket showed up and I installed it onto the bike only to find that it was TOO THICK!! Will it ever end?! This sprocket issue just won't go away. I have been on the horn with Lance from Sprocket Specialists and he has been more than helpful! Really great customer service over there. After chatting for a bit he decided on 2 solutions; One is that he is going to send me a spacer that will make up the difference of the stock 530 sprocket thickness and the 520 sprocket thickness. I personally measured my stock 530 sprocket with a micrometer and got an approximate 8.7mm. The 520 Sprocket they sent me is approx 6.2mm, which makes a difference of 2.5mm. He told me that according to the information in his system, I was 0.6mm off and that the difference was 1.9mm. So this is what they are sending me and I will test it out.
The other solution is that they are going to send me a whole new sprocket and this time, instead of machining the entire surface to the width of the 520 sprocket, they're only going to mill out the area where the teeth lie and leave the face on the inside of the sprocket to the stock thickness of the 530 sprocket with the grooves in it for the t-shaped drive pins to sit in. I was worried about the drive pins with the spacer they sent me because it did not include the grooves for the drive pins. The teeth on this sprocket will be aligned perfectly with the drive sprocket since that is forced to the outside of the bike due to the bracket that holds it into place. This has all been a bit of a blessing in disguise due to the fact that the sprocket I originally ordered from them has 38 teeth. Stock is 36 on the CB350. For those that are unfamiliar with gearing ratios, going up in the rear will help with acceleration but hurt your top end speed. I honestly don't know what I was thinking when I ordered a 38 tooth sprocket. My engine will be pretty high reving to begin with and has significantly more power than a stock 350 engine. A 38 tooth sprocket is going to cause my engine to rev even higher and hurt my top end speed, which is like.. what's the point then?! That being said, going up 2 teeth isn't going to do anything drastic, but still. I think my train of thought was that I wanted a little easier acceleration when driving in the city due to the fact my engine will be a bit clunky at low speeds/rpms. Either way, I think a 34 tooth rear sprocket will be a good fit for my engine and riding style. I plan on getting this beast on a dyno at some point so hopefully I can do a quick sprocket swap and compare the values. That would be interesting! I would also like to do that with an X ring chain vs a heavy duty... but that's for another post altogether.
BTW you can look up gear ratios online but I found a pretty easy way to think about it. Divide your rear sprocket tooth number by your front and you will get a value that tells you exactly how many rotations the front sprocket needs to take in order to rotate the rear sprocket/wheel once. So my stock ratio is 36/16=2.25 rotations. 38/16=2.34. With this ratio my engine has to rotate more in order to turn my rear wheel 1 time. More rotations = higher revs per minute. Easier to get off the line but will hurt overall speed. 34/16=2.13. So now my engine has to rotate less for one complete rotation. Anyway these values are not very drastic but will definitely make a small difference. Will I notice?! Maybe.. Am I racing?! haha who knows. Either way I'm learning and that's ok with me. Just thought I'd share because that's what this is all about.
https://www.youtube.com/watch?v=KTaG4vBEWns
Tank De-Rust & Dent Removal Process:
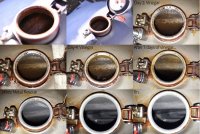
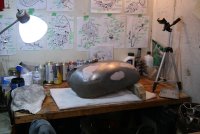
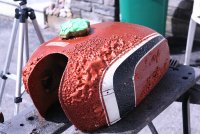
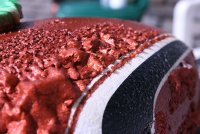
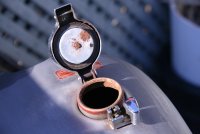
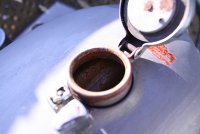
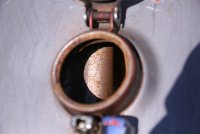
I started out with blowing the heck out of the inside with compressed air with all holes open. I fit in the old petcock, connected a cross flow tube and filled it with plain white vinegar with a few table spoons of table salt. It sat sealed for 7 days with me shaking it 2 or 3 times daily. 7 days is good, or it'll start eating through the tank at some point. I dumped the vinegar and filled with hot water and a few table spoons of baking soda to neutralize the acid.. Shake shake shake! Shake yo booty! Shake yo booty! I dumped and repeated the water filling for probably 30 or 45 minutes! The water coming out was so brown and pieces of rust were just blasting out.. it felt like it wouldn't end! I would fill with a few liters at a time and shook like an absolute mad man!! I really wish I had filmed this process because it would've been hilarious. After awhile the water became more and more clear. I blew it out with compressed air, re-sealed and put in some methal hydrate and let it sit there for about 30 mins or so. This stuff absorbs water and that is important in a gas tank. After another blow dry I was still not satisfied and decided to go with some Metal Rescue. After 36 hrs or so the tank came out sparkling!! It literally looks brand new. Whoever invented that stuff is a dang genius! It is safe to handle, re-usable, environmentally safe and works amazing! No flash rust either. Gold. I'm almost sure they're is some fountain of youth where they get it from.. I am almost tempted to drink it and see if my hair grows back. (I am seriously NOT suggesting you drink Metal Rescue to regain your loss youth). I also used a small dent repair kit from bondo to repair some dents in the tank and it worked out very well! A little elbow grease but it was well worth it. Tank's ready for paint! I just need to commit to a design but I am really taking time to consider it.
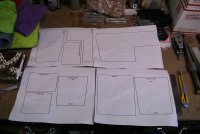
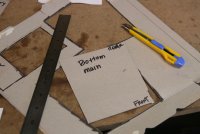
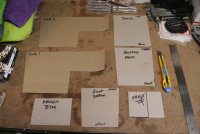
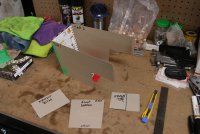
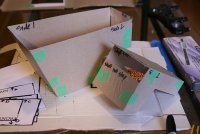
Battery Box Process:
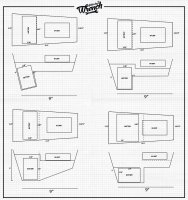
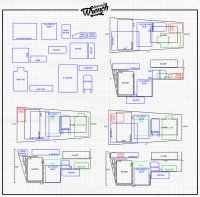
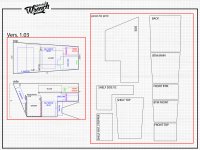
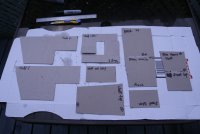
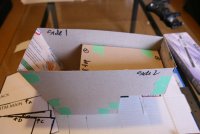
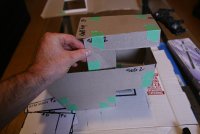
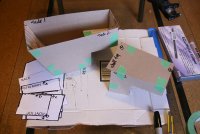
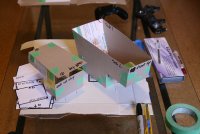
I am fitting quite a few items in my battery box so I started out by measuring all of them. I also measured the space in the frame and started planning on paper, then on the computer to scale. The battery box design was more complicated that I imagined and I can't believe that we hap-hazardly slapped something together when I got my rear seat hoop welded on. In my particular case, it really needed a lot of consideration. I played around with a lot of designs, then started fitting the components inside the box in different configurations until I came up with a good solution. As you can see form the process I came up with a shelf design and mocked it up using cardboard from cereal boxes and the like. I'm really happy I did this because I found that the wheel was making contact with the end of the box and had to hit the drawing board one more time. I also fit in all my components into the cardboard version to see if everything fit and it did, perfectly. Proper planning is so essential with stuff like this. The plans are all off getting welded up from a local shop here in Toronto called Back Alley Moto. I can't wait to see it! Once it's finished I'm going to need to get it powder coated so that will be a few weeks still. I'm patiently waiting for all this stuff so I can get going on the electrical!
Getting really close guys! Hopefully I can get in a few million rides this summer... I think I've earned it.
Rear Sprocket Spacing issue CONTINUES:
The spacer for my rear sprocket showed up and I installed it onto the bike only to find that it was TOO THICK!! Will it ever end?! This sprocket issue just won't go away. I have been on the horn with Lance from Sprocket Specialists and he has been more than helpful! Really great customer service over there. After chatting for a bit he decided on 2 solutions; One is that he is going to send me a spacer that will make up the difference of the stock 530 sprocket thickness and the 520 sprocket thickness. I personally measured my stock 530 sprocket with a micrometer and got an approximate 8.7mm. The 520 Sprocket they sent me is approx 6.2mm, which makes a difference of 2.5mm. He told me that according to the information in his system, I was 0.6mm off and that the difference was 1.9mm. So this is what they are sending me and I will test it out.
The other solution is that they are going to send me a whole new sprocket and this time, instead of machining the entire surface to the width of the 520 sprocket, they're only going to mill out the area where the teeth lie and leave the face on the inside of the sprocket to the stock thickness of the 530 sprocket with the grooves in it for the t-shaped drive pins to sit in. I was worried about the drive pins with the spacer they sent me because it did not include the grooves for the drive pins. The teeth on this sprocket will be aligned perfectly with the drive sprocket since that is forced to the outside of the bike due to the bracket that holds it into place. This has all been a bit of a blessing in disguise due to the fact that the sprocket I originally ordered from them has 38 teeth. Stock is 36 on the CB350. For those that are unfamiliar with gearing ratios, going up in the rear will help with acceleration but hurt your top end speed. I honestly don't know what I was thinking when I ordered a 38 tooth sprocket. My engine will be pretty high reving to begin with and has significantly more power than a stock 350 engine. A 38 tooth sprocket is going to cause my engine to rev even higher and hurt my top end speed, which is like.. what's the point then?! That being said, going up 2 teeth isn't going to do anything drastic, but still. I think my train of thought was that I wanted a little easier acceleration when driving in the city due to the fact my engine will be a bit clunky at low speeds/rpms. Either way, I think a 34 tooth rear sprocket will be a good fit for my engine and riding style. I plan on getting this beast on a dyno at some point so hopefully I can do a quick sprocket swap and compare the values. That would be interesting! I would also like to do that with an X ring chain vs a heavy duty... but that's for another post altogether.
BTW you can look up gear ratios online but I found a pretty easy way to think about it. Divide your rear sprocket tooth number by your front and you will get a value that tells you exactly how many rotations the front sprocket needs to take in order to rotate the rear sprocket/wheel once. So my stock ratio is 36/16=2.25 rotations. 38/16=2.34. With this ratio my engine has to rotate more in order to turn my rear wheel 1 time. More rotations = higher revs per minute. Easier to get off the line but will hurt overall speed. 34/16=2.13. So now my engine has to rotate less for one complete rotation. Anyway these values are not very drastic but will definitely make a small difference. Will I notice?! Maybe.. Am I racing?! haha who knows. Either way I'm learning and that's ok with me. Just thought I'd share because that's what this is all about.
https://www.youtube.com/watch?v=KTaG4vBEWns
Tank De-Rust & Dent Removal Process:
I started out with blowing the heck out of the inside with compressed air with all holes open. I fit in the old petcock, connected a cross flow tube and filled it with plain white vinegar with a few table spoons of table salt. It sat sealed for 7 days with me shaking it 2 or 3 times daily. 7 days is good, or it'll start eating through the tank at some point. I dumped the vinegar and filled with hot water and a few table spoons of baking soda to neutralize the acid.. Shake shake shake! Shake yo booty! Shake yo booty! I dumped and repeated the water filling for probably 30 or 45 minutes! The water coming out was so brown and pieces of rust were just blasting out.. it felt like it wouldn't end! I would fill with a few liters at a time and shook like an absolute mad man!! I really wish I had filmed this process because it would've been hilarious. After awhile the water became more and more clear. I blew it out with compressed air, re-sealed and put in some methal hydrate and let it sit there for about 30 mins or so. This stuff absorbs water and that is important in a gas tank. After another blow dry I was still not satisfied and decided to go with some Metal Rescue. After 36 hrs or so the tank came out sparkling!! It literally looks brand new. Whoever invented that stuff is a dang genius! It is safe to handle, re-usable, environmentally safe and works amazing! No flash rust either. Gold. I'm almost sure they're is some fountain of youth where they get it from.. I am almost tempted to drink it and see if my hair grows back. (I am seriously NOT suggesting you drink Metal Rescue to regain your loss youth). I also used a small dent repair kit from bondo to repair some dents in the tank and it worked out very well! A little elbow grease but it was well worth it. Tank's ready for paint! I just need to commit to a design but I am really taking time to consider it.
Battery Box Process:
I am fitting quite a few items in my battery box so I started out by measuring all of them. I also measured the space in the frame and started planning on paper, then on the computer to scale. The battery box design was more complicated that I imagined and I can't believe that we hap-hazardly slapped something together when I got my rear seat hoop welded on. In my particular case, it really needed a lot of consideration. I played around with a lot of designs, then started fitting the components inside the box in different configurations until I came up with a good solution. As you can see form the process I came up with a shelf design and mocked it up using cardboard from cereal boxes and the like. I'm really happy I did this because I found that the wheel was making contact with the end of the box and had to hit the drawing board one more time. I also fit in all my components into the cardboard version to see if everything fit and it did, perfectly. Proper planning is so essential with stuff like this. The plans are all off getting welded up from a local shop here in Toronto called Back Alley Moto. I can't wait to see it! Once it's finished I'm going to need to get it powder coated so that will be a few weeks still. I'm patiently waiting for all this stuff so I can get going on the electrical!
Getting really close guys! Hopefully I can get in a few million rides this summer... I think I've earned it.
Attachments
-
 IMG_4041.jpg258 KB · Views: 273
 -
 tank_progression.jpg542.7 KB · Views: 303
 -
 batbox_design_options.jpg354.1 KB · Views: 267
 -
 batbox_design_config.jpg721 KB · Views: 282
 -
 batbox_design_finvers.jpg511.9 KB · Views: 264
 -
 IMG_3878.JPG3.7 MB · Views: 280
 -
 IMG_3885.JPG3.8 MB · Views: 267
 -
 IMG_3888.JPG4.2 MB · Views: 265
 -
 IMG_3890.JPG4.1 MB · Views: 285
 -
 IMG_3944.JPG3.7 MB · Views: 274
 -
 IMG_3967.JPG3.6 MB · Views: 267
 -
 IMG_4050.jpg209.1 KB · Views: 274
 -
 IMG_4049.jpg229.2 KB · Views: 271
 -
 IMG_4037.jpg214.6 KB · Views: 269
 -
 IMG_3685.jpg254.1 KB · Views: 274
 -
 IMG_3688.jpg221.6 KB · Views: 261
 -
 IMG_3689.jpg313.5 KB · Views: 271
 -
 IMG_3691.jpg280.9 KB · Views: 267
 -
 IMG_3720.jpg225.4 KB · Views: 270
 -
 IMG_3858.jpg189.1 KB · Views: 269
 -
 IMG_3863.jpg177.8 KB · Views: 266
 -
 IMG_3870.jpg171 KB · Views: 272
 -
 IMG_3872.jpg268.9 KB · Views: 265
 -
 IMG_4030.jpg226.3 KB · Views: 262
 -
 IMG_4033.jpg161.9 KB · Views: 287
Saturdays Wrench
Been Around the Block

snmavridis
Gettin my life together. One bolt. At a time.
Neat!
Man wicked write ups. Thanks for sharing in detail
Looking good Tony,
Have you thought about reducing the battery size? I found a battery called Anti-gravity battery. There super small and light.
This may give you more clearance under the seat.
Great mock up shots. Love the tank in bare metal. Shame you had to bond it. Would have looked sick plain brushed metal.
Keep wrenching"
snmavridis
Gettin my life together. One bolt. At a time.
The antigravity batteries are li-ion right?Andyp said:Looking good Tony,
Have you thought about reducing the battery size? I found a battery called Anti-gravity battery. There super small and light.
This may give you more clearance under the seat.
Great mock up shots. Love the tank in bare metal. Shame you had to bond it. Would have looked sick plain brushed metal.
Keep wrenching"
Saturdays Wrench
Been Around the Block
Thanks Andy.. too late for a battery swap at this point. The 4 cell looks about half the size of my Shorai though but I would have to research how it would work with my set up. I'm happy with the Shorai though, it's the same size as their 8 cell I believe and will work well with my set up.Andyp said:Looking good Tony,
Have you thought about reducing the battery size? I found a battery called Anti-gravity battery. There super small and light.
This may give you more clearance under the seat.
Great mock up shots. Love the tank in bare metal. Shame you had to bond it. Would have looked sick plain brushed metal.
Keep wrenching"
Saturdays Wrench
Been Around the Block
It's been a few wks and I have been as busy as possible with the build. I mean that in the sense that not having certain parts are really slowing down my progress and points like this in a build can be very frustrating as I'm sure most of you guys on here can attest to!
Would you even believe me if I told you I am still having rear sprocket issues?! Well believe it!! I am having zero luck with this whole situation and it has all become quite frustrating. The guys at sprocket specialists sent me a sprocket like I said they would in my last update. They admitted the error in machining the entire surface of the sprocket. They have sent me a second sprocket with just the teeth and not the body machined down to the 520 thickness and the proper groves in the back of the sprocket for my drive pins to sit in, free of charge. And rightfully so! The original sprocket they sent me is absolutely useless without a bit of mill work. It took 3 and half weeks to show up because the border service in Canada kept it for processing for almost 2 weeks.. Not to the fault of S.S. but still annoying. A real bummer considering I could not complete a lot of tasks on the bike until I received that sprocket. It finally showed up yesterday and is absolutely NOT what I paid for. I paid for the sprocket to be lightened (holes machined throughout for weight reduction) and to be anodized in black. It showed up with no holes and in bare metal. I am less than impressed as you can imagine. I ordered this sprocket last November and it's taken this long to sort out. You can imagine my frustration, especially when I get flak for calling them out on the 3rd mistake. The owner got quite aggressive with me when I said it wasn't what I paid for. I admit I may have been a tad aggressive over the phone with them too but honestly... do you blame me?! I now have to take the sprocket to the shop this wknd to MAKE SURE it fits perfectly and then ship it back to them and wait all over again for them to lighten and anodize it and ship it back to me. I'll say no more and let you take from that what you will. Just sharing my experience.
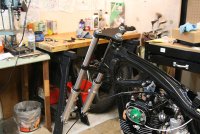
In the meantime I have been doing what I can on the bike. So far I have assembled the front brake caliper, brake line and fitted the master cylinder onto the bars. It's all looking pretty sweet! I also have the clutch cover ready to go for when I get the sprocket, wheel and chain in place.
Before I can put the front wheel back on I need to start thinking about my front fender situation. My plan is to use my existing fender, clean it up and chop it down slightly. I really need to consider this because a fender that is too short is absolutely useless! I know from experience on my Virago. The fender was completely too short and would blast my coils with water anytime it rained or there was water on the road. This caused the coils to fail on numerous occasions! Not to mention the face full of road grit you receive on your face shield! Not worth it.. trust me. I will most likely just chop the front part a little shorter and leave the rear side to stock length. I might not look the coolest but it sure does serve a very good purpose and I do not want any water/electrical problems again. I will also need to de-rust and clean up some of the pitting on the surface. I'm sure there is a crap ton of videos on the youtube for this but if anyone has any advice I am an open book.
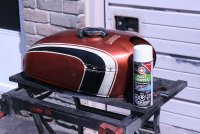
Tank is being dropped off at the painter this Friday! I am struggling very hard on 3 designs I have come up with.. probably over thinking it a little. I am very excited to see this tank and show you guys what I have come up with in the coming weeks.
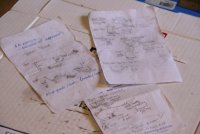
Besides that I have been researching like an absolute maniac on how to wire this bike up and am VERY excited to say that I have crawled through a tunnel of Sh** and came out clean on the other side! I have learned so much about wiring and electrical and I cannot wait to get to that point in the build where I can share my knowledge with the people who find this part intimidating. I will save that for another update but my advice to those who find this intimidating is to literally start with a blank piece of paper and a pencil and draw your self a wiring diagram from scratch. I have done this and it worked out amazingly! Just draw out your components and start connecting them with lines.. You will learn a heck of a lot in a very short amount of time. The battery box has been fabbed up by a local moto shop called Back Alley Customs here in Toronto and it looks absolutely amazing!! I am dropping that off to get powder coated this evening and will share some pictures in the next update.
No other pictures or video yet and I am literally in mid process of shooting another episode while waiting for the sprocket situation to resolve itself. Hoping to get something out as soon as I get that sprocket in the coming weeks. While awaiting that I will probably start on the electronics and have that ready to go, so you may see that update sooner than later.
Thanks for your interest and for reading my novel length updates! I usually have a lot to say when I leave it for 2 or 3 weeks. This project has been quite literally life altering and I am getting closer and closer to completion.
Would you even believe me if I told you I am still having rear sprocket issues?! Well believe it!! I am having zero luck with this whole situation and it has all become quite frustrating. The guys at sprocket specialists sent me a sprocket like I said they would in my last update. They admitted the error in machining the entire surface of the sprocket. They have sent me a second sprocket with just the teeth and not the body machined down to the 520 thickness and the proper groves in the back of the sprocket for my drive pins to sit in, free of charge. And rightfully so! The original sprocket they sent me is absolutely useless without a bit of mill work. It took 3 and half weeks to show up because the border service in Canada kept it for processing for almost 2 weeks.. Not to the fault of S.S. but still annoying. A real bummer considering I could not complete a lot of tasks on the bike until I received that sprocket. It finally showed up yesterday and is absolutely NOT what I paid for. I paid for the sprocket to be lightened (holes machined throughout for weight reduction) and to be anodized in black. It showed up with no holes and in bare metal. I am less than impressed as you can imagine. I ordered this sprocket last November and it's taken this long to sort out. You can imagine my frustration, especially when I get flak for calling them out on the 3rd mistake. The owner got quite aggressive with me when I said it wasn't what I paid for. I admit I may have been a tad aggressive over the phone with them too but honestly... do you blame me?! I now have to take the sprocket to the shop this wknd to MAKE SURE it fits perfectly and then ship it back to them and wait all over again for them to lighten and anodize it and ship it back to me. I'll say no more and let you take from that what you will. Just sharing my experience.
In the meantime I have been doing what I can on the bike. So far I have assembled the front brake caliper, brake line and fitted the master cylinder onto the bars. It's all looking pretty sweet! I also have the clutch cover ready to go for when I get the sprocket, wheel and chain in place.
Before I can put the front wheel back on I need to start thinking about my front fender situation. My plan is to use my existing fender, clean it up and chop it down slightly. I really need to consider this because a fender that is too short is absolutely useless! I know from experience on my Virago. The fender was completely too short and would blast my coils with water anytime it rained or there was water on the road. This caused the coils to fail on numerous occasions! Not to mention the face full of road grit you receive on your face shield! Not worth it.. trust me. I will most likely just chop the front part a little shorter and leave the rear side to stock length. I might not look the coolest but it sure does serve a very good purpose and I do not want any water/electrical problems again. I will also need to de-rust and clean up some of the pitting on the surface. I'm sure there is a crap ton of videos on the youtube for this but if anyone has any advice I am an open book.
Tank is being dropped off at the painter this Friday! I am struggling very hard on 3 designs I have come up with.. probably over thinking it a little. I am very excited to see this tank and show you guys what I have come up with in the coming weeks.
Besides that I have been researching like an absolute maniac on how to wire this bike up and am VERY excited to say that I have crawled through a tunnel of Sh** and came out clean on the other side! I have learned so much about wiring and electrical and I cannot wait to get to that point in the build where I can share my knowledge with the people who find this part intimidating. I will save that for another update but my advice to those who find this intimidating is to literally start with a blank piece of paper and a pencil and draw your self a wiring diagram from scratch. I have done this and it worked out amazingly! Just draw out your components and start connecting them with lines.. You will learn a heck of a lot in a very short amount of time. The battery box has been fabbed up by a local moto shop called Back Alley Customs here in Toronto and it looks absolutely amazing!! I am dropping that off to get powder coated this evening and will share some pictures in the next update.
No other pictures or video yet and I am literally in mid process of shooting another episode while waiting for the sprocket situation to resolve itself. Hoping to get something out as soon as I get that sprocket in the coming weeks. While awaiting that I will probably start on the electronics and have that ready to go, so you may see that update sooner than later.
Thanks for your interest and for reading my novel length updates! I usually have a lot to say when I leave it for 2 or 3 weeks. This project has been quite literally life altering and I am getting closer and closer to completion.


