1971 HONDA CL450 cafe build

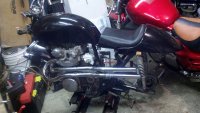
So I got some more parts and I have pictures of the ones I didn't list the other day... I bought a red oring chain and the bike is going to be black with red and white pin stripping. So the chain will look good I think. Also got the ss bolt kit for the entire engine and the acorn nuts for the top of the engine. I got the front pirelli sport demon tire on as well... I also got wiring for redoing the wiring. I will be selling wiring to anyone who wants some as well. I got 11 colors at 500' spools a piece. I'll sell it for close to my cost to save everyone money from having to buy 500' of 11 colors. I also bought the bullet connectors and crimping tool with some other connectors as well... I also tried making that chin fairing from that fzr1000 to fit and look good on my cl450 and it's just not going to work :( the fzr is just far too much larger than the cl450 and wont look good. So I'll have some of that stuff up for grabs as well. Here are some pics:


I just wanted to give you a heads up that you are likely going to have a problem with the o-ring chain. I don't have personal experience but I have heard they are wider than normal chains and will rub on your clutch mechanism in your sprocket cover, destroying it.

Try searching here and hondatwins for 450s and o-ring chains.


END OF LINE
 
Yup, Used o ring chains before even on smaller bikes. The last one I did was the orange cb200 cafe my brother and I had... Barely fit but it worked.. Not trying to offend you, just defending my position based on my experience.. The cb450 factory chain is really beefy and it may be fine the way it is but it may not either. I'm prepared to have to modify the back of sprocket cover to make it work.... I've heard mixed reviews all the time for these things and the oring chains are great and I've used them before... The majority of us on here have daily or other riders and as long as you maintain the cleanliness of the chain and keep your dailies for gravel roads and rain you'll be perfectly fine. They make less noise and have to be oiled very infrequently... I love the orings. I wont use a basic chain on any of my bikes when I change them out and most newer bikes come factory with oring chains anymore. My 95 magna deluxe has an oring chain from the factory and at 17k miles still running strong.... The majority of people out there complaining about the oring chains either have never used one, installed it improperly and had issues, or are stockers and don't like change of things like this.... Find a person who has installed one properly and complains about it or a factory building newer bikes with them on at the factory and thinking they should go back to an old type chain and then you can believe there is problems or they aren't better than stock chains... Again not meaning harm, something to think about... But I'll ride oring chains on all my bikes and make them work, most fit without modifications. but I will let you know for sure in a couple days when I install that part of the bike and see if I need to do anything special... Thank you for looking and your input.!!
 
Cool, I'm not knocking o-ring chains, just wanted to give you a heads up about their fitment on the 450s. If you can adjust for it, great. Better than learning the hard way. ;)

http://www.dotheton.com/forum/index.php?topic=42455.msg466492#msg466492

If you do have to adjust something so it will fit, make sure you show us how you did it so others will know.
 
Sweet good to know on the wiring. How much did the spools cost ya? total for all colours / each. 20 gauge?
 
Alright guys so I worked several hours tonight and feel like I got no where... I took the front end off and beat the races off which was a pain in the a$$. I put in the all balls tapered steering bearings in and the look and feel awesome. I also got the forks torn down and ready for rebuilding, started to rebuild them when the seals were just not seating for anything and I beat the crap out of them trying to get them in and tried both forks flipping them like a usb cord several times expecting a different result with nothing. Finally after ruining one fork seal I looked at the package and it did not list my bike and when I looked it up in the parts diagram it shows they are 2mm too large, and the website I bought them from showed that it would work and I have ordered before without error so I didn't even question it.. Anyways, so that is waiting new correct fork seals to finish rebuilding... I stopped at my local advanced auto parts store to check on some fork boots from a truck shock or something and they had some in stock. Red, blue, and black. Red was what I wanted for the colors I'm doing and they were only $5.99 each!! I cut them down two "notches" and they will fit perfectly once the bike is lowered.. Sorry about the pics, I started working and just kept rolling without taking too many pictures in between. This is what I have though.


Also to check back on the oring chain... It is definitely a NO GO on the bike as stock but I did find this: http://www.hondatwins.net/forum/viewtopic.php?f=5&t=5558&start=230

He has a cb450 with an oring chain and by slightly modifying the clutch pull bracket and changing the sporket to a cb 500 four he has since put 20,000 miles on the bike like that and had no problems. I really wanted the oring chain and was going to make it work. I looked at that last night also and looked like it was going to be close but after I found this I know what I am going to do to make it work. Thanks guys and hopefully this sheds light on the NO oring chain on the cb450 cl450 models. You can do it and this is how it's done. ;)
 
Worked a little bit tonight and got the rear wheel bearings replaced without a puller but the front ones are harder to get out and haven't been able to get them out yet....
I did however get the chance to adjust the front chain area to make the oring chain work. I bent the post that holds the clutch cable outwards away from the sprocket and used a new front sprocket from a cb500 and I saved about 5-7mm of space and only needed 2mm more room for the oring chain to work. I found this method of making the chain work from another thread on another forum and it was successful for him for 20,000 miles on his cb450.


I got a chance to work on the cl450 tonight and I got the pipes somewhat mocked up. Really happy with where they ended up falling. Those tips on the end are actually mufflers! I've heard the 450's hate to not have back pressure and I wanted the look of straight pipes so this worked out perfectly. My brother is going to weld them on and I'm going to use titanium heat wrap and leave about 6" of the chrome tip exposed.. trying to upload from mobile hopefully this works.

Nope wont let me from imgur. Damn thing. I'll try straight from my phone.
 
Here
 

Attachments

  • 2013-02-14_20-45-32_666.jpg
    2013-02-14_20-45-32_666.jpg
    1.9 MB · Views: 680
Finally got around to getting you guys some more pics. Still have a ways to go yet but the project is coming along smoothly. Very excited to get it done before spring so I'll be busting my ass trying for that...
I made my own tool for tightening the steering stem nut which worked decently and well enough to get the job done. I don't have a whole lot of metal working tools at home so I had to make do with what I had. Got a couple pics of the tool and then the bike.


So my pipes are at my brothers house to have the mufflers welded on and I got my header wrap in the mail today. Titanium wrap with some extra ties. I also tried the Gunk branded engine cleaners and the gel one seemed to work a little better than the foaming one. I had to go back over with a brush and carb cleaner to get into the fins good and I missed some but I'm in Indiana so the warmer days are hit and miss in the winter. It's supposed to be in the 40's again this weekend so I may try to clean it again then just to get into the fins a little better.
I cut the foot peg off the bracket for the kickstand and painted it just so it wont rust really bad until next year when I send all of it out for powder coat. This will relieve me from having to use the bike jack when I take the center stand off.
I also go the tank mounted. I had an extra velocity stack from when I rejetted my 95 magna deluxe because I damaged one when I was removing it so I used about 1' of that and cut it in half and used the factory rubber tank mounts to mount the fiberglass tank. I also adhered 2 screws onto the tank towards the rear to hook a strap around the bottom of the frame to hold the tank on. Also installed a smaller piece of flat rubber from the tank to frame in the rear to prevent all the vibrations from the tank. Most of these things will be hardly noticeable or not noticeable at all when I'm finished.
I started to mount the seat and got the mounting plate installed about halfway. I am still going to put 2 more bolts into it and then get my seat mounted.
After I get the tank and seat mounted I'm sending those out for paint. The tank, seat, headlight bucket and the items to be painted. Maybe the headlight ears. After paint and clear I'm having a friend that is a master pin stripper do the design on all of those parts and then it's going back for a couple more layers of clear. Then those will be done.
I ran into a problem slightly with the mikuni vm32 carbs when attempting to install them, first the carbs will not install with the choke levers which was already known but then the factory carb boots were a little harder and dryer than I wanted to try to crimp them down onto the carbs so I ended up buying new boots and those will be installed soon.
I will try to post more pics as I go along. Thanks for looking!!


So the tank idea I had for mounting did not work so I ended up adhering some metal tabs and bolting those to the frame. I put rubber washers in between the frame and top washer as you can see in the one pic. I also got my seat bolted down. adhered to the bolts and when the glue dries I'll be taking the seat back off, the tank and the headlight bucket and sending them to be painted.
I also got new switches for the left and right side. They were inexpensive and simple ones but that's what I was wanting.
Lastly I did clean the engine (only 25 degrees here in IN and I was frozen after the 45min to clean it) one more time only because I didn't like some of the inside of the fins but as you can see the fins are clean all the way to the middle. ;)
I will be working more this weekend and I will try to keep you updated. Hopefully have my exhaust back by this weekend and I will wrap it.


Bought my paint today. GM carbon flash metallic and hopefully I can get that and the pin striping done soon. I had some issues with this grinder I picked up from menards to polish some things but I fixed it and made it work.
I took this heat shield from a cl350 I had lying around that was broken and modified it to loo good and it will be going on my pipes to keep my leg from getting burnt all the time. I think it turned out pretty good I think.

LRNM5OJ.jpg
 
Got a chance to work one it again today...
First off, I went out to the garage to a weird smell to notice a little later a small amount of liquid on the floor. Turns out to be ATF, took the front wheel back off and the left fork tube bottom allen bolt was not tightened all the way. I'm sure I tightened it before putting the forks back together all the way and installing them on the bike. AND now the bolt keeps spinning and doesn't feel like its grabbing anything so I think the stanchion tube inside may be spinning. I never got the bolt out of the bottom fork leg, I just left it in during the rebuild and it was pretty crusty from the outside. Not sure how to get it all the way out yet or possibly get the screw to grab as is yet. I will attempt something with that tonight.
We welded up the mufflers onto the headers today, welded the rear seat hoop, mocked up my rear brake lever for rear sets, weighed the bike and some other small things. I will work on it more tonight also and try to get more pics up.
The bike started out at about 420lbs. I have since removed a ton of parts. For the weigh in here you'll see 331lbs which includes the items seen in the first picture and a set of carbs. So a little weight/parts missing yet but I am also removing a little more yet too including the starter motor gears/sprockets/chain/wires and everything to do with that... I was really hoping to shed 100lbs from the bike and gain 6-8 hp which would put my bike at roughly 320lbs and 50hp? Those are just rough figures I have found from some research. My planned numbers may be unobtainable without heavy modifications but that's what I'm shooting for and I can settle on something if I get close or modify more later as well to make it happen.
Here are the pics from earlier today:

jsqEArv.jpg


P20GQDE.jpg


dlWHBPN.jpg


kLlpW0J.jpg


6t3Afzo.jpg


Thanks for watching my build!!!
 
I forgot I also semi polished some covers the other day. I have the points base and cover here. These were extras I had that I polished and was going to install but I don't think I want to change my points plate until I'm ready to adjust the valves since the valve adjustment nut is over the base plate. I installed the polished cover but not the base plate for now. I just left the original on... I also polished up the sprocket side cover but I do not have a pic ready for that one. I will get that tonight also.

EaI1fFM.jpg
 
Beware! The points housing (or base) is also the exhaust cam bushing. The cam sits in that thing. If you take it off, the cam will drop down and most likely screw up the cam timing.

Make sure you fully understand how the top end works before taking off any of the cam covers. I did not and bent a valve. :(


END OF LINE
 
Thank you for the heads up!. That was the plan with it. I don't want to touch a bolt or remove anything I'm not fairly sure how to put it back together properly... I knew that was valve and cam adjustments or the like. I am going to tear down the whole engine next winter and I will replace it then. For now I think I will bust out my drill polishing attachment and the dremel and polish the best I can with it on the bike. When I rebuild I will remove and put the best of the two of the covers I have back on it with all new parts. ;)
I have the ss allen head bolt kit for the entire engine and I will probably just pull of one bolt at a time while I polish the side/valve/cam covers that I'm not removing and polish the best I can then put the new bolts back in. For now...
 
So thanks to my wife we only had to take the kids to their festival today but other than that I worked in the garage almost all day which is not very common...
I talked to Dave at Legendary Motorcycles (who is the MAN!!) about my project and he recommended I paint the seat pad red and he pointed me in the right direction to get the job done correctly. I didn't think it was even possible so I was just going to keep the black. I made my own little "paint booth" and painted it up. It seemed like i used 10 coats and may have but I didn't count. I did use about 1.5 cans though. It looks amazing though and it dried super fast. It is very durable as well.
I took a picture of the baffles in the mufflers, I got the headers wrapped with titanium header wrap, the seat hoop painted, the carbs installed and carb filters installed. The heat shield I have on there is just zip tied on for now. I think I may be trimming down the front side a little more and shaping it differently.

OEcDyWp.jpg


2M5xkYP.jpg


QgQxXym.jpg


lSxBhyS.jpg


PmzJU5e.jpg


oD07jHk.jpg


9zlOEk5.jpg


cqDixOO.jpg


E04qYEC.jpg


cjpsyTz.jpg
 
I haven't really got much further on my project but I did run into problems with the carb boots and I thought I'd share the information... I have mikuni vm32's and my boots that were on the bike were very hard and not pliable much at all. I had to take the choke levers off the carbs to get them to clear the valve cover and seat nicely. I ordered the mikuni specific carb boots knowing I would have to widen the bolt holes to fit onto the bike. So I did that then mounted them only to see that they have a pretty large area where the cylinder head is exposed creating a decent sized lip around which would restrict the flow of fuel/air into the engine. Also they were a bit shorter in height making the carbs sit far closer to the engine. This in my opinion wasn't going to work well so I bought some NOS honda specific carb boots for my bike... Hopefully this can prevent people in the future from making the same mistake. I have included pictures to attempt to show you what I was explaining. Hopefully I can get some work on the bike done soon and post more pics. Thanks for looking!

(Oh and the left one and first individual picture is the Honda OEM NOS carb boot)

iCU6Gvr.jpg


AOL7beP.jpg


85Z9Aws.jpg


cgv6STd.jpg
 
Back
Top Bottom