CB400F First Build! College Kid's Cafe Project

aaron33royer33

New Member
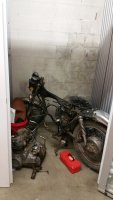
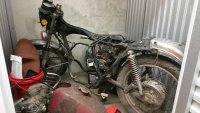
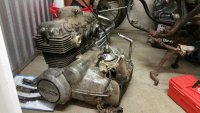
Hello out there! I am so excited to finally start on my own project after researching and shopping for so long. I am an engineering student at Georgia Tech in Atlanta, and I just purchased a 1975 Honda CB400F. The bike needs A LOT of work to get back on the road, but that's just what I'm looking for. I am really interested in learning how the bike operates and functions through this intensive project. The end goal is a cafe style with a minimalist setup.

About the bike:
I bought the bike from an Army veteran who had similar cafe ambitions with it, but did not have the time. Lucky for me, he already ordered nearly every part necessary to get the bike running again (gasgets, ignition kit, jet kit, new tires, master cylinder, Clymer and Haynes manuals, etc.) and provide parts to achieve the cafe appeal (seat, clubman bars, lights, pods, new tires). All in all I paid $750 for the bike and parts, and the guy was kind enough to deliver to the storage unit I have on campus.

Priorities:
I want to be as systematic as possible about the build, mainly because I want to keep the total cost below $1500. This may sound crazy, but there's a catch. I am a mechanical engineering student here at Georgia Tech, and the department has an entire invention studio and machine shop full of every tool, machine, and expert you can imagine. Best part is that it's FREE to students to use. Just have to supply materials.

I want to get the bike running before I start doing anything else. My short term plan is the following:
1) Compression Check
2) Wiring (as bare bones as possible just to get it to start)
3) Ignition Check
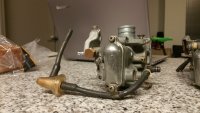
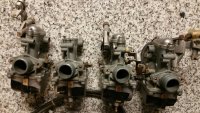
4) Carburetor Rebuild (already done 2 out of 4)
5) Give it a kick!

Again, I am so excited to start up my own project thread on here after seeing the great advice from you guys on other projects. I will certainly be taking valuable lessons from some of the other builds on here (all hail neevo), and look forward to keeping everybody updated along the way. All feedback, suggestions, and questions are greatly appreciated as I have no experience in this field and am wide eyed with the opportunity ahead to get this beautiful street machine back into the game.
 

Attachments

  • Storage Day 1 (a).jpg
    Storage Day 1 (a).jpg
    1.9 MB · Views: 413
  • Storage Day 1 (b).jpg
    Storage Day 1 (b).jpg
    1.6 MB · Views: 308
  • Engine Day 1.jpg
    Engine Day 1.jpg
    1.7 MB · Views: 352
Welcome aboard young fella ;) great little project bikes these mid range Honda's you may think theres a long n tough time ahead but your enthusiasm will take ya to a brilliant end result ime sure, 8) remember photo everything like a picture log real useful, listen to the guys here you will get the best advice enjoy the whole experience east to say when your not tearing your hair out when it just don't go to plan, love your excitement with your first project its still the same even for us old guys its that buzz that keeps our old hearts pumping ;D
 
Look forward to watching this one.

Looks like you have outlined a solid plan.

Word of advice. I deal with engineers on a daily basis. They tend to over complicate everything. Don't do that.
 
Right,
Engineering students are the WORST at project motorcycles.

First mistake was buying a bike in a box.
Move was to buy a running bike, keep it running and over time functionally improve it.
You arent in art school, so I hope you are not "inspired" by junk from pipeburn.

I remember my project while at engineering school.
Didnt have much time for it....
 
Nice project, looking forward to your progress. Hit me up if you need help, parts sources, information, images etc. I have restored 5 CB400F's and can help you through some of the common problems. Be sure to use OEM Honda carb parts and stock exhaust. These little carbs are very finicky and need a lot of work when you add pod air filters or a different exhaust. It can be done, but it is challenging. David Silvers Spares USA has many parts for this bike.
 
mechanicalATL said:
all hail neevo

Well this thread is doomed ;)


All my build was done with some ingenuity plus guidance from a solid collection of peeps on here. Some very smart people on this site with a wealth of experience with these little super bikes. Heed their advice as its valuable and free :)
 
neevo said:
Well this thread is doomed ;)

All my build was done with some ingenuity plus guidance from a solid collection of peeps on here. Some very smart people on this site with a wealth of experience with these little super bikes. Heed their advice as its valuable and free :)

Seriously, listen to these guys. I've been on here for a week or so and have been steered in a great/better direction multiple times.
 
Engineers need to act more like they're in art school. Creative thinking goes a long way toward problem solving. You may make mistakes, I really hope you do. You may actually learn more from them. It's good you plan to get it running first, but even then you have little baseline. I'd consider trying to get your hands on a fully functional well maintained 400f- all in the name of research. Somebody out there is sure to welcome you into their garage to hear and see one run well. You'll have a better sense of where to take this build once you know where zero is.

I look forward to following along.
 
Welcome man. Excited to follow along and thanks for sharing it here!
 
I'm in.

And my advice is ...... since everyone else is telling you how to do it :)

These 350/400 4's are design classics and unbarstardised examples are rapidly appreciating. You have the potential to end up with a bike worth more than your purchase price and planned budget, a better investment/return than from a savings account.

DON'T DO ANYTHING IRREVERSIBLE

No de-tabbing or frikin bobbing of mudguards, no delete of indicators or any part of the electrical system at all. no hipster bare centre frame triangle, not even the air box or side panels ......

Bolt ons are all reversable ie rear sets, ace bars, exhaust, seat.
One old school performance mod for airflow was to discretely bore a few 1" holes in the bottom of the air box.

There are plenty of proper engineering challenges which can make a real difference to the bikes quality of ride.
Like replacing every single bearing with new good quality ones, do any needle/taper roller bearing upgrades that are possible on this model.
Re- manufacture bushes in bronze with grease nipples to feed. Look at what is needed to internally improve the functioning of the front forks. Spend money on getting the frame and fittings back to stock. then all consumables ... modern tyres and brake pads, oils, quality chain and sprockets, electrical upgrades,exhaust expensive rear shocks like period styled Hagons .... that. along with paint will eat your budget nicely, but at the end you'll have something that will only keep on increasing in value, and will be a tight little gem of a ride.
If you really need to bust out the angle grinder and shower sparks all over the shop, grab some angle iron and bust out an engine cradle to hold it nicely on the bench.

In saying this, I also acknowledge that people have done radical shit with these, the whole single sided swinging arm and USD forks conversion which is not cheap and would not necessarily have the same long term value as an unmolested bike. How ever, anything with Yoshimura written on it is a valuable upgrade ;)

In short .. blue printing good, angle grinder bad.
That's my ration of crap, based on experience of having ruined quite a few bikes over the years, which had they been left alone, would be a pleasure to own and a good nest egg for the future should they ever need to be cashed in.
 
Welcome to DTT. Certainly looking forward to seeing what comes of all this. Having access to the facilities that you do will be quite helpful but as has been stated... Simplicity is key.

Starting with a bike in pieces is a massive pain in the ass, but can be overcome with a TON of work and a lot of time.

Keep us posted and again... Keep it simple.
 
Welcome aboard DTT.....get ready for the ride, hang on and enjoy.

Are you actually from Georgia and going to school here, or?
 
I'm in...I just bought my son a 1977 400/4 as a project (not his first bike build) and look forward to whatever way you intend to take your project. Good luck and post updates,even small ones ;)
 
What is simple about these bikes?

I never understand why people think that a SOHC four cylinder Honda is a simple bike.
Triumph twin? Yup simple.
Ironhead? Stone axe

Tolerances are very tight on the Honda, there are a million parts, service is expensive, ect.
Thing will be a turbine smooth bike when running.

That is before we talk about how important having a good base line is. I cant tell you how many people I meet that ride poorly running bikes, because they have zero idea how good something can be.

Can it be done?
Sure.

The dig at engineering students isn't unfounded. They get told in high school the can build anything. And then bite off to much.
I speak as someone that went though engineering school latter then most (I was a mechanic for a few years before going back to school). I ran the car club and garage at Clarkson. Had kids that didn't know how to change their own oil want to talk about swapping engines in Subarus!

Walk before you run.
Ask me about my CB750F that I took apart day one....
 
Thank you Mr. Matthew, let's not let Jwilde turn THIS thread into a shitshow too.

BUILD ON COLLEGE KID!!
 
I'm almost all finished with the carburetors now, I just have to assemble the last one that I've cleaned and then link them all on to the carb bracket. I've been using a custom made agitator to enhance the soak in the carburetor cleaner. You can see from the picture that it's as simple as it gets, but it definitely gets the job done.

My carb cleaning process is the following:
1) disassemble
2) soak in carburetor cleaner for 20 min
3) run the agitator for 5 min
4) rinse
5) dry with compressed air
6) assemble with new jet components

I did make the mistake of snapping one of the carburetor plastic fuel connectors while disassembling the carbs from the holding bracket. To fix this, I took the measurements of the other part that's intact, modeled it in CAD (computer-aided design) software, and am now 3D printing a brand new one as I'm posting this! We'll see how the part turns out after it finishes printing tonight.

I definitely appreciate all of the feedback on the thread so far, and I'll be sure to keep updating in regards to whatever progress I make.

One question: What is this plastic cone that is linked via hose to the carburetors? I am assuming fuel filter, and if so, what kind of replacement fuel filters will work, because I haven't found any that look like the stock one.
 

Attachments

  • mystery cone.jpg
    mystery cone.jpg
    4.3 MB · Views: 276
  • agitator.jpg
    agitator.jpg
    2.6 MB · Views: 322
  • air.jpg
    air.jpg
    1.7 MB · Views: 276
  • clean carbs.jpg
    clean carbs.jpg
    1.6 MB · Views: 321
With all the resources that are online these days there is no reason you can't do whatever you want with this bike. 20 years ago it would of been tougher but still very doable. Now there is basically any part you need at your fingertips, new, used or reproduction. You have videos, online manuals, step by step builds and restorations others have completed. There are probably few questions that you could come up with that aren't answered online somewhere. If you have a plan and put in the time, work and money you will succeed with the bike.
 
Back
Top Bottom