For most things, in order to make a mold, you first need an original from which to make the mold. On the whole, there is only one reason to wish to make a mold in the first place; You wish to make more than just the original, which means copies. Happily, it is quite simple and easy to create an original - at least when compared to making the mold(s) and copies, especially if the shape is complex like what you are considering.
Of course "simple and easy'" largely depends on who you talk to, and everyone will have their own version - if you are familiar with working with clay or plaster, that is easiest, if you like to weld maybe steel or alloy is easiest. If you do not have a speciality already, I suggest rigid foam and fiberglass composite.
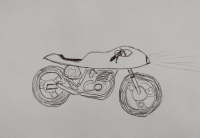
The process is called moldless construction, and if you have some model making or construction experience likely you will find it straightforward. Having a stylist's eye for creating the beautiful flowing shape you may have in your head is another matter, but this process is far better than most for being infinitely adjustable, adaptable - changeable on the fly so you have a much better chance of getting what you want than many other materials.
The basic process is simple enough. You take blocks of rigid foam and glue them together into a larger than the approximate shape of what you want and carve it into the shape you want. Cover the shape with fiberglass, sand smooth and paint. Voila! Of course for a complex part like you have in mind will take a bit more doing than that, but the process is the same. There are urethane foams of any density you like created for this very purpose, but while superb to work with they are also quite expensive. But there are much cheaper alternatives. Green florist's foam works just fine, but it is fairly wimpy structure-wise so if you have slender elements that will have to support bigger portions you may have to create some sort of temporary supporting framing from wood or metal while you work. It is ridiculously easy to carve and shape, and because it comes in blocks intended to stick flower stems into, may not be the optimum foam - it is very easy to find though. A better choice is urethane foam insulation, which comes in 4'x 8'+ sheets in most any thickness you like. This is something bought from a commercial supplier - have never seen the equivalent in Home Depot, etc. It is always tan/gold color in my experience. You want urethane foam because most other foams melt from the solvent components of the resin you will use. Speaking of which, I heavily suggest you use epoxy instead of polyester resin. It is a LOT more expensive than polyester, but is also that much superior in every way. Use fiberglass CLOTH of the lightest weight you can get. Easier to work with. Don't fool around with carbon fiber or Kevlar or anything else. Most people (even those that make beautiful looking parts) do not make lighter or stronger parts from carbon and it is much harder to work with in this technique than glass.
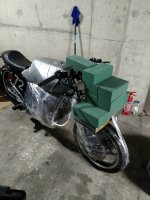
You can do this job right on the bike - but you have to cover it completely because the process is pretty messy. Thin plastic sheeting like body shops use to mask off whole cars and aluminum foil and masking tape will do the job. Make an armature to support your foam, or carve up the underside so it sits right on the bike. You can use construction adhesive, epoxy, I've even used Bondo - whatever you like to glue the foam blocks up around your bike. When you have enough volume, you can start carving. Insulation foam and florists foam are crazy easy to carve. A wood block with #36/40 grit sandpaper files it down so fast you have to be careful not to over do it! Switch to #80 when you get close. You can also use hack saw blades, craft knives, wood rasps, sureform planes, Bondo files, anything you like, the foam is very soft. You want to take an extraordinary amount of time to create the EXACT, PERFECT, FLAWLESS shape you are after. It is super easy to make the foam smooth, flat, curved and perfectly fair. Once you apply the glass it will NOT be.
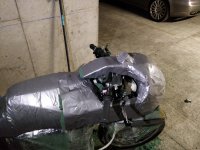
When you think you have what you want, mix up some resin, paint the area you want to cover, wet out a small, cut to size and shape piece of glass and squeegee into place. Repeat until your whole project is covered. This is basically like paper mach'e in principle. As long as your patches of cloth overlap, and a second layer overlaps in a different spot from the overlaps in the first layer, you can consider the strength of the end result to be uniform with no weakness ant any join. If you end up with what yo want for shape and structure, all you have to do is block sand the result, then fill the weave of the cloth with resin thickened micro-spheres or any other preferred thickener. Sand smooth and finish like any other bodywork/painting project. The good news is that if you don't have the shape you want, it is only a matter of hacking off what you don't like, adding more foam if needed, shaping again and reglassing. repeat until you are happy. There is a lot of info out there on U-tube - look at fiberglass boat repairs for starters.
You can make extremely complex and detailed shapes and you can make any adjustment or change you like at any time as there are mostly no structural considerations. If you cut a floor joist 6" too short, you have to start again with new lumber, but with this process, you simply glue on another 6" - it is nearly impossible to screw up where you can't easily recover.
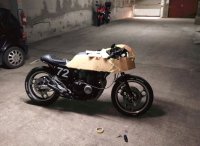
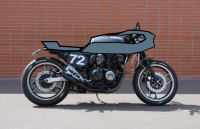
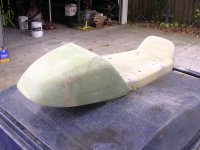
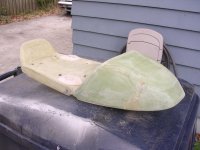
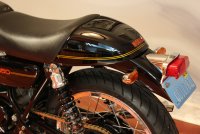
Below is a picture of a seat I made this way. I was out of commercial foam and used florist's foam from the local craft store. You can see the green through the glass. This was a very complex part and had a lot of iterations adding all the features and adjustments, along with embedding threaded plates for mounting hinges and the like, but each portion on its own was pretty simple. They only had small blocks of foam, and you can see the joints between the blocks. The other thing is, it is quite easy to remove the foam and then sand and fair both sides of the end result. The seat here is not finished, but is well along the way. I added a shot of the end result. The entire part only weighs a few ounces and is very strong.
Obviously there is a lot more to this, but a reasonably thoughtful and determined person should be able to get a pretty good result if the think ahead and take their time. It really is as simple as it sounds!


") any kind of glue will do the job to stick the foam blocks together?
any kind of glue will do the job to stick the foam blocks together?