Stuck Rear Master Brake Cyl Yam RD

to bleed the master you put your finger over the end tight and pump 5 or 10 times on the lever,hold down on the lever on the laST pump,release your finger for a moment while keeping the lever down,put your finger back on while the lever is down,and repeat this process untill no air bubbles escape when you release finger
after a few tries it should be pumping solid fluid no air
not that solid fluid exists but you know what i mean
 
xb33bsa said:
to bleed the master you put your finger over the end tight and pump 5 or 10 times on the lever,hold down on the lever on the laST pump,release your finger for a moment while keeping the lever down,put your finger back on while the lever is down,and repeat this process untill no air bubbles escape when you release finger
after a few tries it should be pumping solid fluid no air
not that solid fluid exists but you know what i mean

Ok xb!

So your guess is that theres still too much air in the master.
That would explain why the master cannot fill up that tiny flex line.
 
yep get the air out it is called "bench bleeding" i am just adding it as a bit of help of the procedure beyond jpmobius's excellent write-up
if the master wont bleed and build pressure then you got problemo
 
xb33bsa said:
yep get the air out it is called "bench bleeding" i am just adding it as a bit of help of the procedure beyond jpmobius's excellent write-up
if the master wont bleed and build pressure then you got problemo

thanks xb for helping!

i will go for a more intense bench bleed tomorrow.
when i dont get any pressure i guess i´ll need that expensive repair kit,seals are not to buy anywhere here in europe separately....
 
Right. Should have added what xb said. I usually resign myself to the fact that anytime I get out the brake fluid, there is going to be a mess, so I just cover everything up and expect the worst. The idea with your finger sealing the opening regardless of where in the system you are is that it works great as a one way valve. With medium pressure, you should be easily able to seal off any air getting sucked back in on the return stroke. In fact, in your situation with the master vertical, you really want that piston retracted and the master brimming with fluid where the line goes so once the line is back on, the very first pump will start to add fluid to the line. With your fingers tightly over the banjo bolt at the other end, that first pump should produce pressure (air) which you can allow to escape. Just make sure you are sealing off any possibility of air getting sucked back in, and you should be able to completely fill the line very quickly and easily just by maintaining constant finger pressure and simply pumping the brake pedal until it is full. Constant finger pressure - enough to keep air from being sucked in, but not so much it keeps the compressed air from coming out on the compression stroke. Once fluid gets close, it is impossible to overcome the tremendous hydraulic pressure the master generates, so fluid will squirt past your finger thus making a terrible mess. Once the master is full enough to not be able to suck back air, the one way finger valve will work anywhere in the system. I will often even just remove the bleeder screw from a caliper and use my finger because it is super fast compared to the back and forth loose -tighten process with the bleeder. Not usually much more messy if you are careful. This is especially good on cars because the mess factor is less important, and you don't have to co-ordinate with the person operating the brake pedal. I take out the bleeder screw, put my finger over the hole, have my accomplice just pump away on the pedal until fluid under pressure with no air come out. Stop pumping the brake, screw the bleeder in, clean up mess. DONE! Perfect every time, never takes more than a couple of minutes. In theory, this should work just as well for bikes, but it seems a lot of handlebar mounted masters are very stubborn for not purging that critical air right at the piston. Probably due to the small volume displaced compared to bigger vehicles. For the record, I do not own, nor have ever needed a vacuum apparatus for brakes, though a lot of people like them. Only mentioning it because in my experience, one has yet to be actually needed.

Based on your information so far, I expect your master is fine. Do as xp said, finger over the master and several pumps. Once full, it will be IMPOSSIBLE to hold back brake fluid from escaping past your finger. Don't over test this, you wouldn't want to drive brake fluid into your skin! If you follow these procedures and do not have obvious irresistible pressure at the master - yep, problemo!
 
hey moeb!

thank you again for your extremely helpful input!

i really got into the the brake thing yesterday and tried this procedure 2 times....again without any good results.

i managed to get all air out of the main cylinder ,just clear fluid was coming out of it,that finger thing worked great...unfortunately after i reconnected the line to the master in order to fill the line with fluid i had no luck.

it was just possible to get a few drops running down the line...there was no straight flow out of the line.

then i was terribly frustrated.i took of the line and pumped to pedal looking into the threaded hole on top of the main cylinder....when i stroked the pedal the fluid was moving up and down,up and down....so thats the reason why theres no fluid in the line.

i guess that the main doesnt produce enough pressure.

i took the main apart and tried to figure out whats going on in there.

besides rusty parts on the outside (broken dust boot) the inside looked good and clean..the chrome(?) was not perfect but nice when i used my finger...the cylinder in which the piston slides up and down looked nice and with no "bruises" or rust in the wall.
 

Attachments

  • 20141108_001408.jpg
    20141108_001408.jpg
    2.4 MB · Views: 175
  • 20141108_000725.jpg
    20141108_000725.jpg
    706 KB · Views: 173
  • 20141108_000808.jpg
    20141108_000808.jpg
    778 KB · Views: 186
  • 20141108_000646.jpg
    20141108_000646.jpg
    1.3 MB · Views: 174
  • 20141108_000651.jpg
    20141108_000651.jpg
    1.1 MB · Views: 167
so i got 2 options:

buying an expensive rebuild kit...50 euros
or

i ve found a working yamaha r6 master for 15 euros..might be worth the money..just fab up a bracket and an arm for the pedal lever.
the original one is 5/8 and i think the r6 one is 1/2...what will be the consequence if i use this "smaller" diameter cylinder?
 

Attachments

  • r6.jpg
    r6.jpg
    42 KB · Views: 10,806
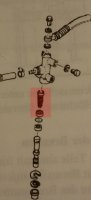
You probably want to stick with the same size bore for a replacement master. The consequences are straight forward of changing parts. To move the piston in the caliper any given distance, a specific volume of fluid is required. That volume is provided by the master. Using a smaller bore master will require a larger travel of the master's piston to produce that same volume. The functional consequence will be that the effort required to produce a given force at the caliper will be less at the master with a smaller piston. So your brake will feel more powerful needing less pedal pressure for the same braking force. More pedal travel will be needed too, and while sometimes this is not especially noticeable, it potentially can be unworkable. You RD rear disc brake is way more than is needed already, so you probably don't want to make it any more sensitive.

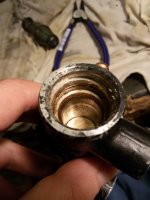
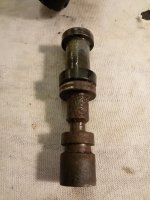
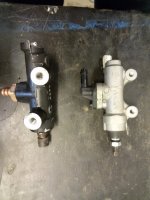
Have to say your master looks like it should work. It is rough outside, but the inside looks ok. If you were holding your finger over the line connection and were getting high pressure, you should be able to continuously pump fluid out of the master as long as you let no air return to it. Once the line is connected, you should be able to fill it the same way, always preventing any air from being sucked into the line when the pedal is released. It helps to keep the caliper end high at all times, especially with a new line which for some reason are often harder to fill. Seeing the fluid move "up and down" is what you would expect to see. The master will not pump because it is easier to draw air back into the open line connection than it is to draw more fluid in from the reservoir. Realize that when the system is assembled and working, that the piston(s) in the caliper move only a tiny distance. The do not slide back and forth against their seals. The caliper piston(s) only gradually slide past their seals as the brake lining wears down, otherwise there is no movement at all between the seal and the piston. It is in fact very difficult to slide the piston along the seal, so in effect, it only can move forward as the hydraulic pressure forces it to. It is too hard to retract when the pressure is released, so fluid from the reservoir gets sucked in to the master instead to replace the lost volume. Once the pads come into contact with the disc, the pistons can move no further, and motion past the seals stops. When hydraulic pressure is applied, the piston travels forward a tiny distance, but not far enough to move past the grip of the seal, so the seal simply deforms. It grips the piston very tightly on one side, and is captured in a groove in the caliper on the other, and it just bends to accommodate the small displacement of the piston. When the pressure is released, the seal returns to its un-deformed state and the piston retracts slightly, just enough to release the grip on the disc. So most of the time, there is no "pumping" of fluid through the system. It is just the same fluid going back and forth. As the pads wear, eventually the piston(s) must travel far enough to move past the seal a bit, and when they do, they do not slide back all the way and a bit of fluid is drawn from the reservoir to make up the missing volume.

What this means is that when you are filling the system, you have to realize that simply "priming" the master will not make it start "pumping". The system must be sealed after the master's piston is compressed and before it is released in order for fluid to be drawn from the reservoir.

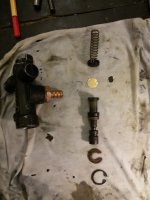
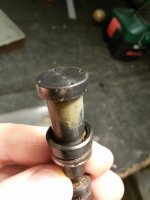
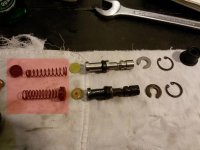
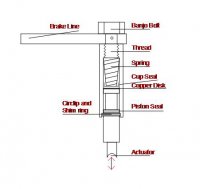
Since you have it apart, clean it carefully, and reassemble it with clean brake fluid only. Pay close attention to those four tiny holes in the end of the piston. They work with that thin disc and the spring to effect the one-way valve action, and might have been a source of difficulty for you if gummed up.
 
I changed the front brake pump too from stock to a reservoir same size bore and the disk brake works perfectly.
The big differnce imho is that it feels less 'moshy'.but the 'lever travel' is the same.

I will def try to find a same size bore master for the rear.

I think ones got to be really really careful to not take a too big one.
It can happen pretty easily when you drive to push the lever to hard and you will faceplant...

So I just called the guy that sells that R6 brakepump.

Its a 1/2-- so i guess this is approx 12.7 MM
Brembo

The RD has stock 5/8 which is around 18 MM

So my question here is:

Should i roll with the new smaller brembo master?
Will there be a feelable step down of braking power cuz of the smaller bore?

Its 15 euros and in good shape so quite a bargain for a part that sells for 50 euro and plus om ebay.

Opinion appreciated!
 
If you are against the 1/2 brembo do you know any newer brake master off of a moto that has the same bore as the RD?
 
Don't know off hand about alternatives. I just added to my previous post - check it out. Sometimes the difference in travel is not too noticeable - depends on a variety of factors. Mushy action is often from rubber lines because they expand slightly against the pressure. Changing to braided stainless -etc - removes most of this and the mushiness goes away. This can also happen by going to a larger piston at the master, but required a lot more pressure for the same braking. If the seals in your master are still soft and have no evident damage, I would try it again.
 
Thx jp your unconditional knowledge you throw out there is so precious!

I will do exactly that,clean it up check the holes and let you know if it worked!
I ll wait with buying that new one.
Should i somehow polish the chromed wall a lil bit with a soft dremel fitting or just leave it the way it is?

What should i look out besides the tiny holes?
The seal looks soft and the seal lips are not scratched.
The spring is strong.
 
If the bore looks undamaged, (It look good in the pics) leave it alone. Good luck!
 
jpmobius said:
If the bore looks undamaged, (It look good in the pics) leave it alone. Good luck!

since christmas is coming along and I sorted spark and carb issues next will be the master cylinder issue.

i put the repair kit from Yambits on my wishlist and then i´ll rebuild that pump.
I´ll get back to you guys when I know more.Thanks for helping me out!

http://yambits.co.uk/rd250f-brake-master-cylinder-repair-kit-rear-p-24975.html
 
hey guys!

so i got the rebuild kit from yambits for christmas...i dismantled the master cylinder and remembered the orientation of the parts by laying it down on a piece of cloth...
when i compared it to the explosion diagram i found out that there must be something wrong either with the stock configuration i got in there or with the parts i got from yambits.

there seem to be 2 seals on top and on bottom of the spring that lies in the master cylinder.
yambits ddidnt deliver 2 seals in the set.

in which orientation does the seal on the spring needs to be oriented?

the diagram is from a RD400F,from 1979,didnt find a suitable for my euro RD250F so i guess this is similar.
 

Attachments

  • 20141226_211943 copy.JPG
    20141226_211943 copy.JPG
    72.7 KB · Views: 185
  • 20141226_211927 copy.JPG
    20141226_211927 copy.JPG
    75.8 KB · Views: 186
Looks like your original was assembled correctly. The spring goes in first, Then the seal - cup side first, then the backing plate, then the piston assembly. I coat the bore and submerge all the internal parts in new brake fluid first. The entrance to the bore is often pretty crusty, and I clean that up with #600 sandpaper until perfectly smooth first to keep the seals from getting scratched as they pass by.
 
jpmobius said:
Looks like your original was assembled correctly. The spring goes in first, Then the seal - cup side first, then the backing plate, then the piston assembly. I coat the bore and submerge all the internal parts in new brake fluid first. The entrance to the bore is often pretty crusty, and I clean that up with #600 sandpaper until perfectly smooth first to keep the seals from getting scratched as they pass by.

i rebuild the main cylinder yesterday with the new rebuild kit.coated everything with brake fluid,bore looks fine,cleaned the crusty entrance installed the master and bled it....so far so good.then installed the line,tried to bleed it and then the master started to leak.

did a little research and it seems like the Yambits kit seem to cause problems with EVERY rebuild.

so i´m gonna either send the master to a professional in the UK who restores,reseals and resleeves masters for the RD Aircooled Forum or i´m gonna try to fit my Honda Nissin Master cylinder (5/8) which i bought on ebay.

i tend to first try to use the honda master since i really only need to make a steel flange to mount on the frame and some little parts (Mushroom for the pedal actuator and the actuator itself) to replace the stock one which seem to cause ONLY PROBLEMS.
 

Attachments

  • 20141130_113717.jpg
    20141130_113717.jpg
    2.4 MB · Views: 172
So i got back yesterday after regaining (some) self confidence.

i took the cylinder apart again (took all the Yambitsparts out).

then i rebuilt the whole system again with:

the yambits cup seal and spring and copper disk

the stock piston and seal (which is mounted on the piston).

remounted on the frame:

and i have a good and a bad message:

good:it doesnt leak anymore (the stock piston seal is a little bigger and has a different "ridge" to it,so i guess the seal on the piston was just the problem for it toleak)

bad:

i tried to bleed the master with the "finger over the banjo bolt hole" trying to let the air release....no chance.
i pumped and pumped and it took "years" that i felt air escaping under my finger escaping the banjo hole....i pressed my finger with the right pressure so they master couldnt suck in more air...frustration....

there was no fluid coming from the "bottom" of the cylinder to the top (spring section under banjo bolt).

there is no way that the cylinder lets no fluid coming trough the four tiny holes and the 2 holes on the side where the DOT fluid feeds...they are not blocked or gooked up.

in my view what i did now is that i put the cylinder back to the "stock" condition,where he was unable to lose the air in master.

at the end i took a syringe and filled up the master from top (banjo hole) and slightly pushed the pedal...the fluid was moving up and down..is it possible that the cup seal is too tight and lets no fluid move up to the banjo?

is there a way to prime to master without mounting it on the frame...maybe submergin it into fluid and then closing it with the banjo to keep it from building up an air bubble?

thanks in advance!
 
Sure seems like you have everything correct, but something is missing. When you put your finger over the outlet tightly, you should get some pressure even if it is all air. If you have filled the system "backwards", it should be impossible to overcome the hydraulic pressure of the fluid with your finger. Is the spring in correctly? The small diameter end goes toward the seal. The seal goes in with the flat side against the copper plate, open side toward the seal. If the reservoir and the line are full of fluid, and you fully compress the piston and afterward close the output with your finger, fluid should be drawn into the expanding void under your finger created by the retracting piston. There should be no source for air to enter the expanding volume, so either fluid will get drawn in, or the piston should not return to the fully extended position due to the vacuum under your finger.
 
jpmobius said:
Sure seems like you have everything correct, but something is missing. When you put your finger over the outlet tightly, you should get some pressure even if it is all air. If you have filled the system "backwards", it should be impossible to overcome the hydraulic pressure of the fluid with your finger. Is the spring in correctly? The small diameter end goes toward the seal. The seal goes in with the flat side against the copper plate, open side toward the seal. If the reservoir and the line are full of fluid, and you fully compress the piston and afterward close the output with your finger, fluid should be drawn into the expanding void under your finger created by the retracting piston. There should be no source for air to enter the expanding volume, so either fluid will get drawn in, or the piston should not return to the fully extended position due to the vacuum under your finger.

hey mobius!

did a little CAD "sketch" how i set up the cylinder!
i guess that my parts are set up right!

i just contacted the firm in the UK that refurbished these cylinders.they take the old broken cylinders and replace them with refurbished ones,you get an exchange fee of 15 pounds back on the price of the exchange.the exchange is however 90 pounds...so i´m gonna try to save the money.

the firm answered me that they however use the parts from yambits but modify the piston so you were right that the new piston seems to be the problem.

happy new year!!!
 

Attachments

  • piston.jpg
    piston.jpg
    61.6 KB · Views: 678
Back
Top Bottom