Shag's driveway build 73' CB350f

shaggycb750c

Active Member
Hey everybody! The name is Shaggy, and I'd like to share my project and hopefully get some insight from other members as I go. I love reading through all these threads and the camaraderie is amazing! A little about me, I'm 29, live in the NoVa/DC area, and this is my first bike. I acquired this little gem from an aging elderly man with some health problems. One of those, "I can't ride anymore, if you take it out of here, it's yours for free" sorta deals. The bike was last registered in 99', and as far as I can tell, was just parked under a tree at that time. When I got to it late last year, the bike was on it's side, covered in magnolia leaves. From this same gentleman, I got some nice tools to help me with the project too, including a Craftsman 6" bench grinding/polishing wheel. With a stuck front caliper, and a stuck brake pivot, neither of the wheels were moving. Anyways, enough of that, on to where I am now. I threw on some cheap clip-ons and rear-sets to start playing with locations and get things where I want them. Then I put on a rear hoop, and started de-tabbing the frame. In the process of pulling off the seat lock tab, I pulled a rusted piece off the frame. Luckily I had some pieces of DOM tubing leftover from the hoop and I replaced a large section of frame rail. My birthday is December 31st, and I want things to be fairly buttoned up by then so that I can ride January 1st. As my father says, "You gotta ride the first and the last day of the year to say you've rode all year. Well, let me know what you guys think, and throw in some input wherever you can. On to the pics...

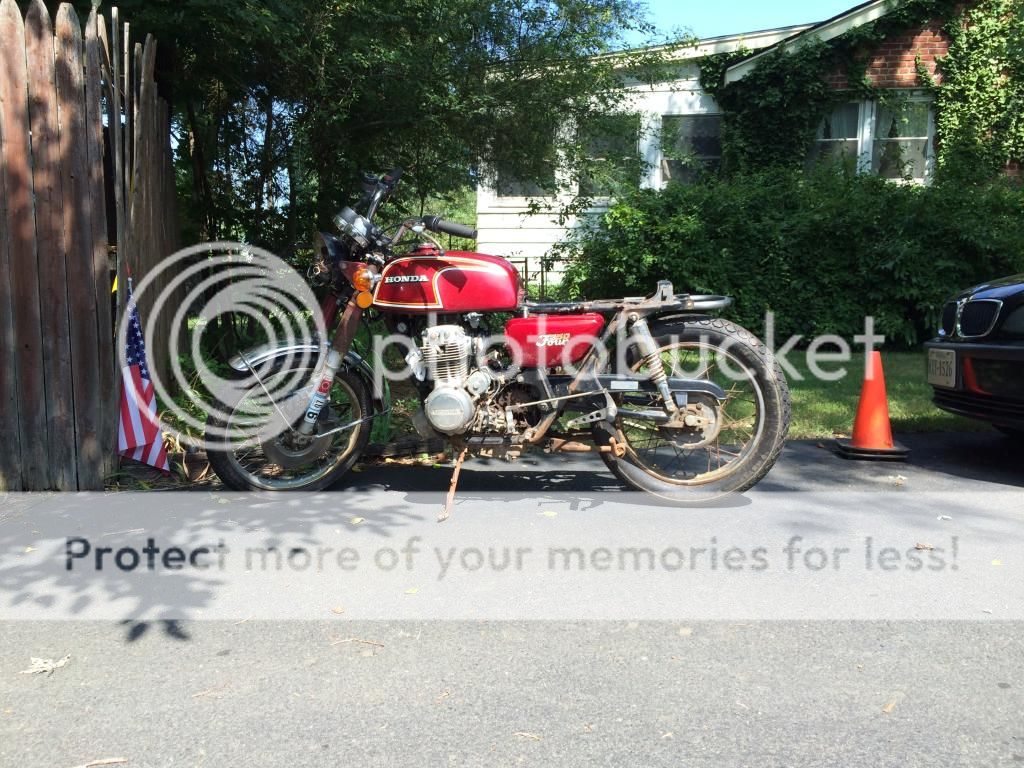
Here's before nearly any mods with the mascot


Found the side covers and deciding on the tail length. Im ideally looking to make a smaller version of the back of the tank


Heres the tail after welding


Pulled out rusty area


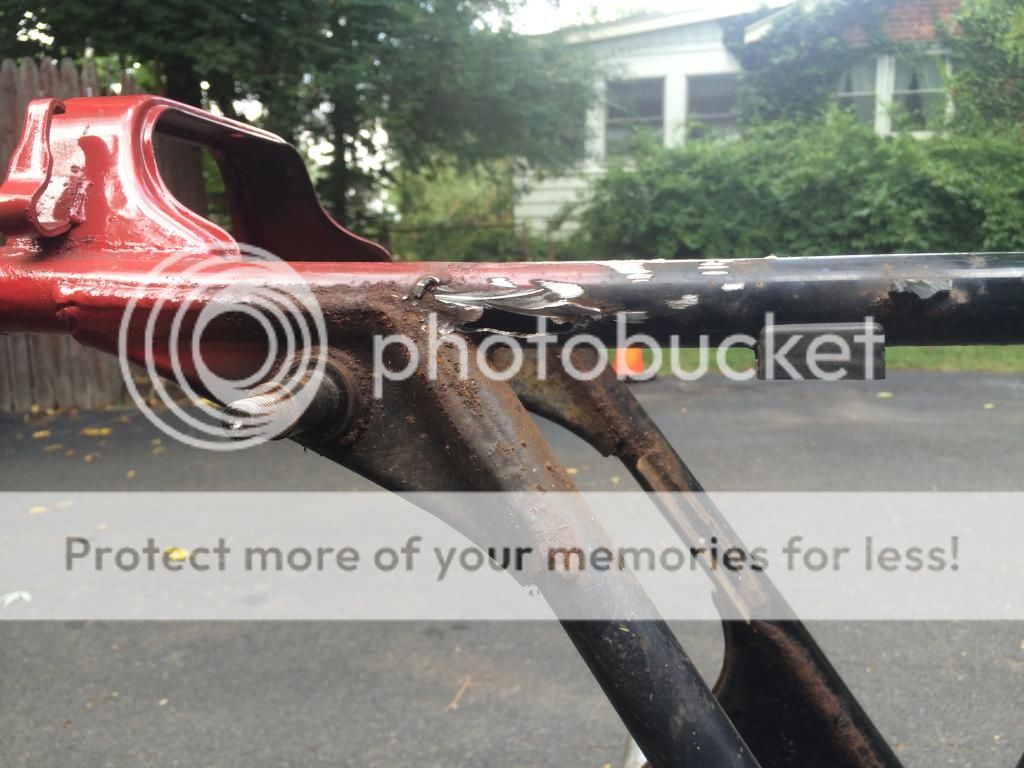
The rail replacement


I think today I'm going to cardboard shape a seat to see the shape I want... New chain is in, I'm currently cleaning the carbs and fuel tank, and I'm constantly at work sanding items waiting for my metal polish to come in. Anyways, thanks for the view, let me know what you think.
Shaggydoo
 
normally the brake connection rod is going on top of the brake pedal instead of underneath it, so you pull the brake lever instead of pushing it...

and i didn't knew frame rails tended to rust through?
be sure to use plugs welding that frame
 
jungalist said:
normally the brake connection rod is going on top of the brake pedal instead of underneath it, so you pull the brake lever instead of pushing it...

Either way works on those rear drums, just want to make sure that spring works to keep the lever up, that the brake arm/stay can move around a little where it's mounted, and that there is enough clearance for the brake arm so that it doesn't hit anything (axle) if the shocks compress.
 
I've been playing around with it a bunch... They came without instructions, so it took a bit of work to get them in and on right. You have to take out the rear wheel and flip the brake pivot 180 degrees so the arm sits upright. the problem I have is the brake tension rod doesn't fit around the shock... Yet. So that's just there to keep the pedal in place til I get to address the brakes. I'm kind of disappointed with the quality of the rear sets too, but that's another day unto itself. Just ordered a petcock rebuild kit, that thing was nasty!
 
Here's everyone's favorite "the obligatory this is what I look like riding pic". I think the tail is shaped just how I want it and I'm going to try to get my foam on after work today. I don't like the side covers for some reason, but love the 350/Four emblems so I want to see if I can make the right spot for them on the tail.

 
Getting a start on the tail section... I'd like for it to sweep down and drop around the frame by about a half inch. Hopefully I can find time to finish it up this weekend.


Well, started on the tail, it's coming out decent. I made the seat pan from an old realty sign. Pretty stiff, and works well. Not so sure about the top radius of the tail, so I'm going to drop the top of the seat pan about another half inch and flow the foam to the new shape. I'm also thinking it should be slimmer towards the top of the pan. What do you guys think?


I really wish that white sign wasn't there so you could see the outline if the tail mo betta.
 
Hmmm... Well I guess I'm going to have to try and compress the suspension a bunch and see how that goes. Thanks for the heads up, better to catch that early.
 
an easy way is to take of one shock and ratchet strap the shock side down
keep in mind when you replace those door stops with some good quality shocks they likely will have a bit more travel as well
 
So... That's gonna cost some time and effort. Lessons are usually best learned the hard way... Guess I'm gonna look into a new tail shape... Looking at the cb's of yore reveals a much smaller tail section. Gonna put some time and beer into it tonight and get an idea of where to go to keep me busy over the weekend.
 
Well after enough cans of fat tire, I've decided that pie cuts are the way to go. Now to weld it up and grind the piss out of it. I've got a shitty flux core mig that I borrowed from a friend, but I used to work as an autobody tech so I've got experience welding in the past. Here's how the morning is going so far...
 
Done for the day, time to start grilling. The pie cuts have been made and a new foam buck formed. I'm liking how this came out in the end, the welder does a half decent job when it's set right.


Personal business has been busy on top of the full time job has kept me busy last week or so. I did the normal white tee over the foam. It came out decent but used too little hardener and then removed horribly, and I wasn't pleased.


So then I decided to try on a method I haven't really seen around before, remembering paper mâché from elementary school. Wire form! It worked well, and made removal very easy.


Here's the rough form, 2 layers of cloth and then a layer of csm. Pretty rough form but it's starting to come together. Cleaning the inside of the fuel tank sucked, quart of Redkote is on the way.
 
Final layers of glass! I'm so itchy all over! It came out smaller tha. The foam buck was larger and made for a shorter seat. The wire mold came out with a longer seat pan and smaller hump. I think I'm going to try and make multiple interchangeable tails/seats. The front end of the pan tucks underneath the rubber tank isolator and holds tight to that area, very pleased with that part.

 
Back
Top Bottom