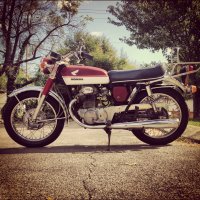
This is a frankenstein of a 1969 Honda CB350 K0. It has a K2 tank, K2 or later front fender, pleated seat, but ironically the K0 oval tail light, forks, frame number, engine number, etc. Grabbed it off craigslist for $950 running and ready to be stripped of mix n' match parts, rattle can paint, and all that 40 year old grime and rust.
We noticed you are blocking ads. DO THE TON only works with community supporters. Most are active members of the site with small businesses. Please consider disabling your ad blocking tool and checking out the businesses that help keep our site up and free.
You are using an out of date browser. It may not display this or other websites correctly.
You should upgrade or use an alternative browser.
You should upgrade or use an alternative browser.
1969 CB350 Street Tracker
- Thread starter dlngro
- Start date
DAY 1: Gauges, Headlight, Handlebar Controls, & Front Fender STRIP!
Just spend a few hours labeling wires as I disconnected the gauges, front signals, headlight and handlebar controls from the main harness. Also removed the front fender.
I think I'll tackle the forks next...
Any advice on how to roll this thing on to a milk crate?
Just spend a few hours labeling wires as I disconnected the gauges, front signals, headlight and handlebar controls from the main harness. Also removed the front fender.
I think I'll tackle the forks next...
Any advice on how to roll this thing on to a milk crate?
Attachments
Traveler350
Active Member
very nice bike.
Barnburner
Coast to Coast
Looks like you got a good base to start with. Are you taking it down to the frame or just swapping bits out? If it's a complete tear down you're doing you probably don't need to swing it up on a crate just yet. I took everything off my CL except the front end, wheels, engine and bars and then laid the bike down on its side over an old mattress, undid the mounts and pulled it back off sans motor. After that, it was plenty light enough to throw it up on my homemade table.
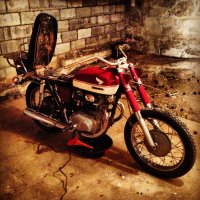
P.S. Are you building this bike in some sort of dungeon?
P.S. Are you building this bike in some sort of dungeon?
My Dad drove down to visit and to lend a hand. We tore it to the frame but still have to remove the steering stem and strip the wires before we send it off to the painters. No crate, but a few cinder blocks along with the rear stand helped in disassembly (Didn't have an old mattress lying around ). I got my hands on a bench grinder as well as a handheld buffer to clean things up though. Made a lot of progress today. Sorry no pics :-[
BarnBurner: It's not a dungeon but an odd corner of my buddies basement where it looks like somebody had some fun with a jackhammer. He's been nice enough to lend me a space this winter since I live in a small apartment, so I haven't given him any hell for his subterranean descent. When the bikes finished though... ;D
). I got my hands on a bench grinder as well as a handheld buffer to clean things up though. Made a lot of progress today. Sorry no pics :-[BarnBurner: It's not a dungeon but an odd corner of my buddies basement where it looks like somebody had some fun with a jackhammer. He's been nice enough to lend me a space this winter since I live in a small apartment, so I haven't given him any hell for his subterranean descent. When the bikes finished though... ;D
POWER COATING PREPARATION:
I tried every trick in the book but there were still a few troublesome bushings that needed pressing out:
2 Engine Hanger Rubber Bushings
2 RR. Swingarm Rubber Bushings
2 Center Pipe Bushings
The rubber bushings needed removing because they would melt in the powder coating oven. The center pipe bushing wasn't as necessary but there a few factors make it worthwhile to press out, a. sandblasting can eat up the face of the bushing b. leftover grease inside the center pipe can ruin the powder coat finish if any is left over and seeps out.
I dropped off the frame, swing arm, and both engine hanger plates to my buddies at Cafe Fabrications, an hour later everything was pressed ready for sandblasting/power coating.
Here's a chart of the bushings...
Frame:
#2
#7
Swing arm:
#4