
coyote13
Over 1,000 Posts
Wellllllllll, I guess it's time I start a build thread. I've been gleaning info off of this site (and others) to get my dad's old CB back up and running, so this is where I'll document that process, if anyone wants to keep up.
This was my dad's bike when he was a kid. Bought brand new in 1972, stayed bone stock for...well...forever. He put a handful of mile on it, had his fun, and put it away. It was relegated to a barn at our farm for about 30 years, until my grandfather pulled it out, had it cleaned up, tuned up, and running well. I learned how to ride on this bike, in this condition. Unfortunately, I was young and stupid, and the bike stayed at our farm, which we seldom ventured out to. One weekend we went out, and the bike wouldn't start. Looking back, I realize it was probably just bad gas, or maybe the battery was shot. In any case, being young and dumb, I left it in the barn for the next 15 years or so.
Fast forward about two or three years ago, I've graduated from college, out on my own, have a steady job. I've been riding motorcycles, and have a couple friends interested as well. "Hell, I've got a little bike you guys could learn on, easy peasy!" Or so I thought. Finally took some friends out to the farm, brought a truck, and went out to the barn to find my old steed. Now, this isn't just a pole barn with dirt floors, open to the elements. It's a nice steel building, on a solid concrete foundation, with a little workshop on one side and a closet in the back. Over the years, I guess the little Honda got in the way and someone shoved her into the closet. So, we pulled her out of the closet, and rolled her into the sunshine for the first time in nearly two decades. At first glance, she didn't look too bad! That's when I realized the error of my young and dumb 11 or 12 year old ways - full tank of what once was gas, petcock open. I sat down on the bike, slightly dejected, and the forks spit nearly all of their oil out, as if to weep with sadness. "Fuck it," I thought, "I can fix this." And so we loaded her up for the trek back to Dallas.
For a little background - we brought the bike back to my house at the time, which was in no way suited for a project of this nature. She ended up under a tarp in the backyard for lack of a better storage option, and there she sat until about a year later when I moved into a house with a proper garage.
So here we are now, with proper garage, decent set of tools and skills, motivation, and a little extra time. After a more or less failed attempt at cleaning and sealing the gas tank, she sat in the back of the garage for about a year and a half while I squared away things with other projects. Life does get in the way you know. I was talking to my girlfriend the other day, and I asked her "If I get that little Honda running, would you want to learn how to ride?" She says "Well sure!"
Psh. Good enough for me.
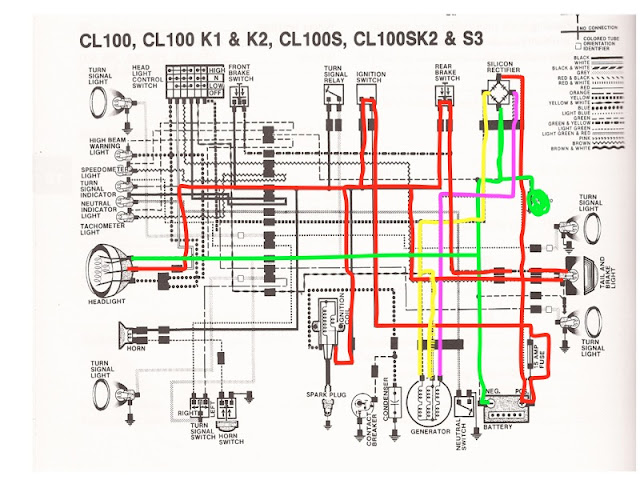
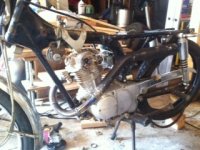
So here she is at the moment, sitting safely in the garage. I busted off the bolt that holds the ignition/advance unit to the cam, with some of the bolt still in the cam. Major problem #1, but I'll attempt to drill it out and tap it for another bolt. Somewhere along the line, I bought a new battery and tried starting it up (after cleaning up the carb of course) and didn't realize the R/R wasn't bolted up and therefore not grounded. Blew the fuse, fried the R/R. Threw on a new fuse and a new reg/rec on now from Oregon Motorcycle Parts. I'm considering a whole wiring harness, or just wiring from scratch. Initially I'm just going to get it running, but along the way it will be customized, modified, and perfected to my liking.
Stay tuned....
This was my dad's bike when he was a kid. Bought brand new in 1972, stayed bone stock for...well...forever. He put a handful of mile on it, had his fun, and put it away. It was relegated to a barn at our farm for about 30 years, until my grandfather pulled it out, had it cleaned up, tuned up, and running well. I learned how to ride on this bike, in this condition. Unfortunately, I was young and stupid, and the bike stayed at our farm, which we seldom ventured out to. One weekend we went out, and the bike wouldn't start. Looking back, I realize it was probably just bad gas, or maybe the battery was shot. In any case, being young and dumb, I left it in the barn for the next 15 years or so.
Fast forward about two or three years ago, I've graduated from college, out on my own, have a steady job. I've been riding motorcycles, and have a couple friends interested as well. "Hell, I've got a little bike you guys could learn on, easy peasy!" Or so I thought. Finally took some friends out to the farm, brought a truck, and went out to the barn to find my old steed. Now, this isn't just a pole barn with dirt floors, open to the elements. It's a nice steel building, on a solid concrete foundation, with a little workshop on one side and a closet in the back. Over the years, I guess the little Honda got in the way and someone shoved her into the closet. So, we pulled her out of the closet, and rolled her into the sunshine for the first time in nearly two decades. At first glance, she didn't look too bad! That's when I realized the error of my young and dumb 11 or 12 year old ways - full tank of what once was gas, petcock open. I sat down on the bike, slightly dejected, and the forks spit nearly all of their oil out, as if to weep with sadness. "Fuck it," I thought, "I can fix this." And so we loaded her up for the trek back to Dallas.
For a little background - we brought the bike back to my house at the time, which was in no way suited for a project of this nature. She ended up under a tarp in the backyard for lack of a better storage option, and there she sat until about a year later when I moved into a house with a proper garage.
So here we are now, with proper garage, decent set of tools and skills, motivation, and a little extra time. After a more or less failed attempt at cleaning and sealing the gas tank, she sat in the back of the garage for about a year and a half while I squared away things with other projects. Life does get in the way you know. I was talking to my girlfriend the other day, and I asked her "If I get that little Honda running, would you want to learn how to ride?" She says "Well sure!"
Psh. Good enough for me.
So here she is at the moment, sitting safely in the garage. I busted off the bolt that holds the ignition/advance unit to the cam, with some of the bolt still in the cam. Major problem #1, but I'll attempt to drill it out and tap it for another bolt. Somewhere along the line, I bought a new battery and tried starting it up (after cleaning up the carb of course) and didn't realize the R/R wasn't bolted up and therefore not grounded. Blew the fuse, fried the R/R. Threw on a new fuse and a new reg/rec on now from Oregon Motorcycle Parts. I'm considering a whole wiring harness, or just wiring from scratch. Initially I'm just going to get it running, but along the way it will be customized, modified, and perfected to my liking.
Stay tuned....
![IMG_4094[1].JPG](/data/attachments/32/32456-42439deb5958ad19013c512338edfb9f.jpg)

![IMG_4596[1].PNG](/data/attachments/38/38224-e7c9d8154fb1252b17880155ace1dda8.jpg)
![IMG_5524[1].JPG](/data/attachments/50/50478-718086a55708f77ee01d74b56ddfabc8.jpg)
![IMG_5525[1].JPG](/data/attachments/50/50479-454c58ea537a0f1898ac374eb40e651a.jpg)


