Follow along with the video below to see how to install our site as a web app on your home screen.
Note: This feature currently requires accessing the site using the built-in Safari browser.
We noticed you are blocking ads. DO THE TON only works with community supporters. Most are active members of the site with small businesses. Please consider disabling your ad blocking tool and checking out the businesses that help keep our site up and free.
Good stuff, enjoying the read and info. Though, when you got the 1mm overbore and pistons, where did you find the proper head gasket for that size? Ive been looking into a 2 over on mine, but cant find anything but and OEM gasket kit.
No problem. I definitely don't mind sending Lani some extra business. He's a real stand up guy.
If you're not familiar with how copper gaskets differ from the OEM graphite styles, read up on them. They can be a bit tricky and they're less tolerant of hasty cleaning and assembly.
I managed to get access to a blaster, but only blasted my cylinders to get the dirt out of the fins. Everything else was pretty clean so I didn't bother blasting it. I also just helped my mate move into a new workshop for his Motorsport business which he said I can use when I want, so I now have a place to wrench whilst at University.
I cleaned all of my parts off after cleaning and blasting with paint thinners and brake cleaner.
Was just about to hone the cylinders, and bam!...drill burnt out...so getting them honed on wednesday now!
Also picking up some matt black engine paint (not sure on enamel or VHT etc yet) tomorrow morning to paint the cases with when I go back to the shop on wednesday.
Had lectures cancelled at uni so I managed to head back to the workshop today.
Picked up some matt black Hammerite BBQ paint on the way to spray my cases with. Please ignore my mate lurking in the background haha
<img src="http://imageshack.us/a/img16/3108/04022013556.jpg" alt="Image Hosted by ImageShack.us"/>
<img src="http://imageshack.us/a/img706/8487/04022013557.jpg" alt="Image Hosted by ImageShack.us"/>
<img src="http://imageshack.us/a/img171/9897/04022013558.jpg" alt="Image Hosted by ImageShack.us"/>
<img src="http://imageshack.us/a/img32/9545/04022013559.jpg" alt="Image Hosted by ImageShack.us"/>
Only sprayed the top case, camshaft box and the camshaft bearing housing things. The paint went on really well and gave a lovely matt finish which doesnt show up too well in the photos but is excellent! So pleased with it!
Heading back tomorrow to spray the top case, cylinders and hopefully the head.
Finished painting all the engine pieces apart from the head (still need to extract a bolt to hold the carb boot on).
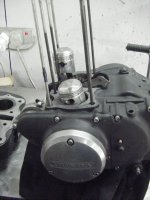
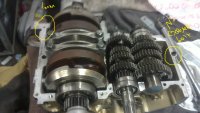
Started to assemble the bottom end too.
Put the transmission in.
<img src="http://imageshack.us/a/img442/9937/06022013562.jpg" alt="Image Hosted by ImageShack.us"/>
<img src="http://imageshack.us/a/img72/7492/06022013563.jpg" alt="Image Hosted by ImageShack.us"/>
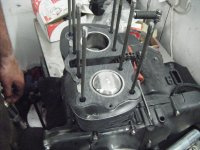
Put the crankshaft back in.
<img src="http://imageshack.us/a/img594/8012/06022013564.jpg" alt="Image Hosted by ImageShack.us"/>
Torqued the carrier down to spec (11.6-15.2 ft lb).
<img src="http://imageshack.us/a/img526/1433/06022013565.jpg" alt="Image Hosted by ImageShack.us"/>
...and then....
...Fuck. Tightening the case bolts down and I tightened 2 too tight and sheared them clean off. There is about 1mm of exposed stud on one of the fuckers, so I may be able to clean it up and then easy out it. On the other, it is snapped right down in the guide cylinder. I should be able to easy out it. Or I can get to it from the underside as the whole goes the entire way through.
Are the ones you sheared off studs? Or were you installing the other 1/2 of the case? Reason I ask is there obviously wasn't any sealant on the cases as its clean in the pic with the sheared bolts.
Are the ones you sheared off studs? Or were you installing the other 1/2 of the case? Reason I ask is there obviously wasn't any sealant on the cases as its clean in the pic with the sheared bolts.
They were the bolts for installing the other half of the case. I did have sealant but cleaned it off when I removed the case to get a pic. Either that or it was a pic of before I put the sealant and tried to install them...cant remember haha
Started to hone my cylinders but only managed one, will finish the other soon.
<img src="http://imageshack.us/a/img839/7557/17022013565.jpg" alt="Image Hosted by ImageShack.us"/>
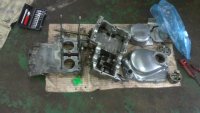
I then managed to seal the bottom end up, install the clutch with new plates and springs, install the oil filter and put the cases back on.
<img src="http://imageshack.us/a/img715/9636/23022013565.jpg" alt="Image Hosted by ImageShack.us"/>
<img src="http://imageshack.us/a/img11/6254/23022013566.jpg" alt="Image Hosted by ImageShack.us"/>
<img src="http://imageshack.us/a/img822/9008/23022013567.jpg" alt="Image Hosted by ImageShack.us"/>
The stator wiring was a bit 'beat up' and the neutral light wire was broken, so I removed the horrible plastic covering and will recover/shrink wrap and add new connectors to it tomorrow.
<img src="http://imageshack.us/a/img9/423/23022013568.jpg" alt="Image Hosted by ImageShack.us"/>
<img src="http://imageshack.us/a/img5/1164/23022013569.jpg" alt="Image Hosted by ImageShack.us"/>
I managed to put some protective covering over the new stator/neutral wires, and clear shrink wrapped the end. Going to be putting new connectors on the end too.
<img src="http://imageshack.us/a/img213/531/24022013569.jpg" alt="Image Hosted by ImageShack.us"/>
I also got to try my hand at some polishing. It isn't great, but it is shiny enough for my liking!
<img src="http://imageshack.us/a/img850/2010/24022013570.jpg" alt="Image Hosted by ImageShack.us"/>
<img src="http://imageshack.us/a/img820/7500/24022013572.jpg" alt="Image Hosted by ImageShack.us"/>
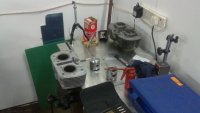
Got my cylinders back from being bored 1mm oversize, and fitted them this afternoon. I needed the head helicoiled as one of the spark plug threads was badly stripped. So the head is going to be cleaned up tomorrow and then fitted. Hopefully will finish the motor up tomorrow too!
This site uses cookies to help personalise content, tailor your experience and to keep you logged in if you register.
By continuing to use this site, you are consenting to our use of cookies.


") Either that or it was a pic of before I put the sealant and tried to install them...cant remember haha
Either that or it was a pic of before I put the sealant and tried to install them...cant remember haha