Szumer's 75 CB360T Cafe Project

Szumer

New Member
Hey guys,
I've been using the DTT forum as a source of information (and inspiration!) for a while now, I figured its about time that I start putting down some thoughts and pictures as I work on my own project bike.

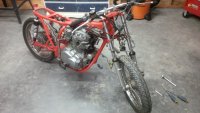
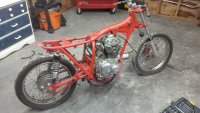
I've got a 1975 CB360T that I 'built' back in high school after a family trip down to Lexington Ohio left me head over heels for vintage motorcycles and all things cafe racer… I fell in love with the little CB and did my best to build it into my vision at that time of what a cafe racer ought to be, mostly trying to replicate the vintage race bikes that I had seen during our trips over the border. Admittedly, at the time I had next to zero experience with a wrench, let alone the patience to do a complete overhaul on a machine, so the build left a lot to be desired to say the least! Still, it was a lot of fun and turned out to be a real head turner around town, running me back and forth to school and even taking over its own parking space behind my girlfriends parents house! Sadly, after high school the worn out old CB got shelved and all but forgotten while life moved on...

Recently, that same girl who let me park my obnoxious old cafe racer on her parents patio (though now my wife) and I bought our first home together, which happens to have a little workshop where I can play with my toys… its far from pretty, but its a great start. Needless to say, the wheels got turning and I decided that the time had finally come to build the old CB into the machine that I dreamed about all those years ago.

I figured there was no better place to bounce ideas off of other vintage bike addicts, and no better way to document my build than to put them out there for everyone to see!
 

Attachments

  • IMG_20141109_175431.jpg
    IMG_20141109_175431.jpg
    1.8 MB · Views: 263
So I've been off for the past few days and started pulling the bike apart… I'm realizing now how many tools I need to add to my box! Until I can get the workshop set up a little better, I'm stuck with some of the more simple tasks, but fortunately I don't need a whole lot of tools to clean up and polish...
 

Attachments

  • IMG_20141119_161728.jpg
    IMG_20141119_161728.jpg
    465.6 KB · Views: 252
  • IMG_20141118_151431.jpg
    IMG_20141118_151431.jpg
    1.6 MB · Views: 233
  • IMG_20141110_165315.jpg
    IMG_20141110_165315.jpg
    1.8 MB · Views: 222
  • IMG_20141110_153100.jpg
    IMG_20141110_153100.jpg
    1.4 MB · Views: 257
  • IMG_20141110_114909.jpg
    IMG_20141110_114909.jpg
    1.3 MB · Views: 222
  • IMG_20141110_141637.jpg
    IMG_20141110_141637.jpg
    1.5 MB · Views: 255
Thanks Chronic, I'm going to be keeping the red frame for sure when I rebuild (can't really picture it any other way anymore!)… still trying to decide whether to try to redesign the rear sets to hook up to the passenger foot pegs, or try a rebuild on the top end this winter. I'm thinking it may be a motor rebuild kind of season, but gonna really have to start doing my homework :)
 
Hey Trek, thanks!

I'm not 100% yet, when I put the bike into storage it was running OK (not great), but I think it was starting to lose compression and even getting some blue smoke from one of the cylinders. I'm running on the assumption that the rings need to be replaced at the very least, …

I also have a 2nd motor that I got when I bought the bike, but it had been sitting without any oil in it for years and I suspect there will be some pretty bad corrosion inside (the PO had left it with carbs and exhausts off and nothing blocking the holes, so who knows what managed to make it inside... :eek:)

I guess at the end of the day, I would just love to try my hand at a thorough rebuild so that I KNOW that the internals are sound and that I can put some mileage on the bike without fear of winding up stranded
 
Szumer said:
Hey Trek, thanks!

I guess at the end of the day, I would just love to try my hand at a thorough rebuild so that I KNOW that the internals are sound and that I can put some mileage on the bike without fear of winding up stranded

with any old bike, sooner or later you will wind up being stranded. Thats just part of the fun. ;D

That being understood. By all means, spend some time this winter hunting good deals on the basic top end rebuild items.
rings, (you wont know what size until shes opened, and you measure the wear. My bike had 10,000 miles on it and cylinders had no wear at all, so I honed walls and replaced the rings w std size, no overbore)
New slide & tensioner set from sparckmoto.com
valve guide seals (good ones) Viton
complete gasket set, (includes cheap valve guide seals, if thats what you want)
new o-ring for oil filter cup not included in seal kits, from (Honda)
Updated oil pickup from a CJ360, easily found on EBAY
new clutch disc set
Heavy duty clutch springs, Bore-tech.com (CB350)
spark plugs NGK B8ES
5 ohm NGK spark plug caps
fresh pair of Carb insulators and diaphragms, slides and springs from Honda
Complete S/S bolt kit and bottle of thread sealant
tube of Hondabond
Gallon of Rotella synthetic oil (blue bottle) & ZDDP oil additive
Assembly lube

special tools

impact screwdriver
valve spring compressor
cylinder hone
spanner tool for oil filter cup removal, (you wont NEED this for a top end rebuild, unless you choose to go all the way, open and clean the lower case.)
compression tester
carb sync (manometer) gauges

AND anything else I forgot. ( this list is off the top of my head, sitting here in the garage looking at my 360)
 
Hahaha thats very true Erskine! I'm sure if I get my butt into gear here I could make a lot of headway ;D

Thanks so much for taking the time to send me the overview of the motor rebuild parts and tools Trek! Its really nice to have at least a ballpark idea where to start, I can at least start trying to source out the parts and get my head wrapped around things!…. as I've said I've long toyed with the idea of cracking open the motor, really looking forward to giving it a try!

I've seen a lot of parts available on a site called common motor collective, don't know if anyone has dealt with them before? Not too sure about brokerage to get them north of the border, but I guess thats a bridge I can cross when I get there!

I downloaded the shop manuals, gonna get a bound copy printed to sit on the tool chest so I don't have to grease up the laptop haha! Thanks again! Just finishing up some night shifts, so hopefully will have some more progress to post in the next few days!
 
So I ended up picking up a few overtime shifts at work, hopefully they'll help fund some nice shiny new things! ;D...

I still managed to get out into the garage for a few hours last night and started pulling the top end apart. It looks like one of the camshaft bearing surfaces may need some TLC...
 

Attachments

  • IMG_20141126_163934.jpg
    IMG_20141126_163934.jpg
    1.3 MB · Views: 209
  • IMG_20141126_163930.jpg
    IMG_20141126_163930.jpg
    1.1 MB · Views: 224
  • IMG_20141126_165431.jpg
    IMG_20141126_165431.jpg
    876.5 KB · Views: 249
  • IMG_20141126_163821.jpg
    IMG_20141126_163821.jpg
    1.4 MB · Views: 228
  • IMG_20141126_154436.jpg
    IMG_20141126_154436.jpg
    963.6 KB · Views: 212
  • IMG_20141126_152003.jpg
    IMG_20141126_152003.jpg
    858.4 KB · Views: 214
Man, those tappets look awesome. Too bad the cover has that gouge, or you'd be perfect up there.
 
everything really does look great.

Hopefully the gouge appears worse in the pic than it actually is ?

even still if the cam is good in that spot and its just a valley with no raised areas. I would use it. You may be able to find one better, because they are out there. But, it may take a while to find and be a bit expensive.

Just be certain to use plenty of assembly lube upon re-assembly and dont apply Hondabond so thick as to squeeze a bead in there. Thats probably what happened it was being wiped clean and dry of oil by a small bead of excess Hondabond at the seam.

Be absolutely certain to spray a bunch of cleaner down the 2 oil journals feed holes and blow them out w compressed air. Do this more than once. So, you are sure not to forget.

When it comes time to remove the head gasket...get a cheap flat razor blade paint scraper and work it under edge of gasket gently at first, so as not to scratch (gouge) into the machined surface.
I tried everything for about 30 minutes w no decent results. Then PJ made the suggestion. In 1 minute I had it off and remarkably clean.

Also, the oil seal kit should include a new rubber seal for the tach gear in the head cover. If you do replace this. make sure to give it a heavy coat of grease or some lube when you install it. I forgot this step and now mine leaks all down the front of my engine. It will spin just enough friction to burn the sealing edge off before the oil gets to it. Then it leaks...forever...very disappointing.
 
Also, when you re-assemble be certain the valve springs go back in right side up. As your pic shows. Ive seen a bunch of guys get em upside down.

And once you get the springs compressed use a small strong magnet to pull the little split keepers out. It would suck to have the compressor slip and pinch your finger in there.
 
Hey Trek, I think the gouge in the cam bearing is (hopefully!) going to be workable… When I run my fingernail over it I don't feel any ridge or sharp edge, so I'm hoping that it hasn't scored the cam itself too badly; the camshaft itself doesn't look like it had actually suffered too much, so I'm hoping that maybe I can carefully clean the bearing surface with some ultra fine emery and let it ride…. will see what options I might have I guess. I will be replacing all gaskets, a lot of them seem like they were in their prime before I was born, so I'd rather be safe then sorry!

Otherwise, it's been a bit of a delay since I had some real time to play with the bike, but I made a little bit more headway over the past few days between getting the Christmas decorations pulled out…. lol!

Devised a very fancy ziplock bag storage system until I can get some better shelving in the garage. I pulled off the cylinder heads, and it would appear that all is unfortunately far from perfect in the combustion chambers… having said that, I was afraid that the right hand side piston might have some physical damage to the skirt, and it looks like everything was still holding together alright!

I finally got some of my machinists tools out of storage, so I will be able to figure out if the cylinders have been bored oversize yet, and whether I might be able to stick with a stock bore or if an overbore will be in order. :) I will have to track down a spring compressor for the valve springs before I can get the valves out, not sure if anyone might be able to point me in the right direction to find one?

This afternoon, I realized that I pulled the whole top end off and now have no obvious way to leverage the stator rotor set bolt to get it undone :-[ D'oh!
 

Attachments

  • IMG_20141208_141442.jpg
    IMG_20141208_141442.jpg
    2.1 MB · Views: 219
  • IMG_20141127_195139.jpg
    IMG_20141127_195139.jpg
    1.7 MB · Views: 237
  • IMG_20141127_194345.jpg
    IMG_20141127_194345.jpg
    1.7 MB · Views: 228
  • IMG_20141127_194327.jpg
    IMG_20141127_194327.jpg
    533.4 KB · Views: 229
  • IMG_20141127_194309.jpg
    IMG_20141127_194309.jpg
    2 MB · Views: 234
  • IMG_20141127_192426.jpg
    IMG_20141127_192426.jpg
    2.1 MB · Views: 215
  • IMG_20141127_192403.jpg
    IMG_20141127_192403.jpg
    1.9 MB · Views: 235
  • IMG_20141127_192353.jpg
    IMG_20141127_192353.jpg
    1.9 MB · Views: 218
  • IMG_20141127_192155.jpg
    IMG_20141127_192155.jpg
    3.1 MB · Views: 223
  • IMG_20141127_192118.jpg
    IMG_20141127_192118.jpg
    1.4 MB · Views: 222
  • IMG_20141127_184950.jpg
    IMG_20141127_184950.jpg
    1.9 MB · Views: 226
  • IMG_20141208_150303.jpg
    IMG_20141208_150303.jpg
    1.4 MB · Views: 226
Szumer said:
This afternoon, I realized that I pulled the whole top end off and now have no obvious way to leverage the stator rotor set bolt to get it undone :-[ D'oh!

Its a bit of pain in the butt, However, I did my rebuild without pulling the rotor off.

But you can still easily get it off there. By jamming a penny in the gears on the right side of engine.

Theres a pic of exactly doing this on mine. When I pulled the rotor off to replace it. AFTER I did my build.

http://www.hondabrat.com/2012/08/rotor-starter-replacement.html

I know this sounds like a bad idea. LOL but it works great.

Both PJ and frogman recommended the penny trick to me...and now I do too.

The penny is so soft the sharp gears almost cut the thing in half. Didnt even leave a mark on the gears.

Also, you may want to think about drilling the TEENY TINY oil journals in the top part of case out. Other than replacing the oil pickup, this is the only oil mod I made.

I used my dremmel pencil attatchment to drill along side the long head studs, (so I didnt have to pull the studs out)

Just drill the holes out 1/32 inch bigger than they are now. I cant remember the bit I used.

Make absolutley certain to clean every last shaving and any dust out of the holes when finished !

11494-151214105227.png


11494-151214105923.png
 
Back
Top Bottom