Guzzi Cali Cafe - Build Thread

I finally tracked down the missing gear change linkage from a breakers in France.. thank god for the internet..
There was an old bush jammed in the frame rail pivot, but nothing my trusty dremel couldn't handle..
 

Attachments

  • Guzzi22 001.JPG
    Guzzi22 001.JPG
    225.3 KB · Views: 498
  • Guzzi17 012.JPG
    Guzzi17 012.JPG
    223.7 KB · Views: 481
  • Guzzi17 013.JPG
    Guzzi17 013.JPG
    222 KB · Views: 485
  • Guzzi22 002.JPG
    Guzzi22 002.JPG
    288.4 KB · Views: 488
Now its back to yet more polishing... the yolks (Triple trees)and stanchions needed a days work.. I was going to polish out the casting seams too, but decided to get a life instead..

And the rocker covers, stainless downpipes, headlight brackets.. on and on, lol
 

Attachments

  • Guzz16 001.JPG
    Guzz16 001.JPG
    280.9 KB · Views: 482
  • Guzzi18 002.JPG
    Guzzi18 002.JPG
    260.7 KB · Views: 465
  • Guzzi16 005.JPG
    Guzzi16 005.JPG
    279.1 KB · Views: 1,117
And even more polishing.. used my drill and wet and dry sand paper to clean up the heads of stainless bolts.. simple but it works..
 

Attachments

  • Guzzi24 003.JPG
    Guzzi24 003.JPG
    294.9 KB · Views: 1,094
  • Guzzi24 001.JPG
    Guzzi24 001.JPG
    191.3 KB · Views: 479
With the forks polished, I went to my mates bike shop and picked up a bottle of 15 weight fork oil and asked him to give me a price on a pair of Hagon shocks. I'd looked at various options for rear shocks, from cheap and cheerful Hagons through Ikons to Maxtons (£550 for a custom made pair), right up to Ohlins which are now over a grand for their basic set ! I did have a mint set of original Konis which were the right length, but the lower mounts were completely different, so couldn't use them.

At the bikeshop, I was asked if I'd considered a set by YSS ... who?? I was handed the catalogue to browse, and they didn't look bad at all, erm, but were they just some cheapo chinese copy?? Apparently not, they make components for some of the big name brands and are now being assembled in the UK to your spec. They'd sold a few already at the shop and had been impressed with the quality, the clincher was the price, less than the basic Hagons... so I ordered a pair, be here next week. Here's a link to the company.. http://www.yss.co.th/

They arrived soon enough, and despite the low price they looked to be good quality.. wasn't long before the Cali was back on its wheels at last..


That seat will have to go.. Notice how the forks look too long, not sure why, but it gave me the chance to drop them and fit the clip ons above the top yoke. My damaged shoulder will thank me ..


So far this thread has been about tidying up an old bike, soon things get a bit more interesting.. time for a tea break :)
 

Attachments

  • Guzzi25 002.JPG
    Guzzi25 002.JPG
    331.9 KB · Views: 484
  • Guzzi24 019.JPG
    Guzzi24 019.JPG
    456.2 KB · Views: 494
  • Guzzi19 003.JPG
    Guzzi19 003.JPG
    256.7 KB · Views: 493
  • Guzzi18 004.JPG
    Guzzi18 004.JPG
    233.5 KB · Views: 491
As i mentioned earlier: tools and skills man,skills and tools,and what a progress!
NICE! :)
 
I love this build. You're doing exactly what I am and getting everything clean/polished "enough". I'm not going for perfect but if it is then great. I'd rather ride than show and it won't stay perfect for long. Thanks for the drill idea for bolts.
 
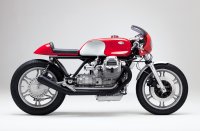
I've restored a few bikes, mainly Ducatis and Laverdas, built a couple of custom 'Harleys' from the ground up, a drag bike.. , in every case I go a little too far. Every bolt has to polished, the best parts have to be used, highest quality chrome, the best painter, Cosworth pistons, flowed heads, big carbs.. on and on.. when their finished, I ride them far less than I should for fear of damaging the finish. Its a habit that's difficult to break, but I'm trying..

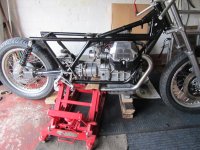
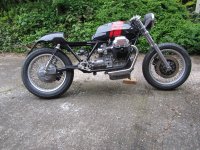
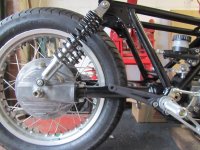
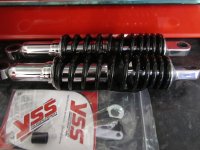
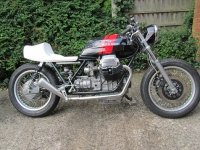
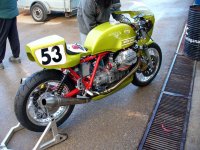
As for Guzzi, the To DO list seemed endless, but at least the bike was on its wheels now, and I could see clear progress..

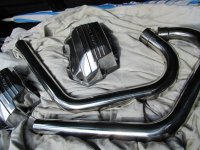
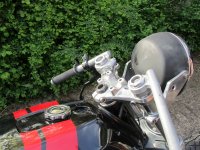
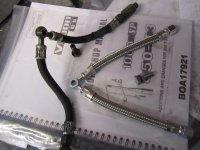
New oil lines for the engine..

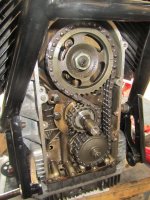
Checking the cam chain tensioner, I bought an aftermarket tensioner, but didn't need it..

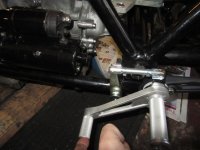
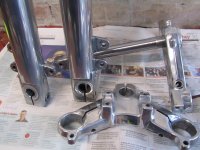
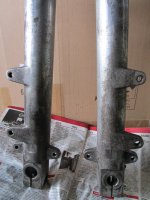
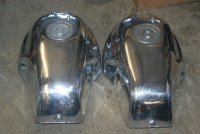
Cleaning up the calipers.. stainless pins would've nice, but I may upgrade the calipers for more modern 4 pot Brembos, not sure yet,so I just rebuild these for now.


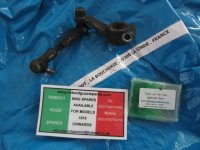
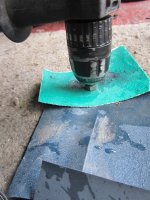
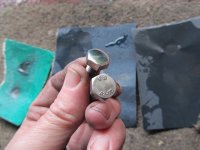
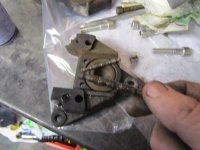
I tried to rescue the throttle, as its integrated with the switch gear housing.. a weird design, but it is Italian ;) In the end I couldn't save it, oh, and I'd like 'Syrens' too
 

Attachments

  • Guzzi26 006.JPG
    Guzzi26 006.JPG
    224.4 KB · Views: 476
  • Guzzi26 020.JPG
    Guzzi26 020.JPG
    296.2 KB · Views: 1,136
  • Guzzi27 005.JPG
    Guzzi27 005.JPG
    188.6 KB · Views: 487
  • Guzzi28 002.JPG
    Guzzi28 002.JPG
    172.3 KB · Views: 474
  • Guzzi29 002.JPG
    Guzzi29 002.JPG
    174.9 KB · Views: 467
I was looking for alternate seat units.. I found this site,

http://www.raggededgeracing.com/22.html

which makes a typcial cafe racer-ish seat for Guzzis.. an easy option, but a bit boring, and not quite what I'm looking for. But they also do lots more too, including a Rickman copy, which I ordered. Looking at the photos on that website, I sketched out what they would look like on the bike, not sure if I've got the size quite right, but anyway this is my best guess... I prefer the 'Rickman' one on top..


A few weeks later it arrived.. may remove that hump in the seat base, as its not needed to clear the rear guard/wheel


I swapped a rusty exhaust system for the master cylinder from an early Yam R1 and the switch gear from a CBR600. I needed to order a new lever for it and find a plastic reservoir 'pot', and off we go. Its a 16mm piston size Vs 12mm for the original, so its plenty big enough for the twin calipers.


At this time, the Guzzi went to my mates workshop to have its braided brake lines fitted. It was a bit out of sync, as I had wanted to sort out the exhaust system first, but he offered to collect the bike so off it went..

 
Back home again, the next item on the to-do list was the exhaust. The connecting H pipe that fits under the gearbox is a known weak point, and sure enough mine was cracked, so I got it welded up, and then played around with a couple of stainless cones I had left over from a previous project. I used the design as I had before, looking back now, its not quite right for the Guzzi, its something I want to change..


Machining the billet end cap


They were quite heavy, so I had them lightened, and the underside machined to fit the perforated baffle tube..


Making the bends to connect the cones to the original H section..


Test fit


I had a problem as the cones were welded to the bends without the bike, they looked perfectly symmetrical when we made them, but on the bike they were miles off. I think the down pipes aren't level either side. Not sure, as I didn't like them anyway, so I haven't bothered to fix it.

 
I had to consider the electrics now, I hate electrics, couldn't put it off any longer. The battery was going to live under the Rickman seat hump, plenty of space under there, while everything else needed to be hidden away as neatly as possible. I made a cardboard template for a shallow tray to fit between the seat frame rails, and got it made by the local welder in stainless steel plate. I then added mounts and bolted the rectifier to its underside to keep it in the breeze..


At the same time, I had him cut me out a plate to strengthen the seat, and let me raise it up a little
 
At this point, I have to confess my head was turned by a new project, my Ironhead Norton, so I put the Cali on hold while I concentrated on the new project. This is as far as I'd got..

But when the Norley is finished, I'll get back to the Cali.. but taking it in a different direction, as I'm not happy with the way it looks now. It going to get a new tank and a half fairing, different exhaust and upgraded suspension, a late 70s endurance racing rep. I used to follow Endurance racing around Europe in the 80s, LeMans, the Bol D'Or .. those bikes left a lasting impression .. so much for my 'cheap, fun little bike' that I first aimed for ::)

Those were the days..mass invasion at the end of the Bol, in the south of France.. still got my ticket..
 

Attachments

  • Boldor 015.JPG
    Boldor 015.JPG
    721.6 KB · Views: 590
  • Boldor 003a.jpg
    Boldor 003a.jpg
    211.6 KB · Views: 2,124
  • Guzzi68 004a.jpg
    Guzzi68 004a.jpg
    131.5 KB · Views: 2,167
Great work! I like it a lot. The new seat/fender does look better and fits the tank and bike nicely. Thank you for updating. I also saw your Norley and dig it too.
 
Erskine said:
Don't stop now! Jeez. ;)

I haven't stopped, just paused while I work on the Ironhead/Norton. I don't have the space or money to work on both at the same time. However, I can still think about the Guzzi. I'm going to get a V7 endurance style tank for it. Need to choose between fibreglass or the more expensive alloy tank? The alloy is about a third more expensive, it'll be painted, so not sure if its worth the extra cost?

Glassfibre, with the period correct clear strip for checking fuel level..or Alloy
This is the sort of look I'm aiming for.. but not in those colours]
 

Attachments

  • moto-guzzi-bol-d27or1.jpg
    moto-guzzi-bol-d27or1.jpg
    106.6 KB · Views: 2,687
  • Guzzi tanks1.jpg
    Guzzi tanks1.jpg
    180 KB · Views: 4,153
  • moto-guzzi-v7-endurance_-616-[2]-767-p.jpg
    moto-guzzi-v7-endurance_-616-[2]-767-p.jpg
    224.8 KB · Views: 995
Bevelheadmhr said:
Glassfibre ........

or Alloy

This is the sort of look I'm aiming for.. but not in those colours..
I live this build. Subscribed!
I'd go with the alloy tank any day. Particularly so if the price difference is 30% up or so (provided your pocket can handle it...)
By the way, the color scheme you rejected (red frame, lime green bodywork) is very Guzzi (and very very V7)... just saying, since you're going to build a V7 replica. What color scheme do you have in mind?

And a pic for inspiration if you'd allow me (although rather "LeMans-esque"):
 

Attachments

  • moto-guzzi-cafe-racer-kaffee-maschine-gessato-gblog-1.jpg
    moto-guzzi-cafe-racer-kaffee-maschine-gessato-gblog-1.jpg
    190.2 KB · Views: 2,502
Yes, I know the green is a classic Guzzi colour, but its not my favourite... 'Red and green should never be seen' as my mum says lol.. I don't intend to build a V7 replica, more a replica of the endurance racing Guzzis I saw in the early 80s.. they were mainly based around the Lemans I think. I always feel that red is the colour of speed, and all Italian sports bikes should be bright red :) My other two are, even my Merch 131 custom is Ducati red.

If I go for an alloy tank, I'll probably have it partially painted, so the alloy is part of the design.. but that's a decision for another day. Those Kaffee machine Guzzis are amazing, a bit too perfect for a road bike... perhaps a paint design like this


BTW, I have this in my shed, a couple of my mates have supercharged road bikes, it will fit between the cylinders and would be driven from the front. Only problem I see is moving the alternater..

I may go mad, I try to make something like this, but maybe that's for another project..
 
Back
Top Bottom