Follow along with the video below to see how to install our site as a web app on your home screen.
Note: This feature currently requires accessing the site using the built-in Safari browser.
We noticed you are blocking ads. DO THE TON only works with community supporters. Most are active members of the site with small businesses. Please consider disabling your ad blocking tool and checking out the businesses that help keep our site up and free.
Ugh, I've been rebuilding my wire harness, eliminating unneeded plugs, and making it all pretty.
I'm running all cables from the rear half to the cafe seat, and the front half to the headlight. I'll need to extend the part of the harness that stops at the junction box to the headlight as well......
Hopefully I'll be done around Friday and I'll post some pics.
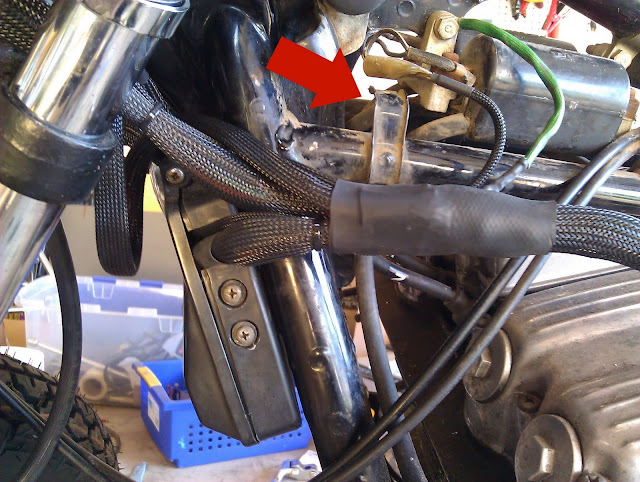
Well, I finished the back half of my harness.
It was a major pain, and I'd agree with Joe that it looks like a rats nest.
But hey, it's functional and I was on a tight budget.
I kept most of the stock connectors.....
One of the bolts on my starter solenoid broke half way, so I'm not sure how functional this is....
I'd hate to have to buy a new one, anyone think it will still function?
does look better in the big pics than the texts bud! use some zip ites and get it all tight! almost there man! i have my cafe back on the lift to do the carb swap so maybe we can go to a vintage night or something
That would be fun.
I finally finished the harness, and decided to keep that junction box.
I don't recall though if the harness goes behind that hook on the frame.
That is going to be an awesome bike! Any chance I can get you to post a pic of the braket you are using to mount your seat? Like an under side picture? I hate to keep asking you questions, but you were so helpful with the turn signal info, I figured I go back to the well one more time
I used some really thick steel spacers and the normal bolt holes that are on there already.
There's 4 of them.
I'm pretty sure it won't break through, but you might want to do a stress test.
Me on it (240 lbs) didn't seem to affect it. I might put some big fender washers between those and the seat to be safe though.
Here's how she's sitting right now.
Joe's going to come help me with the location of the rearsets, so just ignore it for now.
I was playing around with the mounting brackets and it looks goofy.
And obviously the fuel tank needs a lot more work.
I should be getting oil tank back today probably.
looking good man looking good def toss some washers under the spacers on that seat... you will need it to spread the weight and keep the fiberglass from cracking. ill be home today around 9 so hit me up
The bike is looking awesome! I worked off your spacer idea to mount my seat. I added a steel plate cut to fit under the seat to spread the weight around. Thanks for the advice!
We have done the square aluminum tube from the hardware store thing a few times. I can't TIG weld so I have to get someone to weld them for me, but if you have access to TIG, that's the way to go. It makes subframe/mount that spreads the load nicely.
Use a thin strip of rubber between the sea and subframe to reduce fretting
I really like the direction your build is going. I love the F's! Those Lossa clubmans look pretty sweet. Next time your snapping and posting pictures any chance of getting a picture of the bars from the rear of the bike with the wheel straight? Just wondering if the angle of the bars is any different than the ebay clubmans I ditched on my build because they were so uncomfortable.
Congratulations on what looks to be an awesome build. I particularly like your wiring approach. Just a couple of questions if I might. What oil tank will you be using? Are you fitting a cooler?
I watch with interest.
Well, I spent some time today cleaning the tank after sealing it the other day.
Still not sure how I'll do underneath since there's some tight spots.
So here's what the tank looks like with the edges ground down and cleaned up.
I'm sure there are some pin hole leaks, but the Caswell sealer should take care of that.
I'll do a leak test next week after it's had time to fully cure.
Well, I'm not sure if my logic is sound, but rather than introducing more water (ergo rust) into the mix, I'd rather leak test with air.
I capped the top with seran rap and play-doh, and blew hard into the other side (not saying blew and petcock in the same sentence).
I didn't hear any leaks, and I didn't feel any loss of pressure.
Is there a better way to pressure test with air and not water?
Here's a picture of the cleaned up tank on the bike.
Should make for minimal body work.
Any suggestions for filling in the emblem area without welding?
I guess I could leave it and glue the old emblems on.
This site uses cookies to help personalise content, tailor your experience and to keep you logged in if you register.
By continuing to use this site, you are consenting to our use of cookies.


")


