79kz650 generic brat motorcycle thing

DohcBikes said:
You have to know how thick your current shims are to determine the proper new shims. Obviously the ones that have contact may take a couple tries to get a shim that will let you measure.

good work buying a kit. You'll be fine. On my phone at the moment can't see shit but will offer some tips, free of charge, later today. They're worth every penny.

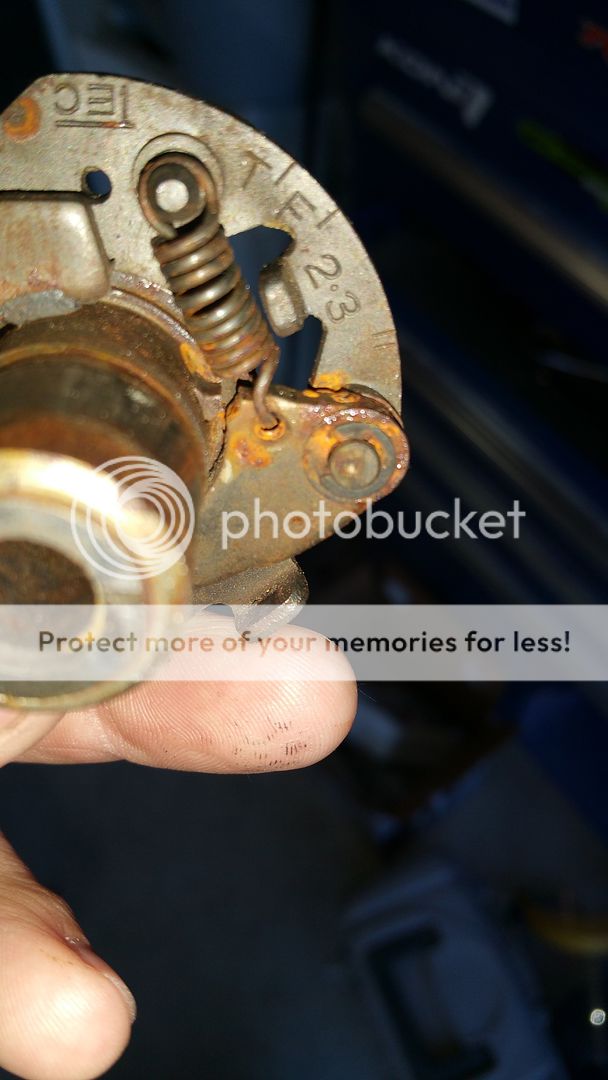
The numbers in the picture are the shims currently installed ( i just edited the post to include this information)

The numbers i got for the shims i need from the table in my haynes book, which looks to be the same table in the factory manual from what i can gather online are as follows:

Intake (1,2,3,4):
2.45-2.5, 2.5, 2.6-2.65, 2.5-2.55

Exhaust:
2.4, 2.45 2.55, 2.45

This is identical to the table in my haynes manual, did i calculate correctly?

ValveClearanceGuide.jpg
 
I personally just use a metric feeler gauge. They are super cheap and then you can quite easily do the math in your head, no shim chart needed. The tolerance should be .08mm to 18mm. if you can, I would error on the high side of that range. for example if you swap to have either a 0.10mm or a 0.15mm tolerance I would error towards the 0.15mm. When i do valve adjustments I try to get all the figures either .13mm or .15mm, with .13 being most ideal. It couldn't hurt to check the cam-chain tensioner once everything is all buttoned up as well.
 
doc_rot said:
I personally just use a metric feeler gauge. They are super cheap and then you can quite easily do the math in your head, no shim chart needed. The tolerance should be .08mm to 18mm. if you can, I would error on the high side of that range. for example if you swap to have either a 0.10mm or a 0.15mm tolerance I would error towards the 0.15mm. When i do valve adjustments I try to get all the figures either .13mm or .15mm, with .13 being most ideal. It couldn't hurt to check the cam-chain tensioner once everything is all buttoned up as well.

Cam chain tensioner works great, i checked it when i first reassembled the top end.

got most of the wiring done today, as i am still waiting on my shim kit, I still wish it was a bit more organized, but its all sound and quite sturdy, and once there is a seat covering it all, im sure it will be fine. I will be busy with the 2nd job next week so i doubt there will be much progress outside the valve lash, but i do appreciate all the input and advice!

(the dust was just from drilling holes for mounting the R/R and the starter solenoid)
20151202_165701_zpsiptfdrb4.jpg


I also made it over to a friends house last night and he had this sitting in his shed:
a Can-Am mx-2 250. I thought it was neat so i snapped a picture. I think he plans to restore it to a practical level of originality and ride the piss out of it.

20151201_191904_zpsgzmzxmr6.jpg
 
Well today I finally got a chance to adjust the valve clearances, got them all within .08mm and .20mm which i think is close enough to the manual tolerance of .08-.18.
Got it all buttoned up, put fuel to the carbs, and she rumbled to life on third kick!

I've still got to verify correct ignition timing, and ive got to put the colortune to it, but for now i can focus on getting the headlight and handlebar switches done. Judging by how easily it started cold in 40 degree weather, i may omit the starter button on the handlebars and hide it under the seat somewhere.

Thanks for anybody who's still following, will get pics once something happens. Im currently working 7 days a week(4days full time, 3 days part time at my 2nd job), so time int he garage is limited.
 
Watching with interest Bogieboy, as some/most of what you're doing I am as well, not on the same model bike though, but close enough.
 
Jboogie13 said:
Well today I finally got a chance to adjust the valve clearances, got them all within .08mm and .20mm which i think is close enough to the manual tolerance of .08-.18.
Got it all buttoned up, put fuel to the carbs, and she rumbled to life on third kick!

I've still got to verify correct ignition timing, and ive got to put the colortune to it, but for now i can focus on getting the headlight and handlebar switches done. Judging by how easily it started cold in 40 degree weather, i may omit the starter button on the handlebars and hide it under the seat somewhere.

Thanks for anybody who's still following, will get pics once something happens. Im currently working 7 days a week(4days full time, 3 days part time at my 2nd job), so time int he garage is limited.
Still following. Were you able to leave the cams in contact with the chain and save the step of timing the cams?

Make sure to check the clearances again after running it several miles. There are lots of reasons for this and I'm too lazy to type them all out, just check em again.

You might find the .20mm clearances to be a bit noisy.
 
DohcBikes said:
Still following. Were you able to leave the cams in contact with the chain and save the step of timing the cams?

Make sure to check the clearances again after running it several miles. There are lots of reasons for this and I'm too lazy to type them all out, just check em again.

You might find the .20mm clearances to be a bit noisy.

I left the timing intact for the first goaround, but i had tobreadjust a few of the. And i wasnt careful enough and one of them jumped, good thing i double counted my links and turned it over by hand first. So after the second adjustment i had to re-time the engine, which is easy enough to do. I will re check them after a few heat cycles once the seats have had time to run in a little bit.

In other news i have a NOS points plate coming because the one on the bike is a bit buggered and difficult to adjust.
 
Kz's rev plenty high (higher than 'redline' is not a problem) to make points bounce and you will leave power on the table guaranteed.

Later Kawasaki electronic ignition will fit. I'm not a huge fan of dynatek but that is an option as well.
 
Jboogie13 said:
Well today I finally got a chance to adjust the valve clearances, got them all within .08mm and .20mm which i think is close enough to the manual tolerance of .08-.18.
Got it all buttoned up, put fuel to the carbs, and she rumbled to life on third kick!

I've still got to verify correct ignition timing, and ive got to put the colortune to it, but for now i can focus on getting the headlight and handlebar switches done. Judging by how easily it started cold in 40 degree weather, i may omit the starter button on the handlebars and hide it under the seat somewhere.

Thanks for anybody who's still following, will get pics once something happens. Im currently working 7 days a week(4days full time, 3 days part time at my 2nd job), so time int he garage is limited.

I never use my electric start. even when its cold. as long as the bike is in tune they are very easy to kick start IMO

DohcBikes said:
Kz's rev plenty high (higher than 'redline' is not a problem) to make points bounce and you will leave power on the table guaranteed.

Later Kawasaki electronic ignition will fit. I'm not a huge fan of dynatek but that is an option as well.

Whats wrong with dynatek?
 
doc_rot said:
I never use my electric start. even when its cold. as long as the bike is in tune they are very easy to kick start IMO

Whats wrong with dynatek?
What's wrong with electric start?
 
DohcBikes said:
What's wrong with electric start?
the starter clutch was going out. Common on this platform. also kick starting is awesome and that alone is reason enough.... Dynatek?
 
doc_rot said:
the starter clutch was going out. Common on this platform.


Common problem on lots of bikes with the 3 roller ramp style starter clutches. You can get the KZ650 one out without splitting the cases though which is good (not as good as a GS, but still not too much hassle). You just need to flatten out the roller ramps with a die grinder are they're good to go again...as long as the rollers are still round.
 
Well i got some time yesterday to put the new points plate on, and while i was at it I figured it would be a good idea to pull out the advancer and give it a little grease. Upon removal i found the little dog ear that rotates in the shaft was broken off on one of them, so waiting on a serviceable one from the 'bay. One thing after the other.
20151215_120450_zpsx9y9gtmf.jpg


I dragged it out into the sun for some good ol' visual progress (kinda)
20151215_134954_zpshwkxmpus.jpg


Hopefully i will find some time today to start brainstorming about the seat, I think i want it to be pretty close to stock on thickness, just long and flat(ish). Since i was not able to get the stock seat from the P/O, would i be better off buying a stock seat foam from ebay? or does anybody know where i can get some decently firm foam around 4 inches thick for a good price? Ive already read the DIY motorcycle seat website through, but im still a little confused as to what type of foam/density would be best, So i figure that the stock seat already has that decision made for me. I just dont know what model to order to get the most material to work with, as you can get new foam inserts on ebay.

Also, i need some opinions on shocks,

I was originally just going to buy some used KYB shocks from a ZRX11/1200 but im now torn between that or some new Hagons, as both are about the same price.
 
I would go with the Hagons as they will be custom set up for you.
 
So its been quite a while since ive done anything on the bike, but ive had a lot of time to think about the direction it was headed. This could infuriate some purists, or make them a little happier, but ive been looking at a lot of z1 superbike stuff, and i found myself wishing i hadnt cut the bike up, so i went and welded the stock frame section back on, and started ordering a lot of stock parts that i never recieved with the bike. (seat, battery tray, side covers, a useable wiring harness, and the kz ducktai)
so heres how she sat when i decided to change directions:

20160317_155249_zpsod5gsgbu.jpg
[/URL]

and this is where i am at now:

20160324_131237_zpswptzev5s.jpg
[/URL]

Ive fitted some longer vx800 shocks, which will do for now as they are the length i am after (~14")

Roast away haha
 
Seat: I was reluctant to destroy the original seat on the CBX as it was in very good ocndition. So I bought a seat with a torn cover but good stock foam as, like you, Honda made the decision for me. I was to cut it down a bit, but with a smoother base it would still work OK. Use an electric carving knife to shape the foam and a 60-80 grit paper to smooth it out, work very well indeed. I chose to cover mine with closed cell yoga mat to protect the foam from British rainwater which is wetter than normal I think?

Carry on.... :)
 
I like the new direction. The stock tail is one of the coolest parts of the 650 imho
 
the stock seat i bought has a torn cover as well, but im not sure i want to try slimming it down a bit, or just recover it and leave it the way it is. i think the latter will end up happening, and i will likely focus all my modification from this point forward to performance oriented mods like a front end or a swingarm swap. Though from what ive gathered, some better springs and new oil in the front end will likely suit my needs just fine.

Im pretty convinced that most of the decision to basically undo everything ive done so far comes from my deep regret of selling the ZRX.
 
Slow going here, as I've recently begun house hunting. but i have managed to get most of the brackets and tabs welded back on that i need. i still need to get the side cover mounts re-created, but that shouldnt be too bad. Also still need to buy a lock set for a matching ignition, seat latch and fuel cap. After doing some calculating i found my trail to be at 3.75" so i will need to put some stock length shocks back in to bring that to a more rideable value.

I think ive finally learned my lesson here being that i prefer bikes as they are in mostly stock form. still kicking myself from cutting this thing up.

20160422_142625_zpsnlpvmevj.jpg


20160422_142734_zpsrsvk79ie.jpg


The good news is that since im using a stock battery box, i can use a stock airbox if i run into too many tuning issues with the pods.
 
Back
Top Bottom