72 Suzuki GT380

There is a vacuum tap on one of the carburetors.

I like the vacuum operated petcocks. I am one of those people who would frequently forget to turn off the fuel. I like that it turns off the fuel automatically.
 
I took the ignition switch apart today and cleaned. I found that the PO put some steel balls under springs for the contacts and not under the springs for the detents. So I took them out and put them in place. Works fine now.
Got the caliper in the mail and installed. Now I'm going to have to bleed the brake. I've bled brakes on vehicles, so hopefully it's the same principle :eek:.
Also I installed some clips that needed to be put in place and thats about it. Moving forward, making progress!
 
Success!!
I did some wiring the other day, and this morning I filled the battery and put it in place, then hooked up -'s and +. I have horn, rear running lamp, rear brake light (from foot and hand), both rear blinkers come on, but fronts are not hooked up yet so no blinky. Tomorrow I'll test to see if I have spark. I also painted the headlight ears and headlight bucket. Of all things I painted it with Rustoleum oil based paint with a brush. It actually looks real good because all the paint kind of runs slightly and fills in the brush marks. (This is not a show piece, just want it to look painted and be durable.) Tightened the oil pump screws some more because it was still leaking, and I think I have a small pinhole leak in the feed tube, so I'll have to replace that, too. (I think that explains where alot of the oil was coming from that was pooling up around the oil pump) I'll post some pics tomorrow.
 
Here's some pics of the painted ears and the wiring thats just about done.
bucket.jpg


blackears.jpg
 
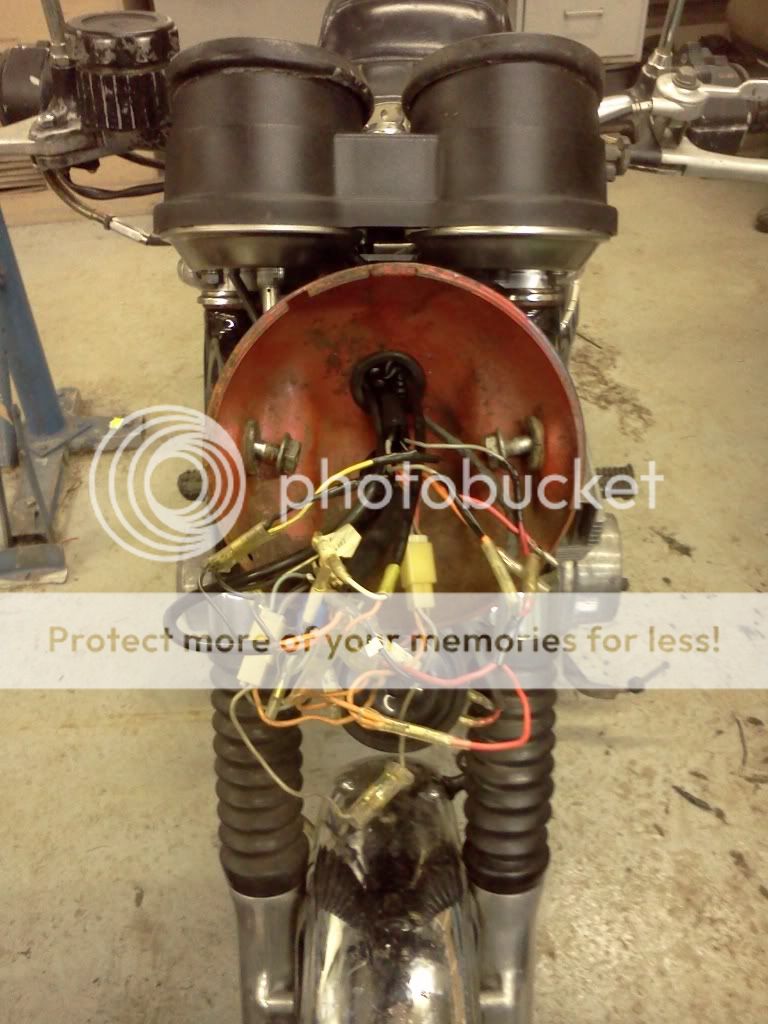
When I checked yesterday, I had no spark. Earlier, I had tested the coils and the primary and secondary resistance were within spec, and am thinking that the coils are/were not the problem. Also checked continuity and condition of wires from ignition to coils- all good. So I took off the points cover and saw a big dirty mess. I couldn't clean just the points, I had to clean everything, even the plate.
When I cleaned inspected the points, I noticed one of them has a pretty big pit, so that means a new one is necessary. No problem because I have extra new ones. Well, they are not for the ignition system I have. Sooo, I guess it would be advantageous to just replace all three at the same time. I found points for like $50 each (bike bandit) and I started thinking that for that price, maybe an electronic ignition is the way I should go. Can anybody offer any suggestions as to what I should be looking at?


I found this one, but thats about it:
http://www.ebay.com/itm/SUZUK-GT380-GT550-GT750-BOYER-ELECTRONIC-IGNITION-NEW-/261018880711?pt=UK_Motorcycle_Parts&hash=item3cc5f00ac7

I had a Pamco electronic ignition on my CB350 and thought it was really easy to install. I tried looking for their website, but I can not find it. I will keep searching. Thanks in advance for your help :) Oh yeah, also got my front blinkers and will install them tomorrow morning. I think after that I can put the headlight on and call the wiring up there done.
 
cool little bike, I just sold a gt550 last week and have a T500 Titan I a turning into a cafe bike. will start a thread when I finally get it running (just put in electronic ignition). I went with the newtronics ignition, it is nice.
 
Thanks MikGsxr. Really like those Titan's, should make a nice bike when finished. I'll be looking for your new build thread :)

On an off the subject comment, I'm enjoying a Short's Brew Pandemonium Pale Ale right now. I'm not a big drinker, but I find Pale Ale to be really good.
 
I have found a number of points sets and tune up kits on Ebay for both the Nippon Denso (ND) and the Kokuson. Just need to determine which one you have. Here's an example:

http://www.ebay.com/itm/290690986060?ssPageName=STRK:MEWAX:IT&_trksid=p3984.m1423.l2649

Do a search on GT380 tune up kit

Good luck! 8) Bermkid
 
bermkid,
Thanks for the info. I didn't even think to look on ebay for those. Ordering one up as soon as I feel comfortable setting them. I'll practice with the old ones first :)
On another note, I filled the tank with vinegar and let it sit for a day. The rust literally scrapes right off. So, Monday I'll put the screws in there and start shaking for about 15 minutes, that should get everything clean. I'll post a pic on Monday of the inside of tank. And the oil drip is gone, Yeah!
 
Good and bad news :eek: I got all the wiring finished. New blinkers are installed and the flasher unit is working... But only on the left side. The right side lights up but does not blink. I switched the connections in the rear and the left rear and right front work, but the left front and right rear just light up and don't blink. I then connected another blinker up to the right rear and the right side blinks. So I've narrowed it down to the right rear (hope that makes sense). I took the bulb back to the dealer I bought it from and they gave me two new light bulbs to plug in and see if that works. (All grounds are good, and the power lead is good also.)
I let the bike sit over the weekend and did not see any visible leaks on the ground, so I believe the leak is now gone.
And finally, the vinegar trick really worked. All the rust I could get at through the fill neck just scraped off with a screwdriver. So I dumped about 3/4 of the vinegar out and put a bunch of screws in there. Sloshed those around and drained with fresh water. Then I put in water and baking soda, dumped that and then poured in a whole spare 1/2 quart of 2 cycle oil and mixed that around so it coated everything. Tomorrow I'll try and get all those screws out, but Suzuki maked their filler necks deep, so getting all those out is a bitch. I'll post some pics of how it turned out tomorrow.
 
To get the screws out of the gas tank - if you used steel screws, use a magnet - either a mechanic's "stick" or one on a string if you have to. If you can get the tank really dry - use compressed air or maybe a hair dryer - vacuum out the rust debris. You may have to duct tape a smaller piece of hose to your vacuum hose to get into the tank. I learned these things the hard way; a customer brought his tank in to get sealed up (lotsa pinholes) and his acid etching had left about a quarter pound of crud in the bottom of the tank.
And a piece of advice that I learned from a friend's 380; when you're setting the timing DO NOT put a wrench on the end of the points cam shaft - it's driven by a plastic idler gear off the right side of the crank and you can shear the teeth off. Either use the left side of the crank or do what I did - pull the plugs, put the bike in gear while it's on the main stand and rotate the rear wheel slowly to check timing and points gap. No, I didn't shear the teeth off, but I had to buy a complete right side engine cover from a wrecker's to get the little gear for the bike after some "yoot" at the local m/c shop did the nasty deed.
Regards,
Pat Cowan,
Vintage Motorcycle Fiberglass
 
Hey Pat,
Thanks for the input. I did read about the plastic gear and do not want to replace that, so I will not do that. I like the trick of putting it in gear and rotating back tire. I never thought of that. I did however install the new bulb this morning and it works :D So I can check that off the list.
Will try the vacuum trick, good idea since screws are stainless. I'll let you know how it goes.
 
Screws are out, inside of tank looks great. Got new parts for fuelcock today and will finish that up tomorrow.

I was setting timing today when I realized that the wires that go to the points are all grounded all the time, and they all have continuity to each other. If I unplug the points wires at the coils, they are not grounded anymore. I thought I connected kill switch up wrong, but thats fine. If I turn the kill switch to off, they are not grounded anymore. I have 12.5V at the orange wire in the headlight going to the coils. Somewhere, something is really wrong ???. Thoughts, suggestions? A thought I had is that someone has gotten into the wiring harness before and hooked the points wires to the ground wire. I'll have to strip back loom and check in the morning.

In addition, there is an extra wire that is suppose to be hooked up to battery (?) that is located by battery. It's black with a white stripe; not the negative, but another wire. Is that the charging wire? There is also another wire that is under the coils. I figured it was a grounding wire and hooked it up to the ram air cover.

I got the blinkers towork now, but only with headlight off. If I turn headlight on, they just stay lit. So I hooked the charger up to the battery and turned the headlight and blinkers on and they all work, so I'm thinking the battery is just a little weak and needs a charge. But it shows 12.5V Weird. Maybe related to points wires?
 
mate, drop the points system and get the newtronics electronic ignition- you will thank me later, points are a headache!
 
Grab a wiring diagram and test each leg of the circuit one at a time to see what is connected. In principle it's 12v from battery -> main switch -> kill switch -> coils -> Points and condensors. Each circuit is separate from the coil feed to points. Each set of points connects and power goes to ground as it closes and completes the circuit. Capacitor/condensor is connected to each set of points and they will show as a ground if you use a multimeter with a big fat power supply in it. (something to look out for).

Electronic ignition replaces points and condensors and the rest stays the same.
 
Thanks guys. Electronic ignition-maybe. We'll see.
I'm not really leaning towards the condensors because the three wires going to the points are disconnected right now and if you check them with a muiltimeter they all have continuity to each other. So the condensors are out of play right now. And when I unplug the main power supply at battery, all symptoms disapear. So my thought is that the 3 points wires are grounded somewhere in the harness.
So, right now I do have- power to switch, power to kill switch, power to coils.
Thanks again for all your help. It sucks when your almost there, but 1 little thing is holding you back.
 
The black wire with white stripe is ground. The ground cable which goes from the battery to the engine is what supplies ground for starter power. The black with white stripe wire grounds the wiring harness.

12.5 V is not a fully charged battery. It should read 12.6 or higher.

I think you have your kill switch wired wrong. It does not kill the engine by grounding out the points, it kills the engine by interrupting power to the coils. As teaser explained, power is supplied to the coils through the ignition switch, then the kill switch. The points complete the coil circuit to ground when they close.
 
have you also checked to the see if the points are ok- they apparently need fibre washers so they don't ground out. but like i said- i hate points so don't know much about them.
 
ADC, I thought that, too. I looked at the wiring for the kill switch and it is hooked up to the orange wire (power) and then to the coils- so thats right. I then hooked up another set of coils and got the same problem as before. Then I checked the continuity of the coil wires with them unplugged at the harness. Each orange wire with coresponding wire shows continuity, as does with the other 2 sets of coils I have (9 ohms).
With the coils unplugged from wiring harness, I set the timing/points. Then I plugged in the coils and tested for spark on the left cyl., and I got spark.
I'll set the battery on charge for the day and see what happens.

Mike, Yep, the wires are on top of the little nylon washer. Good thought!
 
Back
Top Bottom