We noticed you are blocking ads. DO THE TON only works with community supporters. Most are active members of the site with small businesses. Please consider disabling your ad blocking tool and checking out the businesses that help keep our site up and free.
You are using an out of date browser. It may not display this or other websites correctly.
You should upgrade or use an alternative browser.
You should upgrade or use an alternative browser.
1974 CB360 "Pickled"
- Thread starter Luck
- Start date
Luck
Been Around the Block
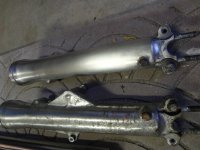
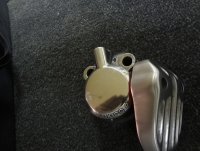
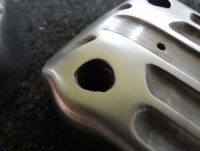
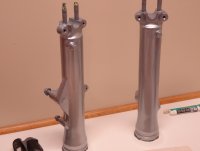
That thing was a pain! Is this bolt stainless steel? I kind of buggered one of them up taking it out by hand. I moved along and started sanding my lower forks. Now Im not sure if I want to go painted or polished. Heres after 400 grit. Man what a difference. Now for another 2 hours on the other side. lol
Attachments
Luck
Been Around the Block
True. I grew up in a body shop as a kid. There are lots of different paints and they all have their place. I have a friend that just cleared his polished forks with urethane. I haven't talked with him about it but last time I seen the forks the urethane seemed to be holding up. I was wondering if clear powder coating would work over bare aluminum. Anyone try it?
Luck
Been Around the Block
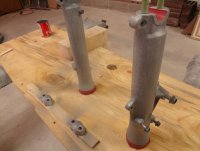
Still trying to figure out what I want to do with the fork lowers. I have a paint job in mind but how can a guy beat polished aluminum?
I picked up my new float today so I am able to get the carbs put back together. I had read somewhere on the site that the stock float height isn't the ideal setup and I was wondering if people were going slightly higher or lower than factory recommendations. Im also having a tough time figuring the measurements on the floats. I have read and watched videos on the old you tube and I cant seem to figure out how Im screwing up my measurement. I keep getting around 11-11.5mm. Anyone with an idea of what I could be doing wrong? Thanks
I picked up my new float today so I am able to get the carbs put back together. I had read somewhere on the site that the stock float height isn't the ideal setup and I was wondering if people were going slightly higher or lower than factory recommendations. Im also having a tough time figuring the measurements on the floats. I have read and watched videos on the old you tube and I cant seem to figure out how Im screwing up my measurement. I keep getting around 11-11.5mm. Anyone with an idea of what I could be doing wrong? Thanks
Luck
Been Around the Block
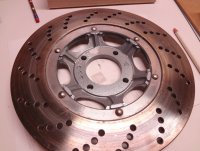
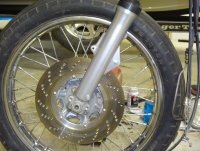
I have been taking advantage of the last couple of weeks of fishing up here in MN. I did find some time to polish up the brake caliper and played around with doing the brush aluminum look. I like the Brushed aluminum better but Its a little to much work for now. I will change everything over to brushed this winter. Anyways, heres a couple of pics of the parts. Just waiting on my rotor to get back and I should be able to get the front end back together.
Attachments
Luck
Been Around the Block
Self etch coating followed by epoxy primer. Picture looks sketchy but it flowed out on the final coats. Now hopefully I can get these things painted. Im also thinking of throwing some different bars on this thing, stock bars are just not going to cut it. Im looking to use a straight bar with a slight bend on each end. Anyone have an idea?
Attachments
Luck
Been Around the Block
I had some time yesterday to get some paint on the fork tubes, back part of the headlight, and also went ahead and painted the rotor center. I found out the Epoxy primer I sprayed cant set for more than about 36 Hrs. before topcoating. I had to go back and sand my fork tubes, respray the primer, topcoat and clear. What a pita. Because I wanted these few parts to match with the tank, I had to go this route.
Attachments
Alaskanrocket
Active Member
Luck said:I had to go back and sand my fork tubes, respray the primer, topcoat and clear. What a pita. Because I wanted these few parts to match with the tank, I had to go this route.
^Heeeelllllllooooo? I had to edit to add letters to express sarcacsm to proper grammar to
Luck
Been Around the Block
I had them polished and didn't like it. The only thing I would have done different would have been to polish them and then do the brushed look over it. I decided to paint them because I had some extra silver laying around and thought it would be a good color to paint the rest of the bike. Its also basecoat clear coat so it should last for quite a while too. I may change the rotor center to black or red but I want to get the rest painted to see if changes will be in order. At this point get the bike to a rideable, moveable state is my main concern. This winter will be my play time. Now Im hoping to find some Stainless spokes, drag bars/ cheap clip ons, and pipes.
Attachments
Luck
Been Around the Block
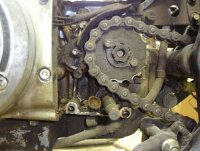
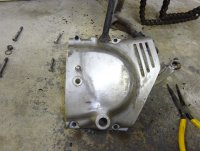
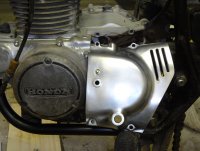
Waiting on some sprockets and decided to start cleaning the front cover. I took it off this morning and found what looked to be a squirrels winter stash/ Acorns all over the place. lol The front cover was actually in nice shape so sanding down with 320, 600, 1000 and 1500 was quite easy. The little nooks and crannies are where the time gets wasted. I was surprised that 000 steel wool does a nice job of helping to bring a shine to sanded parts. Naturally I will buff and polish to bring the luster to it but the steel wool really worked great. I decided to go with the 530 chain and sprockets because I didn't see enough of an advantage switching everything to 520. I chose a 17 front and a 37 rear. Just eliminating that stock rear sprocket should look amazing. lol