540cc Honda 360 Engine

haplo_84 said:
Wow is that thing going to be the frame?

Yes sir! And it has changed some since these pictures were taken. I have some updated pictures to post and some of the finished 540occ engine.
 

Attachments

  • P1000166.jpg
    P1000166.jpg
    137.7 KB · Views: 263
  • P1000167.jpg
    P1000167.jpg
    130.7 KB · Views: 297
  • P1000168.jpg
    P1000168.jpg
    137.6 KB · Views: 259
  • P1000175.jpg
    P1000175.jpg
    148.1 KB · Views: 277
Here are a couple more of the engine details.
 

Attachments

  • P1000174.jpg
    P1000174.jpg
    105.6 KB · Views: 254
  • P1000176.jpg
    P1000176.jpg
    131.6 KB · Views: 260
  • P1000186.jpg
    P1000186.jpg
    125.7 KB · Views: 273
Details of the frame. The rear loop is being re-done next.
 

Attachments

  • P1000185.jpg
    P1000185.jpg
    149 KB · Views: 278
  • P1000184.jpg
    P1000184.jpg
    136.2 KB · Views: 261
  • P1000183.jpg
    P1000183.jpg
    140.4 KB · Views: 278
  • P1000182.jpg
    P1000182.jpg
    128.6 KB · Views: 281
Some more of the front of the frame. The rear hoop is being re-done for more tire clearance.
 

Attachments

  • P1000169.jpg
    P1000169.jpg
    145.9 KB · Views: 278
  • P1000171.jpg
    P1000171.jpg
    136 KB · Views: 275
  • P1000172.jpg
    P1000172.jpg
    121.8 KB · Views: 294
What a display of motorcycle building....It is Insane and Brilliant.

I am curious about the output of the "big" 360 there.

Looking forward to wheels on the ground, so to speak..
 
mydlyfkryzis said:
What a display of motorcycle building....It is Insane and Brilliant.

I am curious about the output of the "big" 360 there.

Looking forward to wheels on the ground, so to speak..


540cc is too big for the valves so it should be a torque monster at lower rpm
Valves are 'correct' size for around 425cc
 
We are glad you are all enjoying the build and thank you for your comments and interest. I am excited too and maybe I will get a test ride on this machine when it's completed.

Here are some details from Pops on the frame:

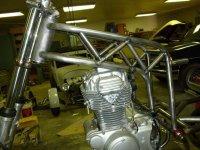
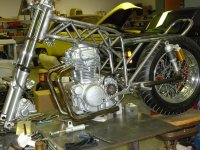
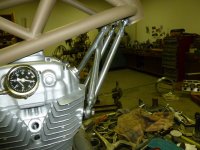
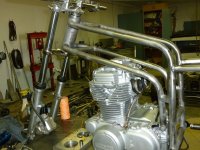
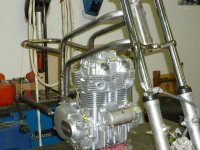
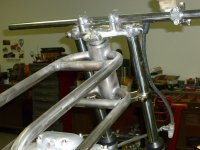
Yes, I think its a Cafe Racer, my style anyway. Building a frame is a real brain exercise, which is what I like. I've started putting in the girders in between the frame tubes, thats going to make a big difference in stiffness & looks. Also have a idea on how to connect headstock to engine for super racer look. I can't use a drawing program so I cant show you a picture of how the tank will look, maybe I'll try to sketch it and take a picture.
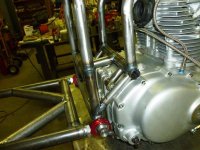
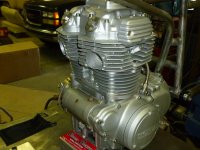
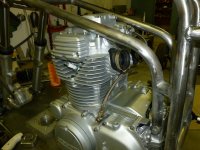
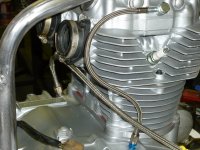
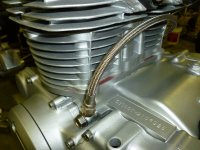
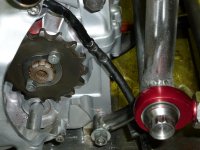
And on the engine:

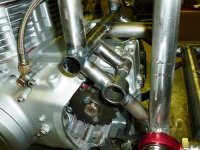
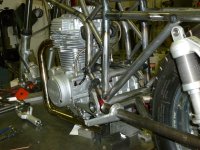
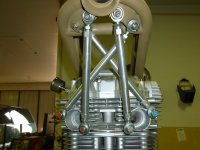
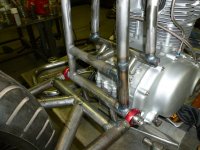
The oil comes out of engine on the lower right side cover, in a #4 line, and yes the filter, cooler goes in that line. Then back into the main engine gallery on the left side to oil the crank & trans, then out of the main gallery on the right side to a #3 line to the head at the end of the camshaft, which has been gun drilled to oil lobes & bearings. Most internal oil passages in case & head have been plugged, no oil to head studs or stock filter, (also removed). The cam cover is not sealed as yet to allow engine to be spun over with starter to prime and fill oil system & check oil pressure (at the head).

He also said:

This might be of interest to people on DTT site. This is the fellow I got the copper head gasket from, good quality, shipped & packed well.

www.coppergaskets.us

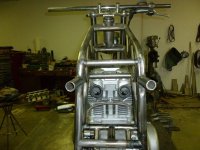
I'll have some better pictures of the frame in a few days when it looks more like a motorcycle.

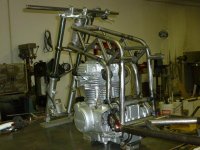
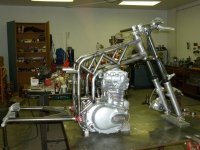
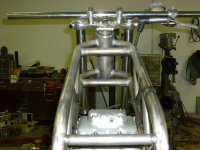
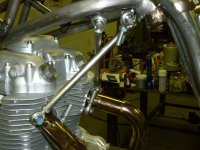
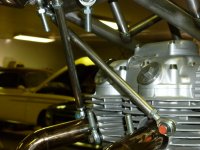
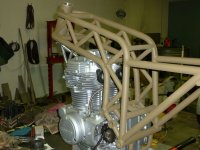
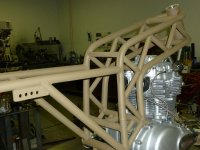
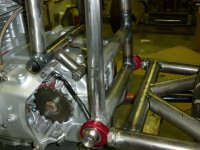
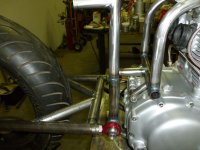
And here is another picture update showing the struts in the top tubes. And more info from my father:

Heres the latest photos, you can see a little better what its going to
look like. The tube with the hole in it is to get the upper rear motor
mount bolt in and out, only way I could come up with keep brace where I
wanted it.
 

Attachments

  • P1000190s.jpg
    P1000190s.jpg
    89.4 KB · Views: 259
  • P1000189s.jpg
    P1000189s.jpg
    89.9 KB · Views: 278
  • P1000188s.jpg
    P1000188s.jpg
    81.5 KB · Views: 261
  • P1000187s.jpg
    P1000187s.jpg
    82.9 KB · Views: 279
This should probably be in the projects section, but I don't really want to move it now.

Here 4 more photos of the bike as it sits now. More coming soon...
 

Attachments

  • P1000191s.jpg
    P1000191s.jpg
    88.8 KB · Views: 266
  • P1000193s.jpg
    P1000193s.jpg
    71.2 KB · Views: 258
  • P1000194s.jpg
    P1000194s.jpg
    77.7 KB · Views: 259
  • P1000195s.jpg
    P1000195s.jpg
    106.4 KB · Views: 268
From Pops:

"Heres the latest pictures, now to weld all that crap together.
I think you can see how the motor gets tied to frame, those tubes are
just to show how it will look. The rods will be aluminum with left and
right threads so frame can be preloaded. not sure yet on final pairings.
When I get the front tire on I can block it up and set up pegs & see if
I'm close on the shift pedal I made, I have it pivoting on the swing
arm bolt with a bushing, hope its in the right spot as I like pivot
idea. The oil filled pressure gauge seems to be loosing its oil."
 

Attachments

  • P1000209.jpg
    P1000209.jpg
    130.8 KB · Views: 274
  • P1000208.jpg
    P1000208.jpg
    120 KB · Views: 255
  • P1000204.jpg
    P1000204.jpg
    168.4 KB · Views: 252
  • P1000203.jpg
    P1000203.jpg
    149.2 KB · Views: 255
and this also after I asked him some questions about it...

"Those pipes are also off of my 350, not for this bike, just checking
for clearance & look. Your right there will be studs in the exhaust
for struts, maybe springs to hold pipes? something racey . I'm
thinking maybe both pipes going down to the left side & under the alt.
area, side by side. I was going to have them exit under the seat like
GP bike but ran out of space. Maybe high pipes if I can do it right.
Pipes are a rather important visual part of a bike, so deserves extra
thought. It's all apart now for welding. might build a stand so as to
start the engine."

And the latest:

"Heres Pictures of struts, using engine as frame member, seems to work
well. now for a seat and tank, may use stainless for both, as I have a
bunch of 20 GA polished & it will stay bright."
 

Attachments

  • P1000210.jpg
    P1000210.jpg
    135.2 KB · Views: 264
  • P1000211.jpg
    P1000211.jpg
    118.7 KB · Views: 281
  • P1000212.jpg
    P1000212.jpg
    125.8 KB · Views: 245
  • P1000213.jpg
    P1000213.jpg
    117.9 KB · Views: 249
Back
Top Bottom