CB350F - Carbs keeps overflowing

tahitianrider

Been Around the Block
Hi everyone,
I'm currently finishing my '73 CB350F scrambler build but still have problems with the carbs.
The bike was a barn find that didn't run for 30years, I managed to restart it, I entirely rebuilt the carbs using a full rebuild kit, they were also ultrasonic cleaned 6 times.

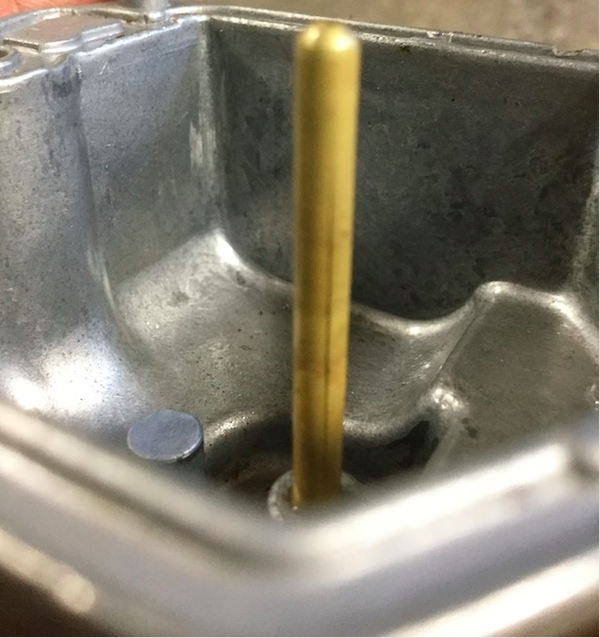
However I still have trouble withe the carbs leaking from the bottom brass tube of the bowls, which is the overflow exit. So my first guess was bad float height of bad float needles. The float needle & valve from the rebuild kit did seem a bit different from the stock one, with a stiffer spring on the needle but also a much shorter spring travel that the stock one.
So I installed back the stock one that were still in great shape.
The float height on the CB350F is supposed to be 21mm, but it overflows like crazy. So I increased it a lot, maybe 30mm! And it stills overflows... less, but still overflows a bit. It does affect more 2 of the 4 carbs than the 2 others.

Any guess on what should I do? increase float height even more? buy some new (better quality) floats needle & valves?

Thanks for the help!
 
Take bowl off. Fill with isopropyl (rubbing) alcohol (over a sink). Leaking? Dump the isopropyl, inspect with a light and magnifier if your vision is poor fo cracks along the tube or at the base. cleanwell, scrape the cracks, and solder them with a large iron and plumber's (acid core) solder and flux. Clean any big blobs off that might catch on a float. Leak test with isopropyl again.

If the tube doesn't leak, the float valve and seats should be addressed.
 
Thanks for the tips, or I could also try other bowls since I have 4 spare bowls?

But I don't think that the tube is leaking because it will not overflow right away, when connected to the fuel line (from a workshop fuel bottle at the moment) it doesn't leak until completly full, and then when I turn fuel off, I won't leak anymore. And I can tell that bowls are full because I can run the bike without any fuel supply just with the fuel on the bowls for at least 5min.
 
I just had this exact issue w 75 400four.

Mine wasn't cracked tubes, but YES I looked there first. So yes check all yours.

I had new float valve kits kits from 4into1 installed. I didn't like them simply because Im weird.

So I replaced them all w new Honda float valve kits. Probably unnecessary.

So try polishing the float needle valve seats. I found a Q-tip was too big. So I whittled down a felt Dremel bit until it fit.

I use toothpaste for this.

Clean them afterwards. When I was done I found one of the 4 still leaked. I said "F" it and went for a ride.

All the wiggles and jiggles must've washed out a bit of toothpaste residue, now none of them leak a drop.

Also did you separate carb bodies for cleaning? I found a piece of crap stuck in the T fuel fitting. On my second round of cleaning.

Reset floats to proper 21mm.

Heres a pic from the wifes 400A, cracked float tube.

11494-220318052652-35111521.png
 
Yeah I did check my tubes when rebuilding the carbs and did not see any cracks.

Yes I separated the carbs when rebuilding them and also cleaning the T fuel fitting.

Well my carb rebuild kit came from 4int1 too so it has those weird float needle that have a stiffer spring but people does not seem to have issue with them.

I'll try giving it another go and if it still leaks, I'll try to polish the with my dremel and toothpaste!

Wow that is a nasty crack!
 
Yeah all new needles will have stiffer springs. Your old ones are bad and gone mushy.

I don't take much to get them polished up nice.
 
Well you guys were right, turns out 2 bowls had cracked tubes. Found out an easy to test them: put your finger on one side then spray carb cleaner with a small tip on the other side and see if it leaks.
One thing weird though is that one that wasn't cracked stopped leaking just by putting it on another carb lol

But on the 8 bowls I have (I have 2 set of carbs for CB350F), at least 3 are cracked.. so I guess they can be fixed with the plumber solder thing?
Could an electrical heat shrink tube over the tube work??
 
tahitianrider said:
Could an electrical heat shrink tube over the tube work??

No. I tried. Gas eats it. Get a good powerful soldering gun (I have butane powered one that was perfect). Clean and flux well.
 
I tried the heat shrink too, fail. I think in total I ended up w 8 bowls. For Rachels twin...All arrived cracked.

However, carb bowls from Murrys carbs fixed em.
 
Damn heat shrink would have been too easy.

I don't know any place in France where I could have the bowls fixed so guess I'll have to try to solder them.
By soldering you mean like the big plumber thing to weld copper? with a torch?
Or more like a soldering iron for electronic you use with tin? this I am familiar with because I solder a lot of electrical compoments, but not the "weld" thing.
 
I have a portable butane soldering iron - piezo ingniter, pretty nice. I think Weller sells one now. It designed for electronics work, but is a bit hot for circuit boards. Regular plumbing solder and acid flux, not electronics rosin flux. I fear a torch would be way too hot and uncontrolable unless you could get a jeweler to do it with one of their tiny torches. One of the larger solder "guns" or irons for soldering large wires, radiators, etc. might work. I really doubt one of the smaller 15 - 30 Watt electronics irons would be able to heat up the brass enough.
 
Oh yeah I see what kind or soldering iron you have, dremel has a butane one like that and it looks really nice, always though about getting one for working on the wiring harness of the bike, on the bike.
I'll need to find acid flux, I only have electronics flux right now.

This may be a dumb question, but do you use the same Tin wire as the one you use to solder electronics?

I also read about people succesfully using JB weld to fix those cracks
 
I'm not saying to do this, but I have used JB weld in a carburetor before and it held up well to the fuel, at least for the year until I sold the bike.

I tried soldering the overflow tube on my 360 carb bowls but could never get it to stick to the brass.

I'm surprised someone doesn't make these new to press in.
 
advCo said:
I'm not saying to do this, but I have used JB weld in a carburetor before and it held up well to the fuel, at least for the year until I sold the bike.

With Quadrajet carbs, there are a couple of places where they plugged the bores to jets at the factory. The common fix is to epoxy (JB weld) over those plugs to stop the eventual leaks. It's a legit and acceptable fix.
 
irk miller said:
With Quadrajet carbs, there are a couple of places where they plugged the bores to jets at the factory. The common fix is to epoxy (JB weld) over those plugs to stop the eventual leaks. It's a legit and acceptable fix.

Second this. I have used a little JB weld to repair a cracked overflow tube and have had long-term success.
 
I'm gonna go for the JB weld method then! sounds easier than soldering.
And since I treated my rusty gas tank with some Tank cure epoxy sealant anyway, I don't see why it would be a problem to have a little epoxy in the bowls.
 
Anyway, here is a quick pic of the build status, pretty happy of the look so far
 

Attachments

  • cb350f tom.PNG
    cb350f tom.PNG
    979.2 KB · Views: 232
tahitianrider said:
Oh yeah I see what kind or soldering iron you have, dremel has a butane one like that and it looks really nice, always though about getting one for working on the wiring harness of the bike, on the bike.
I'll need to find acid flux, I only have electronics flux right now.

This may be a dumb question, but do you use the same Tin wire as the one you use to solder electronics?

I also read about people succesfully using JB weld to fix those cracks
I've also read that JB weld doesn't last. I used plumbing solder, which has acid core. The acid flux is not expensive, nor the solder. Get a flux brush while you are at it. I used "Ruby" paste flux, which is what I also use on plumbing. A good thing about soldering is that if there is still a small leak, you can re-flow. Once you have used the JBWeld, I doubt you could ever get it clean enough for soldering.
 
JB weld, Marinetex, and others are fine for intermittent exposure to gas, and even work in fiercely hostile applications, (like exhaust ports!) but don't seem to be permanent submerged in gas. Soldering is really quite easy and is a permanent repair. Check out some you tube vids. Regular electric or plumbing solder is fine, as apposed to silver soldering which is the same but needs a lot more heat. A propane torch would be great. You will need a fair quantity of heat, but not a lot of temperature as "soft" (electric or plumbers) solder melts pretty easily. There are just a couple of things to know, but they are absolutely critical to meet with success. First is, the part(s) must be clean. Clean means free from oxidation, not just wiped off. This is where the flux comes in, and yes, you have to have it even though you may be using rosin or acid core solder. The flux is made so it cleans corrosion missed by mechanical cleaning (like the tiny amount you can't see) when it heats up. Second is, you have to heat the part(s) you are soldering up to the point that they are hot enough to melt the solder without the flame being present. So for something like your vent tubes, you would clean the tubes, apply the flux, and play the flame from the torch on the tube briefly, remove the flame and test to see if the solder melts on it. If not, repeat application of the flame, remove the flame and try the solder again. Repeat until the solder melts freely and flows into the crack. If any manipulation of the solder is needed, you can re apply the flame, but only with extreme care. The solder will follow the heat, so if your crack is filled on one end but not the other, heat the "other" end of the tube patiently until you can add solder to that end. It takes a little practice, but as long as you conform to these two principles you should meet with success. If there is a part three, it is to be very careful to not overheat the parts. You can solder with an oxy/acetylene rig, but it is WAY too hot if you are not an expert with both soldering and the torch setup. If there is a part four, it is to use as little solder as possible. Once it looks like your crack is filled, stop at once; you are done. Adding solder will simply try to fill the tube.
 
Back
Top Bottom