Follow along with the video below to see how to install our site as a web app on your home screen.
Note: This feature currently requires accessing the site using the built-in Safari browser.
We noticed you are blocking ads. DO THE TON only works with community supporters. Most are active members of the site with small businesses. Please consider disabling your ad blocking tool and checking out the businesses that help keep our site up and free.
Thanks Jadus
im glad you like how its turning out so far. I would go full 12v if I had the money, ive got less than 700$ in this to date and will probably have under 1k in when done. I will stick with the 32mm vm for now but will add a 34mm and better reeds at some point. I will re make the expansion chamber when I do all that too as the current pipe is for low torque ( not the pipe in the software program dialed into 7000rpm ) this pipe is made to work with stock carb and porting for now.
oh and im going to go with premix as I don't trust the pump and don't want a tank. it will be for short rides anyway. I can make a provision for a small place under the seat to carry a small bottle of oil if I have to fill up. may not get the mix right like that on the road but it wont hurt that much.
Awesome technique with the expansion chamber there.
Yeah I went with premix as well and carried a small bottle of 2 stroke oil under the seat. Then I just got a mix app for my phone so I could always get roughly the right ratio to the amount of fuel i filled up with if I couldn't at home with a more controlled measure
that is a great idea to use an app to calculate the mix. ill look into that.
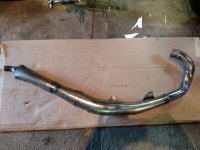
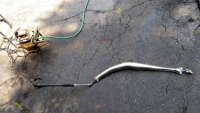
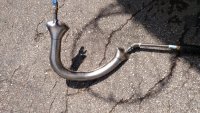
some more updates. had to add a silencer so I hydroformed a small part, cut the end of the pipe some and added the stinger inside the cone ( I believe bell mentions this in his book ) and added a curved tip that makes a gap from the end of the stinger inside to form the resonator / silencer. great app I found on the web for muffler design for 2 strokes that simulates all kinds of muffler designs and the resulting frequencies it dampens.
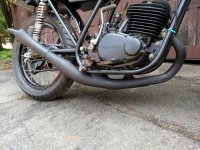
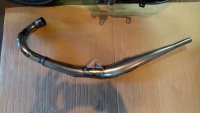
added some flat black header paint.. looking better. next is finishing the wiring , rebuild the carb, foam the seat and im ready to run I think
Exhaust pipe process looks super cool, but is there a way to do it so it doesn't look like a blown up mylar balloon? Just curious, because I would love to try it out but I don't necessarily want that look at the seams.
Exhaust pipe process looks super cool, but is there a way to do it so it doesn't look like a blown up mylar balloon? Just curious, because I would love to try it out but I don't necessarily want that look at the seams.
the hydro-forming is pretty cool and actually easy with the tools. you can make the seams go away by bending the edges over toward each other and making a lap joint. weld it good and clean, expand it with a pressure washer and then carefully grind the remaining weld down some.
I personally like the seam as it loos like vintage factory exhausts that came on motocross bikes of the era. they used the same method to make pipes back in the 70's. way less work than rolled cones and a smoother appearance. that silencer at the end I added makes it look worse than the seams actually look on the pipe. I may change that depending on the sound I get from it.
ive got another pipe im making for a 60's arctic cat sled. I may try the lap joint method to see how it goes.
there is several free programs available I found as well as the one I posted the image of that I paid for to design expansion chambers. pretty simple really. I use autocad to layout the actual template and convert the diameters to half the circumference as the cut pattern.
the bends get tighter by about 10% when forming and it takes only about 500-700 psi with a pressure washer. mine can go to 1750psi but its not needed. in fact my house water pressure half formed the shape before I pulled the trigger on my pressure gun to shape the pipe. a TIG welder is key I think to get 20ga or 18ga steel to have a clean small bead like it needs. 35-42 amps and a 1/8" tungsten rod is all it takes. practically no filler rod at all to fuse the edges.
I cant wait to make another chamber , just need another bottle of Argon and some more 20 ga steel.
thanks , i like the look of this pipe. i will make another with a fatter mid section when i get a better carb and reeds. you should try the hydro forming. it should be a thread on here maybe. i found 3 free pipe programs and one you have to pay for. did a lot of reading and even found a 2 stroke silencer design program.
a tig welder is key i think and a pressure washer, thats all other than the ability to cut the sheet metal.
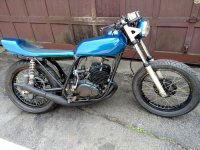
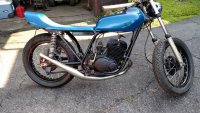
finally have it finished for the most part and riding. its a Beast! comes on the pipe early and lofts the front . added a minicell foam seat finally , sanded and shaped it and glued it down.
needs adjustments and a little jetting tweak still
Man, that looks like the most fun bike I've seen in a while. Great example of what I think most of us are all looking for in a bike. . . .minimum hardware and maximum function. Nicely done! (not too sure about those foot pegs though- just sayin'. ) Appreciate the write up - you may have inspired me to try some hydro-forming - been plotting to do it for a while now - project #867!
thanks so much guys. I had a lot of fun making this project. light minimal big bore vintage 2 stroke street toy is what I was after. got the jetting sorted a bit better and it is smooth but pulls hard, still getting used to its wheelie power band lol
I agree with that too. I tried to mount rear sets but have not found a way and still have a kick starter, no electric on these. that's one area I will tinker on in time.
This site uses cookies to help personalise content, tailor your experience and to keep you logged in if you register.
By continuing to use this site, you are consenting to our use of cookies.

")