
We noticed you are blocking ads. DO THE TON only works with community supporters. Most are active members of the site with small businesses. Please consider disabling your ad blocking tool and checking out the businesses that help keep our site up and free.
You are using an out of date browser. It may not display this or other websites correctly.
You should upgrade or use an alternative browser.
You should upgrade or use an alternative browser.
Guzzi Cali Cafe - Build Thread
- Thread starter Bevelheadmhr
- Start date
were the carbs sods blasted or was that powder a very fine glass bead?
Rusnak_322 said:were the carbs sods blasted or was that powder a very fine glass bead?
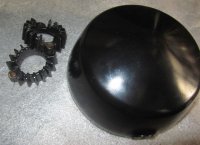
Used a fine silicone bead, as that's what my local machine shop is set up for. I'm not allowed to bead blast any steel components in their cabinet, as doing so somehow pollutes the blasting medium.
CarbsAndCylinders
Careful With That Axe Eugene
What a great build!
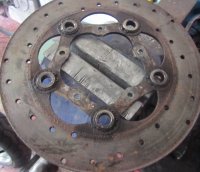
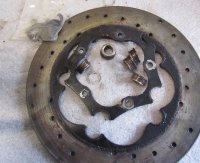
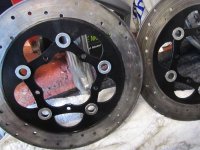
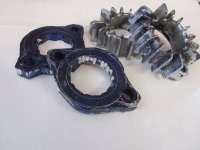
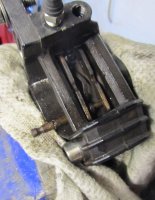
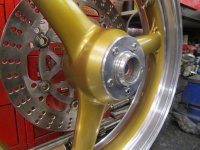
The cast iron floating Brembo discs were looking very tired and rusty, being cast iron they're always going to rust, but nevertheless they could be cleaned up.
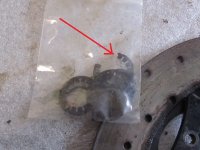
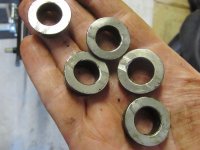
The floating rotors are held to the alloy centres by steel bobbins which are in turn held in place by a sprung washer (called Belleville washers) and circlip. The front discs came apart easily, while the rear was badly corroded and put up more of a fight. A couple of the sprung washers were rusted through and fell apart, so it turned out to be one of my better ideas to rebuild the discs. The tops of the rear discs bobbins were badly scored too, they'll need to be skimmed in the lathe as will the rotors to clean them up. The centres are alloy, so I'll bead blast and paint them later.
The floating rotors are held to the alloy centres by steel bobbins which are in turn held in place by a sprung washer (called Belleville washers) and circlip. The front discs came apart easily, while the rear was badly corroded and put up more of a fight. A couple of the sprung washers were rusted through and fell apart, so it turned out to be one of my better ideas to rebuild the discs. The tops of the rear discs bobbins were badly scored too, they'll need to be skimmed in the lathe as will the rotors to clean them up. The centres are alloy, so I'll bead blast and paint them later.
Attachments
Not been able to do much this week, though things should speed up at bit soon. I'll be hammering my credit card at the Stafford Classic show this weekend, when I'll order the alloy endurance tank I want and new rims and spoke sets.
I have painted and reassembled the discs, had to do it twice, as the high temperature paint I used the first time turned out to be too delicate, I had WD40 on my fingertips when I handled the painted parts, it lifted the paint better than paint stripper. Started again, this time using satin black Hammerite, which seems to endure high temps surprisingly well according to the internet.
My masking of the disc edges was rubbish, but that's ok, as they'll be tidied up when the discs are skimmed on the lathe, which needs them to be assembled first.
Also, before a couple of parts go off to be chromed, including the exhaust collets, I used them as a template to mark a couple of scrap pieces of 10mm billet plate, and made a start on hacksawing and filing new collets from the plate. It would be much quicker to ask my mate to shape them on his miller, but sometimes I just want to do it myself and see how it turns out. That said, I may decide not to use them in the final build..
Attachments
The big news this week is that I've bought the alloy endurance racing tank I've wanted for months, should be delivered in a week or so, while a couple more small parts have been bought too.
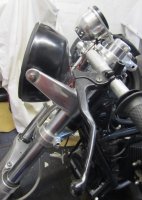
Firstly, the original headlamp brackets didn't look quite right, so they've been replaced with a pair that look more café racer-ish. Fitting the front forks on the frame, confirmed that the headlamp shell definitely needs to be chromed, which I'll take to the chromer in a couple of days time. The owner of which used to be in charge of chroming at Roll Royce/ Bentley, he's not the cheapest but I'm assured the quality is excellent.
Also bought a 50mm thick disc of billet alloy, which will be used to make (a hopefully) cool part for the engine...
Attachments

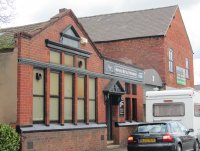
I took the parts to the chromers where I was told they'd be ready for collection in 4 weeks. While I was there another customer was collecting his newly chromed parts from a KH500, and I have to say they did look good. They work out of what used to be an old school house or maybe a chapel, I noticed a nice bit of stone work over the entrance, it was build in the 1890's..
Back to the bike... while I eagerly wait for my tank to arrive, there are still lots of small jobs to do..
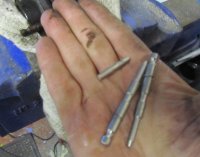
Replace the old rusty brake pins with my shiny stainless pins, and polish the caliper socket head bolts too..
Back to the bike... while I eagerly wait for my tank to arrive, there are still lots of small jobs to do..
Replace the old rusty brake pins with my shiny stainless pins, and polish the caliper socket head bolts too..
Attachments

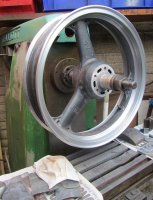
The discs have been cleaned up on the lathe, the front two discs look good, but the corrosion on the rear disc is pretty bad in places where the pads don't touch, but we did the best we could. I'll probably end up fitting replacement discs all round from EBC at some point, but at £140 each, that can wait.
That done, I machined a few more stainless bolt heads before they went back on the bike, and cut a small bevel on the socket heads, just because they look better that way..
I'd been holding off refitting the swing arm, while I waited until the wheels were rebuilt, as the whole back end would be needed when a new billet mount was made to hold the modern Brembo caliper I recently bought. I changed my mind, so for now I'll be using the original mount and caliper, which meant I could go ahead and refit the swing arm at last.
Attachments


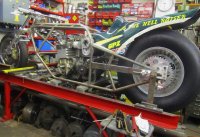
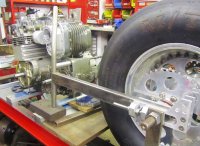
BTW, while the Guzzi is slowly coming together, we've not been idle.. there's a new project that I call 'The Spares Bike'. Its being built out of all the spares, take off parts, unused stuff that have accumulated over the years from a couple of old drag bikes, of which I own 50%.
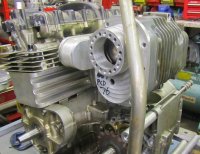
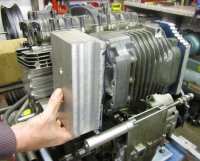
We're building a 80's era big block Kawasaki Zed based drag bike... with a supercharger..")
We're building a 80's era big block Kawasaki Zed based drag bike... with a supercharger..
Attachments
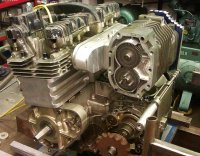
The block isn't water cooled, its a home made billet block, made by Jeff, who is doing most of the work on the spares bike... I'm just the idiot with a camera
ok major thread diversion ..
Over the years our (that's me and Jeff) main drag bike project has been changed and changed and changed again... different front end, different back wheel, different crank, different blower, manifold, frame.. there's not much left of the original drag bike that was bought five or six years ago.
All the take off parts were carefully stored away, maybe they'll come in handy one day, or someone will pay good money for them? Well, there's not much of a market for old Zed drag bike parts, while one chap wanted to buy everything as long as Jeff built him a running bike for nothing.. nope that's not gonna happen.
Roll forward to late last year when after a lot of hard work through the summer, Jeff finally completed a much needed extension to his workshop, which in turn meant he could squeeze in a second frame jig into the workshop.
Since I own a share of all those old Zed parts, we discussed building another Zed based drag bike, something simple, you know just a bit of fun, get us out on the track, and maybe sell it afterwards and put the money raised into the main 'comp bike'... sounds good, but I was sceptical, as Jeff tends to get distracted into other projects before the current one is ever finished. Would this be the case again I asked?
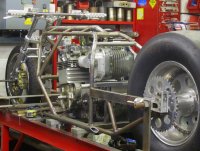
Oh no, it wont take long to build I was assured and it wouldn't cost much as we already had 99% of the parts needed...front end, engine cases, blower, magneto.. just need to knock up a frame, make a few parts and away we go.. Apart from a suitable 10 inch rear wheel and drag slick.. which I just happened to have at home, along with matching frame rails and adjusters...
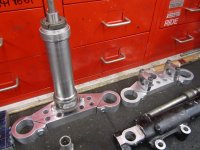
That was over xmas, since when progress has been a bit stop start (no surprise there), but a frame has been made, yokes machined, and old pair of GPz forks used and so on..
Here are a few pics of the build..
ok major thread diversion ..
Over the years our (that's me and Jeff) main drag bike project has been changed and changed and changed again... different front end, different back wheel, different crank, different blower, manifold, frame.. there's not much left of the original drag bike that was bought five or six years ago.
All the take off parts were carefully stored away, maybe they'll come in handy one day, or someone will pay good money for them? Well, there's not much of a market for old Zed drag bike parts, while one chap wanted to buy everything as long as Jeff built him a running bike for nothing.. nope that's not gonna happen.
Roll forward to late last year when after a lot of hard work through the summer, Jeff finally completed a much needed extension to his workshop, which in turn meant he could squeeze in a second frame jig into the workshop.
Since I own a share of all those old Zed parts, we discussed building another Zed based drag bike, something simple, you know just a bit of fun, get us out on the track, and maybe sell it afterwards and put the money raised into the main 'comp bike'... sounds good, but I was sceptical, as Jeff tends to get distracted into other projects before the current one is ever finished. Would this be the case again I asked?
Oh no, it wont take long to build I was assured and it wouldn't cost much as we already had 99% of the parts needed...front end, engine cases, blower, magneto.. just need to knock up a frame, make a few parts and away we go.. Apart from a suitable 10 inch rear wheel and drag slick.. which I just happened to have at home, along with matching frame rails and adjusters...
That was over xmas, since when progress has been a bit stop start (no surprise there), but a frame has been made, yokes machined, and old pair of GPz forks used and so on..
Here are a few pics of the build..
Attachments
Tune-A-Fish
BOTM LOSER Proudly Deplorable
So much in this, makes me feel good people are still making stuff from the raw... Racing in the Raw!!
You guys have a lota Chucks workin in that shop These drag bikes scare the bejesus out of me but I would still love to launch one.... in a diaper
You guys have a lota Chucks workin in that shop
These drag bikes scare the bejesus out of me but I would still love to launch one.... in a diaper That one will be run on Methanol, should make about 250 ish BHP, so it wont be that quick, but should be fun. The main project bike is a lot more involved, it will be run on Nitro and will make 800 to 1000 bhp depending on how much nitro is used before the engine grenades.. that's if it ever gets finished..
Attachments
K
Kamn
Guest
God, thats all kinds of beautiful that you have going on there!
Thanks for sharing this
Thanks for sharing this
Your welcome, I should probably start a new thread for all the weird engineering stuff we mess about with. For example, last weekend on the way to the big classic bike show, we stopped off to collect a gearbox that Jeff had bought on ebay for £10. The gearbox was a 2 speed auto off a 1956 Chrysler of some description, with no idea if it was damaged. Now, neither of us have a yank tank, so why buy a 60 year old gearbox?
Which is what I asked Jeff before we set off... Answer being 'I want to see how it works... ' ok, but why? I replied... Jeff thinks that he may be able to use the 2 speed transmission shafts and gears to make a 2 speed transmission for a drag bike...
He may spend weeks or months working on it, then decide it wont work, or maybe it will, who knows.
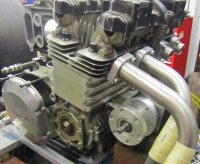
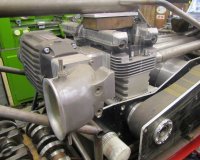
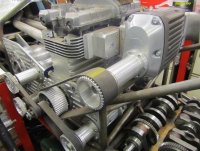
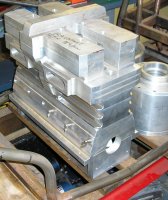
Here's one of Jeff's somewhat over ambitious projects...making his own engine..
Which is what I asked Jeff before we set off... Answer being 'I want to see how it works... ' ok, but why? I replied... Jeff thinks that he may be able to use the 2 speed transmission shafts and gears to make a 2 speed transmission for a drag bike...
He may spend weeks or months working on it, then decide it wont work, or maybe it will, who knows.
Here's one of Jeff's somewhat over ambitious projects...making his own engine..
Attachments
K
Kamn
Guest
well, now that you have shown us that picture of the engine he has started building and making, you will have to keep us updated of any headway or work done to it. It cant be unseen now
CarbsAndCylinders
Careful With That Axe Eugene
Now, I am completely blown away. This is some amazing stuff!


