mini chrome pilot/idiot light set

wowbagger

Been Around the Block
So, I'm making sets of these now and thought I'd throw them up here to see if there was any interest in them. They are a set of four (red, amber, green, blue) 3mm 12V LEDs in chrome or black bezels. No resistors are needed. The black bezels are powder coated with a satin/flat black finish. I suppose I could entertain custom bezel color requests as well.

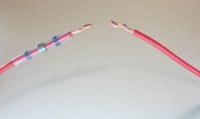
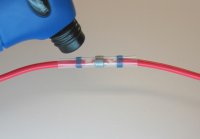
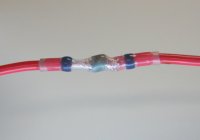
The plug and play set have all connectors, insulators and needed diodes so that they will plug directly into the stock wire harness on all Honda SOHC bikes. They also come with a set of 8 heat shrink soldering butt connectors since the wires will need to be cut so that the chrome bezel and nut can be properly installed. Once installed just strip a bit of the insulation off both ends, insert them into the solder connector and heat it until it seals.

If you have questions or would like to order a set send me a PM.

Specs:
3 MM 12 volt LED's with white diffused lens
-Each LED is 20ma and uses 0.24Watts
-Viewing angle 140°
-MCD=1000
Bezel fits in a 1/4" pilot hole
12" 20 gauge wire leads

Pricing:
I sell these LEDs a few different ways.

Bare Wire Sets:
$15 - Set of 4 (oil, neutral, high beam and one turn) with 12" bare wire leads
$18.75 - Set of 5 (oil, neutral, high beam and two turns) with 12" bare wire leads

Honda SOHC4 Plug and Play:
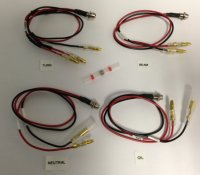
$25 - Set of 4 (oil, neutral, high beam and one turn) with 12" wire leads terminated with the correct 3.5mm bullet connectors for the Honda wiring harness
$31.25 - Set of 5 (oil, neutral, high beam and two turns) with 12" wire leads terminated with the correct 3.5mm bullet connectors for the Honda wiring harness

Other mix and match options:
$3.75/LED for the bare wire style
$6.25/LED for SOHC4 plug and play style

Shipping is $4 anywhere in the US. PM me for international shipping prices.

Let me know what you want.

Chrome Bezels:

419409_10151930212894867_1971510036_n.jpg

970856_10151930212919867_1672657531_n.jpg


Black bezels:
IMG_2109_zpsab4e0be8.jpg

IMG_2113_zps8dfeae1b.jpg


SOHC4 Set:
Pilot_LEDs_SOHC_PnP_zps1152b00e.jpg


Installed Eye Candy:
Pilot_LEDs6_zps3007f9df.jpg


Night shot video:
http://www.youtube.com/watch?v=epcjqnE8OoQ#ws
 
that's one of the generations of the CB77 superhawk gauge. I have an extra one if anyone wants to pick it up. Send me a PM.
 
Yeah, they are a pre-1964 gauge set from a cb77 Superhawk. I'm rigging them to work on my 1971 CB500.
 
If the internet is to be believed, the cb77 and the 71-73 cb500 have the same tach and speedo ratios. So, to "rig" them you'll need the gauge, the gauge seal, the headlight bucket, headlight, two gaskets and possibly fork ears. You'll also have to decide what to do with the holes on the headlight bucket where the cb77 high beam light and the headlight switch are.
 
The plug and play sets are ready to go. All diodes, connectors and insulator boots are preinstalled. They also will come with a set of 8 heat shrink solding butt connectors so that the bezel nut can be removed and mounted correctly.

To install:
1 - Drill a 1/4 inch hole in the desired location for each LED.
2 - Cut the black and red wires leaving enough room to slide the wires still attached to the LED into one of the solder connectors.
Note: I recommend cutting and installing one LED at a time so as not to confuse which wire connector goes to which LED.
3 - Remove the bezel nut
4 - Feed the wires on the LED through the desired hole and secure the bezel in place with the bezel nut
5 - Stripe about 1/4 inch of insulation off of both ends of the red wire at the point where you cut it in step 2.
6 - insert both stripped ends of the wire into one of the solder connectors until the stripped wire sections overlap slightly
7 - Without moving the wires, heat the solder connector with a heat gun (or hair dryer) until the solder joint melts and splices the wires back together
8 - Repeat steps 5-7 for the black wire.

To connect to the wire harness:
Turn signal indicator:
- Disconnect the orange and light blue wires that feed the original turn indicator
- Plug one red male bullet connector into the orange wire's female connector
- Plug the other red male bullet connector into the light blue female connector
- Plug the black male bullet connector into the spare green ground female connector.
This is the connector that the green ground wires from the two turn signals also connect to.
High beam indicator:
- Disconnect the dark blue and green wires that feed the original high beam indicator
- Plug the red male bullet connector into the dark blue female connector
- Plug the black male bullet connector into the green ground female bullet connector
Oil pressure indicator
- Disconnect the black and dark blue/red striped wires that feed the original oil pressure indicator
- Plug the red male bullet connector into the black female bullet connector
Note: This is not a typo. Black is the power feed and therefore needs to connect to the red wire for the new LED
- Plug the black female bullet connector into the dark blue/red striped male connector
Neutral indicator
- Disconnect the black and light green/red striped wires that feed the original neutral indicator
- Plug the red male bullet connector into the black female bullet connector
Note: This is not a typo. Black is the power feed and therefore needs to connect to the red wire for the new LED
- Plug the black female bullet connector into the light green/red striped male connector

Test all four indicator lights.
- If any of the lights do not come on check your connections first.
- If the Oil and Neutral lights both do not come on then unplug one of the red male bullet connectors and plug it into a different black female connector that is available.
On some of the later models the Oil and Neutral LED indicators will only function if they are fed from separate circuits.
 

Attachments

  • Pilot_LEDs_SOHC_PnP.jpg
    Pilot_LEDs_SOHC_PnP.jpg
    189.3 KB · Views: 1,012
I still have these available. I'm also making wiring harness adapters for early Honda bikes. PM me if you're interested.
 
Here's a few images to show how the self soldering heat shrink tubes work. I ship these tubes with the SOHC4 plug and play kits since the nuts won't fit over the bullet connectors.
 

Attachments

  • tube1.JPG
    tube1.JPG
    67.2 KB · Views: 949
  • tube2.JPG
    tube2.JPG
    91.2 KB · Views: 944
  • tube3.JPG
    tube3.JPG
    57 KB · Views: 930
I've got a local buddy that is willing to powder coat the bezels for me now. I'm offering chrome and black by default but I may be able to do other colors as well. Check out the first post for photos. http://www.dotheton.com/forum/index.php?topic=50157.0
 
Neat idea to have plug and play, many people can't build their own LED lights
I fill the tops with clear epoxy, that way they are OK to use 'outside' and also have more of a lens effect
 
I epoxy the bezel onto the LED already to make them waterproof. I will have to try filling in the tip on a set and see how that affects the light dispersion. Thanks for the idea.
 
I didn't like the little 'cup' formed between LED and bezel.
After working on bikes and other equipment that 'lives outdoors' I know the long term effects won't be good if water can stand anywhere
 
Most of the sets I've installed myself, I've disassembled the gauge and mounted them behind the glass. So, direct water exposure hasn't been an issue. I'll play with a set next week and see if I can get it to fill clear enough that I'd be comfortable asking someone for money for it.
 
Back
Top Bottom