re-locating battery

Tad

Been Around the Block
Hi, Have decided to move my battery as it needed renewing, also that I can fit an after market air filter at some point. Here's what I did in case you want to move yours.
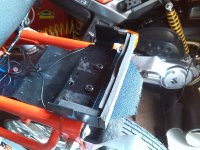
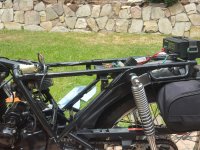
After removing L/h panel and battery I removed the battery carrier by taking out the four self tappers that hold it to the air box.
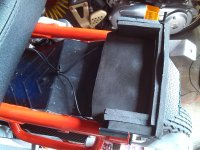
Next removed the seat and using the cross member at the rear of the frame I drilled two 6mm holes in back of carrier so that battery will lay down bolted to it.
Make sure that you use flat headed screws as not to damage the battery when in place.
Check that the battery carrier doesn't foul the inside of the seat hump, a bit of trial and error.
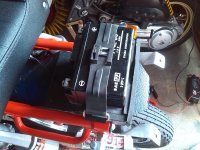
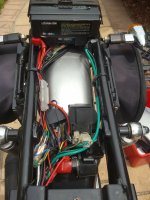
When I was happy with the carriers position and it was tight I used some sticky backed foam padding to pack out the holder to take smaller battery,
Lengthened the battery leads to reach and replaced the seat.
 

Attachments

  • bat2.jpg
    bat2.jpg
    1.3 MB · Views: 389
  • bat3.jpg
    bat3.jpg
    1.3 MB · Views: 372
  • bat4.jpg
    bat4.jpg
    1.1 MB · Views: 387
  • bat5.jpg
    bat5.jpg
    930.7 KB · Views: 383
Is it feasible to have the battery lie on its back like that? Does it not have to rennai standing upright for the plates and acid to do their thing?

If it is ok then I'll definitely do the same as you !
 
It should be OK as the original was nearly upside down and that was alright.
Also as their sealed for life the acid isn't going anywhere.
 
What I have done is turn the battery over so that the terminals are at the bottom. this keeps wires out of the way when replacing the seat.
 
Must be running a gel cell battery tad. Mine was conventional and could not do this unless I replace it with one like yours. Will be getting a lithium style light as battery maybe as they are so light and small. $100 well spent


Sent from my iPhone using Tapatalk
 
Hi, Not sure of the amperage the wire is but you should extend them with like for like. A motor factor or local garage should be able to help you out with a couple of short piece's of wire.
I have removed starter switch along with solenoid and related wiring, so only needed two length's wire same as lights/flashers etc.
You should also solder the heavier red wire as this feeds the started motor.
Tad
 
Tad said:
Hi, Not sure of the amperage the wire is but you should extend them with like for like. A motor factor or local garage should be able to help you out with a couple of short piece's of wire.
I have removed starter switch along with solenoid and related wiring, so only needed two length's wire same as lights/flashers etc.
You should also solder the heavier red wire as this feeds the started motor.
Tad

Thanks
 
Well, it's the bike that just keeps giving. Having read all I could on battery relocation I decided today was the day to collect all the parts required; new battery, leads, connectors, foam fill and cable ties. I removed the side cover and retaining strap and what do I see, a Lithium Ion Battery (Skyrich HJT7B-FP)! This mod's just saved me $157aud. (A years supply of petrol!).

My neighbor comes to see what I'm doing and gives me the power lead (left over from a caravan battery mod). I might as well do it today.

Remove the air box and unscrew the battery mount. Drill holes and place on back cross member.

What cable length do I need to fabricate? I re route the earth lead and it reaches the terminal comfortably! Ok now for the positive lead. Can't leave the solenoid and CDI unit where they're currently mounted. Reroute the lead from the starter to the RHS of frame (along brake light switch lead). Reverse both solenoid and CDI unit in their rubber mounts and attach to the rear fender left side mounting bolt (see pic). Hmmm, not far to the battery terminal. And yes it also fits comfortably. Return cable to neighbour.

Cable tie flasher relay and other joiners to centre member under tank.

All clean and neat. I haven't removed the side cover mounts but did put SS M6x12 bolts into mounting screw holes to clean it up a little bit.

Total cost of battery relocation mod $0 and three hours (which included two cups of coffee with "She who must be obeyed" and a Mr Sheen cleanup).

I'm very happy with how neat and clean the finished job looks.

I hope this and the photos assist anyone else contemplating this mod. (Also added an as purchased pic for comparison. Much cleaner!)

PS. You will notice "other cabling", one set (with a peg fuse holder) is for a trickle charger port, now relocated under the battery, relay for Stebel dual air horn (every vehicle should have one) and light cable for accent lighting which is mounted under rear fender and left and right side under fuel tank.
 

Attachments

  • 20161119_123100.jpg
    20161119_123100.jpg
    2.8 MB · Views: 367
  • 20161119_114643.jpg
    20161119_114643.jpg
    2.3 MB · Views: 352
  • 20161119_114549.jpg
    20161119_114549.jpg
    1.7 MB · Views: 399
  • 20160814_171434.jpg
    20160814_171434.jpg
    3.1 MB · Views: 390
Back
Top Bottom