Yamaha SR250 - A clean standard build

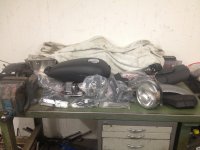
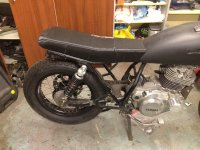
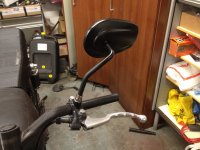
Got to a point yesterday where I said fuck it, no more excuses, its time for the 'strip, bag 'n tag'. In the past I have been much better about labeling everything - but I know the SR so well now I will get it back together without too much trouble.

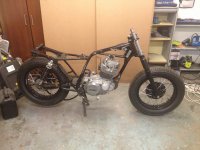
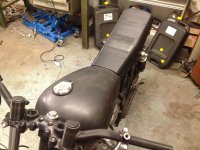
She looks pretty damn naked! Ahead of me it a whole lot of frame tidying, bead blasting, sanding, paint prep, painting, then re-assembly ;D
 

Attachments

  • IMG_7822.JPG
    IMG_7822.JPG
    2.8 MB · Views: 284
  • IMG_7825.JPG
    IMG_7825.JPG
    2.3 MB · Views: 278
JadusMotorcycleParts said:
Sweet, good to know. Is that with stock bore? Then one could presume that the overbores would work too? On that note, how different are the pistons side by side?

The pistons are different, but the rings are shared.
 
I drove for 5 hours today to go and visit one of my suppliers. He has been pretty bad with communication and I suspected it was because he is super busy and maybe that I write to him in English. So I figured it would be worth driving, shaking hands and meeting the guy and have a good chat with him. Luckily my Swedish is at a very good level speaking wise - I just write so badly its embarrassing - so that made the conversation pretty easy. And he was super busy - does stuff for all sorts of Swedish companies, Volvo included. But he'll fit my job into the schedule.

Anyway, was well worth the trip. It was such an impressive workshop - 3 different hydraulic, digitally indexed tube bending machines, lathes, mills, all sorts of welding equipment and shelves and shelves of different sizes and types of tube. He will make the exhaust for me and a few other parts, super capable of doing most things actually.

Really cool that he was into bikes too! So funny in this industry - one of my other suppliers is also into bikes! It means they are really passionate about doing stuff for other bikers. This guy had semi-raked Harley and a SR400 and was telling me how much he regretted selling his old XT500! Its awesome to be doing business with people I can meet and talk to and who take pride in their work :D
 
Where's he located? I'm thinking about doing a universal type of frame for my final project at uni but we don't have good enough tools in our workshop.


Sent from my iPhone using Tapatalk
 
Eleganten said:
Where's he located? I'm thinking about doing a universal type of frame for my final project at uni but we don't have good enough tools in our workshop.

Hes up in Valberg. He has made some Sportster hard tail kits for a guy out of Halmstad too, so very capable of something like that.
 
Yesterday I took delivery of a 7.5hp compressor with a 180L tank :) This should do the trick for the blasting that is to come. Only problem was getting down to my basement workshop all on my own. The delivery guy couldnt get it down the ramp for me and had to run. So I rigged up a two strap system where I could let alternate ones go 5cm at a time. Worked a treat, just took a while.
 

Attachments

  • IMG_7867.JPG
    IMG_7867.JPG
    1.2 MB · Views: 263
  • IMG_7868.JPG
    IMG_7868.JPG
    3.7 MB · Views: 262
Today I glued together another seat prototype. Still not quite right but very close now. I like the lines and most of the measurements underneath line up with the frame details.

I also welded up some of the exhaust header on the XS750 I am working on for a customer. Trying harder to get some neater welds with the gas welder and I got one that came up alrite.
 

Attachments

  • IMG_7935.JPG
    IMG_7935.JPG
    2.9 MB · Views: 258
  • IMG_7937.JPG
    IMG_7937.JPG
    998.1 KB · Views: 260
  • IMG_7939.JPG
    IMG_7939.JPG
    2.3 MB · Views: 253
Today I got to test fit the machined prototype I had made for the finned oil filter cover. Fits perfect. Really cool to see it right next to the plastic 3D printed prototype I made too. Really helps with product development.

Looks like it will sit out in the nice cool breeze when cruising - without being too obtrusive.
 

Attachments

  • IMG_7927.JPG
    IMG_7927.JPG
    994.7 KB · Views: 264
  • IMG_7926.JPG
    IMG_7926.JPG
    2.4 MB · Views: 254
  • IMG_7925.JPG
    IMG_7925.JPG
    2.8 MB · Views: 256
  • IMG_7924.JPG
    IMG_7924.JPG
    2.6 MB · Views: 242
  • IMG_7870.JPG
    IMG_7870.JPG
    2.4 MB · Views: 254
I also got the Harley mirrors I ordered in the mail. For some reason I really like this shape Harley has come up with. On a bike like this, I didn’t want round ones, didn't want square/rectangular ones, or tacky chopper style ones or CNC billet ones either, so it had to be the Harley style. A simple bent rod then an elegant shape. I have ridden without mirrors before and sure, the bike looks waaay cooler, but I really miss being able to see behind me and beside me without turning my head. Practicality out weighs style here for me. Might take them off for any photos etc though.

Anyway, of coarse being Harley, they had imperial threads (3/8''s I think). So I had to chop the threaded end off and weld on the end from the butt ugly stock mirrors. No harm done by sacrificing these ;)

I ground a large chamfer so I could get a deep strong weld. Welding something this chunky generates a lot of heat though so I was careful not to scorch the rest of the mirror. I have a little finishing to do still - its a bit rough looking and I only had matte black spray paint so it doesn't really match the rest of the mirror. So I'll do some more filing and paint it with gloss again when I get some.

I am considering threading the other mirror instead - with a M10x1.25 die. If I can find one for a decent price, this might save the effort with welding...
 

Attachments

  • IMG_7953.JPG
    IMG_7953.JPG
    2.6 MB · Views: 255
  • IMG_7951.JPG
    IMG_7951.JPG
    1.9 MB · Views: 241
  • IMG_7945.JPG
    IMG_7945.JPG
    1.9 MB · Views: 247
  • IMG_7944.JPG
    IMG_7944.JPG
    1.7 MB · Views: 246
  • IMG_7941.JPG
    IMG_7941.JPG
    1.8 MB · Views: 256
  • IMG_7940.jpg
    IMG_7940.jpg
    729.7 KB · Views: 240
  • IMG_7910.JPG
    IMG_7910.JPG
    2.3 MB · Views: 256
Today I started taking some more stuff off the bike. I wanted to get the chain off - requiring me to take off the alternator side engine case. Since I bought my first impact driver over 7 years ago, I have sworn it has been my best tool when working on old bikes. Put in the right bit, set it for the right direction and bash away. Never had a problem before, it has always got corroded bolts loose for me.... Until this one! It was so stuck that the Philips bit stripped the whole screw head. So I drilled the head off so I could at least get the cover off. Then I grabbed the remaining screw with some beefy vice grips and tried unscrewing it... No joy. The entire screw snapped right at the point it enters the engine case.

Now I'll have to get a bolt extractor kit. Never used (or had to use) one before so I hope it works on bolts as small as M6!
 

Attachments

  • IMG_7954.JPG
    IMG_7954.JPG
    2.3 MB · Views: 257
  • IMG_7956.JPG
    IMG_7956.JPG
    2.2 MB · Views: 261
I've never had luck with an extractor where the bolt is actually stuck and wont turn. Left hand drill bits are the way to go IMO.
 
doc_rot said:
I've never had luck with an extractor where the bolt is actually stuck and wont turn. Left hand drill bits are the way to go IMO.

Thanks for the tip man. So you just punch a center in the middle of the bolt and drill away? Any suggestion for diameter of drill bit for an M6? 5mm I would guess? Don't want to damage the thread in the cases if possible. Worst case I install a helicoil kit.
 
JadusMotorcycleParts said:
Thanks for the tip man. So you just punch a center in the middle of the bolt and drill away? Any suggestion for diameter of drill bit for an M6? 5mm I would guess? Don't want to damage the thread in the cases if possible. Worst case I install a helicoil kit.

I would start with a 2mm bit and work up to the 5, unless the bit is centered directly you are probably going to drill off some threads with the 5mm. Also i would soak the bolt in a 50/50 mix of acetone and ATF to help loosen it, alot of the time once you drill the middle out, the bolt turns out by the action of the drill bit turning anti-clockwise.
 
Thanks again for the tips doc. Should have hunted around harder for those left hand drill bits! Haha

It's always the unexpected things that you dont count on that kill the progress of a build. This damn screw!

The local hardware store didn't have any left hand drills but they did have a bolt extractor kit. So I thought I would give that a crack first. Was doing everything right (I think) then the worst possible happened. I was really trying to feel the tension on the bit but I guess they are more brittle than I thought - and it snapped! :mad: These fckers are hardened steel too, so this is actually the worst thing one can do when trying to remove a stuck bolt. Gaargh. Was pretty pissed. Now I gotta find a carbide tip drill or something. I dont think HSS bits will do it either. I rounded a couple of my standard ones before giving up for the day. This thing is fckn stuck! I'm gonna have to drill the whole thing out tomorrow and install a thread kit. If there's one thing I have learned in the shop, its that there is always a fix ;D

Pictures tell the story.
 

Attachments

  • IMG_7989.JPG
    IMG_7989.JPG
    2.2 MB · Views: 242
  • IMG_7985.JPG
    IMG_7985.JPG
    2.5 MB · Views: 256
  • IMG_7984.JPG
    IMG_7984.JPG
    2.7 MB · Views: 263
  • IMG_7983.JPG
    IMG_7983.JPG
    2.6 MB · Views: 268
  • IMG_7982.jpg
    IMG_7982.jpg
    3.4 MB · Views: 245
  • IMG_7980.JPG
    IMG_7980.JPG
    2.7 MB · Views: 253
  • IMG_7978.JPG
    IMG_7978.JPG
    857.3 KB · Views: 254
On a more positive note, I got all the parts for the Tank Leveling Kit sorted and actually shipped a few out to people on Monday ;D

I hope the install goes well for these first customers. They are like the Beta testers for my start up haha. I will stay in contact with them and then with their input, update any parts and/or instructions if needed.

If there's anyone else that wants to install one on their SR just send me a pm :D
 

Attachments

  • IMG_7970.jpg
    IMG_7970.jpg
    3.1 MB · Views: 269
  • IMG_7971.jpg
    IMG_7971.jpg
    2.7 MB · Views: 251
Unfortunately, your experience with the bolt extractor kit is fairly common. Left-twist drill bits like Doc said, or weld-on a nut to the remaining bolt (many times the heat of welding will break loose the threads) and use a socket wrench.
 
JadusMotorcycleParts said:
Thanks again for the tips doc. Should have hunted around harder for those left hand drill bits! Haha

It's always the unexpected things that you dont count on that kill the progress of a build. This damn screw!

The local hardware store didn't have any left hand drills but they did have a bolt extractor kit. So I thought I would give that a crack first. Was doing everything right (I think) then the worst possible happened. I was really trying to feel the tension on the bit but I guess they are more brittle than I thought - and it snapped! :mad: These fckers are hardened steel too, so this is actually the worst thing one can do when trying to remove a stuck bolt. Gaargh. Was pretty pissed. Now I gotta find a carbide tip drill or something. I dont think HSS bits will do it either. I rounded a couple of my standard ones before giving up for the day. This thing is fckn stuck! I'm gonna have to drill the whole thing out tomorrow and install a thread kit. If there's one thing I have learned in the shop, its that there is always a fix ;D

Pictures tell the story.

Yeah that why I don't use them. they always break off if the bolt is really stuck. Your only two options are to try and dremel it out with a carbide bit, or take it to a machine shop with an EDM or simular. Ive never been abel to drill one out with a carbide bit, plus shit can go south real quick if you are not deadnuts centered on that extractor. If youre gonna tear the motor down anyway I would just take it to a shop. good luck
 
Your advice saved me doc. It was too late to try you suggestion though zap, unfortunately.

I took a trip to a massive hardware store and bought a couple of drill bits and some dremel bits - thought I've give them both a crack. The drills, even the colbalt and titanium, as doc suggested, didn't do shit. Just made a mess around the hole - which I am almost embarrassed to post a picture of! :-\

The carbide dremel bits saved the day though. These things are so damn hard. They ate through it like butter. Still took a good amount of time and care, but eventually I got through the entire bolt extractor and stuck screw. The diamond coated grinder worked well too, but not as fast. In the end, all of the bits took a beating though - in this case, they were a one time use cos now they're stuffed.

After that I was all ready to start installing a helicoil when I thought I would just run a M6 tap through the hole to check what was left there. Turns out most of the thread was fine. So I screwed in a M6 bolt and torqued it down to spec just to check and it held up! Then I just cleaned up the area a bit with a needle file. Looks like I got lucky this time. If it causes any trouble in the future I'll just bite the bullet and install the helicoil.
 

Attachments

  • IMG_8030.JPG
    IMG_8030.JPG
    2.5 MB · Views: 251
  • IMG_8026.jpg
    IMG_8026.jpg
    2.7 MB · Views: 253
  • IMG_8025.JPG
    IMG_8025.JPG
    2.4 MB · Views: 256
  • IMG_8023.JPG
    IMG_8023.JPG
    2.5 MB · Views: 249
  • IMG_8021.JPG
    IMG_8021.JPG
    777.8 KB · Views: 243
  • IMG_8020.jpg
    IMG_8020.jpg
    3.3 MB · Views: 251
  • IMG_8037.JPG
    IMG_8037.JPG
    889.1 KB · Views: 266
JadusMotorcycleParts said:
Thanks again for the tips doc. Should have hunted around harder for those left hand drill bits! Haha

It's always the unexpected things that you dont count on that kill the progress of a build. This damn screw!

The local hardware store didn't have any left hand drills but they did have a bolt extractor kit. So I thought I would give that a crack first. Was doing everything right (I think) then the worst possible happened. I was really trying to feel the tension on the bit but I guess they are more brittle than I thought - and it snapped! :mad: These fckers are hardened steel too, so this is actually the worst thing one can do when trying to remove a stuck bolt. Gaargh. Was pretty pissed. Now I gotta find a carbide tip drill or something. I dont think HSS bits will do it either. I rounded a couple of my standard ones before giving up for the day. This thing is fckn stuck! I'm gonna have to drill the whole thing out tomorrow and install a thread kit. If there's one thing I have learned in the shop, its that there is always a fix ;D

Pictures tell the story.

That sucks out loud!!!!!!
Great recovery though!
 
Back
Top Bottom