
If you find yourself in similar straits again, here's an old tip from the (air-cooled) VW world: heat up the tip of the broken stud until it glows red hot, then touch it with a paraffin wax stick so it melts and draws into the threads. Let it cool and (most times) you can just unscrew the stud remnant.
We noticed you are blocking ads. DO THE TON only works with community supporters. Most are active members of the site with small businesses. Please consider disabling your ad blocking tool and checking out the businesses that help keep our site up and free.
You are using an out of date browser. It may not display this or other websites correctly.
You should upgrade or use an alternative browser.
You should upgrade or use an alternative browser.
Yamaha SR250 - A clean standard build
- Thread starter JadusMotorcycleParts
- Start date
zap2504 said:If you find yourself in similar straits again, here's an old tip from the (air-cooled) VW world: heat up the tip of the broken stud until it glows red hot, then touch it with a paraffin wax stick so it melts and draws into the threads. Let it cool and (most times) you can just unscrew the stud remnant.
Great tip! So I guess the heat doesn't distort the cases or anything?
Yeah I am pretty stoked how things turned out. I think I would have been more stressed if it was the wet side crank case cover, but this side is not as critical. Definitely learned a few things in the process!
_ Bolt extractors suck
_ If the bolt was is stuck, the head breaks trying to remove it, its best to drill it out anyway (or try Zap's tip in the future)
_ You'll never be able to drill through one
_ Carbide bits are awesome
_ A thread can look pretty bad but still work
")
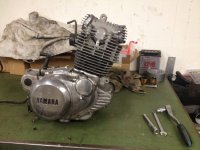
I stripped things even further today - wheels and forks off, swingarm out, chain off, then eventually, engine out.
One of the bests things about the SR250 is its lightweight. I was able to lift the whole engine in the frame onto the work bench for easy working access. Not too many other bikes you can do that with.
Now Im gonna make special blanking plates for all the open holes - starter motor hole, exhaust, intake, speedo drive, sprocket side hole etc so that it is masked up super tight with everything buttoned down before I blast it. I like the look of a blasted engine and this will be a pretty quick way to get it looking good again ;D
Attachments

sincerelyadam
Active Member
Jadus, this thread is so great. I recently bought a 1980 SR250 as my first street bike. It is running fine and I'll ride it til it gets too cold here in Philadelphia, USA. But I'm as interested in learning how to work on the bike as I am riding it, so I'm planning on stripping it down over the winter (like you just did) and cleaning everything, blasting and painting. I'll make some mods, not much to the engine though, cause if it ain't broke I'll probably break it My eventual goal is sort of a street scrambler.
I've read every word of your build thread, little bits every morning before work, and it's been so informative and insightful. Now I'm caught up to date and looking forward to seeing the progress from here.
I'm also really impressed with your product development for this specific model. I've already fallen in love with my bike and I love it's simplicity, but there are certainly a few things that can be improved and I think you're hitting all those points. I'll certainly be ordering some pieces in a few months. I think someone mentioned it already, but I think a fork brace kit with included fender would be great. You could even develop a few different fenders to create options for customers.
Thanks for all the thoroughness and photos. It's a great help for us newbs!
My eventual goal is sort of a street scrambler.I've read every word of your build thread, little bits every morning before work, and it's been so informative and insightful. Now I'm caught up to date and looking forward to seeing the progress from here.
I'm also really impressed with your product development for this specific model. I've already fallen in love with my bike and I love it's simplicity, but there are certainly a few things that can be improved and I think you're hitting all those points. I'll certainly be ordering some pieces in a few months. I think someone mentioned it already, but I think a fork brace kit with included fender would be great. You could even develop a few different fenders to create options for customers.
Thanks for all the thoroughness and photos. It's a great help for us newbs!
sincerelyadam said:Jadus, this thread is so great. I recently bought a 1980 SR250 as my first street bike. It is running fine and I'll ride it til it gets too cold here in Philadelphia, USA. But I'm as interested in learning how to work on the bike as I am riding it, so I'm planning on stripping it down over the winter (like you just did) and cleaning everything, blasting and painting. I'll make some mods, not much to the engine though, cause if it ain't broke I'll probably break it
I've read every word of your build thread, little bits every morning before work, and it's been so informative and insightful. Now I'm caught up to date and looking forward to seeing the progress from here.
I'm also really impressed with your product development for this specific model. I've already fallen in love with my bike and I love it's simplicity, but there are certainly a few things that can be improved and I think you're hitting all those points. I'll certainly be ordering some pieces in a few months. I think someone mentioned it already, but I think a fork brace kit with included fender would be great. You could even develop a few different fenders to create options for customers.
Thanks for all the thoroughness and photos. It's a great help for us newbs!
Thanks for the kind words adam. I will be very interested to follow what you do with your bike and what you manage to do over winter. I dont love winter but in one way, it gives project minded people like myself and many others the chance to knuckle down and really try to create something in those dark, cold months. Best of all is if that creation can give pleasure and enjoyment in the summer months! Bikes are perfect there ;D
The fender/brace kit is a cool idea and I am still trying to track down a reliable supplier for making the fenders. But when it happens, I'll def add it as an option on the webshop.
I hated the grossly proportioned and weirdly detailed levers/perches that were on this bike so I went hunting for some new ones. Its actually not that easy to find lever sets that fit all requirements for this bike. I really wanted:
_ Black perch and levers
_ Made for 7/8'' bars
_ Both with mirror mount threads - preferably M10x1.25 size/pitch
_ Brake lever with built in brake light switch
_ Brake lever made for drum brakes!
_ Complete sets that include the adjustment and locking knobs as well
Stupidly hard to find lever sets with those things for a reasonable price. After searching pretty hard, I found out that lever sets for certain years of Royal Enfields fit these exact specifications! Even down to the weird Yamaha left hand thread on the clutch lever (or is it brake?). Either way I will be using a thread adapter so I can run what ever mirrors I like.
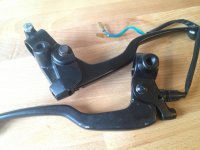
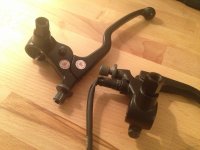
I bought a set from ebay and was real dissapointed - terrible quality, missing parts and threads, miss-matching parts, paint chips and general false advertising from the seller - check out the photo. The switch was so poorly made that it popped out when using it and the lever was so sloppy that it would push the switch off on an angle and bend its plastic button. What can you expect for 9£ though right?
I ended up ordering some from Hitchcocks - the Enfield specialists. And I am sure I can rely on the quality from them. Fingers crossed. I paid much more but you pay for what you get as always.
_ Black perch and levers
_ Made for 7/8'' bars
_ Both with mirror mount threads - preferably M10x1.25 size/pitch
_ Brake lever with built in brake light switch
_ Brake lever made for drum brakes!
_ Complete sets that include the adjustment and locking knobs as well
Stupidly hard to find lever sets with those things for a reasonable price. After searching pretty hard, I found out that lever sets for certain years of Royal Enfields fit these exact specifications! Even down to the weird Yamaha left hand thread on the clutch lever (or is it brake?). Either way I will be using a thread adapter so I can run what ever mirrors I like.
I bought a set from ebay and was real dissapointed - terrible quality, missing parts and threads, miss-matching parts, paint chips and general false advertising from the seller - check out the photo. The switch was so poorly made that it popped out when using it and the lever was so sloppy that it would push the switch off on an angle and bend its plastic button. What can you expect for 9£ though right?
I ended up ordering some from Hitchcocks - the Enfield specialists. And I am sure I can rely on the quality from them. Fingers crossed. I paid much more but you pay for what you get as always.
Attachments
r.s.hutchinson
Active Member
JadusMotorcycleParts said:I hated the grossly proportioned and weirdly detailed levers/perches that were on this bike so I went hunting for some new ones. Its actually not that easy to find lever sets that fit all requirements for this bike. I really wanted:
_ Black perch and levers
_ Made for 7/8'' bars
_ Both with mirror mount threads - preferably M10x1.25 size/pitch
_ Brake lever with built in brake light switch
_ Brake lever made for drum brakes!
_ Complete sets that include the adjustment and locking knobs as well
Stupidly hard to find lever sets with those things for a reasonable price. After searching pretty hard, I found out that lever sets for certain years of Royal Enfields fit these exact specifications! Even down to the weird Yamaha left hand thread on the clutch lever (or is it brake?). Either way I will be using a thread adapter so I can run what ever mirrors I like.
I bought a set from ebay and was real dissapointed - terrible quality, missing parts and threads, miss-matching parts, paint chips and general false advertising from the seller - check out the photo. The switch was so poorly made that it popped out when using it and the lever was so sloppy that it would push the switch off on an angle and bend its plastic button. What can you expect for 9£ though right?
I ended up ordering some from Hitchcocks - the Enfield specialists. And I am sure I can rely on the quality from them. Fingers crossed. I paid much more but you pay for what you get as always.
Why not just drill and tap the levers for the appropriate thread instead of using adaptors?
I too had a hard time finding even just a drum brake lever with a switch for the brake light. Or atleast one that matched my clutch lever I guess but I remember searching pages and pages on ebay.
r.s.hutchinson said:Why not just drill and tap the levers for the appropriate thread instead of using adaptors?
I too had a hard time finding even just a drum brake lever with a switch for the brake light. Or atleast one that matched my clutch lever I guess but I remember searching pages and pages on ebay.
Yeah tell me about it. The only way to drill and tap the perches to fit another mirror would be if the existing threads were M8 and you could drill and tap for an M10. One of these perches is M10 normal, the other is M10 reverse - hence the need for the reverse thread adapter. I could drill out the reverse thread and install a thread insert, but it would be a mission to find an M10x1.25 tap and then a M10x1.25 insert as well. Besides, the adapters I found are pretty neat I thought.
Where did you end up getting your brake lever from? Or at least, what was it made for? Was it just titled 'universal'?
zap2504 said:Lots of repro items for old Japanese "Scrambler" type bikes available new. Like these: http://www.ebay.com/itm/7-8-Honda-Suzuki-Kawasaki-Yamaha-Lever-Brake-Clutch-Perch-Set-Combe-One-Pair-/301637557874?hash=item463affde72&vxp=mtr
Damn that guy (k1motorcycle) is an awesome source for parts. Cheers zap
r.s.hutchinson
Active Member
JadusMotorcycleParts said:Damn that guy (k1motorcycle) is an awesome source for parts. Cheers zap
Here is the exact one I got because it was the closest match to the lever I had already for the clutch.
http://www.ebay.com/itm/371087768906?item=371087768906&viewitem=&sspagename=ADME:L:OU:CA:3160&vxp=mtr
r.s.hutchinson said:Here is the exact one I got because it was the closest match to the lever I had already for the clutch.
http://www.ebay.com/itm/371087768906?item=371087768906&viewitem=&sspagename=ADME:L:OU:CA:3160&vxp=mtr
Looks nice. Thats exactly what I was looking for too. Too bad that same seller doesnt have a matching clutch assembly.
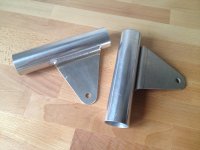
Got these headlight brackets in the mail today. The quality/finish is awesome. The welding is like art. So I am pretty chuffed. The nice thing is, the mounting holes are offset from the center, so you can choose to mount the headlight low or high. I have no idea if many/any people would be interested in these. So I will wait to advertise them or order any production quantities. I just like the fact that they cover the chrome stanchions and give a darker/heavier front feel - making the wimpy 32mm stanchions look a bit more substantial and giving the option for colour personalisation - black for me!
Attachments
zap2504 said:Aluminum or steel? And how do they mount on the forks - 3 "O" rings (2 for top/bottom internal, 32mm one for a base), a wrap of old inner tube?
All in ally - they're pretty light. Yeah good guess, they're held in place with 2 o-rings. One top and one bottom. Seems to work a treat. Stock ones on say the XS750 or Honda CBs have similar set ups - except theirs are moulded rubber parts of coarse!
Sounds like you could package-up a kit and market it on your site...
Only 2 "O" rings internally? I thought the older bikes that had this arrangement had a "shouldered" bushing on the mount bottom (maybe the top too?) so that the mount did not rattle against either triple (i.e., sliding up/down) while riding?
Only 2 "O" rings internally? I thought the older bikes that had this arrangement had a "shouldered" bushing on the mount bottom (maybe the top too?) so that the mount did not rattle against either triple (i.e., sliding up/down) while riding?
zap2504 said:Sounds like you could package-up a kit and market it on your site...
Only 2 "O" rings internally? I thought the older bikes that had this arrangement had a "shouldered" bushing on the mount bottom (maybe the top too?) so that the mount did not rattle against either triple (i.e., sliding up/down) while riding?
Yeah you are right, the OEM ones had a moulded 'shouldered' rubber bushing - which is the ideal set up. But from the test install I did, the o-ring top and bottom seem to hold it in place pretty well. The o-ring is thick and does not actually fit between the stanchions and walls of the brackets, rather they get 'sandwiched' between the top and bottom edges of the bracket and the triple trees. Will be good to see how they hold up to vibes after a few weeks of riding
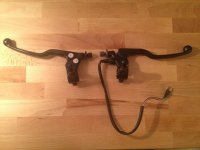
I received the levers from Hitchcocks today. Much, much better quality. Its seems even they too have issues getting consistency with some stuff though - the colour matching of the blacks is not 100% and the hardware, although good quality, is a little different either side - especially the adjuster knobs (why couldn't they be exactly the same part???). I was really hoping these would almost be like a 'mirrored' left and right lever (with the switch etc). Agh, I'm just being fussy now.
I rekon the thread adapters I put in them dont look half bad either.
I rekon the thread adapters I put in them dont look half bad either.
Attachments
sincerelyadam
Active Member
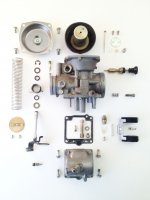
JadusMotorcycleParts said:Also had a go at this recent hip trend of making an anal-retentive exploded view of some detailed mechanical thing.
haha that is most definitely a thing. http://thingsorganizedneatly.tumblr.com/


