I really don't know much about the printers yet, I haven't had the time or reason yet to use them, but i fully plan on getting into them in the future. From what i have seen, the objet30 has very good dimensional accuracy, and super easy to print, just drag and drop the file essentially. There is a water-jet booth, but apparently it doesn't work all that great.
We noticed you are blocking ads. DO THE TON only works with community supporters. Most are active members of the site with small businesses. Please consider disabling your ad blocking tool and checking out the businesses that help keep our site up and free.
You are using an out of date browser. It may not display this or other websites correctly.
You should upgrade or use an alternative browser.
You should upgrade or use an alternative browser.
Yamaha SR250 - A clean standard build
- Thread starter JadusMotorcycleParts
- Start date
Finally bought flights to go back and visit friends and family in Australia after 3 years living in Sweden. Heading back in Feb. Cant wait! Will skip some of the worst weather here ;D
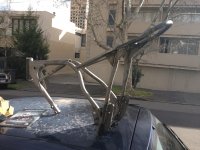
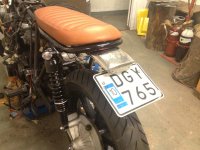
Already pondering what to do with an abandoned project I started a few months before I packed up and left... As it is, it is on a pallet in a friends garage. Do I try and finish it in the few weeks I am in Aus, then road register it and sell it? Or, do I bundle it up the best I can and try and ship it to Sweden? Selling it as is is not an option, a box of bits is pretty much worthless. I would really like to finish it as I think it has a lot of potential.
Anyone have experience with shipping a bike overseas? Companies? Costs? Any suggestions greatly appreciated!
Attachments
cosworth
Coast to Coast
If it's on a pallet it might be cheapest to just ship it on the plane. but that is *highly* variable and works only for direct flights or one with one long stop over. How many direct flight from Oz to SWE?
The GF and I have thought about moving back to the UK from Canada and taking one of my bikes on the plane is the cheapest option. But that's a direct flight. We've also thought about flying to Peru with MY enduro and crossing the Atacama, again, plane is the only usable option.
Look into someone who is moving a container that isn't full.
Thanks for the ideas and thoughts. I'll see how I feel when I look at it again in Aus ")
Or just ship the tank as that is probably the most valuable piece and could be used on other bikes.pjdave said:Its a dirty old SR 250, you can pick up a complete one for under a grand, not worth the money shipping. Sell it on the Melbourne cafe racers page on facebook, someone should be keen to find a frame with the loop already done and a bennelli tank.
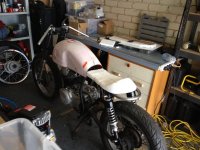
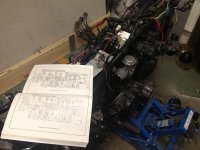
Sorry for the lack of updates recently! I have been working more hours consulting (gotta get that money!) and spending a lot of time with Davids XS750. He is coming to take photos of it this Friday (6 days time) and I still have a lot to do on it. Right now I am trying to sort the electrical system - I already have about 20 hours invested in it (including making the battery box and various other mounting brackets) and there is always unexpected issues that come up. It is so much harder to pull off the 'clean triangle' look than what one might expect. Relocating the battery, starter relay, fuse box, reg/rec, flasher unit etc etc and making them 'unseen' has been a mission! Also wiring up a nice Daytona idiot light display - but that was pretty straight forward.
I'll be back into the SR after this week. Cant wait 8)
I'll be back into the SR after this week. Cant wait 8)
Attachments
jjacks31
New Member
Just read this thread from start to finish and I am so glad I did! I just picked up a sr250 and have been having nightmares about the seat. I'm relatively mechanically inclined but you your prototyping is spot on! You can be sure I'm ordering one of your seats in the next couple of weeks (gotta get paid). I'm really interested in that rear frame loop you had made. Was it pricey getting it machined? It would be ideal for me not to have to do any major cutting or welding seeing as my 'garage' is my living room with hard wood floors.

Is the design of your seat easily recoverable? Would be interested in finding a cobbler locally and maybe going with tanned leather or something along those lines. Keep up the amazing work!
Is the design of your seat easily recoverable? Would be interested in finding a cobbler locally and maybe going with tanned leather or something along those lines. Keep up the amazing work!
jjacks31 said:I'm really interested in that rear frame loop you had made. Was it pricey getting it machined? It would be ideal for me not to have to do any major cutting or welding seeing as my 'garage' is my living room with hard wood floors.
Is the design of your seat easily recoverable? Would be interested in finding a cobbler locally and maybe going with tanned leather or something along those lines. Keep up the amazing work!
Cool man. Looks like a fine sample sr you have there!
With the rear frame loop, it worked out far too expensive to have it machined for production (which I suspected). What I ended up doing is paying for some special tube bending tooling to be made to achieve the unique bend profile. The tooling will be completed in early December and I will be getting off tool samples mid-late December. So if you can wait till then... you could be one of the first to try install one! I have designed it so it is still a bolt on part so it would be totally possible to do in your living room ;D
With the seat, I have had a few mails now with interest from people who want a different colour or finish. So what I am thinking of doing is offering to sell the seat 'raw'. That is, with the base, attachment fittings/hardware plus the moulded foam component (minus the upholstery). The tooling is being finalised this week for both of those parts so will be testing the process next week. But that would suit you too right? Then you could get it covered however you like. Its nice to support locals too!
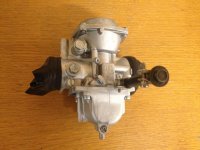
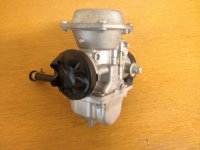
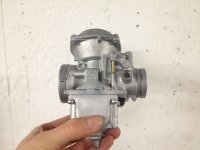
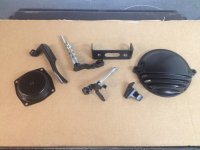
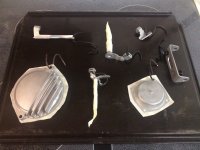
In between blasting and painting parts for the XS750 i quickly blasted up the SR carb to see what it would come up like. A couple of photos with the masking on and then the masking off. It came up pretty sweet. A couple of blisters in the aluminium though which I am not sure what they are. Cant be some kind of coating pealing off right? Its not corrosion... Could it just be from the original casting process? I'll take the cap off at some point and powder coat it black I think, then replace the screws on it too.
Really looking forward to blasting the engine if the aluminium casings come up looking like this!
Really looking forward to blasting the engine if the aluminium casings come up looking like this!
Attachments

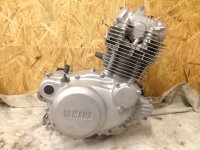
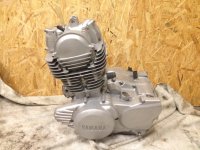
I made time today to blast the engine. What a mission. I built a 'blasting room' in my workshop with sealed walls and ventilation so I could take in larger items like bike frames and motorcycle frames and not be restricted by the size of a cabinet. I have all the safety equipment, full overalls, gumboots, blasting hood (hangs past shoulders) with eye protection, hearing protection, respirator plus long thick rubber blasting gloves. Somehow the grit still gets in my eyes even after purchasing some blasting 'goggles' - after learning from the first try that stuff comes into the hood. It must come in through the tiny an-fog vents some how. What a dirty, dirty job. I have much respect for the guys that do this day in and day out.
Now I have decided to tear down the 'room' and build my own oversized cabinet to my specs. I cant be arsed with this mess and I dont want to have to go into the eye clinic again and have them scrape stuff off my corneas! haha
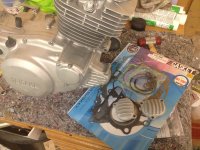
Anyway... Engine came up pretty much as hoped ;D
Now I have decided to tear down the 'room' and build my own oversized cabinet to my specs. I cant be arsed with this mess and I dont want to have to go into the eye clinic again and have them scrape stuff off my corneas! haha
Anyway... Engine came up pretty much as hoped ;D
Attachments
Oh yeah, I finished the XS750 too, so hopefully now will be able to spend more time with this!
sincerelyadam
Active Member
The engine looks great. What media did you use? Did you do any prep to the engine besides plugging holes, or just straight from frame to blast?
sincerelyadam said:The engine looks great. What media did you use? Did you do any prep to the engine besides plugging holes, or just straight from frame to blast?
Thanks man. The media was glass beads, 0.1-0.25mm grit. No, no other preparation really. Of coarse the oil was drained. But with the masking, I made sure everything was either bolted down with a bracket and gasket, or blast masking tape on small things. I made one mistake with the oil sight level - the masking was not strong enough and I accidentally blasted that window a tiny bit. I am hoping I can polish it out. You can still see, but it doesn't look good.
sincerelyadam
Active Member
*thumbs up* and thanks for the info!
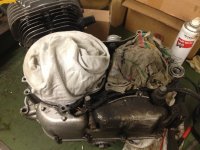
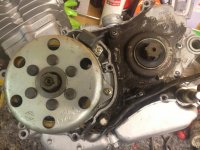
Just a note to anyone wanting to blast their engine... take particular care with masking the alternator side cover. The blasting media likes to go everywhere you dont want it to go Luckily, I had taken the cover off and masked the flywheel and pick up separately, then bolted the cover down over that, then stuffed rags up under the opening for the wires. When I was taking the cover off, rather than blowing it with compressed air, I got in at it with the shop vac and that seemed to pick up most of the grit. Happy days
Luckily, I had taken the cover off and masked the flywheel and pick up separately, then bolted the cover down over that, then stuffed rags up under the opening for the wires. When I was taking the cover off, rather than blowing it with compressed air, I got in at it with the shop vac and that seemed to pick up most of the grit. Happy days Attachments
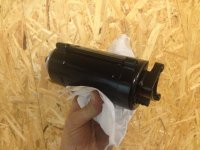
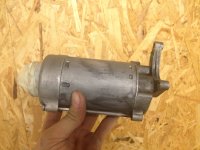
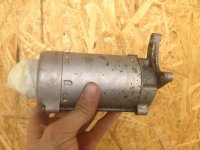
Had some time to do some more blasting and painting today. Most parts I was able to powder coat. But with the starter motor, not only did I not want to blast it, I didn't want to powdercoat it either - cant be good for it to bake it at 200C right? So I hand sanded that and spray painted it instead. Came up looking alrite!
Attachments
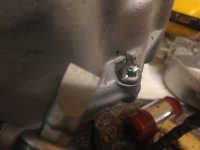
Got another one of them stuck crankcase bolts! Even with the impact driver it stripped the philips socket. But this time my standard solution worked - cut a slot in the head of the bolt with the die grinder using a thin cutting off disc. Then just use the big flat blade bit on the impact driver. Yus!
Also started installing the covers with new gaskets
Also started installing the covers with new gaskets