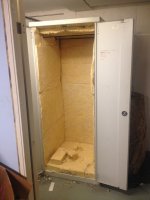
Not so much progress on the bike lately, but progress on the powder coating oven! I enlisted the help of a buddy who has a bit more experience with stuff like this and hes been doing a tidy job of it so far. The insulation will be covered in thick aluminium foil then the elements (all of them) installed from a wrecked oven. I just hope it will be able to bring the internal temp up to 200c. This will allow me to powder coat an entire frame and other large parts that dont fit in the normal oven I have. I am hoping to do a few bike frames on the side too. The single speed craze is world over now right? Was huge in Melbourne already like 5 years ago!
We noticed you are blocking ads. DO THE TON only works with community supporters. Most are active members of the site with small businesses. Please consider disabling your ad blocking tool and checking out the businesses that help keep our site up and free.
You are using an out of date browser. It may not display this or other websites correctly.
You should upgrade or use an alternative browser.
You should upgrade or use an alternative browser.
Yamaha SR250 - A clean standard build
- Thread starter JadusMotorcycleParts
- Start date
Weldangrind
Quae nocent, docent
Did you repurpose an existing metal cabinet for your powder coating oven? If so, that's brilliant! I'm looking forward to reading about how it works for you.
What kind of elements are you using? Element resistance is hugely important to how well they work. Four major factors must be considered- voltage/amps/oven size/insulation thickness. There is a spray coating used in ceramic kilns called ITC. It's a highly reflective refractory material. It may be much more than you need, but it serves to protect the insulation as well. FYI, they make a lung soluble insulation that is much much safer to use. You can also use fiber board instead of blanket. Fiber board comes in various thicknesses. I hope you're wearing at least a P95 respirator while you mess with that glass. Since your temps are so low, and since your using blanket, make a bunch of 2" metal buttons out of sheet metal. Cut circles and drill two holes in the center. Then, drill holes in the exterior of the box and "sew" the buttons running through the insulation with electric fence wire. The buttons will hold the blanket up and allow the oven to last much much longer. Get rid of the chicken wire for the top. Use buttons instead. Another way to do the roof insulation is to cut 3" wide strips with a length equal to the depth of your box, put two holes in each one in the same place, then stack them like a wood cutting board and run allthread through them all to compress them and make a board. Drill two holes in each side of the box to run the allthread through to mount to the roof. Get yourself (4) 4-inch muffin fans:JadusMotorcycleParts said:Not so much progress on the bike lately, but progress on the powder coating oven! I enlisted the help of a buddy who has a bit more experience with stuff like this and hes been doing a tidy job of it so far. The insulation will be covered in thick aluminium foil then the elements (all of them) installed from a wrecked oven. I just hope it will be able to bring the internal temp up to 200c. This will allow me to powder coat an entire frame and other large parts that dont fit in the normal oven I have. I am hoping to do a few bike frames on the side too. The single speed craze is world over now right? Was huge in Melbourne already like 5 years ago!

and use them to exhaust through the top. I've also done them 2 on each side near the top of the box. You want a dry environment, so the fan/heat combo will act as a de-humidifier. I've built dry boxes the same size that maintain 200° with just one electric floorboard heater. No need for trying to reuse oven elements. If you do use the oven elements, and they are the coil type, DO NOT STRETCH THE COILS. The outer dimension and the gap between coils, plus the overall length are all factors in how they heat. Any stretch raises resistance and reduces their heating qualities. You'll also want to get a rheostat to control your heat. A rheostat varies voltage/resistance to the elements. Another reason to get a floorboard heater is that they already come with one built in. The truth is, 8 incandescent flood lamps will probably get you to your temp of 200°. I bet 800 - 1000 watts will get you to 200°. A standard dimmer switch can control your temp.
Weldangrind said:Did you repurpose an existing metal cabinet for your powder coating oven? If so, that's brilliant! I'm looking forward to reading about how it works for you.
Hi, yeah its an old cabinet. I have no idea what its use was but i was looking for something this size for quite some time. It was bolted together too so I was able to dismantle it and get it through my small workshop doors. Its also pretty sturdy being made of a good guage of steel.
I got my inspiration and a lot of good info from the user r.s.hutchinson. You can read his build thread here:
http://www.dotheton.com/forum/index.php?topic=64461.0
He got some really nice results

deviant said:What kind of elements are you using? Element resistance is hugely important to how well they work.
My mate has got this all covered. He knows a damn sight more than me about it. When we took the elements from the old oven, they are electrolux units (solid, not coil) and they are stamped with their resistance on them. So we calculated exactly what their power requirements were and we will wire in all of them - the main oven ones plus the grill ones which had highest resistance - giving highest heat. Its all 3-phase too to be able to deliver that kind of power. We skipped the warmer drawer ones though as they are not grunty enough.
Yep, me and him always wear respirators when working with this shit. Thanks for your concern. We also use overalls and kitchen gloves too - this shit is a skin irritant as well. Thats the reason I want to cover it with foil as well - so there will be no dust and no irritant exposed. Good idea with the straps/buttons though, will definitely do that. Is there any reason to take the chicken wire away though??? That will cope with the 200 degrees wont it?
Excuse my ignorance, but what are the extraction fans for? Wouldn't we just loose all the heat in the oven? I thought it needs to be sealed tight?
We are following what r.s.hutchinson did and he seemed to get great results with his oven - with no extraction.
Cheers
Extraction is to keep the humidity out. If that's no concern, then of course no worries. I like to have a wrap on the environment in the unit. Plus, the venting deals with any fuming.
The chicken wire will handle the heat just fine. You already have the rods up there. They could've been used to make the ceiling.
I'm a master kiln builder, so I get a bit excited about this stuff. I've built quite a few of the type ovens for clients as well. I'll check out that guy's thread too.
Sent from my iPhone using Tapatalk
That and even heat distribution of heat top to bottom. In kiln ventilation, the air is drawn from the bottom. So as heat naturally rises, the ventilation draws it back down through the wares.
r.s.hutchinson
Active Member
Coming along nicely.
What gun are you using for blasting?
What gun are you using for blasting?
deviant said:Extraction is to keep the humidity out. If that's no concern, then of course no worries. I like to have a wrap on the environment in the unit. Plus, the venting deals with any fuming.
The chicken wire will handle the heat just fine. You already have the rods up there. They could've been used to make the ceiling.
I'm a master kiln builder, so I get a bit excited about this stuff. I've built quite a few of the type ovens for clients as well. I'll check out that guy's thread too.
Thanks for the info. Geeze, you'd be a handy guy to know if you were local!
r.s.hutchinson said:Coming along nicely.
What gun are you using for blasting?
Cheers. It is a combined soda and media blasting unit with two pressure pots. I bought it from a company in Sweden called Verktygsboden but I have seen the exact same system (but in blue colour rather than red) for sale from Harbour Freight
Seems like these companies all have the same suppliers, just rebrand the stuff (real common these days anyways).You didn't have any issues with ventilation or humidity with your set up did you?
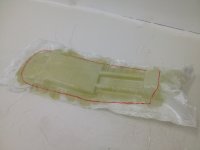
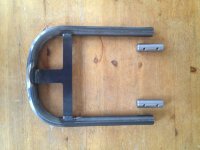
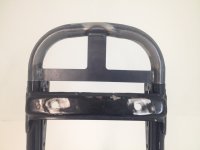
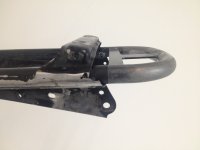
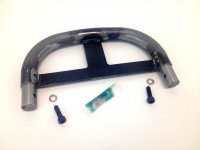
Yesterday I received the fist off-tool sample of the rear frame loop kit I designed ;D Looking really good! The dimples in the metal tubing from the bending process are only visible on the insides of the radii, so the outside is perfectly smooth. The lugs came up good too.
The idea is that the customer can cut this to their preferred length, drill a couple 6.5mm holes in both the frame and the loop and screw it together. This would be for a cosmetic solution. If it was a frame bracing solution/load bearing/stressed, the lugs would be used as locators for welding it all together. The brace welded to the loop is for attaching fenders, tail light brackets, indicator brackets, batteries, different seats, etc etc.
The idea is that the customer can cut this to their preferred length, drill a couple 6.5mm holes in both the frame and the loop and screw it together. This would be for a cosmetic solution. If it was a frame bracing solution/load bearing/stressed, the lugs would be used as locators for welding it all together. The brace welded to the loop is for attaching fenders, tail light brackets, indicator brackets, batteries, different seats, etc etc.
Attachments
Test install...
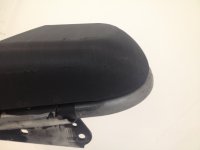
Didn't have the latest seat design on hand so used the end of the last prototype before tooling. Fits good!
Didn't have the latest seat design on hand so used the end of the last prototype before tooling. Fits good!
Attachments
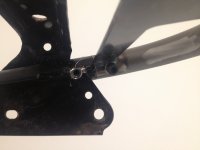

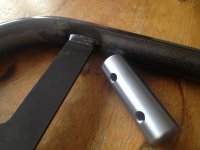
If you get (or make) a drilling template, you're guaranteed to line your holes up and not have to dig away with a burr bit to get to your threaded hole in the bung.
r.s.hutchinson
Active Member
JadusMotorcycleParts said:You didn't have any issues with ventilation or humidity with your set up did you?
Nope, everything came out great. Ventilation would be easy to add and would create convection as well.
deviant said:If you get (or make) a drilling template, you're guaranteed to line your holes up and not have to dig away with a burr bit to get to your threaded hole in the bung.
Haha, you noticed my terrible drilling skills! Yep, had to hog it out a little with the dremel to get it to line up. That drill jig is sweet! Would definitely help me with other stuff too. I was hoping though that customers could install this kit on their own with simple tools - a hole punch and a cordless drill perhaps... And some caution and patience
Even if the holes are a little oversize, once the bolts are tightened with a locking/spring washer they hold everything together real nice r.s.hutchinson said:Nope, everything came out great. Ventilation would be easy to add and would create convection as well.
Sweet. Yeah, like these other guys have said, a small fan could be added easily enough. I'll see what the results are like without it first.
Something I have been working on over the Xmas/New Year break - an SR specific intake trumpet/bellmouth or whatever you want to call it. I have read a lot, and it also seems logical, that running a carb with a pod/clamp on filter is detrimental to airflow. Many of you may be thinking 'duh, no sh*t'! But it still surprises me how common it is for people to just trash their factory air boxes and run clamp on filters thinking its going to remove restrictions and let loose some extra horses! Lol. I shouldn't laugh, I have done it too! But its fun to learn ;D Doing it just for looks, well thats another thing entirely
Somethings I have learned working with bikes is that I am not, and will never be smarter than the team of designers/engineers that put together any particular bike/engine package. The only thing you can beat them on is the cost/time restrictions they had in front of them when they were working on the project. I.e. you can spend more time and money on small areas of the engine and get small improvements where they were out of time or budget - their solutions were the best economical and performance compromise.
Somethings I have learned working with bikes is that I am not, and will never be smarter than the team of designers/engineers that put together any particular bike/engine package. The only thing you can beat them on is the cost/time restrictions they had in front of them when they were working on the project. I.e. you can spend more time and money on small areas of the engine and get small improvements where they were out of time or budget - their solutions were the best economical and performance compromise.
That was a rant sorry!
I was influenced a lot by two articles in particular, and a couple of images when I decided to do something for the SRs BS34 carb. I'll dig them up and attach them next.
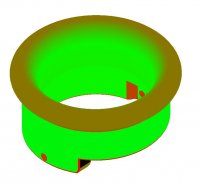
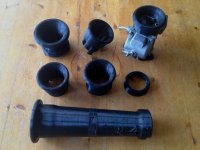
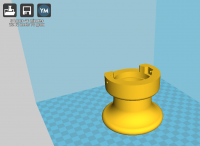
In the meantime, here are a few (some stupid) prototypes I made before coming to a final design that I will have machined up in aluminum for dyno testing. For packaging reasons, this is only intended to improve the flow of air into the carb (perhaps up to 5% more), rather than try for any harmonic tuning. One of the prototypes in the picture would get the 2nd harmonic in the 6,900 - 8,000 rpm range, the third in the 5,200 - 5,900 rpm range and the 4th in the 4,000 - 4,500 rpm range. But look at it! It would be ridiculous haha.
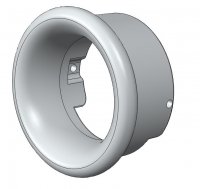
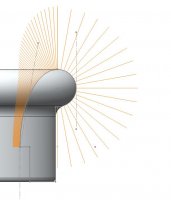
I used some ideas from A-class automotive surfacing and curvature to achieve the smoothest entrance possible within a reasonable size - see screenshots from the solidworks files using various surface analysis tools - curvature combs, curvature display and zebra stripes. The idea is that the bellmouth bolts onto the carb with two M4 set screws behind two flanges on the carb. There is also a large flat surface on the outside of the part just past the radius to be able to squeeze a clamp-on air filter over the top of it and clamp it tight. I personally would never run an open carb/velocity stack on the street, or metal mesh for that matter. This will be clearer when I get the proper proto.
I was influenced a lot by two articles in particular, and a couple of images when I decided to do something for the SRs BS34 carb. I'll dig them up and attach them next.
In the meantime, here are a few (some stupid) prototypes I made before coming to a final design that I will have machined up in aluminum for dyno testing. For packaging reasons, this is only intended to improve the flow of air into the carb (perhaps up to 5% more), rather than try for any harmonic tuning. One of the prototypes in the picture would get the 2nd harmonic in the 6,900 - 8,000 rpm range, the third in the 5,200 - 5,900 rpm range and the 4th in the 4,000 - 4,500 rpm range. But look at it! It would be ridiculous haha.
I used some ideas from A-class automotive surfacing and curvature to achieve the smoothest entrance possible within a reasonable size - see screenshots from the solidworks files using various surface analysis tools - curvature combs, curvature display and zebra stripes. The idea is that the bellmouth bolts onto the carb with two M4 set screws behind two flanges on the carb. There is also a large flat surface on the outside of the part just past the radius to be able to squeeze a clamp-on air filter over the top of it and clamp it tight. I personally would never run an open carb/velocity stack on the street, or metal mesh for that matter. This will be clearer when I get the proper proto.