
You got me! Thats what i meant with 'trying to remove it with all sorts of stupid ideas (including the oxy torch)' . So yeah, my stupidity 100%. Probably made these unsafe to use now - i've f*kd the temper etc. Now they'll be too brittle in that critical area. Only up side is that i have some new prototypes being made up as we speak... Higher rise, more universal etc
We noticed you are blocking ads. DO THE TON only works with community supporters. Most are active members of the site with small businesses. Please consider disabling your ad blocking tool and checking out the businesses that help keep our site up and free.
You are using an out of date browser. It may not display this or other websites correctly.
You should upgrade or use an alternative browser.
You should upgrade or use an alternative browser.
Yamaha SR250 - A clean standard build
- Thread starter JadusMotorcycleParts
- Start date
JadusMotorcycleParts said:You got me! Thats what i meant with 'trying to remove it with all sorts of stupid ideas (including the oxy torch)' . So yeah, my stupidity 100%. Probably made these unsafe to use now - i've f*kd the temper etc. Now they'll be too brittle in that critical area. Only up side is that i have some new prototypes being made up as we speak... Higher rise, more universal etc
I try to drill and tap holes as early in the fabrication process as possible that way if you duff one of those bosses you can just toss it, instead of tossing the whole assembly.
I agree with XB that it may be a material issue. If done correctly steel is very forgiving. welding should not effect the threads unless spatter gets on them, or if its a very long hole and warpage occurs.
a coupler nut works nicely for that type of fabrication its just a long ass nut ready made
drill out 1/2 of it ,carve a deep radius into it to fit and then just plain ole oxy acetylene brazing is best
no need for welding
finally cut the slot ,you can do a pretty darn straight precision slot ,wide enough ,with 3 hacksaw blades at once
drill out 1/2 of it ,carve a deep radius into it to fit and then just plain ole oxy acetylene brazing is best
no need for welding
finally cut the slot ,you can do a pretty darn straight precision slot ,wide enough ,with 3 hacksaw blades at once
Thanks for the tips. I actually thought the steel was too hard from the welding process so I thought I would try and soften it to remove the tap. So I heated it up cherry red and dunked it in dry sand to slow the cooling process - I had read that that is a way to remove some hardness. I am pretty clueless with this stuff. It obviously didn't work.
Now I have the chance to pick you metallurgists brains for the future handle bars... How do these grades of metals sound for the bars (I myself have no idea):
1. DC01; HC180 for the 22mm x 2mm thick bar section
2. S195T EN10255 for the clamp-on section
Both tubes have seems.
Now I have the chance to pick you metallurgists brains for the future handle bars... How do these grades of metals sound for the bars (I myself have no idea):
1. DC01; HC180 for the 22mm x 2mm thick bar section
2. S195T EN10255 for the clamp-on section
Both tubes have seems.
Wait, you did this with the tap in the hole?JadusMotorcycleParts said:I thought I would try and soften it to remove the tap. So I heated it up cherry red and dunked it in dry sand to slow the cooling process
Yep!
JadusMotorcycleParts said:Now I have the chance to pick you metallurgists brains for the future handle bars... How do these grades of metals sound for the bars (I myself have no idea):
1. DC01; HC180 for the 22mm x 2mm thick bar section
2. S195T EN10255 for the clamp-on section
Both tubes have seems.
What happen to all the experts??? Anyone? I'm gonna contact an old colleague of mine who is a wizz with this stuff but does anyone here know about the actual specs of these metals? Or are there different US and European standards?
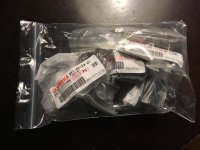
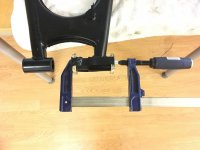
Got a bit done over the weekend. Managed to properly insert the new swing arm bushes with my 'press'. Just a couple of bits of ply and a screw style clamp. Pretty rough but worked a treat ;D
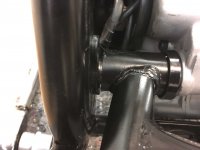
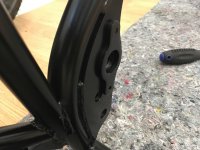
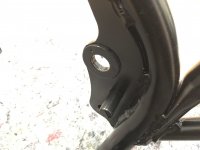
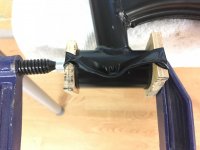
Then got on to installing the swing arm into the frame. I checked and double checked everything from reference photos I had, photos of spare parts I found online AND the exploded parts diagram. Nothing was/is missing, yet I still end up with the gap here on the left side of the frame. It looks like something is missing but it is not. I double checked with my other SR and it is the same. The gap closed a little once I torqued up the bolt but still... Just wondering, has anyone else had/noticed this?
Then got on to installing the swing arm into the frame. I checked and double checked everything from reference photos I had, photos of spare parts I found online AND the exploded parts diagram. Nothing was/is missing, yet I still end up with the gap here on the left side of the frame. It looks like something is missing but it is not. I double checked with my other SR and it is the same. The gap closed a little once I torqued up the bolt but still... Just wondering, has anyone else had/noticed this?
Attachments
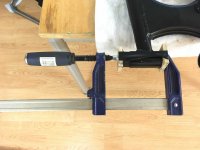
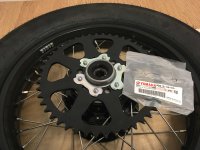
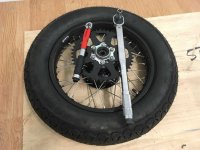
Then I got the rest of the engine brackets in placed and torqued them up and assembled the front and rear wheels - with new lock washers. These two torque wrenchs got some good use this weekend. Some people dont think they are necessary but I am always surprised by how little or how much torque is specified for certain bolts, so for me, its worth doing it to spec than going from 'feeling'. Obviously, many bolts are common sense and the spark plug for example I have torqued up so many times I have a decent enough feel for that that I dont use the torque wrench anymore. But these bolts on the cush drive to hold the sprocket for example, they only had 21.7ft/lb spec'd, which didn't feel like much at all. I would have easily done them tighter without it. No wonder a couple of them were stripped on the other SR I have - someone was over enthusiastic when tightening them ")
Attachments
Swing arms invariably need shims. Very often, the frame will seem too wide (or too narrow) for the arm, but will be drawn together by the swing arm pivot bolt. The shims are needed because the span of the internal bushings has to be slightly wider than the span of the swingarm (with outside bushings) so it does not get clamped to the frame when the pivot bolt is tightened. The shims are needed to take up whatever slack is left. These shims are invariably not shown on the parts exploded view even though they are invariably included in the factory assembly. You should shim to zero lash. I trial assemble with light oil or WD40 to get the fit right (takes a couple of trial and errors) and then final assemble with wheel bearing grease. This will result in a VERY tight fit but will almost immediately loosen up to perfect after a few miles. The arm should just fall of its own weight when correct. Looser than that will be needlessly sloppy.
jpmobius said:Swing arms invariably need shims. Very often, the frame will seem too wide (or too narrow) for the arm, but will be drawn together by the swing arm pivot bolt. The shims are needed because the span of the internal bushings has to be slightly wider than the span of the swingarm (with outside bushings) so it does not get clamped to the frame when the pivot bolt is tightened. The shims are needed to take up whatever slack is left. These shims are invariably not shown on the parts exploded view even though they are invariably included in the factory assembly. You should shim to zero lash. I trial assemble with light oil or WD40 to get the fit right (takes a couple of trial and errors) and then final assemble with wheel bearing grease. This will result in a VERY tight fit but will almost immediately loosen up to perfect after a few miles. The arm should just fall of its own weight when correct. Looser than that will be needlessly sloppy.
indeed yes you have learned so much from just reading my posts
except for those made up words you seem to try to confuse me with those but not this time anyway i looked at partzilla the sr250 has an unusual lasup one outer one inner thrust both shimable
but yeah unusual the one is inbored the other outbord
i tried wrapping my brain around why they dun that,that way....got a splitting headache and thatt was that
Thanks for the input. Well I found the exploded quite confusing as well. I am just surprised I didn't notice this when I took it apart and any photos I have of that area before I did show a little gap...
Anyway, the swing arms metal bushings are tight against the frame and the engine mounts - meaning that the swing arm rotates freely (but not too freely) around them. It feels proper and there is no play so I'm gonna roll with it. There was also an oil seal there so nothing is going to come in or out I think.
Anyway, the swing arms metal bushings are tight against the frame and the engine mounts - meaning that the swing arm rotates freely (but not too freely
) around them. It feels proper and there is no play so I'm gonna roll with it. There was also an oil seal there so nothing is going to come in or out I think.Just went back to the first post of this thread and realised I've been working on this bike for just over a year! Damn, things always take longer than expected. Feels good to be on the re-assembly side of the build though ;D
Well, you have to learn somewhere! Constant exposure always yields a certain degree of contamination! I see my erudite vernacular utilized irrespective of necessity is striking a nerve. In the future I shall try to restrain my sesquipedalian habits and keep my garralous tendencies to a minimum.xb33bsa said:indeed yes you have learned so much from just reading my posts
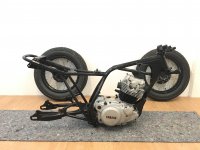
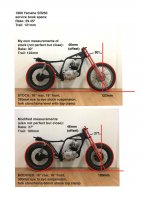
I got there! Rolling chassis 8) While I was at it I figured I would do some checks of the chassis set up to make sure I'm not building a death machine... I was a bit concerned that with all the changes to wheel size, suspension lengths/lowering etc that things would be out of wack - and now is the time to correct it if so.
I checked the workshop manual and got some specs, then did my own calculations based on some photos and measurements from the bike itself. The attached image is what I came up with.
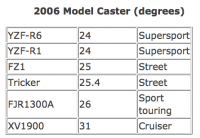
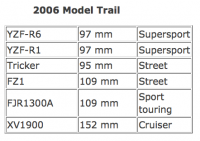
Now, with very little knowledge or experience with this myself, I had to read up on a lot of it. It all makes sense to me but what I wanted was some concrete numbers from real world examples/production bikes to compare with so that I know I'm in the ball park/safe. Then I found a sweet technical article of the Yamaha website that listed caster/rake and trail dimensions for different bikes from their 2006 line up - see screen shots.
The SR in stock trim leans toward to cruiser side of geometry - what I thought would be the case. The set up I have now leans towards street/sport-touring but not too extreme to be super-sport. Basically, I think for the kind of riding I do and the speeds this humble mule will go, I'm super safe!
Good reference material here for anyone else modifying an SR and making similar changes to chassis/wheels/suspension/ride heights ;D
I checked the workshop manual and got some specs, then did my own calculations based on some photos and measurements from the bike itself. The attached image is what I came up with.
Now, with very little knowledge or experience with this myself, I had to read up on a lot of it. It all makes sense to me but what I wanted was some concrete numbers from real world examples/production bikes to compare with so that I know I'm in the ball park/safe. Then I found a sweet technical article of the Yamaha website that listed caster/rake and trail dimensions for different bikes from their 2006 line up - see screen shots.
The SR in stock trim leans toward to cruiser side of geometry - what I thought would be the case. The set up I have now leans towards street/sport-touring but not too extreme to be super-sport. Basically, I think for the kind of riding I do and the speeds this humble mule will go, I'm super safe!
Good reference material here for anyone else modifying an SR and making similar changes to chassis/wheels/suspension/ride heights ;D
Attachments
why did you drop the front ? that is not the way to start out, that is at the potentially most squirrily setting
a wise one would do some testing with them back where they belong if you find the steering too lazy and not responsive by all means pull them up a bit ,dropping the front,10mm at a time is a good rule of thumb
all the bikes you have listed use a factory installed steering damper there is a reason for that
but i dont understand why you drop it before you even test ride ? there are other factors besides rake and trail itself that factor into handling changes when rake and trail is changed ,weight distrubution \for one
you cannot use a modern bike with completely different type of frame radial tires etc as A BENCHMARK
dont EVEN tell me you like the look of the dropped front end because NOBODY will see the difference anything at all like you think you do
on another note was wondering if you measured your bike with suspension compressed slightly or topped out ?
and on a level surface if you bubbled the rake ?
ENGLISH !! DO YOU SPEAK IT !??! SAY sesquipedalian ONE MORE TIME I DARE YOUjpmobius said:Well, you have to learn somewhere! Constant exposure always yields a certain degree of contamination! I see my erudite vernacular utilized irrespective of necessity is striking a nerve. In the future I shall try to restrain my sesquipedalian habits and keep my garralous tendencies to a minimum.


