Follow along with the video below to see how to install our site as a web app on your home screen.
Note: This feature currently requires accessing the site using the built-in Safari browser.
We noticed you are blocking ads. DO THE TON only works with community supporters. Most are active members of the site with small businesses. Please consider disabling your ad blocking tool and checking out the businesses that help keep our site up and free.
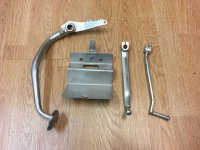
Some development of the battery tray... First a rough thin sheet aluminium version made up quick to get some sense of scale and position. Then a couple of 3D printed prototypes to fine tune the cut out and hole positions and the final flange lengths, then the final 3D printed plastic prototype - two views. These would be laser cut and bent up out of 3mm steel plate and powder coated in black if the design ever makes it into production. If enough people are interested? It is designed for either the AntiGravity or the Ballistic 8 cell (or even the 4 cells if so desired) and so that the starter relay mounts on that tab that sticks up. The relay can be cable tied in place if the rubber mounts are shot. It fits both the SR250 Specials and the SR250 Classics (re-released ones) which has a brake lever bracket to clear - hence the cut out.
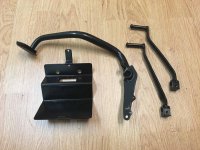
I don't have time to wait for a proper prototype to be made so I made one up by hand from 2mm stainless plate. Its pretty close to the final plastic prototype but is very rough still - being hand made with a vice, hammer and hand drill. It should come up alrite once its blasted and powder coated.
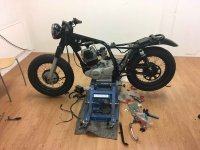
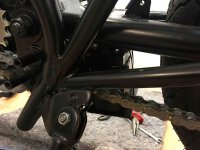
You can see where it is positioned as well. Nice mass centralisation haha ;D
Do you plan to seal off the battery and/or connections in a waterproof enclosure? That looks like it will get a lot of water down there. Even it if shorting is never issue, what about the effects of oxidation on connections?
I was planning on making a box type enclosure that sits on the bracket but I think I'll skip it for now and just see how it works out. If necessary, it would be pretty easy to add a simple splash guard there later. Otherwise I think it will be pretty well protected under there - its just the shit from the tyre.
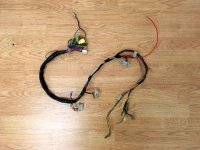
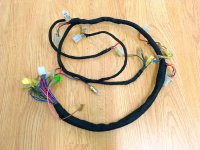
I worked out how the new position of the relay will work into the wire harness today. Then I stripped and cleaned the wire harness and re-wrapped it in automotive fabric tape. I like the look of the stuff. Don't know how it holds up but we'll find out next riding season!
I never thought about mounting my battery under the swingarm. Great idea. Have you had any experience with the 4 cell batteries? Mine seems to be plenty powerful. I hope in the long run i made the right decision.
I never thought about mounting my battery under the swingarm. Great idea. Have you had any experience with the 4 cell batteries? Mine seems to be plenty powerful. I hope in the long run i made the right decision.
Na, no experience with the 4 cell batteries. But plenty of sorry experiences with flat batteries and bump starting! Awesome that the 4 cell is grunty enough. If it is working for now, it will probably keep working for at least a couple/few seasons - but like all batteries, they lose their life eventually. There is a lot of easy weight savings there so I would say you made a good choice! I will probably test one on the next SR I build - more of a cut back racer. So a 4 cell would be perfect there.
A lot of people install kick-starters on these bikes and I actually have all the components to do so. But I don't want to. I have a feeling (I could be wrong) that people who install kick starters on these bikes have not had kickstart bikes before and don't quite appreciate the button. I have had several kick start bikes and yes, I felt manly and 'connected' to my machine when I kicked it into life, but boy, I got over it. Especially if its a cold morning and it may on the off chance die at the traffic lights and you're stuck there kicking away like an idiot haha. They do look cool though, I'll agree on that ;D For example the re-release of the W800 (update from the 650) just didn't quite look the same without the kicker
Kickstarter would be nice. My push start button doesn't make a real good connection inside the handlebar mounted housing. I had to push start in a few public places. I think ive got it figured out now but it would be nice to kick over. And that w800 was a nice looking bike. I would like to find one.
Yeah. You can drastically reduce the battery size if you go with a "kick start" only scenario. The KZ 650's that I built in the past were kick start only and I ended up with a 6aH Lithium type battery. It sure makes things easy for wiring and of course allows you to remove the starter motor, starter relay and associated "large" conductors. In fact, one of them had a pooched started clutch assy so I removed it as well....
You're right though, it is a great debate on kick vs. electric start. IF the bike is well set up and tuned correctly, the kick start should be adequate; but it isn't terribly convenient. If the bike is NOT tuned well it can be the most frustrating experience of your life. It's really funny, because most modern dirt bikes have gone electric start; my 2013 KTM 200 2 stroke is e-start even though it is the easiest bike to kick over... sometimes its just easier to hit the button to get it going. Some don't even have a kicker as an option (weight savings I suppose).
All that being said, I will probably go kick-only on my SR at some point, but need to get to other items on my list first.
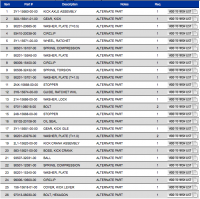
Jadus - I've been searching around to find a consolidated parts list for the swap without success. The fiche for an 80's XT250 is easy enough to find but I'm still not certain what is "actually" required. I watched a youtube video about the install and it has some documents attached however they are not in english! I don't suppose you have a parts list?
Very true about the weight loss and electrics simplification with kickstart only. On some bikes you can even run a large capacitor or battery eliminator kit (SR500s I think).
I have also noticed that lots more trail bikes have been skipping the kickstart entirely!
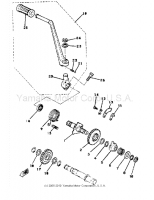
Hmm, about the kick-start, I also only have some exploders and a parts list - see attached. But I'm pretty sure thats all the parts listed that are needed!
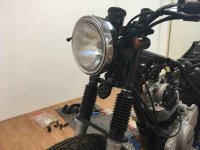
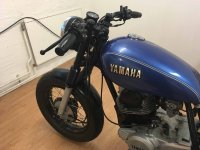
Things are slowly coming together on the bike - especially at the front end. Now just waiting for a few minor parts to complete that section. Its really fun putting it all together now that most of the hard work is done. I'm just gonna take my time with it now because it is so enjoyable!
I decided that to get the side covers spot on in the frame, I will have the stock ones 3D scanned so I have an exact reference point for the mountings for when I re-model them. Then I'll probably 3D print them and either fibre glass over the top of them or just coat them in fibre reinforced filler.
Well I got the final few parts blasted and powder coated. Hopefully no more for this build. I will strip the paint off the tank and take that to a professional and get him to match the guards.
The hand grips and the guard bolts arrived today too so the front end is complete! Just chucked the other tank on there for a pic
Hmm, about the kick-start, I also only have some exploders and a parts list - see attached. But I'm pretty sure thats all the parts listed that are needed!
Thanks for this! I'm going to keep my eyes open for a ratty XT/TT 250 and watch Ebay as well. This isn't a priority at the moment, but may work on it over the winter months.
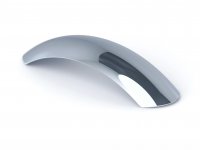
I like the look of the front end with the "lowered" fork (as a result of the clip-ons over the top triple) and the smaller front wheel and wide tire. It doesn't appear that you have much room to spare between the front tire and fender, but again looks great!
Well if you live anywhere near to a wreckers (what do they call them in the states?) it might be worth calling them up and asking if they have any XTs or TTs they are willing to part out, or even sell you the whole engine. I picked most of the parts up for my set that way. Then just complimented that with a few extra parts bought from boats.net that were missing - a couple springs and clips I think.
It's good if it's a long term project, then you can really wait for one to pop up!
That's my plan exactly! We have a motorcycle wrecker/ salvage yard in town that I plan to check out to see what they have. Ideally I will find someone selling an entire bike (XT ot TT) that I can take parts from...
That's my plan exactly! We have a motorcycle wrecker/ salvage yard in town that I plan to check out to see what they have. Ideally I will find someone selling an entire bike (XT ot TT) that I can take parts from...
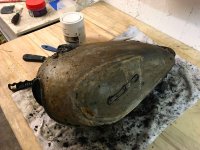
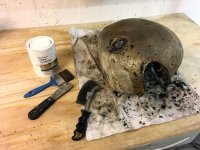
I stripped the tank over the weekend and it really took the whole weekend. I tried this environmentally friendly stripper and I get the feeling that if it's softer on the environment, it's also softer on the paint. It tool 4-5 re-applications and a lot of scraping to get it to this stage - and it looks shit. I kinda wish I had just bought the harsh stuff and worn gloves and a mask, at least the paint would have come off better (I presume?). I even tried putting a really thick layer on, wrapping it is plastic food wrapping (to air seal it), and left it over night. This actually helped a lot, but still didn't take it all off...
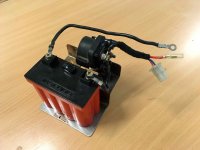
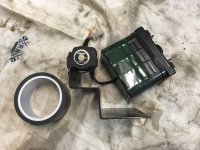
In between coats of stripper I assembled and installed the battery. Rather than paint the red part of the ballistic battery I decided to tape it. Hope it lasts! I think it would last longer than paint that would chip off right away. It can always be re-done later if needed.
I used some thin automotive foam double sided assembly tape on it as well to really hold it in place and reduce vibes a tiny, tiny bit. Then the bracket was bolted in place and battery zip tied down with two massive ones.
Oh yeah, kick stand on too. Felt good to get it off the jack
Wow. What a pain in the ass. I HATE stripping old paint... As nice it is to have a sexy new paint job it's almost worth just sanding/ filling over the old paint so you don't have to deal with this stuff. My experience is the same as yours. The "environmentally friendly" stuff doesn't work well and the stuff that does work is toxic as hell!
This site uses cookies to help personalise content, tailor your experience and to keep you logged in if you register.
By continuing to use this site, you are consenting to our use of cookies.

 SR250_BatteryTrayDevelopment.jpg323.2 KB · Views: 286
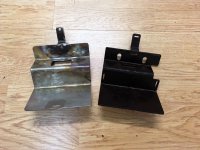 SR250_BatteryTray_SS.jpg491.7 KB · Views: 279
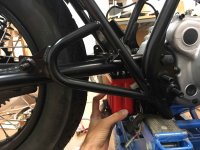 SR250BatteryTrayContext2.jpg398.1 KB · Views: 314
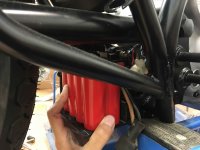 SR250BatteryTrayContext1.jpg333.3 KB · Views: 283
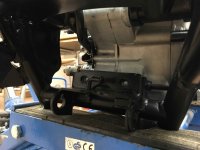 SR250_BatteryLocation.jpg339.1 KB · Views: 274
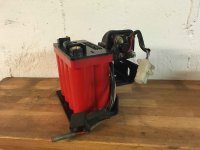 SR250_BatteryTray_Prototype1.jpg328.7 KB · Views: 283
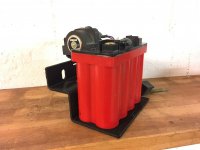 SR250_BatteryTray_Prototype2.jpg278.1 KB · Views: 272