How I made a cheap seat myself

bigr

New Member
Hi All,

I am almost finished with my Street Tracker project. I promised to do it all myself, with no professional help. As you can see it is a unique project. So far all I have farmed out is the welding, which my brother did.

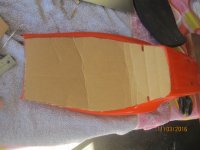
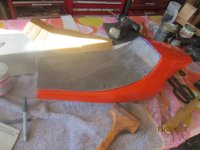
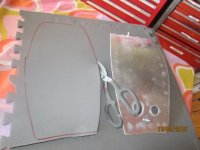
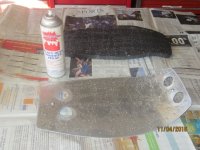
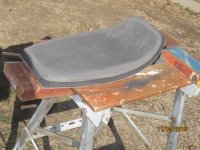
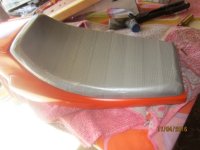
The seat is from Ryca. I also bought their foam, which in retrospect was a ripoff. I intended to do the upholstery at home. I used some vinyl left over from another project. It came out well, not professional quality but I can say I did it myself.

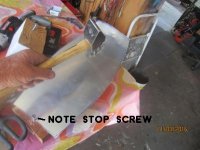
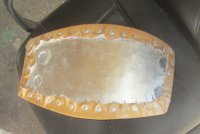
The seat will be a simple affair, no sewing or seams, pleats, etc. I took step by step pictures and will show you how to do it. The total cost for all materials and supplies, including glue, pop rivets, foam, studs, foam etc was less than 40 dollars. You wanna see how I did it?

John in Kalifornia

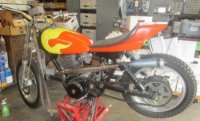
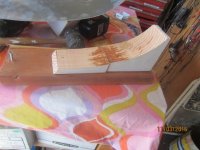
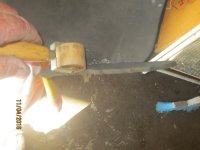
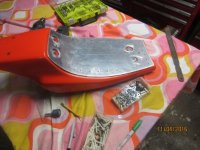
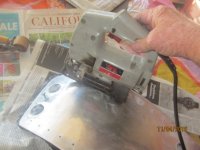
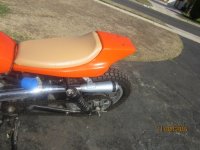
First pic is of bike before upholstery. You can see the foam on top of the fiberglass seat. I was just gonna glue it to the base but that looked tacky.
 

Attachments

  • TRACKER NO SEAT.jpg
    TRACKER NO SEAT.jpg
    98 KB · Views: 1,537
OK, here we go. First you must make a pattern for the seat pan; I used cardboard.

Then you need to cut out the pan itself. I used 3003 aluminum .063 thou, or 1/16th thick. What tool you use to cut it out isn't critical. I have an old Ryobi wood cutting band saw that does not have a slow speed for metal cutting. If you use a metal cutting blade and go slow it will cut aluminum, not steel though.

The seat pan has to be curved to fit the base. This is why we use the 3003 alloy, it bends and doesn't crack like a stronger alloy might. 3003 is used extensively for race car interiors. I cut up some 4 by 4 wood posts into curved forming blocks. The band saw worked for this, too. I made up both convex and concave blocks. They are mounted on longer pieces of wood.

John in Kalifornia
 

Attachments

  • cardboard template.jpg
    cardboard template.jpg
    94.7 KB · Views: 1,376
  • bandsaw.jpg
    bandsaw.jpg
    91.1 KB · Views: 1,348
  • convex block.jpg
    convex block.jpg
    101.1 KB · Views: 1,404
  • form reverse.jpg
    form reverse.jpg
    100.7 KB · Views: 1,428
OK, now we have the metal base and the forms needed to curve it into shape. Note: you can't cut it to the final outline until you curve it to match the seat. Leave it oversized, it won't hurt anything.

I don't have a metal shop, an English Wheel, metal roller, etc. No Snap-On tools, either. What I do have is lots of patience and a number of BFH's from Harbor Freight. You can see where having a wooden form to back up the metal comes in handy. I don't have metal shop experience and am making up stuff as I go along. The whole point is to do it at home, not throw money at someone else who may do a nicer job. It's my bike and I BUILT IT MYSELF!

Just whack on it with whatever tools you have at hand. The shot filled "soft blow" hammer is especially useful. Ya can't have too many hammers! It helps to have some bodywork dollies but they aren't really needed. Use a plastic faced hammer for the final smoothing. Keep at it til the seat pan fits the curvature of the seat.

You may find that the metal wants to shift down off the form as you try to establish the concave curve. I screwed a big sheet metal screw into the wood form to keep the metal plate from slipping down.

John in Kalifornia
 

Attachments

  • hammer one.jpg
    hammer one.jpg
    19.2 KB · Views: 1,157
  • seat pan curved.jpg
    seat pan curved.jpg
    101.4 KB · Views: 1,124
  • hammer two.jpg
    hammer two.jpg
    101.9 KB · Views: 1,140
OK, now we got the seat pan cut out and curved. Put it on the fiberglass base and mark where you may need cutouts to clear mounting bolts, etc. To fasten the cover to the base we will use Pop rivets. I drilled 1/8 inch diameter holes around the periphery of the pan about 3/4 inch in from the edge. Spacing was IIRC, 2 inches, except on the corners where I put extra holes.

Note, you will have to also drill holes in the seat base for the studs that were installed on the metal pan. Mount the pan to the base and mark around the outside where it will need to be trimmed to fit. Remove the base from the pan and trim the aluminum for a nice fit. I used a flapper sanding disc on an angle grinder for this.

Now, for the foam. I used some high density foam that I bought from Ryca when I purchased the fiberglass seat. I see it is now listed at 59 dollars! I did use this for the bottom layer. I think from the pics on the Ryca site that they intended this to be the total of the seat upholstery, with no covering. This was not what I would call a well thought out solution. I wanted a bit more padding.

Answer, Harbor Freight foam anti fatigue mats. I bought a pack of 4 for ten dollars. The density was just right. Glue the layers of foam to the aluminum pan. Don't worry if it is too big, it will be sanded down. If there are places where the foam is too small, just glue on a patch. A great tool to have is a wallpaper seam roller. Use it to make sure all the foam is fastened down securely.

John in Kalifornia
 

Attachments

  • roller glue patch.jpg
    roller glue patch.jpg
    84.1 KB · Views: 1,299
  • foam cut out.jpg
    foam cut out.jpg
    91.1 KB · Views: 1,279
  • foam mat.jpg
    foam mat.jpg
    86.9 KB · Views: 1,271
  • foam glue.jpg
    foam glue.jpg
    106.1 KB · Views: 1,274
  • seat pan with holes.jpg
    seat pan with holes.jpg
    104.3 KB · Views: 1,273
Now we have a seat pan with two layers of foam. Time to do some shaping!. First cut the foam to fit the aluminum base. I used a metal cutting blade on a jig saw. Others say to use an electric carving knife. Whatever works.

Use the studs mounted on the bottom of the pan and bolt the foam/aluminum assembly to the shaping wood block you used to make the curve. To extend the studs use coupling nuts and threaded rod. Take the whole assembly out to the yard where the wind can blow away the foam bits. This is a messy process! Mount everything to a Workmate stand or something else that won't move around.

Now sand to your heart's content to get a nice curved edge on the seat. The 7 inch disc sander was rather too much. I found the flapper disc on the angle grinder to work the best. Keep going over it with your fingertips and smooth out the rough spots. If you have some small gouges no big deal, they will be covered over.

John in Kalifornia
 

Attachments

  • seat on stand.jpg
    seat on stand.jpg
    115.9 KB · Views: 1,289
  • studs in wood.jpg
    studs in wood.jpg
    22.9 KB · Views: 1,263
  • sanding stand.jpg
    sanding stand.jpg
    139.1 KB · Views: 1,293
  • saw trim foam.jpg
    saw trim foam.jpg
    93.3 KB · Views: 1,276
Starting to look like a seat now! I found some vinyl covering left over from another project. What you use is up to you. I did not want to have to beg the use of a sewing machine or farm out the covering job so I intended to just stretch the vinyl around and tack it down. This is where you can put in pleats or seams or whaterver you desire. I stayed with the KISS principle.

To allow the covering to slide over the foam and also to smooth over any divots I covered the whole seat with duct tape.

Cut the covering oversized to fit. I used a quality pair of Gingher scissors for fabric cutting, no Harbor Freight cutting tools! If you leave it in the sun for a few hours it gets more stretchy, a heat gun helps also.

Then it was just a matter of pulling and stretching the covering over the form. Use washers under the heads of the Pop rivets or the fabric will pull through. I started in the middle and worked my way to each end. Because the seat base was curved I had to make sure to stretch across the seat left to right to keep the cover fastened down. If you tried to stretch fore and aft instead the fabric would not lay flat.

At the corners and on the end you have to do some improvising. I had to cut some darts in the cover and also fold it over itself. A Monokote heat gun helped with the stretching. You may need more rivets. If that is the case you need to hold the fabric with one hand and drill through the fabric into the metal base with an electric drill. Warning! Put a wheel collar or some other form of stop on the drill bit so you don't drill through the foam!

This is very hard on your hands and they might start to cramp up. You can always take a break. It helps to do this on a hot day in the sun so the fabric will stretch. If you make a mistake you can drill out the rivets. Worst case if you screw it up is cut another piece of vinyl and start over.

It's done and you can say you did it yourself! What do you guys think?

John in Kalifornia
 

Attachments

  • duct tape.jpg
    duct tape.jpg
    89.6 KB · Views: 1,273
  • cover and cat.jpg
    cover and cat.jpg
    16.8 KB · Views: 1,251
  • bottom finished.jpg
    bottom finished.jpg
    1.3 MB · Views: 363
  • done seat.jpg
    done seat.jpg
    98.6 KB · Views: 1,316
Looks pretty good. What kind of vinyl did you use? I know there's 2 way and 4 way stretch vinyl. I assume the 4 way would be easier to work with.
 
Hi,

I really don't know what kind it is. It seems to have no pronounced grain either way so that probably means "4-way." Didn't know there were different kinds. The secret from my perspective is to use the heat gun and have strong fingers. I do know that it will tear unless you use washers under the Pop rivets.

John in Kalifornia
 
Back
Top Bottom