1987 GPz305 "Goldie"

animalrobot

New Member
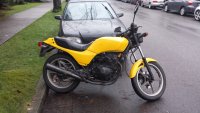
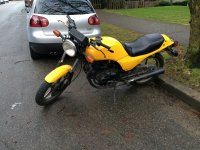
I recently purchased a 1987 Kawasaki GPz305 (Belt Drive) from a woman named Goldie.

http://www.motorcycledb.com/Kawasaki_GPZ_305_Belt_Drive_1987/31585

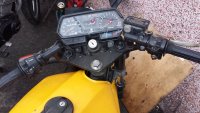
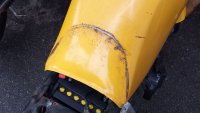
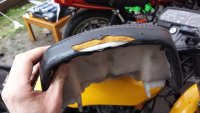
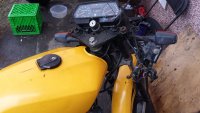
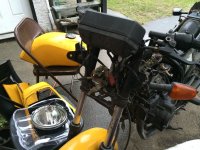
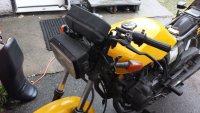
She got the bike for a couple hundred bucks from a friend, with the intention of taking lessons and getting her license. At 5'2, she felt too short for the bike, and decided to let it go. It was parked in an alley and had been sitting, uncovered, for 2 weeks during a period of heavy snow (for Vancouver), and some rain. The front fender, gas tank, side covers, and cowl were all rattle-canned bright yellow. Combined with the square front light and possibly the ugliest instrument panel ever made, the bike was not making a strong impression.

It took about 30 seconds to start. We chatted while we let it warm up for a few minutes, and then I took "Yellow" for a spin.

I had previously been riding a 1982 Kawasaki 250 LTD. However, I have to give it back to the owner when he returns from Columbia in September. I have very little experience with motorcycles, to date. So please understand that my opinions are subjective.

I immediately liked the riding posture of the GPz more than the LTD. I felt like I was in a more active posture, but still relatively neutral. I felt like this would be more comfortable for longer rides. The 305 is substantially faster. It redlines at 11k, which allows for a lot more play in the power band where the bike is most fun (6500+). The exhaust was nice quiet, which I really like.

Earlier in the week, my friend let me borrow his 2006 Ninja 636 for a few days. Well, that changed everything I knew about riding a motorcycle. I couldn't believe that bike could feel so responsive. I hated the look of the bike, but I loved the feeling of riding it. Getting back on the 250 was an eye-opener, for sure. I knew that I wanted a bike that was simple enough mechanically that I could work on it myself. But, I also wanted something light and agile for congested city riding.

I rode "Yellow" out of the alley and on to the street. I gave it some gas and felt the engine surge to life. Everything felt so right. I decided that I was going to take it before I got to the end of the block.
 

Attachments

  • Goldie.jpg
    Goldie.jpg
    868.1 KB · Views: 824
  • Lola and Ninja.jpg
    Lola and Ninja.jpg
    777.6 KB · Views: 598
After buying the bike, I did a ton of research on it. It sounds like the main gripes owners have with this bike are; the lousy oil pump drive sprocket, which is made of nylon, and prone to breaking when it spins too quickly in cold motor oil; the oil strainer, which clogs easily, because it's just a little tube with a piece of gauze at the end.

http://www.gpz-305.de/Bilder/Technik/Motor/Oelpumpenritzel.jpg
http://i48.photobucket.com/albums/f216/stinkwheel/305/Image025.jpg

Since the engine is a bored out z250, it's already under considerable stress. And since this bike was generally regarded as a gutless commuter unworthy of the GPz fairings, people tended to bag the shit out of them. There is a lot of hearsay about these bikes having catastrophic top-end failures at 12,000 miles.

My bike is at 58,000 kilometres. I don't even know if that's accurate. It's just what the odometer reads. When I change the oil next, I will inspect these parts. In the mean time, I have been warming my bike up for 5 minutes before riding, and riding easy for another 5 minutes or so.
 

Attachments

  • Goldie Odometer.jpg
    Goldie Odometer.jpg
    788.8 KB · Views: 531
It's winter in Vancouver, BC. But, it's been unseasonably dry. I've had a lot of fun riding this bike around, the past few weeks! This has given me a chance to get to know the bike a lot better, and to figure out what I'd like to do with her.

When I was shopping around for motorcycles, one old guy with a '79 CB750 said to me, "Be careful about how much money you sink into old bikes." I know that it would be too easy for me to spend a lot on making this bike "perfect". But, I know that perfect is subjective. And nothing is ever really "done". Art is never complete, it is merely abandoned.

With that in mind, I'd like to make economy my mantra for this project. I am going to focus on low-cost, high-impact modifications to create something equally fun to ride, and look at. Here is my preliminary list of things to do:

Workshop Manual
  • Buy it

Oil
  • Change Oil
  • Inspect Oil Pump Drive Sprocket
  • Inspect and clean Oil Strainer

Intake
  • Check for air leaks
  • Disassemble and clean carbs
  • Replace carb boots
  • Remove air box
  • Install pods
  • Rejet carbs

Paint
  • Remove front fender, gas tank, and cowl
  • Sand
  • Choose color
  • Rent paint gun
  • Do it

Seat
  • Chop seat pan
  • Buy foam
  • Shape foam
  • Upholster it
  • (optional: Order new seat in case I ruin everything)
  • (optional: Skateboard seat pan)

Engine Covers
  • Clean or sand these down (currently covered in dirt and gunk)
  • Replace gaskets, if I can find them

Header
  • Clean rust from headers
  • Polish or repaint? Or fuck it? Maybe the bike looks good with rust
  • Header wrap? Will this look stupid with the black engine?

Exhaust
  • Check exhaust exchange for rattle
  • Cut exhaust pipes and remove some of the baffling
  • Maybe don't do anything

Tail light
  • Order a new tail light with integrated turn signals
  • Install tail light

Gauges
  • Go to bent bike and find a new Speedo/Tach
  • Replace instrument panel with new shit
  • Find LEDs for neutral and turn signal indicators
  • Find a cool housing for the fuel gauge

Bars
  • Flip bars
  • Find new grips
  • Buy or make new control switches

Dat Gap
  • Cut Fender
  • Move battery
  • Move stater
  • Move regulator rectifier
  • Remove chain guard
  • Remove center stand
 

Attachments

  • 20131215_155829.jpg
    20131215_155829.jpg
    819.3 KB · Views: 442
  • 20131214_141619.jpg
    20131214_141619.jpg
    721.8 KB · Views: 550
  • 20131214_141557.jpg
    20131214_141557.jpg
    500.7 KB · Views: 433
  • 20131214_141545.jpg
    20131214_141545.jpg
    566.1 KB · Views: 429
Well, since I have nothing else to do today, I'll just keep posting.

Paint Update

I looked into renting a paint sprayer. Kerrisdale Equipment rents them out for $75/day. Since my primary mode of transport is a bicycle, I would need to rent a zip car to pick this up. That wouldn't cost very much. Maybe $10-15. Automotive paint seems like it's almost $100 per pint. I didn't realize it would cost that much! Right now, I have estimated a cost of $200, plus taxes, to paint my tank, fender, and cowl. Rattle cans are starting to look like the right option.

I originally wanted to paint the tank a dark green with a gold flake. I guess now I'll be looking at what RustOleum has to offer. Off the top of my head, I'm thinking a glossy burgundy, or a metallic grey.

Bars
Stock mirrors are gone and replaced with a bar-end mirror. I decided to flip the bars upside-down, so I removed the throttle, and the unit beside it with the killswitch and starter. I then took off the clutch and the controller on the other side. Took the bars off next.

Then I realized that if I wanted to flip the bracket with the splines that lock the bars into position, I would need to remove the whole yoke. (I think that's what it's called. First bike. No manual. Going for it.) I didn't have a wrench big enough to get around the nut at the top of the fork, so I borrowed a friends motorcycle and rode to the hardware store.

Armed with a 27mm wrench, I tried to turn these bolts and failed entirely. The sun was setting, so I reassembled everything and just wrote the day off as a learning-experience.

Instrument Panel
The master cylinder seems to have broken the instrument panel. I assume this was from the bike being dropped. There are numerous signs of this bike being dropped on both sides. I'm going to replace this instrument panel soon. But, I'm also somewhat tempted to try and reuse the gauges that I have and just build new housings for them. Soup cans might work!
 

Attachments

  • Bars Off.jpg
    Bars Off.jpg
    688.6 KB · Views: 426
Headlight

My friend bought a bottom-mounted headlight to replace the stock light on his GS400E. I was thinking about buying a smaller headlight for my bike, possibly a bottom-mounted unit as well. Instead, I asked my friend for his stock head light. He graciously parted with it, and I began to remove the rectangular horror from the front of my bike.

I had quite a few wires inside my headlight assembly, but it was nothing compared to the rat's nest that my friend is dealing with! The previous owner of his bike did a lot of work on it, and he did everything wrong.

The stock light from the GS400E looks a million times better than the stock light from my Kawasaki! The Suzuki light is not as wide, so the fork covers have to swing in a bit on either side to make it work. I will add something between the light and the cover eventually, to even it all out. A skateboard bushing on either side might do the trick.

I may not order a new headlight at all. I like the way this one looks. I want to remove as many unessentials as I can from this bike. It would be nice to remove the fork covers. But, if I am going to keep this light in the name of saving dollars, I might as well see what I can do with it. There are some little brackets coming off of either side. I wonder if these were for fog lights? Maybe I'll order some micro turn signals and mount them there.
 

Attachments

  • new Headlight.jpg
    new Headlight.jpg
    1.2 MB · Views: 470
  • GS400E Wires.jpg
    GS400E Wires.jpg
    798.3 KB · Views: 407
  • Headlight wires.jpg
    Headlight wires.jpg
    973.4 KB · Views: 503
  • Fork Covers.jpg
    Fork Covers.jpg
    664 KB · Views: 468
Top-end Maintenance

Well, I ran into my first real challenge with the bike. I wanted to check the valve clearances, so I looked up the specs online and started to take the head off. (In case anyone is wondering, the specs I found for the valves said .014-0.19mm for intake and .21-.26 on the exhaust side.)

The engine cover is pretty dirty. I was nervous about taking the cover off, as I didn't want to get dirt inside the engine. I wiped it down a little. But, it was really caked on there. I'm not sure if or when it was last opened. I also realized, after loosening all the bolts, that I did not have a spare head gasket for the engine, and the dealership in Burnaby is closed until the 3rd! Shit. I accepted the fact that I might not be riding my bike again for a while.

I started to take the head off, but it seemed stuck in one corner. I tried to jiggle it around, but didn't have any success. I tightened down the other three corners again, part way, to take pressure off of the stuck corner, allowing it to unstick itself. But, it didn't unstick. It's still stuck.

I don't have a manual, so I don't know if I missed an important step. I am certain that I unscrewed each bolt. Not sure if I should just man-handle the whole thing off or if that is a horrible idea? Do I run the risk of breaking anything?
 

Attachments

  • Top End.jpg
    Top End.jpg
    896.5 KB · Views: 439
If you want half way between spray bomb and pro job. Get a wagner power painter from walmart or home depot and then just pick your poison as far as paint goes, use tremclad or something similar mixed in whatever color you want, thin it down and spray it through the gun, for under $100 you can do the entire bike. you'll want to do some searching on the mix ratio, but its a great way to paint things.

I did a quick search for a manual but i could only find one in german hahaha

http://www.mediafire.com/view/cm1z4ejh9gi/305_Supplement_German.pdf

Might have better luck searching for a 250 one?
 
D4N63R said:
If you want half way between spray bomb and pro job. Get a wagner power painter from walmart or home depot and then just pick your poison as far as paint goes, use tremclad or something similar mixed in whatever color you want, thin it down and spray it through the gun, for under $100 you can do the entire bike. you'll want to do some searching on the mix ratio, but its a great way to paint things.

I did a quick search for a manual but i could only find one in german hahaha

http://www.mediafire.com/view/cm1z4ejh9gi/305_Supplement_German.pdf

Might have better luck searching for a 250 one?

Thanks for this! Even without the ability to read German, I can still get quite a bit of information from this. I can also run the PDF through Google Translate.

As for the paint, that sounds like an excellent solution! I'll look into it over the next few days.
 
Another paint option is rattle can color and Max2K clear over the top. Cheap and effective, but less range of colors. Duplicolor have some interesting metallic colors that might work.
 
If you do go rattle can be sure to read the how to found in the $50 mod thread it's a great step by step to achieving a good finish with spray paint.

Edit: it's in the paint section not the mod thread but the mod thread is essential as well hahaha

Here's the paint thread
http://www.dotheton.com/forum/index.php?topic=10993
 
If your checking the valve clearance only, don't remove the head. Remove those large looking circular bolts in the pic you posted. They are there for that reason. Headlight made a huge difference. As far as the paint, I would try rattle can personally. Bbq paint works pretty good on exhaust to help freshen it up. Good luck from up in whistler
 
Hi from the UK. I have a Z250 from 1983 which has a lot in common with yours. I'm looking at transforming it in the late summer. Your thread is bookmarked!
 
Shawzie said:
If your checking the valve clearance only, don't remove the head. Remove those large looking circular bolts in the pic you posted. They are there for that reason. Headlight made a huge difference. As far as the paint, I would try rattle can personally. Bbq paint works pretty good on exhaust to help freshen it up. Good luck from up in whistler

Hey Shawzie, thanks! I noticed these plugs after I loosened all the nuts holding the top-end on. Oops. If I'm going to check the valves through those holes, how do I turn the engine over and get it to top dead center?

After unsuccessfully trying to take the top-end off, and tightening everything back down again, I have noticed some oil leaking over the engine block. I called up my local Kawasaki dealership and ordered a new head gasket. I will try to take it all off again, and replace the gasket. Hopefully this time I can get that damn engine apart!

For now, I am back on Lola, the little Kawi 250 LTD I have on loan from my buddy.

BBQ paint on the exhaust seems like a smart move. I'm going to give that a try!
 
Well, after a few conversations and a little bit of research, I think I figured out the solution to my problem! The first problem was me mixing up the names of the various engine components that I was working on...

I attempted to remove the valve cover, not the top-end. Turns out it was completely unnecessary to remove this, as there are convenient little portholes (I still have no idea what these are properly named) that I can open, in order to check the valve clearances.

The reason that I was unable to remove the valve cover, is that my engine was not at top dead center, causing either the piston or the cylinder (not sure which one) to be pressing against the cover. I'm glad that I didn't try to rip the cover off with any substantial force!

After bolting the valve cover back down, I noticed a good amount of oil leaking out over the engine covers. I previously called Kawasaki to order a new head gasket, but I now understand that I need a valve cover gasket, instead. Noob life, right here. Turns out there is no such thing as a valve cover gasket for the GPz305 or EX305. Instead, they use a liquid gasket.

I am currently waiting for a tail light in the mail, along with a bunch of other parts. In the meantime, I will change the oil, check and adjust the valve clearances, get that liquid gasket seal around the valve cover, and start thinking about painting the tank, fender and cowl.

I'll leave you guys with a little inspiration. Here is a shot of an 88' GPz that a friend of mine stripped down....
 

Attachments

  • STU.jpg
    STU.jpg
    644.6 KB · Views: 550
Considering RustOleum Metallic Purple for the paint job. Thoughts?
 

Attachments

  • rustoleum purp.jpg
    rustoleum purp.jpg
    7.6 KB · Views: 1,898
  • rustoleum purp swatch.jpg
    rustoleum purp swatch.jpg
    5.5 KB · Views: 1,988
I like purple (my 2 favorite MG colors are Aconite and Black Tulip, both purples) but I'm probably in the minority. Buy a can and do a sprayout on a piece of steel to see what the color will be like in person, don't go by the color swatch alone.

Put some hangers on it and call it the Grape Ape? :)
 
nice little bikes. Purple would not be my first or tenth choice, not only because i don't liek it but because it would make the bike very difficult to sell. Still, as you don't have much in it and probably wouldn't get much out the color is mostly just a question of what you like.
 
krafty said:
I like purple (my 2 favorite MG colors are Aconite and Black Tulip, both purples) but I'm probably in the minority. Buy a can and do a sprayout on a piece of steel to see what the color will be like in person, don't go by the color swatch alone.

Put some hangers on it and call it the Grape Ape? :)

I had a feeling that it wouldn't be that popular of a choice. I think I'll have to consider some more conservative choices. RustOleum makes a nice deep speckled grey. I could also try automotive touch-up paint. There is a burgundy color that I've seen which could be really nice.

If I end up sticking with purple, I'll probably call it "The Grapist".

http://www.youtube.com/watch?v=mqgiEQXGetI
 
Back
Top Bottom