We noticed you are blocking ads. DO THE TON only works with community supporters. Most are active members of the site with small businesses. Please consider disabling your ad blocking tool and checking out the businesses that help keep our site up and free.
You are using an out of date browser. It may not display this or other websites correctly.
You should upgrade or use an alternative browser.
You should upgrade or use an alternative browser.
CB450 Tracker
- Thread starter Pete12
- Start date
Pete12
Been Around the Block
Thank you, getting close now. I was going to go with vapour blasted covers but decided to go with satin black powder instead.NoRiders said:This is coming on well.....engine will look super clean. Machine work is ace.
I'm contemplating my engine cases and what to do with them...thinking black case with vapour blasted covers could look sweet.
Thanks, having a lot of fun with the mill, and haven't even looked into food production equipment yet haha. I'm pretty keen to get that third axis working though, now that'll be fun.Hurco550 said:Ive enjoyed watching this build. I spent a lot of time behind a 2 axis proto trak. You sure are putting yours to good use (way more exciting than making food production equipment lol)
Pete12
Been Around the Block
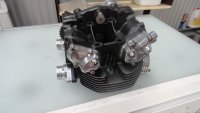
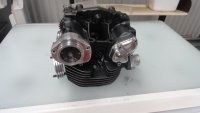
I got the cylinder head painted yesterday, and then rubbed back the fin edges to match the cylinder. The head has lapped valves, new valve guide oil seals, and all put together with assembly lube, so it should be good to go. I need to get some new cylinder head washers before I bolt it together, but as I have to go to Indonesia for work on Sunday I fitted the old engine covers to the cases and then filled up the crankcases with oil until such time as I get home and start working on it again. The bottom end was all assembled dry, so the oil will have a chance to get in and keep everything lubricated until I'm ready to get back into it.
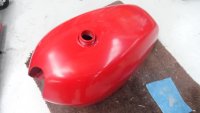
I also put a shot of colour on the tank, so I need to rub that back flat and then spray the design on. I'm thinking a gold strip down the centre of the tank and tailpiece broken up with a white pin line, but it's all subject to change, depending on how I feel that day haha.
I also put a shot of colour on the tank, so I need to rub that back flat and then spray the design on. I'm thinking a gold strip down the centre of the tank and tailpiece broken up with a white pin line, but it's all subject to change, depending on how I feel that day haha.
Attachments
That head looks trick.
Pete12
Been Around the Block
advCo said:That head looks trick.
Thanks advCo, I'm pretty happy with it and my brother came over this afternoon and he was very happy, so all good there. I wish I was a better photographer though, my photos always look terrible - I think it looks better in the flesh.
crazypj
Split personality, I fake being smart
I know a little about photography (I know a little about almost everything, guess that's what happens when you get old ") ) I did actually win a national competition once though
) I did actually win a national competition once though
Taking good pictures of something black, on a white surface with polished shiny bits is about the most difficult thing you can do, even professionals have problems with it. I think you did pretty good
) I did actually win a national competition once thoughTaking good pictures of something black, on a white surface with polished shiny bits is about the most difficult thing you can do, even professionals have problems with it. I think you did pretty good
Pete12
Been Around the Block
Haha, thanks for that, I feel better, but it still doesn't help with my other photo shots...crazypj said:I know a little about photography (I know a little about almost everything, guess that's what happens when you get old
Taking good pictures of something black, on a white surface with polished shiny bits is about the most difficult thing you can do, even professionals have problems with it. I think you did pretty good
Pete12
Been Around the Block
I hung the cylinder head in the frame to see how everything would line up and it appears that I'll need some offset adaptors for the throttle cables to tuck them inside the tank, no big deal. I also made up the brackets to mounts the back of the battery box to the inner rear guard, a plate for the starter solenoid and a blanking plug for the tacho cable.
Attachments
crazypj
Split personality, I fake being smart
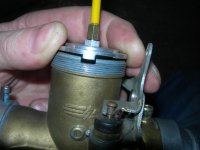
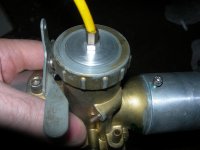
Are you carb tops one piece or two piece? (not that it really matters) I made new 'top flanges' for an old set I have, should have angle drilled for cable adjuster threads but didn't think about it at the time. There are probably pics on here somewhere but I don't remember where as they could be in someone else's build thread? I'll see if I can find the original pics
crazypj
Split personality, I fake being smart
Had to go back a way, Looks like I modified carbs in 2008 or 2009. I couldn't get a decent clearance under tank, the welded flange was just about in exact same position as cable exit, even angled entry adjusters wouldn't originally work. Couldn't find pictures so probably on XS650.com somewhere?
Attachments
Pete12
Been Around the Block
That's a nice way to do it pj, I received my angled adjusters and they fit perfectly, so all good there.crazypj said:Had to go back a way, Looks like I modified carbs in 2008 or 2009. I couldn't get a decent clearance under tank, the welded flange was just about in exact same position as cable exit, even angled entry adjusters wouldn't originally work. Couldn't find pictures so probably on XS650.com somewhere?
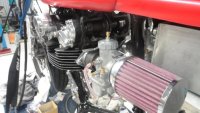
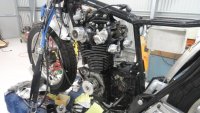
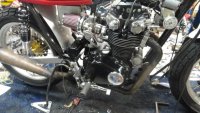
Finally got back from O/S and my brother came around and helped me install the cylinder head. That was easy enough but getting the cam timing done and reinstalling the camchain was a PITA. All done now though, and the engine is back in the frame. I need to finish polishing the cam covers and they can go on once the tappets clearances are adjusted.
Attachments
Pete12
Been Around the Block
This plan is finally coming together..
I got back home from overseas and started doing some work on the bike. Made up a mirror stem to suit a $6.50 mirror from ebay. It's a lot smaller than it looked in the photo, but this happens to me all the time. Anyway, all good, mirror finished and legal.
https://i.imgur.com/uuyxuCm.jpg[/IMG]]
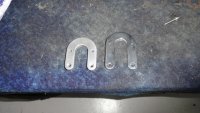
I made up a gear lever, cutting it out of some 6mm plate and then filing, filing and more filing. I only have it tacked together now so that I can adjust the position when the seat is in place. I know it can be moved on the splines, but sometimes they end up between the splines, so I'll just wait.
https://i.imgur.com/ThPoJLa.jpg[/IMG]]
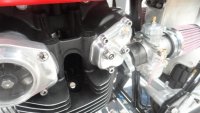
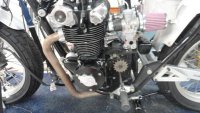
I also assembled all the drive gear and alternator and fitted both covers. I have fitted the exhaust as well so that I can make up the rear mount for it and then get it painted. The footrest mounts that I made previously won't fit now because the exhaust is in the way, so I'll make up another set and put the old ones into the ever increasing pile of redundant parts that I have made for this project. I am pretty happy with the engine colour though, the satin black sidecovers go well with the flat black engine cases, and the polished bits stand out quite well.
I got back home from overseas and started doing some work on the bike. Made up a mirror stem to suit a $6.50 mirror from ebay. It's a lot smaller than it looked in the photo, but this happens to me all the time. Anyway, all good, mirror finished and legal.
https://i.imgur.com/uuyxuCm.jpg[/IMG]]
I made up a gear lever, cutting it out of some 6mm plate and then filing, filing and more filing. I only have it tacked together now so that I can adjust the position when the seat is in place. I know it can be moved on the splines, but sometimes they end up between the splines, so I'll just wait.
https://i.imgur.com/ThPoJLa.jpg[/IMG]]
I also assembled all the drive gear and alternator and fitted both covers. I have fitted the exhaust as well so that I can make up the rear mount for it and then get it painted. The footrest mounts that I made previously won't fit now because the exhaust is in the way, so I'll make up another set and put the old ones into the ever increasing pile of redundant parts that I have made for this project. I am pretty happy with the engine colour though, the satin black sidecovers go well with the flat black engine cases, and the polished bits stand out quite well.
Attachments
Pete12
Been Around the Block
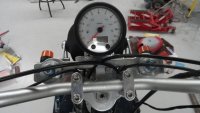
The tacho was getting a little crowded from the cables so I made up another bracket to move it forward 12mm. I fitted it up and there is a lot more room there now, so I guess the next thing to do will be connect up all the cables. They will all require shortening so I will get the scope iron out and get started on it. I also need to make up new rear footrest brackets and incorporate the muffler mount in the rhs one, then I can make the mounting bracket and weld it on to the pipe, then get it painted.
Attachments
Really nice work man 8)
Pete12
Been Around the Block
I made up the choke cables, which worked out OK, but then my scope stopped working. The problem is the little carbon block inside, so I've ordered a new one - the throttle cables will have to wait until I get it.
https://i.imgur.com/KxJAxn0.jpg[/IMG]]
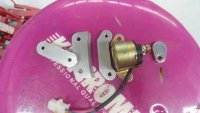
I welded the starter solenoid bracket on the top of the inner rear guard, which tucks it out of the way but is still easy to work on.
https://i.imgur.com/uRQCGGb.jpg[/IMG]]
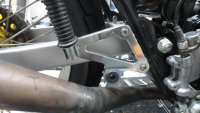
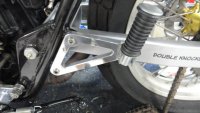
Today I made up the new rear footrest brackets. The right hand side one has a bracket for the exhaust so that is tomorrow's job. I have used old school footrests, which match the front ones and don't look too bad.
https://i.imgur.com/KxJAxn0.jpg[/IMG]]
I welded the starter solenoid bracket on the top of the inner rear guard, which tucks it out of the way but is still easy to work on.
https://i.imgur.com/uRQCGGb.jpg[/IMG]]
Today I made up the new rear footrest brackets. The right hand side one has a bracket for the exhaust so that is tomorrow's job. I have used old school footrests, which match the front ones and don't look too bad.