We noticed you are blocking ads. DO THE TON only works with community supporters. Most are active members of the site with small businesses. Please consider disabling your ad blocking tool and checking out the businesses that help keep our site up and free.
You are using an out of date browser. It may not display this or other websites correctly.
You should upgrade or use an alternative browser.
You should upgrade or use an alternative browser.
Next Project - Plate Alloy 5.5m Xtracab
- Thread starter XS750AU
- Start date
XS750AU
Coast to Coast
Don't worry, I did cost making vs buy!SONIC. said:What, you didn't want to build a trailer?
The trailer cost me AU$3,750 to buy outright. By the time I bought all the steel, wheels, axels, brakes and fittings plus had it hot dip galvanised it was going to cost me $2,900. So for $850 I would rather spend my time riding the XS896 or out fishing. ;D
XS750AU
Coast to Coast
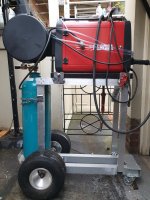
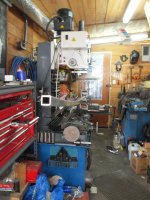
Getting ready for the next phase, and I think I will be better off with the Cebora MIG on an elevated trolley.
I made up the trolley out of some go-cart wheels and aluminium sections I had from a previous project.
I still need to make up some draws to go under the welder for bits and pieces.
I made up the trolley out of some go-cart wheels and aluminium sections I had from a previous project.
I still need to make up some draws to go under the welder for bits and pieces.
Attachments
XS750AU
Coast to Coast
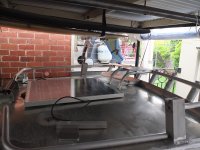
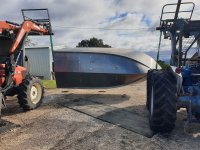
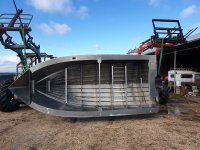
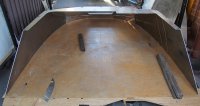
Took the hull up to the farm and lifted it off the trailer with a couple of front end loaders. When lifting we used the bow trailer hitch and at the stern, 2 of the outboard mounting holes. To roll it, lowered it onto wooden blocks and then changed the stern lift point to 1 of the lower outboard mounting holes. That was enough offset when lifted to allow it to gently roll onto its side and then with a small effort roll it right over.
From there it was a simple lift with 1 tractor to get it in the shed to weld. By the end of the weekend all external seams were welded, plus the external chine seam was ground smooth.
From there it was a simple lift with 1 tractor to get it in the shed to weld. By the end of the weekend all external seams were welded, plus the external chine seam was ground smooth.
Attachments


XS750AU
Coast to Coast
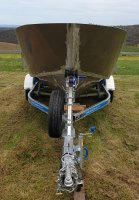
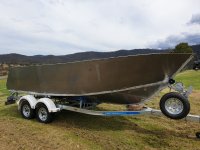
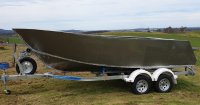
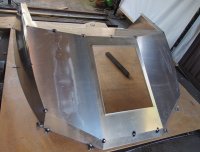
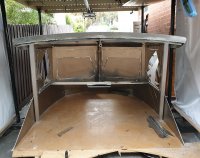
After a family holiday to Japan, I can now get back into it. This weekend I welded on the keel cap which needed to be full length welded and fully sealed to keep the water out. Once that was done I could then weld in the inner keel plates. Does not look any different but it is back on the trailer.
Next I am building the cabin off the boats and on the jig provided in the kit. I do need to get a couple of panels folder in a brake press. Luckily we have a few brake presses at work which I can use. Next weekend I am on the cabin.
Next I am building the cabin off the boats and on the jig provided in the kit. I do need to get a couple of panels folder in a brake press. Luckily we have a few brake presses at work which I can use. Next weekend I am on the cabin.
Attachments
XS750AU
Coast to Coast
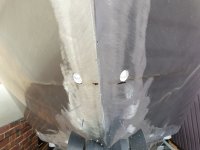
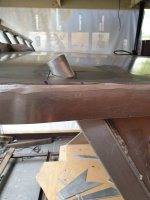
The sides are going to be covered in vinyl wrap, which will overlap at the bow, so the grinding at the bow will be covered. Down on the chine, I will go to a fine stainless wire brush on the grinder to get an even surface, but it will never be like the rolled finish. There will be a 15mm margin from the chine to the edge of the vinyl wrap that will be visible, but as long as it is an even surface I think it will be OK.
XS750AU
Coast to Coast
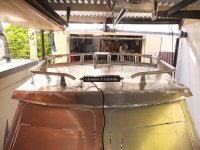
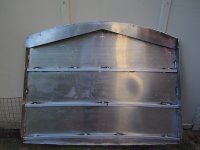
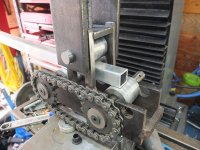
The guys at work folded the panels for the cabin front panel and dash panels on Thursday, so this weekend the assembly started. The roof has an arch, so to help I had a 3 roll former that I built for another project that I wanted to help form the structure. Unfortunately there was not enough gap with the 3rd roller to get the 25mm square section started, so I had to turn off 4mm from each roller to provide enough gap.
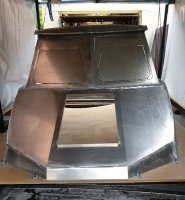
The roof is assembled and all external seams welded. The bottom assembly is tacked together.
Next is to tack in the window frames so the roof can be put in place. Then I have to decide on the best way to weld it all together - if I weld it as is on the jig, then there is a lot of vertical and overhead welding which is not my favorite position.
Attachments
XS750AU
Coast to Coast
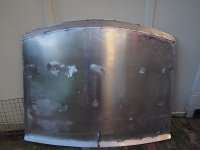
In hind sight I should have just left the roof tacked and fully welded it once the whole cabin was tacked together. The roof had a bit more distortion than I thought it would. I thought it would be easier to weld on the ground. But I am finally getting the hang of how to dial the Cebora in for the different thicknesses and orientation of welds, so it would have been OK.
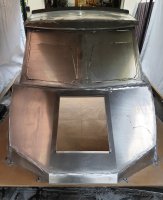
It is all together and the external seams have been ground down. Once it is on the hull and welded into position then I will add some internal welds for some added strength.
The Cebora is very sensitive to the amperage setting. 3mm external edge weld is perfect @ 90amps, not 80 and not 100amp. 3mm to 4mm was best at 120amps and 4mm to 4mm at 145amps. Once it was set right it did not matter if it was horizontal, vertical or overhead, it would weld.
Attachments

XS750AU
Coast to Coast
SONIC. said:Are the windshield pieces left in until it's welded to hold the structure?
I did weld some plates on the inside of the window frames to help control the distortion during welding. Plus I left the panels in the windscreen frames as I thought it could also help control weld distortion. The panels in the windscreen are the end panels for the bunks in the cabin.
I am going to leave the remaining dash panels out until I get it stuck to the hull, as they would add rigidity which I don't want yet.
XS750AU
Coast to Coast
Whow - new format takes a little bit of effort to navigate.
Long weekend in Melbourne this weekend due to the running of the Melbourne Cup (horse race)on Tuesday. I spent the first 3 day up at the farm vaccinating this years calves. Also had a close encounter with a Eastern Brown snake (sorry no photo). I lifted up an old truck tire, and it just looked up at me. It was only a little one , about 1 meter long, they grow over 2m when fully mature. As they are No2 most venomous in the world I was happy enough just to walk away. Also had a bit of fun with the Husaberg FE550.
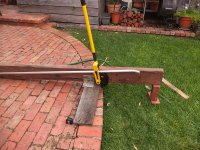
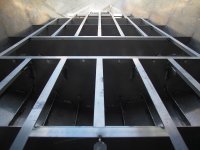
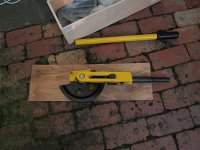
On the boat I welded in the sole (floor) bearers into the hull. I then brought the hull back to Melbourne so I can install the cabin in the next few weeks. Today I did a bit more on the cabin. I started to make up the rocket launcher, rod holder. I also need to start making the grab rails with the Ebay pipe bender.
Long weekend in Melbourne this weekend due to the running of the Melbourne Cup (horse race)on Tuesday. I spent the first 3 day up at the farm vaccinating this years calves. Also had a close encounter with a Eastern Brown snake (sorry no photo). I lifted up an old truck tire, and it just looked up at me. It was only a little one , about 1 meter long, they grow over 2m when fully mature. As they are No2 most venomous in the world I was happy enough just to walk away. Also had a bit of fun with the Husaberg FE550.
On the boat I welded in the sole (floor) bearers into the hull. I then brought the hull back to Melbourne so I can install the cabin in the next few weeks. Today I did a bit more on the cabin. I started to make up the rocket launcher, rod holder. I also need to start making the grab rails with the Ebay pipe bender.
Attachments
XS750AU
Coast to Coast
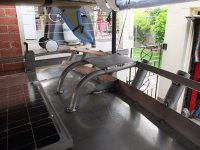
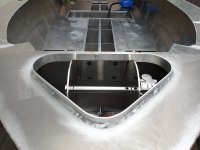
A few fiddly jobs today. The anchor well needed the chine plate to be welded in, but with weld build up I first had to trim the chine plate so that the anchor well floor was set at the correct height. It sits on the top of the Chine plate. It meant trim a little, check the fitment, then trim a bit more. Took 6 steps to get it fitting correctly.
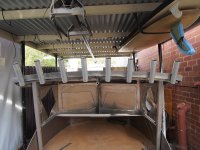
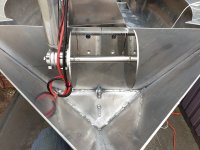
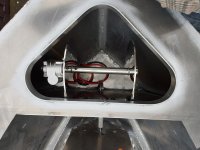
Added 2 drain holes for the anchor well as the top is open and any waves over the bow will fill it. The photo shows the winch motor pointing up, later I rotated the motor 180 deg so it was pointing down which made a much neater installation.
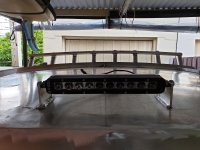
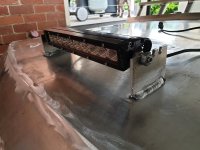
Then installed a LED light bar onto the top of the cabin. In order to prevent glare coming up off the front of the cabin the mounting bracket was set back so the front edge of the roof shades the front of the cabin. Unfortunately the solar panel did not arrive on Friday so I cannot fit it this weekend.
PS. New site format is working well for me.
Added 2 drain holes for the anchor well as the top is open and any waves over the bow will fill it. The photo shows the winch motor pointing up, later I rotated the motor 180 deg so it was pointing down which made a much neater installation.
Then installed a LED light bar onto the top of the cabin. In order to prevent glare coming up off the front of the cabin the mounting bracket was set back so the front edge of the roof shades the front of the cabin. Unfortunately the solar panel did not arrive on Friday so I cannot fit it this weekend.
PS. New site format is working well for me.
Attachments
XS750AU
Coast to Coast
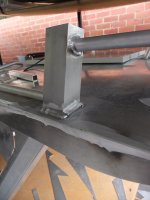
Finished off the anchor well today. It needed a 40 X 4mm strip welded to the inside perimeter of the top deck plate cut out. The kit comes with a 19mm thick ply former that you first roughly form up the strip. Them it is tacked into the top deck plate. The top deck plate was then tacked onto the hull to prevent excessive distortion when welding the perimeter strip in fully. Finally the top deck plate is fully welded onto the hull. The winch is mounted with a 6mm plastic plate to prevent electrolysis between the stainless steel winch and alloy bulkhead.
Also added what I would call a wiring grommet the through the roof of the cabin (on both sides). There is going to be a fair bit of electrical equipment up there. Light bar, side work lights, rear work lights, navigation light, 100W solar panel, radio antenna and possibly in the future a radar system. The "grommet" is OD38mm X 3mm tube 70mm long with generous radii on the ends and it protrudes through the roof to prevent water flowing off the roof and down into the hull. The "grommet" goes directly into the 50 X 50mm square section upright which will take the wires into the cabin at shear level. I will make small towers to cover the grommet on the roof and limit the amount of spray which could flow along the wires and down through the "grommet". Hope that makes sense.
Also added what I would call a wiring grommet the through the roof of the cabin (on both sides). There is going to be a fair bit of electrical equipment up there. Light bar, side work lights, rear work lights, navigation light, 100W solar panel, radio antenna and possibly in the future a radar system. The "grommet" is OD38mm X 3mm tube 70mm long with generous radii on the ends and it protrudes through the roof to prevent water flowing off the roof and down into the hull. The "grommet" goes directly into the 50 X 50mm square section upright which will take the wires into the cabin at shear level. I will make small towers to cover the grommet on the roof and limit the amount of spray which could flow along the wires and down through the "grommet". Hope that makes sense.
Attachments
XS750AU
Coast to Coast
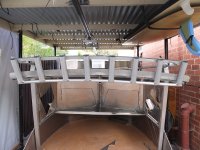
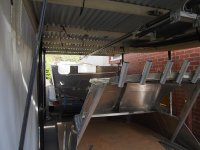
Spent time today working on the rails which will also be wiring conduits. The "grommets" were welded into the cabin roof. Then I made and welded the "towers" over the top of the grommets. The rails line up with 19mm holes in the towers and lead out to the rear rocket launcher and forward towards the LED light bar.
Added a grab rail to the bottom of the rocket launcher tubes. It also prevents the rods from drop through and resting on the reels.
I also made up a platform, that as well as a mount for the navigation anchor light also braced the 2 center rocket launcher stations. 1 of the 2 center rocket launcher stations will be used as the "shotgun" position when trolling 5 lines for Southern Bluefin Tuna. I reason that it is better to add the bracing to avoid cracking the cabin or bending the rocket launcher.
Final photo gives you an idea of the general layout on top of the cabin.