
We noticed you are blocking ads. DO THE TON only works with community supporters. Most are active members of the site with small businesses. Please consider disabling your ad blocking tool and checking out the businesses that help keep our site up and free.
You are using an out of date browser. It may not display this or other websites correctly.
You should upgrade or use an alternative browser.
You should upgrade or use an alternative browser.
KDX 200 Project thing
- Thread starter CaferacerMO
- Start date
CaferacerMO
Been Around the Block
Little update:
The frame is at powder, the piping for the new exhaust is finished, and I'm redoing the seat.
I've been thinking about attempting upholstery for a long time, and finally picked up a singer 404 sewing machine with a walking foot, and ordered 1/2" closed cell neoprene to shape the seat, and toss a new cover on, we'll see where this goes.
Sent from my iPhone using Tapatalk
CaferacerMO
Been Around the Block
Update: you guys were right, the bond came out like ass.
I just had the tank blasted, and I have to fill in some pin holes on the bottom of the tank that were found.
I picked up dynalite to give this a second run.
I also get the frame back from powder today.
Sent from my iPhone using Tapatalk
I just had the tank blasted, and I have to fill in some pin holes on the bottom of the tank that were found.
I picked up dynalite to give this a second run.
I also get the frame back from powder today.
Sent from my iPhone using Tapatalk
focusinprogress
City Limit Moto:Parts-Service-Apparel (716)8038606
CaferacerMO said:Update: you guys were right, the bond came out like ass.
I just had the tank blasted, and I have to fill in some pin holes on the bottom of the tank that were found.
I picked up dynalite to give this a second run.
I also get the frame back from powder today.
Sent from my iPhone using Tapatalk
I've had excellent luck using a micro torch and leaded solder to patch tank pinholes, then caswell tank liner, then bodywork and paint.
CaferacerMO
Been Around the Block
Yep, I actually just patched it up with acid core solder (radiator solder).focusinprogress said:I've had excellent luck using a micro torch and leaded solder to patch tank pinholes, then caswell tank liner, then bodywork and paint.
Just got done doing the pinholes, now I'm smooth them out.
Sent from my iPhone using Tapatalk
CaferacerMO
Been Around the Block
On to my favorite part..
Wiring.
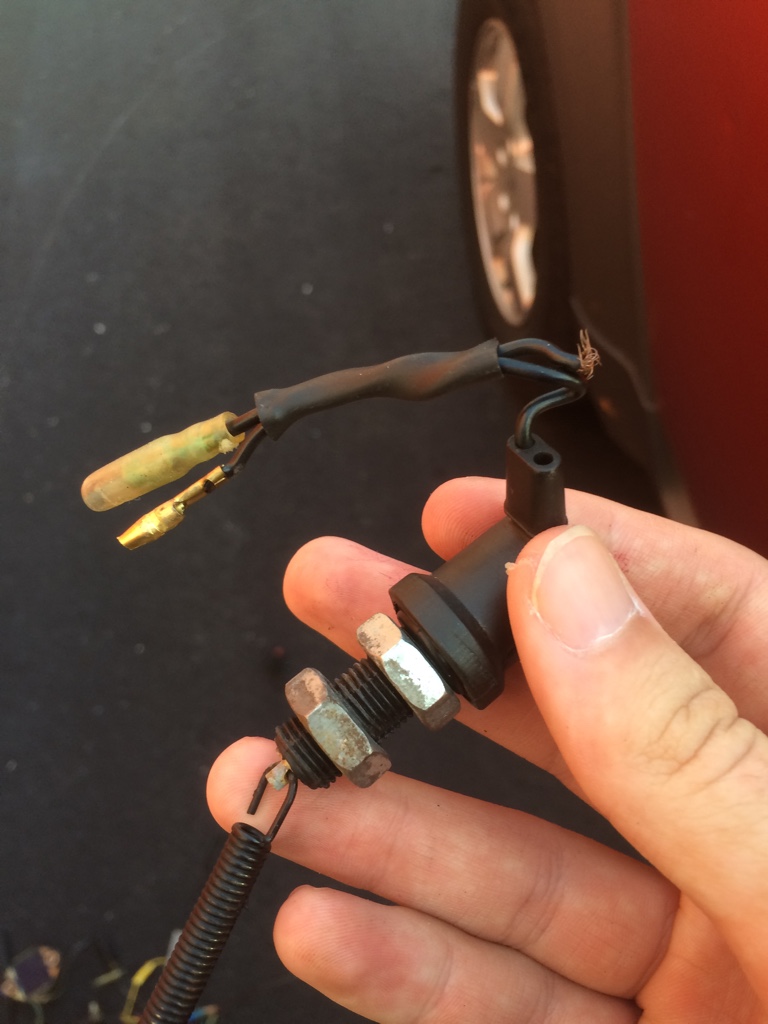
I'm trying to figure out where exactly I wire this cheap eBay ignition into.. Unsure, as I've never messed with wiring.
Previous owner made this bare bones harness..

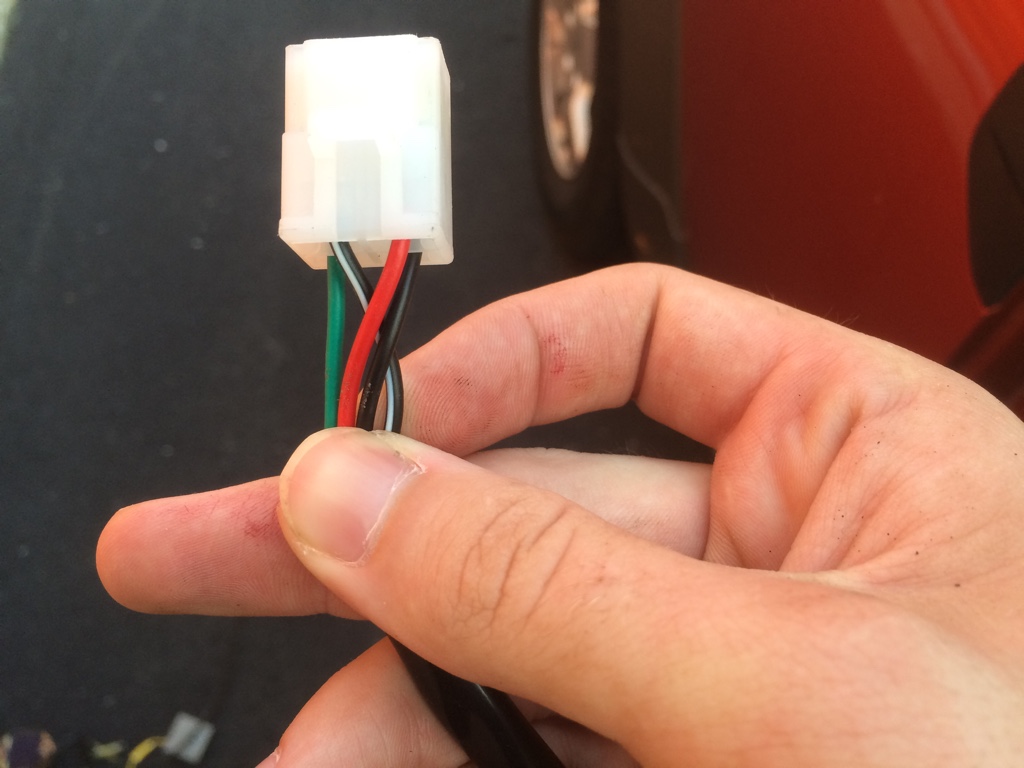
It's powered off the magneto, not the battery.
It's currently ignition less and I want this on the street so I don't want anyone to be able to roll up and just kick the thing and go.. Lol.
Also, is this shot?
Sent from my iPhone using Tapatalk
Wiring.
I'm trying to figure out where exactly I wire this cheap eBay ignition into.. Unsure, as I've never messed with wiring.
Previous owner made this bare bones harness..
It's powered off the magneto, not the battery.
It's currently ignition less and I want this on the street so I don't want anyone to be able to roll up and just kick the thing and go.. Lol.
Also, is this shot?
Sent from my iPhone using Tapatalk
Tune-A-Fish
BOTM LOSER Proudly Deplorable
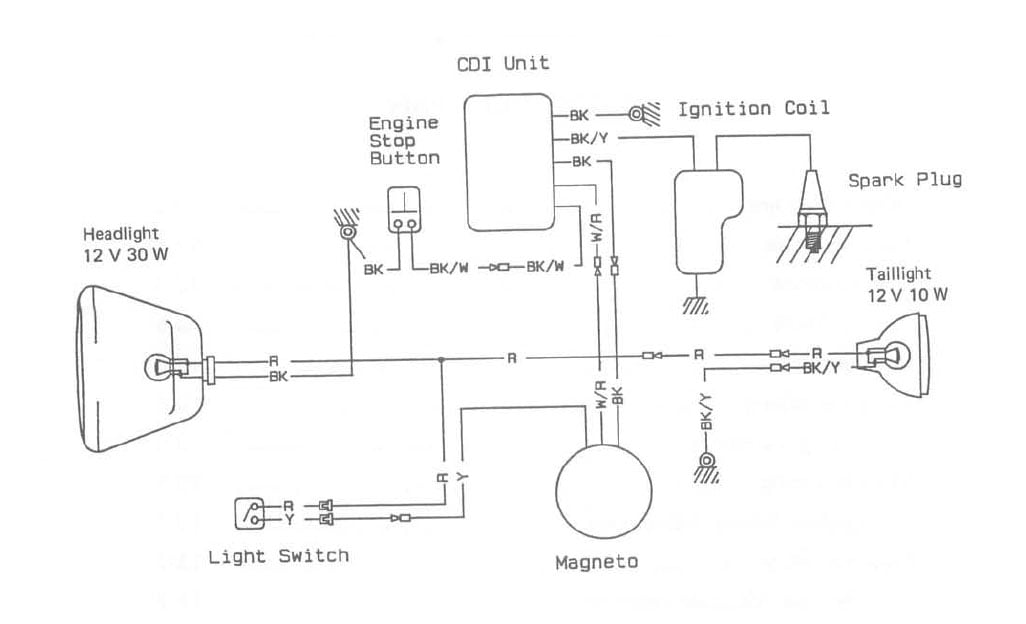
Black/black white is ignition, black white to coil and black to kill switch and coil others are likely for lights and if it had a battery one to charge
This is for a KDX200
This is for a KDX200
CaferacerMO
Been Around the Block
Black white splices into the coil wiring, and then black into kill switch wiring?
Thank you for the diagram!
Sent from my iPhone using Tapatalk
Thank you for the diagram!
Sent from my iPhone using Tapatalk
Tune-A-Fish
BOTM LOSER Proudly Deplorable
CaferacerMO said:Black white splices into the coil wiring, and then black into kill switch wiring?
Thank you for the diagram!
Sent from my iPhone using Tapatalk
Yes. The kill is just a open contact and when pushed it goes to ground "killing" the spark
CaferacerMO
Been Around the Block
Is it possible to remove the kill and put the ignition in its place since it's almost essentially the same thing? (Opening and closing of a circuit)
Sent from my iPhone using Tapatalk
Sent from my iPhone using Tapatalk
Alex jb
Been Around the Block
CaferacerMO said:Is it possible to remove the kill and put the ignition in its place since it's almost essentially the same thing? (Opening and closing of a circuit)
Sent from my iPhone using Tapatalk
Why not!
I did something similar with an old Vespa Primivera 125, I used the tool box lock to create an on-unlocked off-locked ignition as well as the kill button. When it's magneto and there was no battery there was no worry of leaving the lights on
")

Sent from my iPhone using Tapatalk
Tune-A-Fish
BOTM LOSER Proudly Deplorable
Yep, however you like, I use a micro switch under the tank on one bike that has no key at all and a kill so you can have an interrupt anywhere that goes to ground off the coil to kill it. lots of guys run a toggle hidden just as a anti theft device or to keep the kids from starting the bike.
I always run a hidden toggle for power to everything and a second bar or dash mounted toggle for power to coils. If there's an electric start, then another momentary switch (toggle or button) is in place for start.
CaferacerMO
Been Around the Block
Here's where we're at..
I got the frame and some pieces back from powder today..
They did OKAY but not amazing.
I paid 125 for the frame to be done, so I think within what I paid its alright.
I starting putting the wiring and all of that together.
Really it's ready to go as soon as my tank gets in..
But that could be weeks.
Which the last few things revolve around the tank, I can't sew the seat until I have it, and I have to see if the forks hit and address that as well.
So it's the waiting game now.


Sent from my iPhone using Tapatalk
I got the frame and some pieces back from powder today..
They did OKAY but not amazing.
I paid 125 for the frame to be done, so I think within what I paid its alright.
I starting putting the wiring and all of that together.
Really it's ready to go as soon as my tank gets in..
But that could be weeks.
Which the last few things revolve around the tank, I can't sew the seat until I have it, and I have to see if the forks hit and address that as well.
So it's the waiting game now.
Sent from my iPhone using Tapatalk
$125 blasted and painted? Thats not a bad deal, all the quotes I get around here are $250+ for basic colors.
CaferacerMO
Been Around the Block
KDX 200 Project thing
125 for the frame to be blasted and painted a color they had to order in, and then they painted the pegs and foot brake and called the bill even at $130 since it took them like 3 and a half weeks or something.
A place in my home town of 4,000 people did my last bike for $120 and that got me my frame, triple tree clamp, swing arm, and battery box done, but it came back with a lot of pin holes, and bubbles.
So I only take parts there that I don't care about as much.
I'm happy to hear I'm getting decent deals around here.
Then again I'm in missouri so that could be a factor?
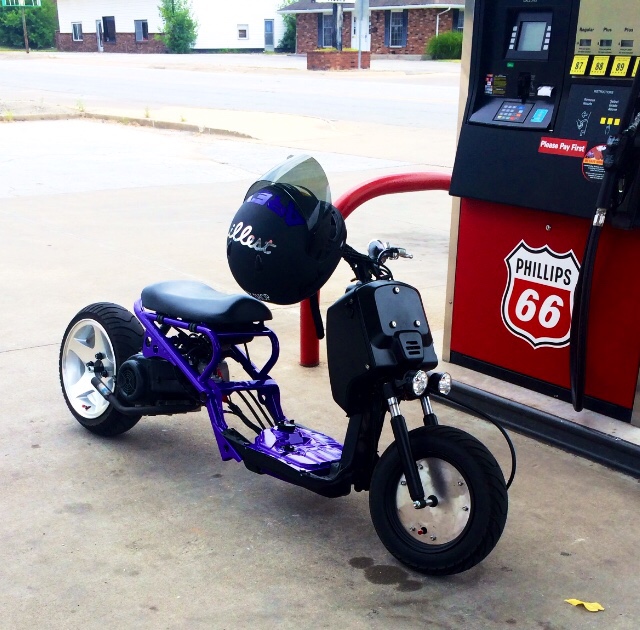
Here's the last bike I had done.
From far away it looks great; just up close it was weak.

The same place did my GY6 Ruckus as well.
Sent from my iPhone using Tapatalk
Oh, I did alright then!adventurco said:$125 blasted and painted? Thats not a bad deal, all the quotes I get around here are $250+ for basic colors.
125 for the frame to be blasted and painted a color they had to order in, and then they painted the pegs and foot brake and called the bill even at $130 since it took them like 3 and a half weeks or something.
A place in my home town of 4,000 people did my last bike for $120 and that got me my frame, triple tree clamp, swing arm, and battery box done, but it came back with a lot of pin holes, and bubbles.
So I only take parts there that I don't care about as much.
I'm happy to hear I'm getting decent deals around here.
Then again I'm in missouri so that could be a factor?
Here's the last bike I had done.
From far away it looks great; just up close it was weak.
The same place did my GY6 Ruckus as well.
Sent from my iPhone using Tapatalk
CaferacerMO
Been Around the Block
Been really chasing my tail on this one.
Ordered a new tank thinking it would jive well, needless to say it did not.
I decided I've drawn this out long enough that I'll just rock my current tank.
I began re assembling and ran into my next snag.
I dropped my top tapered bearing and it exploded into pieces.
*face palm*
So a new one is ordered now.
Things that are left to do:
*re oil the forks
*stitch up the seat*
*wrap the headlight set up
*lock tight things
*tune tune tune tune tune
I hope to be done in the next two weeks before the fall semester starts.
That would be ideal before I start getting stupid busy.


Sent from my iPhone using Tapatalk
Ordered a new tank thinking it would jive well, needless to say it did not.
I decided I've drawn this out long enough that I'll just rock my current tank.
I began re assembling and ran into my next snag.
I dropped my top tapered bearing and it exploded into pieces.
*face palm*
So a new one is ordered now.
Things that are left to do:
*re oil the forks
*stitch up the seat*
*wrap the headlight set up
*lock tight things
*tune tune tune tune tune
I hope to be done in the next two weeks before the fall semester starts.
That would be ideal before I start getting stupid busy.
Sent from my iPhone using Tapatalk
do you have any idea how much wheel travel you have ? here is a simple one, you have to know this,how much sag is there with and without rider ?
you really should delve into this stuff it is a safety issue as much as anything
just bolting shit together without knowing anything is just begging to get hurt,thats all
what is the shock sourced from ? what calculations/comparisons were done to arrive at that donor unit ?
bottom line is you cant build a mono with the spring on the shock the whole time you have to take it off very first thing, so you can observe the range of travel till hard into the bumper
it not spooky or hard to do
CaferacerMO
Been Around the Block
Does anyone have any experience with these style carbs?
I've never messed with them before, but I am leaking a ton of gas from the bowl, which makes me lean towards thinking its float height.
Though I don't know how to measure it on this like free floating style carb.


Sent from my iPhone using Tapatalk
I've never messed with them before, but I am leaking a ton of gas from the bowl, which makes me lean towards thinking its float height.
Though I don't know how to measure it on this like free floating style carb.
Sent from my iPhone using Tapatalk
Tune-A-Fish
BOTM LOSER Proudly Deplorable
Put a fuel line onit and blow in while slowly depressing the needle/float arms that little sprung peg in the needle should stop the flow of fuel before it bottoms out, if not check the needle and seat, if yes it stops air dead (about half way) you can be certain the floats are needing adjustment or well... don't float, fill the bowls with something and see, alcohol works well and dries fast. dont use acetone lol if all floats well search the part number for the float level on the goog and set accordingly not close but spot on as possible.
Also if you have a YZ 85 carb off the other bike, that thing will work nice on this motor with jetting dialed.
Also if you have a YZ 85 carb off the other bike, that thing will work nice on this motor with jetting dialed.


