'72 CB350 -- First build

druckson

New Member
Hi all,

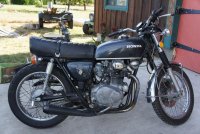
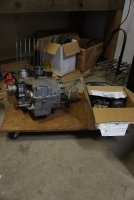
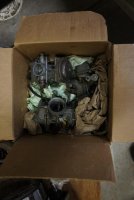
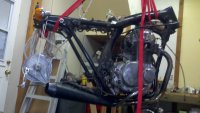
Bought this bike a few years back off a friend who was leaving for basic training. It was running when I got it, but started losing power after a month or so of light riding. I've worked on it a few times (rebuilt the carbs and replaced the battery), but now I'm ready to get down to business. The bike came with a replacement engine (in pieces), and I have 3 extra carbs, plus several boxes of other misc. parts. Just a warning, this is the first bike I've owned, and my knowledge is mainly from the shop manual and looking around online. Just looking for some general advice on where to go with it from here. As I said I'm a novice when it comes to this stuff, so any advice is much appreciated!

Cheers,
Druckson
 

Attachments

  • DSC02719_scaled.JPG
    DSC02719_scaled.JPG
    173.7 KB · Views: 228
  • DSC02922_scaled.JPG
    DSC02922_scaled.JPG
    109.8 KB · Views: 653
  • DSC02923_scaled.JPG
    DSC02923_scaled.JPG
    79.6 KB · Views: 227
First off, welcome Druckson. Lots of CB350's on the site, so there will be lots of people to answer any questions. Bike looks to be in decent shape.

Is it running now? If not, first order of business should be to get it running so that you can better evaluate everything. Prior to this you can do the routine maintenance type activities : change oil, clean filter, check/adjust points, fresh gas, charge battery, check/adjust valve clearances, new plugs, etc. Once you get it running you can check the compression numbers as well. Be sure to check the brakes before riding, since its been asleep for a bit.

If you need a manual, you can get them over at Hondatwins.net - http://www.hondatwins.net/forum/viewtopic.php?f=43&t=13538

Have fun!
 
Thanks for the responses guys,

I was able to get it running about a month ago, though it was pretty rough, and died when I revved it.

I just changed the oil a bit ago, but I didn't know how to clean the oil filter at the time. I also replaced the plugs not too long ago. I'm attaching pictures, they're a bit dirty, but there's not really that much buildup yet.

I'm planning on replacing the oil and cleaning the filter. While I'm at it, I'll look at the kick start mechanism. It wasn't working when I got it, the return spring seems to be broken or missing. I'll post pictures once I have the case cover off. I also need to get a replacement throttle cable (posting a pic, it's seen better days), and possibly clean the carbs again. I'd like to try out either the lemon juice or the Pinesol methods, these carbs are pretty dirty. Does anyone have recommendations on this?

Once that's all done, I'll check the points and valves. I'll need to buy a compression tester, can anyone recommend a brand?

DrJ - Yeah, it should look pretty nice once I clean it up a bit. It isn't currently hooked on under the bike though, and the brake pedal scrapes it when pressed. I'll have to look into that once I get past these engine issues.
 

Attachments

  • DSC02935_left.JPG
    DSC02935_left.JPG
    80.2 KB · Views: 648
  • DSC02937_right.JPG
    DSC02937_right.JPG
    86.4 KB · Views: 667
  • DSC02725_scaled.JPG
    DSC02725_scaled.JPG
    114.1 KB · Views: 243
Alright, back for a bit of an update. I've been working on getting the right side case cover off to look at my kickstart mechanism and clean the oil filter, but those screws are on there pretty good. I was using WD40 on it for a few days, heating/cooling the area and going at it with an impact driver. All I managed to accomplish was to twist the tip of my impact driver. I got a can of PB Blaster, so hopefully that'll help. Any other ideas about stubborn screws?

In the meantime, I've been working my way through a tune-up. I set the tappet clearance without much trouble. I'm not sure that it was at TDC for one side, but the valves were both completely open, so I'm assuming that's not a big issue.

The ignition timing gave me a bit more trouble. I got the gap set, but the timing was off by a good 20 degrees (I checked with a test light). The thing is, I couldn't turn the base plate enough to fully compensate for this. This plate has slots that hit the tappet clearance screw housing when you get to a certain point, and I'm at that point. Right now the left side is lighting up slightly before the LT mark, and the right side is lighting up about half an inch past it. I could use a dremel to give myself a bit more wiggle room, would that be advisable? Also, I'm still confused on how to adjust the right side once the left side is set. Do I just try to get both to match up as well as possible?

One last issue I ran into was with the battery. I've charged it twice, and both times after I'd put it back in the bike it started leaking and went dead. The second time I noticed that it was hot a good couple hours after I stopped charging it. I'm assuming there's a short somewhere, but if anyone has any other ideas I'd love to hear them.

Thanks again for any advice,
Druckson
 
OK, I found the short. It looks like the red wire going from the fuse box to the ignition switch is grounded out. I'm reading zero resistance between it and both the ground wire and the other green wire on the negative side of the battery. That green wire seems to go up to the handlebars, though I haven't been able to trace it all the way. I'm assuming it has to do with the stop switch. However, when I turn the stop switch to off, the circuit is still grounded out. I seem to remember that the stop switch never had an effect when the bike was running, so I'm thinking it's wired incorrectly. Does this sound right?

Thanks,
Druckson
 
druckson said:
I seem to remember that the stop switch never had an effect when the bike was running, so I'm thinking it's wired incorrectly.

Yes, the kill switch tends to corrode and fail over time. Previous owner may have bypassed it and hardwired the ignition coil power wire (black and white) to the hot wire (black) so the coils are powered up whenever the key is turned on and is not affected by the killswitch.
 
OK, I'll have to look around some more. I don't see any hardwiring, but it's all pretty jumbled in there, so I'll have to look some more. In the meantime, I gave the points a few more tries, and am still having the same problem. The timing is just so late that I can't correct for it. Would it be possible that the cam chain is off by a notch?
 
Alright, time for another update. I've been continuing to work though a full tune-up this week. I've now set the tappet clearances and rebuilt the carbs. I boiled both carb bodies in diluted lemon juice, and they came out looking really nice. I set the float heights to 26mm, which I believe is correct for these carbs (they're marked 722A). I posted another topic in the electrical section about my timing issue: http://www.dotheton.com/forum/index.php?topic=42068.0. I haven't resolved that yet, but hopefully that'll be soon.

So, my big problem now is the right side crank case cover. I've been going at it for a week now, soaking each screw in PB Blaster, tapping the case with a hammer, heating it with a torch and cooling it with ice, using an impact driver on it. So far I've twisted 2 impact driver heads and am just about to strip a screw. For now I'm thinking I should just cut my losses on it and move on to other things. I won't be able to fix the kickstart mechanism, but I can live with that for now. The only real problem is that the oil filter cap screws are all completely stripped, so I'll have to drill them out if I want to clean the oil filter. The level of wear on these screws makes me worry that the oil filter hasn't been cleaned in a very long time.

I still haven't figured out the electrical issue, but that's been sort of sidelined by the other issues. I did look at the kill switch, and it looks like it's working after all. When I turn it off, my test light stops turning on. I'm going to do some more looking around on it, but probably not until I have some of these mechanical issues figured out.

This whole situation is pushing me closer and closer to just rebuilding my spare engine. I still haven't figured out what's going on with my ignition timing, but the problem doesn't seem to be fixable with points adjustment. Also, it seems like the only way I'll get the kickstart working is to cut the screw heads off and try to get them out with a vice grip. To do that I should probably have the engine out of the bike. I'd really like to avoid doing this immediately though, so if anyone has advice it'd be much appreciated.

Thanks again,
Druckson
 
Alright, back for another update. I was able to get the clutch cover screws off. I worked on it for a week and a half every evening, doing about everything I could think of, but none of them were budging. Finally, I mixed up some ATF/acetone penetrating fluid, threw it on for a couple of hours, and they all came off with 1 or 2 hits with the impact driver. That stuff is pretty awesome. I'm going to have drill out the oil filter cover screws, but for now I can work around that.

So, after that I was able to make pretty quick progress. Here's a list of things I did:
- Set tappet clearance
- Set points clearance / timing
- Cleaned the oil filter plug / barrel
- Cut a new clutch cover gasket
- Bought replacement allen screws for the clutch cover and oil filter cover. The clutch cover screws are all too long, so I need to cut or grind them to size.
- Cleaned the carburetors, boiled the bodies in lemon juice
- Replaced the fuel lines, added filters
- Replaced the crossover line

So at that point I felt pretty good about starting the thing up again. My battery is dead (I was charging it on an 8 amp charger, oops), so I had to jump it. I checked the plugs, and the spark was nice and blue (I'll need to check again once my new battery comes, but at least it wasn't going to get in the way of starting the bike). I then checked the compression, and got 60psi on the left, 65psi on the right. At that point, I figured I might as well at least try getting it started, so I poured some gas into the bowls and tried it. As expected, it didn't start.

So I'm going to double-check the tappet clearances, but if that isn't the problem I'm looking at an engine rebuild. If that's the case I'll also start working on the cosmetics, so that I'll have something to work on while waiting for parts.
 
Hi All,

Haven't had time to update this log in a while, I'm on break from school now, so I have some time to get stuff done. I'll split this post up so it doesn't get too long, this first part will be about the engine.

I figured my compression issues might be caused by incorrect tappet clearances. I had already set the clearances, but I'm using flat feeler gauges, so it's tough to tell when the distance is right. I re-checked the clearances, and then checked the compression (this time with a screw-on gauge, rather than the rubber tip one I used before). I got readings of 90psi on the left, and 110psi on the right. Since I wasn't able to get the engine running well enough to warm it up, these numbers are for the cold engine. I then put about a tablespoon of oil into both cylinders, and checked it again. This time, the left side went up to around 120psi, and the right went up to 115psi. From this, I'm assuming that I have a pinched ring (or something like that) on the left side.

Given this, plus the fact that my kickstart mechanism is broken, I'm thinking I should rebuild my spare engine. The top end is already disassembled (came like that from the PO), and the bottom end has been sitting in my garage for a few years, uncovered. Anyone have ideas on how to clean it out? I haven't done any sandblasting in the garage, and nothing (that I know of) has fallen in to the crank case.

So, in terms of machining the top end, I'm thinking I'll need to have the cylinders honed, the gasket surfaces cleaned up a bit, the valve seats finished (I've heard a 3 angle job is good for this bike), and potentially the ports cleaned up a bit. Then I'll need to replace the rings, and maybe the cam chain. I have no idea what the PO did with it, so the cam chain may be new. Is there any way to tell if this is true?

Once I have the machining done, I need to figure out how to protect the engine and make it look nice. I've seen quite a few people with polished and painted engines. I've talked to a few guys who say it's a bad idea, since any polishing or painting will reduce heat transfer, and lead to overheating problems. How big of an issue is this? Is there a way I can finish the engine up without damaging performance? I was looking around at high temp paints, are there any that have good heat transfer properties? I know it's important that the fins conduct heat well, but could I do something with the side covers? Is powder coating out of the question?

I'll post again soon with details on the rest of the bike.
 
OK, now to the rest of the bike. I have it almost stripped down to the engine, and I'm working on cleaning up the pieces I have off.

I pulled the forks, and started cleaning up the tops of the stanchions. I'm attaching pictures, they're getting pretty clean. I'm either going to put chrome or clear powder coat on the bare parts. Anyone have experience doing this? I'm a bit worried the extra thickness will make the stanchions too thick to fit through the trees.

I pulled apart the rear shocks, cut the cover down and coated both it and the spring. I've attached a picture, the spring is coated with a Ford blue powder, which is the same coat I'll use for the frame.
 

Attachments

  • 2012-12-18_14-40-08_417.jpg
    2012-12-18_14-40-08_417.jpg
    210.2 KB · Views: 225
  • 2012-12-18_12-56-36_174.jpg
    2012-12-18_12-56-36_174.jpg
    203.9 KB · Views: 226
  • 2012-11-11_14-04-04_880.jpg
    2012-11-11_14-04-04_880.jpg
    151.7 KB · Views: 231
  • 2012-12-18_12-56-18_939.jpg
    2012-12-18_12-56-18_939.jpg
    101 KB · Views: 218
I pulled the tires off the wheels, and I've attached pictures of both rims. The front rim is in pretty good condition, there's one section that's rusted out, and only one spoke is pretty rusty. The rear wheel is in pretty bad shape. All of the spokes are rusty, several of them are bent, and there's a good deal of corrosion on the inside of the rim. I was considering pulling the spokes and painting the rims and hubs, but I'm pretty sure those back spokes would break if I tried to put them back in. I was looking at replacement spokes, but it looks like that's a pretty big purchase. For now I'd like to clean it up as well as possible, and maybe in the future I'll look in to stainless spokes, and potentially aluminum rims. Anyone have ideas on cleaning up a wheel for a reasonable amount of money?

I'm attaching a picture of my exhaust. It's a bit hard to see from the picture (tough to get a good angle on it), but there are clearance issues with both the center stand and the brake pedal. Both of them scrape it when moved. I'd like to do something to finish the exhaust, but I don't want it to just get scraped off. Since the exists on both sides of the exhaust, I'll either have to get rid of my center stand, or my brake pedal, or both. I'm planning on getting clip-ons at some point, but it'll probably be a bit before I'm ready to do that.

Finally, I'm attaching a design picture I drew up to organize parts for coating. I might change the paint on the tank and cowl, but it gives a general idea of what I'm planning.
 

Attachments

  • 2012-12-18_12-56-50_108.jpg
    2012-12-18_12-56-50_108.jpg
    77.5 KB · Views: 220
  • 2012-12-18_12-57-41_282.jpg
    2012-12-18_12-57-41_282.jpg
    79 KB · Views: 201
  • 2012-12-14_12-14-48_325.jpg
    2012-12-14_12-14-48_325.jpg
    81.4 KB · Views: 224
  • 2012-12-18_13-35-21_581.jpg
    2012-12-18_13-35-21_581.jpg
    91.7 KB · Views: 210
As for cleaning the wheels, I suggest that you get yourself some Milkstone from you local Tractor Supply, http://www.tractorsupply.com/dairyland-milkstone-remover-acid-rinse-2214079. This stuff is relatively cheap, $13/gallon, and works great at removing rust. It will not affect the chrome at all.Best of all, it is biodegradable. I would pick up at your local hardware store a wallpaper tray like this one.

Using this tray you can place your wheel in it, one arc at the time and leaving it there for a couple of hours, or longer as you see fit, and repaet until you have submerged the whole circumference of the wheel.
When you are done make sure that you rinse the wheel well and dry it right away to keep rust from forming again.
If the wheel looks good enough and has no major pitting or holes, you can paint ti or powder coat it until the Banjamins are available. ;D

I did this with the wheels of a '72 CB450, and I was pleasantly surprised at the results. Good luck
 

Attachments

  • wallpaper tray.jpg
    wallpaper tray.jpg
    14.1 KB · Views: 405
Habanero - Cool, thanks for the suggestion. Does this stuff work if you brush it on? The visible parts of the rims look fairly good, it's the spokes that are in bad shape.
 
This does not really work brushing it on. The part needs to be submerged in the solution. Trust me , it will not affect the chrome at all.
If you are only going to use the stuff for your spokes, place the spokes in a glass or plastic jar tall enough to get the full length of the spokes and fill with the solution. Leave it in there overnight. Next day you will see all of the rust gone off the spoke. If you are happy, repeat the process with the rest. You will then need to polish the spokes so they sparkle.
Good luck.
 
If they are pretty corroded, don't waste you time, buy new ones. It's would be unsafe to use spokes that are too corroded. It would just be a matter of time before the fail and you can really get hurt. Check on eBay and see what you can find.
Good luck.
 
Back
Top Bottom