We noticed you are blocking ads. DO THE TON only works with community supporters. Most are active members of the site with small businesses. Please consider disabling your ad blocking tool and checking out the businesses that help keep our site up and free.
You are using an out of date browser. It may not display this or other websites correctly.
You should upgrade or use an alternative browser.
You should upgrade or use an alternative browser.
turbocharged cb550 bobber
- Thread starter swansmaa
- Start date
Tune-A-Fish
BOTM LOSER Proudly Deplorable
DohcBikes said:That's not perfect, it's for another bike.
I would not run a stock head gasket with a turbo. You are either trying to build major pressure or you might as well scrap the whole idea right now.
Ever had a turbo project? When it's done, I guarantee it wont be fast enough.
Yer right again!!
Turdbow needs a laminated gasket i guess. The metal/paper smmich.
With all this cad cutter business going on, even my wife has a cutter called doodle bug and it will soon be making some of my gaskets... any hooo this could be simple if someone with exp stepped in, simple as in cut the gasket using high quality image paper layered with copper foil' all CNC cut and laminated using permetex copper for glue. I'm guessing but somewhere between 7 and 11 layers with paper top and bottom. Big process but big results require it.
Custom gaskets hmmm

Isn't that what Lani does at Copper Gaskets Unlimited?
Tune-A-Fish
BOTM LOSER Proudly Deplorable
deviant said:Isn't that what Lani does at Copper Gaskets Unlimited?
Surly someone does, all the data is the tough part and I'm somewhat lost in that department, but have an r&d shop in china I can call on for anything you can imagine, I could ship them a stack of gaskets and have the software dang fast... if I had the OS or whatever protocol the machine speaks.
I probably shouldn't have framed that as a question. That is what Lani does at Copper Gaskets Unlimited. The service is wonderful...
http://www.coppergaskets.us/index.htm
That is what Lani does at Copper Gaskets Unlimited. The service is wonderful...http://www.coppergaskets.us/index.htm
Tune-A-Fish
BOTM LOSER Proudly Deplorable
Nevermind
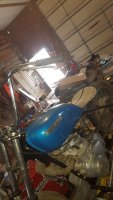
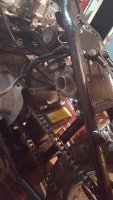
Had a buddy blast the frame, and I just got done rattle canning it in my basement (winter in Iowa, and shop isn't kept warm). Engine is on its way back together too. APE cylinder studs, honed the cylinders, new rings, and a multi-layer steel head gasket is on its way. Need to finish lapping valves and putting the cylinder head back together, and it should be about time for final assembly.
Attachments
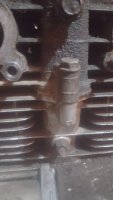
Got some final assembly done today. Engine is back together with APE head studs, mls head gasket, two base gaskets to lower compression, fresh rings, and lapped valves. And a fresh ebay cylinder head after discovering the damage done to the last one. Quite a few smaller things will be needing some attention, and then I'll be back at trying to get a carburetor dialed in.
Attachments
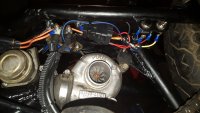
got a little wiring done. Mostly ignition switch, power to coils, starter button, and starter solenoid. Using one 30A fuse to protect everything, and a nice 30A weather proof sealed relay for the ignition side. Ignition toggle switch and momentary starter button are mounted on the frame under the left side of the seat. Haven't done anything with the charging system yet, I need to do a little more research on a simple solution for a one piece regulator/rectifier.
Attachments
Sonreir said:30A is too much. Drop it down to 15A.
Will do for sure. Original plan was to let this one fuse handle my lighting too (headlight and tail light). Will 15A be enough for this, or do I need to be sure to run my lighting through a separate fuse? I have a cheap LED headlight I plan to start off with, and a 10 watt tail light. Wanting to do this wiring right, but as simple as possible.
Fuses are based on the thickness of the wiring. Thinner wires need smaller fuses.
To figure out if your wiring is thick enough, add up the wattage of all your electrics and then divide by 14 (14 is an approximate operating voltage).
Since Watts = Amps x Volts, we can do a bit of algebra and rearrange it to Amps = Watts / Volts. There is also a relationship between Ohms and Amps and Volts known as Ohms law. This lets you calculate the Amps, Volts, or resistance in a circuit if you know two of the three items.
Anyway... 10W bulb will pull .7A at 14V. Because 10 / 14 = ~.7.
If all you're running is headlight, tail light, and ignition coils, the calculations shouldn't be too bad.
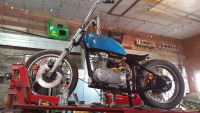
Got the seat on. pan was an old tractor seat pan that I cut to size, and glued some polyethylene foam to. For the cover, I decided I liked the material from an old heavy duty bench seat cover in an old pickup. Had a friend sew it up, and here's what I have. Im not real crazy about the single narrow stripe down the center, I'm wishing now I would have found a better position of the seat cover to use. This will do for now though.