KZ 750 Twin - Two point zero

http://www.jamestowndistributors.com/userportal/search.do?refineType=1&sub_attr_name=Brand&refineValue=WEST+System&page=GRID&engine=adwords&keyword=west_system_epoxy&gclid=CjwKEAiAjIbBBRCitNvJ1o257WESJADpoUt0zM-jpbCmbJKjG44xgg4IZTCU05J8iLTkB2U4jLKsGxoCrx7w_wcB

105 resin and 206 hardener. The smaller sizes should run you about $70 for both. Totally worth it, and you will have them around for a while. Add in a tube of 410 and you can mix a few spoonfuls in with your epoxy mix and it makes a super strong and easy to sand filler. You can likely just lay a few layers of 6oz cloth over what you have to help smooth the surface before filling.

6oz.jpg
 
irk said:
That's why I use epoxy resin. Eet's no stinky.
ditto

I just use a chip brush to remove bubbles once everything is saturated. i tried the rollers a few time and didn't like em.
 
Thanks for the tips guys. I might get some of that epoxy type but I'm going to try and finish up with what I have.
Today I welded in the seat supports and the tail piece. Not a standard loop and it's not structural. I haven't figured out how to hang the electrical box but soon.
 

Attachments

  • kzframe.jpg
    kzframe.jpg
    541.7 KB · Views: 271
I needed to cleanup the chopped tail and play with my welder and grinder.
 

Attachments

  • kz750_tailcleanup1.jpg
    kz750_tailcleanup1.jpg
    136.9 KB · Views: 479
  • kz750_tailcleanup2.jpg
    kz750_tailcleanup2.jpg
    150.1 KB · Views: 523
  • kz750_rear_welded up_1.JPG
    kz750_rear_welded up_1.JPG
    54 KB · Views: 275
stroker crazy said:
and it's stronger!

Also bonds much more tenaciously to more substrates. Costs a lot more as well but you get what you pay for in this case. One thing to consider is that epoxy is very pleased to be used on top of polyester resin composites, but remember that once you do, you don't want to go back to polyester as it does not bond well to epoxy. Not usually an issue on small bike parts, but it can be an issue for people doing things like repairs to boats.
As a rule I only use chip brushes and squeegees myself as most of the parts I make are principally cosmetic and don't need to be either ultra strong or ultra light. Seems to me many seats or seat bases are a lot heavier than necessary because the builder feels the need to make the part more structurally robust than needed. Most bikes have a heavy steel frame directly under the seat, so if you design the glass work to fit or be supported well by the frame it can be extremely light and thin and still be very durable.
 
I forgot to mention, I've used nylon strand with great success. I haven't found a source for a mat or fabric in the nylon like glass, but if you're working from a mold or buck the nylon strand does very well and makes the process relatively non-toxic.
 
This stuff in the pic is what I'm using, it's the easiest to find locally so far. I've got enough for 3 more layers. It's possible this particular seat design effort will want a do over and if so I'll order the good stuff.
 

Attachments

  • cloth.jpg
    cloth.jpg
    147.4 KB · Views: 797
That looks fine for cloth. Unless your building an airplane, your most important criteria is ease of working. You can make the whole process more complex, and in fact, if you are really going for performance, it is. That said, you can make VERY light and strong parts with very minimal wherewithal with a little planning and a couple of tricks. 99% of the time, I use very light glass CLOTH and epoxy resin. I recommend using the same despite the rather large price in cost of the epoxy. I think it is a lot easier to use, and is much stronger. I very rarely use molds (only if I make something really complex and have strong belief of using it again. Really good molds are super expensive if you make something complex) and never use gelcoat. Go to a marine store and get the lightest cloth they have - they should have "finishing cloth" and buy this epoxy here: http://www.epoxyproducts.com/noblush.html . The fine cloth is easy to use and makes extremely strong parts with a few laminates. You can make damn near anything with these two materials.
The first "trick" is to make very careful and accurate foam models of what you want. The best thing to use is styrofoam (picnic coolers and cups are not actually styrofoam but expanded polystyrene which will NOT work!) but it is pretty pricey. Urethane foam is very good also but sometimes hard to find (try an industrial insulation vendor) but green florists foam is fine if a twinge expensive. Take whatever time it takes to make a perfect exact size model of what you want, and then sand it a bit smaller - whatever thickness of glass you want in all dimensions. Then you simply laminate glass layers over the form and you have your part. I often use polyester body filler (regular ol' Bondo) to glue foam together and mount blocks temporarily to a frame etc. I build lots of parts right in place - right on a bike frame for instance but you have to comprehensively mask off EVERYTHING within several feet of where you are working unless you are psychotically neat.
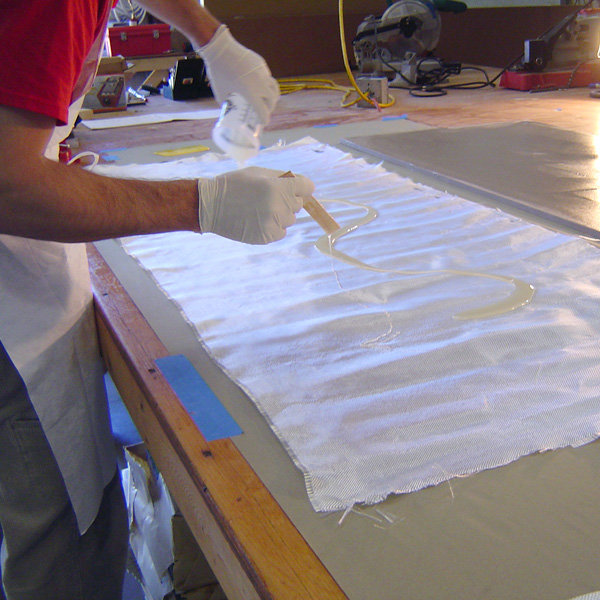
Likely you will come up with a shape that has compound curves and the cloth will strongly resist smoothly conforming to the shape and you will wish you had bought chop strand mat instead. Stick with the cloth unless you want crazy heavy and weak parts! There is a solution. The second "trick" is to carefully cut out your pieces of cloth so they will lay flat on your compound surface. This means you will have to cut wedge shaped reliefs in various places to avoid overlaps and/or use multiple pieces to fit over your shape. Cut all the components you will need for the session first and take your time to do a precision job. You can leave extra at the edges, but time spent here will pay heavily when you lay them up. To make them stay in place, mix just enough epoxy to paint the surface of your foam form. don't allow ANY epoxy to get on your cloth laminates. Once the epoxy has started to "kick" (don't wait too long) it will be very sticky and you can lay on a layer of cloth and smooth it out flawlessly with a credit card squeegee. It might take a little fussing, but as the epoxy cures it will eventually very tightly bite on the cloth and not let go. The epoxy needs to be sticky enough that it doesn't soak into the cloth. You can get PERFECT smooth layers that flawlessly conform to the craziest shapes this way. Once you are sure the layer of cloth will stay tightly stuck in place you can mix up some more epoxy and saturate the cloth. Don't worry about the wet epoxy - it will not soften up the first painted on layer and let your cloth go. Epoxy is not a solvent and fresh batches will not dissolve an earlier batch that has started reacting. Squeegee as much epoxy back out of the cloth as you can, and wait for it to get sticky just like the first painted on coat. Then you can stick on your next laminate of cloth. Then saturate and squeegee the excess. Repeat until you have the thickness you want. You can use this same technique with polyester resin if you want to save some money, but you should at least try the epoxy and decide for yourself.
The foam is super soft and you can easily carve, scrape and sand it out of your new part after the epoxy cures. Many epoxys take rather a long time (like polyester resin does) to keep a really permanent shape despite seeming totally hard and cured. So if you make something like a seat pan, you should think of leaving the foam intact and your part on your frame etc for a week or so so it keeps its exact shape. If your part needs to be hollow, you can cut an access hole or cut it in half, scrape out the foam and then epoxy the joint back together with a recess and a couple of strips of cloth laminated over the joint.
After you are done and satisfied with the part you can fill the weave of the cloth with a filler mixed with epoxy (as previously suggested) and sand it flat to a paintable finish.

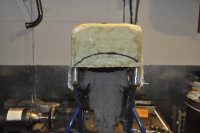
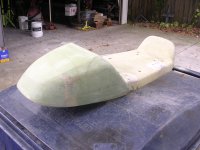
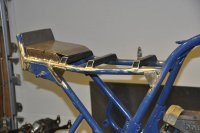
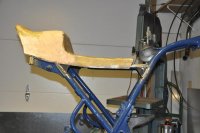
This seat/tail section was made in this exact way, is very strong and weighs less than 2 pounds. You can see the green florists foam is still inside the tail piece.
 

Attachments

  • DSCN0798.JPG
    DSCN0798.JPG
    647.4 KB · Views: 246
Just go to Home Depot or Lowes and get insulation foam. Pink at the Depot or blue at Lowes. You get a hell of lot more for the price, and it sculpts better. No need to go to a specialty industrial place and its much better than florist foam. Oftentimes, strand works better for complex shapes, especially when working over a buck, ie a mold (which is what the foam is). You can also thin coat the surface of the foam with joint compound and sand it super smooth so you have a perfect surface.
 
irk said:
You can also thin coat the surface of the foam with joint compound and sand it super smooth so you have a perfect surface.

Well that's an idea! I'm going to have to try that sometime!
 
jpmobius said:
Well that's an idea! I'm going to have to try that sometime!
If you want something that acts similarly, but is much stronger, there is a material called <a href="http://www.aquaresin.com/"> Aqua-resin</a>. It's a very opaque plaster-like material that gets very hard and has a similar cured hardness to fiberglass resin. I've been using it to make castable positives for years. It's nice because of it's hardness and zero toxicity. Here's an example of a master made from insulation foam and Aqua-resin...

10584744_491495340999839_2130583307_n.jpg
 
irk said:
If you want something that acts similarly, but is much stronger, there is a material called Aqua-resin. It's a very opaque plaster-like material that gets very hard and has a similar cured hardness to fiberglass resin. I've been using it to make castable positives for years. It's nice because of it's hardness and zero toxicity. Here's an example of a master made from insulation foam and Aqua-resin...


What is the favorite for a release agent on molds when doing fiberglass?
 
I have a couple I use.

Honey Wax, which even McMaster-Carr sells...

Honey_Wax.jpg


And stuff called Mann Ease Release 200 or 300...

th
 
Yeah the wax is a must. fills small holes in really well. I have been spraying PVA over that but any sulfur free mold release will work like what IRK posted. I have used straight up axle grease in the past with good, albeit messy, results.
 
Snapshot of what I got done today. Body filler is still in progress for the seat, it's pretty ugly at this point but I think it'll look fine when I'm done. The seat pan is done and I'm happy with the mounting setup too. Battery and electronics tray done. I got the frame braces done tonight but there is still some cleanup I need to do. My welding skills still need alot of practice and even my grinding could use some work but I'm happy with the progress.
 

Attachments

  • uglyseat_andpan.JPG
    uglyseat_andpan.JPG
    51.7 KB · Views: 271
  • kz_framestuff.JPG
    kz_framestuff.JPG
    44.2 KB · Views: 269
  • uglyseat_stuff.JPG
    uglyseat_stuff.JPG
    48.1 KB · Views: 254
Back
Top Bottom