We noticed you are blocking ads. DO THE TON only works with community supporters. Most are active members of the site with small businesses. Please consider disabling your ad blocking tool and checking out the businesses that help keep our site up and free.
You are using an out of date browser. It may not display this or other websites correctly.
You should upgrade or use an alternative browser.
You should upgrade or use an alternative browser.
1974 CB360 "Pickled"
- Thread starter Luck
- Start date
crazypj said:I just checked and found it almost instantly, August 25th 2012
thanks bubba.
Luck
Been Around the Block
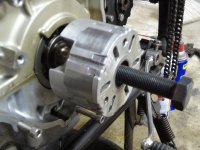
Hell, I just went to the site and found it as well. It showed up right away. I may have used some weird link to get to your site, either that or I didn't scroll down far enough. Sorry for the hassle. Either way it doesn't matter, I appreciate you giving me the info. Just an FYI for others removing the rotor, I bought a 16mm bolt with the 1.50 threads x 60mm. It might be longer than needed, but it worked fine. I simply held the rotor by hand and used an impact drill along with the correct impact socket It popped right off. Its just a Makita impact drill not a big 1/2" air impact gun. Point is it shouldn't take much to remove it. Anyone with a beat up tank with a clean inside they wouldn't mind getting rid of? Trade for some Decals? Let me know, mine isn't going to be ready in time. Trek, did you want a pic of the plug once installed? It should show up Friday. I'll throw it on and get a couple of pics. I also have to pull the head. One of the studs on the exhaust was broken when I bought the bike and Im trying to decide if welding will work on the cast aluminum or should I look for a new head.
yes, get a decent pic of the plug, installed and post it here. Also, I will add the bolt you used. so screw it into the rotor and take a pic of that as well.
Dont go to all the trouble of welding the stud or a new head. Simply, find a machine shop close to you. Drop it off and then pick it up. Im sure they won't charge much to remove a broken stud. (less than shipping alone on a new head) probably easier and quicker than you could fuck it up yourself. If things are slow for them...maybe while you wait, or run an errand.
Dont go to all the trouble of welding the stud or a new head. Simply, find a machine shop close to you. Drop it off and then pick it up. Im sure they won't charge much to remove a broken stud. (less than shipping alone on a new head) probably easier and quicker than you could fuck it up yourself. If things are slow for them...maybe while you wait, or run an errand.
Luck
Been Around the Block
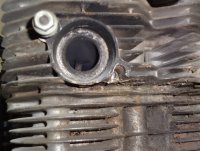
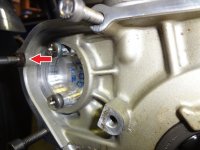
Sounds good. Heres the issue I have. Its not the stud itself but part of the aluminum around it. Someone JB welded some shit in there but it obviously didn't hold. lol I didn't know it was broke, I just thought it was an exhaust leak. Bike wasn't running when I picked it up. I have fired it up so I know it runs but Im sure the motor wouldn't take this for to long. Any thoughts? This crap aluminum is tough to weld I hear.
Attachments
Luck
Been Around the Block
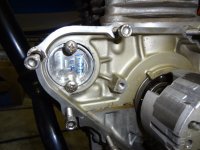
Trek, heres a couple of pics you wanted. Im holding off putting the covers on. I ended up breaking off one of the little plugs which aids in getting the side cover lined up to the case. I should have left it but it was rusted in and I hate when I cant remove something that's supposed to removable. lol I also had a problem with the stator cover after clear coating it. I peeled all of the clear off in about 4 chunks. Im not sure what happened but I will clean it well and see if I can get it to stick this time. Other clear coated pieces are holding up. (fingers crossed).
Attachments
HerrDeacon
Over 1,000 Posts
http://www.cmsnl.com/honda-cb360-usa_model1007/partslist/E++09.html#results
HerrDeacon
Over 1,000 Posts
I'm not sure, I've never ordered from them. I just use the site to get the Honda part number. I then give this to my local Honda dealer and he orders it in for me, much easier that way. Always a good idea to keep a parts fiche site like that bookmarked so you can look up the part numbers quickly.
Luck
Been Around the Block
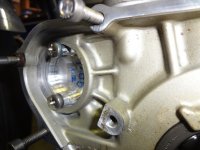
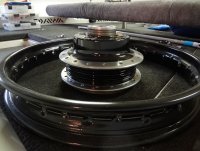
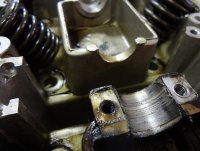
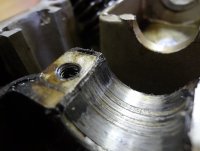
Its been a while. Were moving in a month so its been tough to find time. This week I took apart the rear hub a little further and painted it. I didn't care much about how nice it ended up, but it turned out quite nice anyways. When you care about a paint job, theres always dust, hair or a fly that somehow lands in it. When it doesn't matter, the results are usually near perfect. lol I also received a different head for my bike because I had a broken bolt and chunk of aluminum missing off the original. I posted a pic of the new head and I was a little concerned with a bit of wear on the cam (journal?) Im not sure what its called. Can someone tell me if its ok? I want to get it vapor blasted but Im holding out until I know for sure.
Attachments
Luck
Been Around the Block
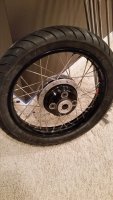
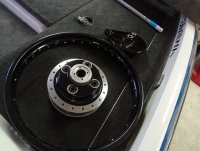
Just wanted to bring the old thread back from the grave. I have been slowly working on the bike, waiting on parts, money, time and everything in between. I finally took out my stock motor and pulled the head and cylinders off. I had a friend hone the cylinders and go over the head. He was also kind enough to clean it with a heat and water tank system they use at his shop. I also learned how to spoke and true a wheel. I think it came out really good. Now I want to balance it using beads. I don't know much about it but I have other things to do before Im at that point anyways. Heres a couple of pics of the latest.