Follow along with the video below to see how to install our site as a web app on your home screen.
Note: This feature currently requires accessing the site using the built-in Safari browser.
We noticed you are blocking ads. DO THE TON only works with community supporters. Most are active members of the site with small businesses. Please consider disabling your ad blocking tool and checking out the businesses that help keep our site up and free.
Got the shift linkage and kicker set. (Never mind the rearward folding peg--just worked out that way on the mock-up_
More interestingly, I had the African Machine Shop adventure this morning, getting the stem prepped to take the taper roller bearing for the new headset setup.
Big on color, awesome old lathes, and the most voluminous collection of blocks and cranks on earth. Not big on safety gear. But they did like surgical masks if not shoes, eye pro, or gloves.
Hah, thanks. I wish I could get the shift slightly more vertical but the rod is a tad too long. I might lose a jam nut and see if it works.
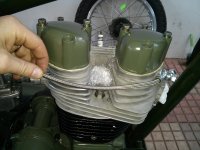
So the headset looks great but it needs a better cover system. Water can pour in past this metal dust cap. I will probably rig up plastic caps out of spray bomb lids to cover them completely, similar to my stock setup. Sucks to hide the pretty aluminum...but no way around it that I can think of aside from machining big aluminum cups and I dunno if the shop can do it.
I could probably make what you need for those caps if those guys can't, looks like it shouldn't be a problem for them if you can communicate what you need.
I'm still waiting to see that XR500 muffler on the bike
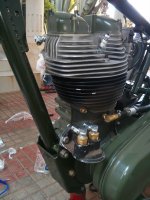
Little chance this morning to mock up the carb and airbox. Problem with clearance between the new bigger carb and the tank, but I should be able to file down the tank mounting tab and maybe shorten the intake hose to make it fit.
Also looked at the oil plumbing scheme. I was going to change a few hose ends after seeing it in person, but turns out Earl's doesn't make the size/style I want anyhow.
Earl's Speed-Seal hosing hates dremel cutting wheels, or vice-versa...went through wheels crazy-fast, but cutting and assembly were pretty damned easy.
Lessons in braided lines: There's a natural curve to the line, so make sure you design that in, and torque your hose-ends to be in a good position when the line sits naturally when using a banjo end. You have a little bit of wiggle room in how much you tighten, so you can alter the position of the banjo just a tad. Helps if you're not fighting against a twist it as you try and thread the banjo and two compression washers into the aluminum haed.
As it is totally unnecessary right now, I played with the front end setup. Tried for an asymmetrical look for my gauges and I am stuck with that. Still kinda like it.
However, I am not convinced of the headlamp position with my trick new short headlamp ears.
I have a set of longer emgo ears which would let me set the lamp further out and higher. Hmmm.
So my guards knocked over the bike, destroying the headlight bucket and messing up the gauges a bit. Gauges will be recoverable (if I want to...) but I need a new lamp.
Ordered a bottom-mount black 7" Bates style and plan on hanging it upside-down from a bracket off the top crown. Ought to be interesting.
Also need a way to lock my steering stem nut in place. It's a cone nut that fits into a cup in the crown. (Yeah, Enfield weirdness...these are a set of "Thunderbird" model crowns, off their wannabe chopper...) Normally there is a top cap nut to lock it in place but the taper bearings I installed take up more space than the stock arrangement.
Considering drilling one hole in the stem itself and then a hole in each of the hex nut faces...whichever is closest to the hole will get safety wire or a roll pin through to lock it in place. I do worry about flaking the chrome during/after this, just as a corrosion issue. Any other ideas?
What about machining the threaded tube down to just below the top of the cone nut and threading the inside of the tube enough to screw in a binder screw?
What about machining the threaded tube down to just below the top of the cone nut and threading the inside of the tube enough to screw in a binder screw?
OK, decision made. Off with the tacho. Simplify, simplify. Generic mini speedo centered in front of the bar clamps, tucked low.
The original idea was a big tacho jutting up into the rider's field of view, with a mini speedo only out of necessity for odometer and registration, but the giant pod was just too big and I can't cut it down much. Been toying with options for a week and decided I would just keep it simple and clean, if generic.
Also looked at tucking it behind the top triple tree, but that seems to serve no purpose other than to be contrarian.
OK, I think my tacho is happy up front in the cut-down pod. Any votes for where to tuck in the speedo? (Snigger) sorry for crap pic quality in this thread.
I think alongside the tach but vertical gets my vote. Second to alongside the fork leg.
Made the throttle cable, too. $20 Chinese electric solder pot makes it super simple to put on cable ends...guess it is more expensive than a $2 pipe end fitting, but I don't have a torch to melt the solder. Either way, totally worth it over using the electric soldering iron. 60/40 solder and red liquid flux. Dip. Boom. Done. Solder exactly where I need it, in appropriate amounts, without overheating the wire or stiffening it with excess solder wicking.
This site uses cookies to help personalise content, tailor your experience and to keep you logged in if you register.
By continuing to use this site, you are consenting to our use of cookies.


")