We noticed you are blocking ads. DO THE TON only works with community supporters. Most are active members of the site with small businesses. Please consider disabling your ad blocking tool and checking out the businesses that help keep our site up and free.
You are using an out of date browser. It may not display this or other websites correctly.
You should upgrade or use an alternative browser.
You should upgrade or use an alternative browser.
acetelyne n hammertone ADVtwin
- Thread starter xb33bsa
- Start date
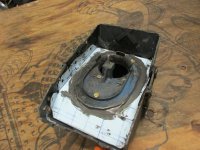
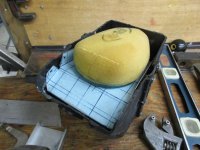
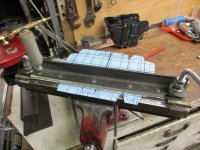
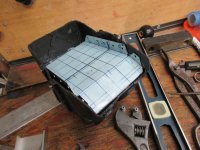
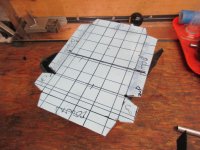
airbox with some construction detail the air filter cage and plastic base plate from a 1984 kx125
the carb stacksd which one i kinda messed it up by cutting too short, then adding material
they were amongst rubber parts that i have been saving 185 honda atc 3 wheeler carb to airbox boots is what they are.
seatbase forms top of airbox fresh cool air will only be allowed from underneath at rear of seat gap to fender,bonus,it should be very well silenced as far as intake bark and moan
Attachments

Tune-A-Fish
BOTM LOSER Proudly Deplorable
Nice airbox mang! But what up with that cussum crescent wench with 12pt munster knobs?
good eye ! originally modded the"crescent wrench"for working on getting seal cap removed from the old koni shocks,they can be soooo tight even after warming up the outer thread area with hammer and anvilNoRiders said:Modded monkey wrench - adapted to undo dog tooth collars and alt nuts?
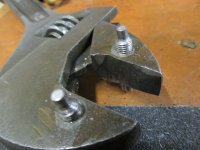
adjustable 2 pin spanner best tool i have ever made my nigerian engieering degree in full force 8)
the wrench is an older S-K as good as you can buy
the "pin" is a HIGH ALLOY HEAT TREATED grade 10(i think 10 they make blue chips in the lathe turning them down) aircraft bolt 1/4-28 bolt that threads securely into the jaws
i have them turned down to a variety of pin sizes and i often turn them slightly cone shaped, the end of pin largest so the pins stay in holes when great force is needed
the biggest trick is drilling and tapping the spanner its tough steel indeed,if you fab your own all you need is a hint of threads if you try to tap a full thread in the tough steel you will just snap taps
you can also use as nut to secure the pin ,tapping the threads is not really needed
and i got lucky on the edge distance any further from the edge and the jaws would not clear the shock rod on the koni's, as you can see i have even ground the one jaw for clearance
its been super handy and a better tool you cannot buy,
Attachments
oh ,so solly,i didn't see you caught that,fish eyeTune-A-Fish© said:Nice airbox mang! But what up with that cussum crescent wench with 12pt munster knobs?

NoRiders
Over 1,000 Posts
Nice..I do like a tool made for one and only specific job. Homehashed tools are even better.
They often look like nothing in the tool tray and mostly live their life in the slooow lane....but when they are needed, nothing else will do....love it.
Local to Oxford, where I live, is a garden centre with a 'tool museum' displaying mostly old farming implements along with household gadgets. Easily spend a few hours browsing the very special, one job only, tools of olde.
Worth a click - Link: https://seaandsieve.wordpress.com/2015/01/13/wellies-for-sheep-waterperry-rural-museum/
thanks for the link ill check it out i do lots of shock work and all of my seal head unscrewing tools (except the koni)are a triple clamp from any number of cycles having them already in a variety of sizes really helpsNoRiders said:Nice..I do like a tool made for one and only specific job. Homehashed tools are even better.
They often look like nothing in the tool tray and mostly live their life in the slooow lane....but when they are needed, nothing else will do....love it.
Local to Oxford, where I live, is a garden centre with a 'tool museum' displaying mostly old farming implements along with household gadgets. Easily spend a few hours browsing the very special, one job only, tools of olde.
Worth a click - Link: https://seaandsieve.wordpress.com/2015/01/13/wellies-for-sheep-waterperry-rural-museum/
i like to keep them crude and raunchy looking like someone said wtf is that ?
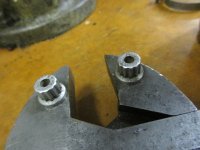
here is seal head tool and piston removing tool
the tools here work for curnutt and vIntage works pistons and heads.... pistons 35mm.... heads 37 mm TO 38MM the clamping effect combined with a pin ,100% ensures, safe, clean removal with out marking up the seal head or elongating its pin hole
the pistons are loctited to the rod ,red loctite and require heat but the works piston has springs and ball valving (EMPTY PISTON HERE)you cant just play a flame on it or the springs take a shit
so with the triple clamp very tightly secured to piston i heat up the tool itself transfering heat over to piston ,safely, to loosen the loctite and get it unscrewed and disassembled, pronto, before any exsess heat can spoil the springs temper
Attachments


thank you !you got me all puffed up nowjpmobius said:Man, that crescent wrench mod!!!! I am SO going to steal that!
Mighty fine build you have going here sir - always looking forward to the next update!
dont skimp with an em,wobbly, cheap, undersized or worn out wrench tho, not that you would , but in my mind the near precision fit and stability of the movable jaw in that s-k 12" wrench is what makes it work so well
Tune-A-Fish
BOTM LOSER Proudly Deplorable
You could drill the holes, shoulder the holes, make up press fit mild steel plugs with opposing shoulders, press in, re drill then tap the mild steel 8)
Or not :
Or not :
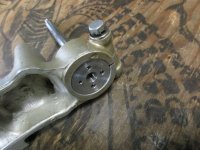
ha !! at first i was using a drilled hole that you could just beat a 1/4 hex drive short hex key/allen wrench bit into .....the selection of hex 's and their stoutness worked well .the big hole was not all the way thru ...the last was like 3/16 but you would beat the hex bit in till it bottomed .allas they would shift and back out and after i knurled up my knuckles,hard :-X :'( ,i went v 2.0 drilling thru with 15/64 bit, i tapped that few rounds of threads and converted over to using the screws with lathe turned tipsTune-A-Fish© said:You could drill the holes, shoulder the holes, make up press fit mild steel plugs with opposing shoulders, press in, re drill then tap the mild steel 8)
Or not :
a usa made,titanium nitrided cobalt tap will just barely cut threads in that s-k forged steel
those aircraft screws are bad ass ,the turned tips ,it can happen ,they will bend but wont snap
Tune-A-Fish
BOTM LOSER Proudly Deplorable
Hah! I tell people my hands are ragged from busting teeth.
Improvising and figurin things out is sometimes more fun than doing things. Sometimes the neutral light burns out and you end up finishing something you never even started
Improvising and figurin things out is sometimes more fun than doing things. Sometimes the neutral light burns out and you end up finishing something you never even started
NoRiders
Over 1,000 Posts
xb33bsa said:thanks for the link ill check it out i do lots of shock work and all of my seal head unscrewing tools (except the koni)are a triple clamp from any number of cycles having them already in a variety of sizes really helps
i like to keep them crude and raunchy looking like someone said wtf is that ?
here is seal head tool and piston removing tool
the tools here work for curnutt and vIntage works pistons and heads.... pistons 35mm.... heads 37 mm TO 38MM the clamping effect combined with a pin ,100% ensures, safe, clean removal with out marking up the seal head or elongating its pin hole
the pistons are loctited to the rod ,red loctite and require heat but the works piston has springs and ball valving (EMPTY PISTON HERE)you cant just play a flame on it or the springs take a shit
so with the triple clamp very tightly secured to piston i heat up the tool itself transfering heat over to piston ,safely, to loosen the loctite and get it unscrewed and disassembled, pronto, before any exsess heat can spoil the springs temper
See what did I tell ya, a pile of scrap parts you'd find in any workshop bin....and yet, like a conjurer the magic happens!
I made a brakeshoe spring puller out of 3mm wire/bar circa 6" long, bent into a loop at one end and a ground down, shaped hook at the other, perfect for stretching springs back into place. These tools don't have to be hi-tech.
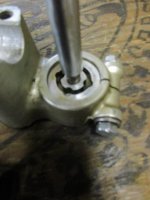
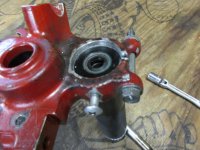
ok here is a little trick that can come in real handy
you have a rare nut a special nut, maybe left hand even ,ultra fine thread is often a culprit
like a primary gear nut steering stem nut,or axle nut and the dang thing wont start on straight or is so tight it is wadding up metal :-X the leadin starter of the thread is dinged, knurled over, full of rust whatever
well all you really need to clean out that thread and even cut bent over metal out of that female thread
is a much smaller tap with the same thread count.which you are more likely to have than an ultra fine large dia tap
as well as using the smaller tap as a thread identification pitch gauge, use it to scrape the damaged thread
get it held in there just right and it will cut metal easy
i have even used this method to oversize a nut by spinning the nut in the lathe very slowly and driving the tap shank into the drilled hollow end of a bar or pipe to get a good handle
voila you can make metal chips by hand pressure
if it is the lead-in that is dinged you want to drag/scrape in the direction of exitng the nut
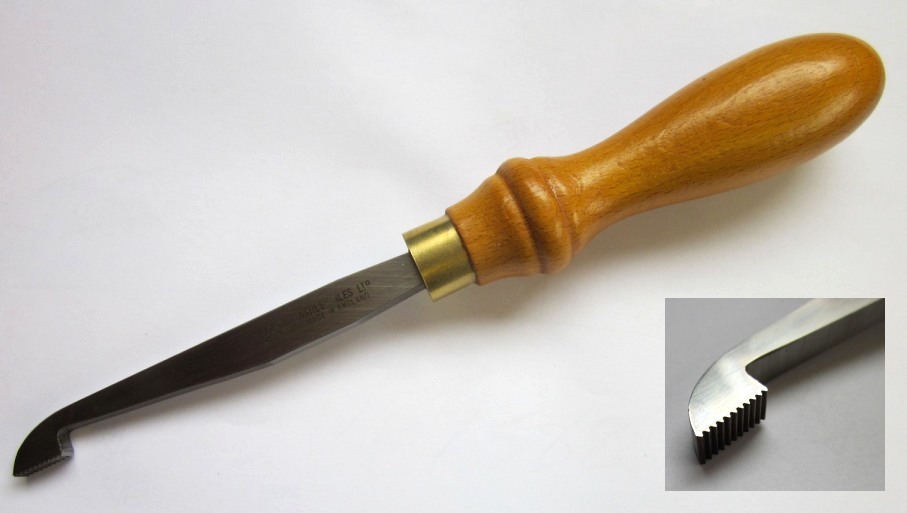
there is actually hand tools made just for doing the same metod in principal
in wood but heck metal is just harder wood

you have a rare nut a special nut, maybe left hand even ,ultra fine thread is often a culprit
like a primary gear nut steering stem nut,or axle nut and the dang thing wont start on straight or is so tight it is wadding up metal :-X the leadin starter of the thread is dinged, knurled over, full of rust whatever
well all you really need to clean out that thread and even cut bent over metal out of that female thread
is a much smaller tap with the same thread count.which you are more likely to have than an ultra fine large dia tap
as well as using the smaller tap as a thread identification pitch gauge, use it to scrape the damaged thread
get it held in there just right and it will cut metal easy
i have even used this method to oversize a nut by spinning the nut in the lathe very slowly and driving the tap shank into the drilled hollow end of a bar or pipe to get a good handle
voila you can make metal chips by hand pressure
if it is the lead-in that is dinged you want to drag/scrape in the direction of exitng the nut
there is actually hand tools made just for doing the same metod in principal
in wood but heck metal is just harder wood
high time i updated merry christmas to you all
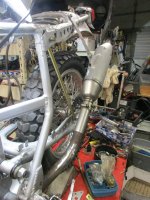
in all these here images i have the rear wheel bumped up into travel not quite halfway i guess
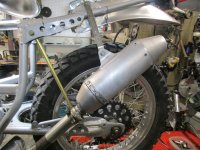
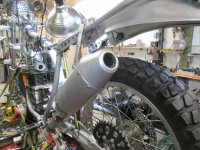
pipes i wasnt quite happy for one thing i was clashing cans on shocks during the wheel travel event and i wasnt happy with the aesthetic of how the pipes flowed down at near footpegs so both sides got massaged a bit to get what i was looking for
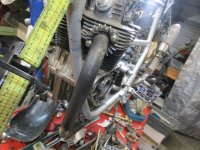
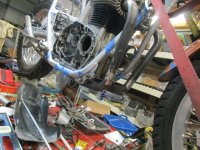
cylinder head got the intake ports raised and match to the 28mm intake spigots
its all new stuff here new valves and a nos never used sl350 head
the ports were not enlarged any more that to match 28mm intake(sl head is 25mm in ) and just smoothing rounding sharp bumps/casting leakage beyond that and tyding up the bowls
same with exhaust ports just a cleanup
lots of pictures
in all these here images i have the rear wheel bumped up into travel not quite halfway i guess
pipes i wasnt quite happy for one thing i was clashing cans on shocks during the wheel travel event and i wasnt happy with the aesthetic of how the pipes flowed down at near footpegs so both sides got massaged a bit to get what i was looking for
cylinder head got the intake ports raised and match to the 28mm intake spigots
its all new stuff here new valves and a nos never used sl350 head
the ports were not enlarged any more that to match 28mm intake(sl head is 25mm in ) and just smoothing rounding sharp bumps/casting leakage beyond that and tyding up the bowls
same with exhaust ports just a cleanup
lots of pictures
Attachments
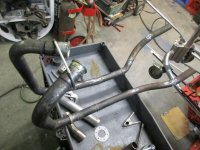
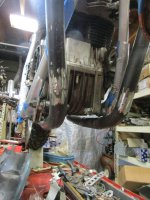
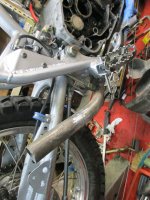
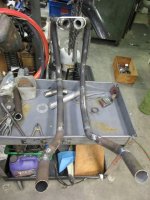
moron pipes ha funny
the big ugly clamps are simply for fitment the last sections that allow the slip fits are ss handrailing sourced
mufflers are off an 05 or so honda 250 mx bike a thumper that splits to two cans from oem
i will do some kinda trick can hangars down the road it just needs to come to me
i am thinking of skinny tubbing with nicely brazed ends but in a V 2 points of attachement up at the frame with a decent spread this will give natural stability as to motion inline with wheel track