Not Really a Bob, Not Cafe, GS300 Suzuki

I thought so too Hoosier. I checked everything multiple times. The wiring on the bike is actually in really good shape. It hasn't been hacked, and the connections are clean. The weird thing is how consistent the problem is. Always the same routine. Runs good cold for a few minutes, drops a hole for a few minutes, picks back up. Even when it's warm, it'll do the same thing.

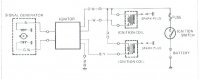
Now magnetic pick-ups rarely go bad. I've run mag pick-up ignitions in various hot rod cars over the years and have never ever had a failure.

Electronic circuits on the other hand...a micro fracture can make all kinds of strange things happen. When the circuit warms and expands, it can either lose or regain contact. My research on these electronic ignition systems on small suzukis have led me to believe that they are problematic. Maybe the reason there aren't many survivors is because once they quit running, the bike was parked, junked, parted out, etc. Replacement parts simply are not available.

So, we improvise. I'll document the procedures and maybe we'll all learn something in the process. I know that I'm flying blind here, only guided by my automotive knowledge.
 
Let em say first, I apologize if this was tried, and if you knew this stuff already so here it goes.

First suspect, fuel, I had an issue with a bit of rubber hose that made its way into a carb. Bike suddenly wouldn't idle right, felt like a loss of power. Found it when i took them apart. I also run an inline filter, high flow see thru style. Its amazing how much crud is in gas.... I know you said new plugs didn't fix it, but what were the condition of the old plugs and did you perform plug chops? As you know they can tell you a lot. I had a sooty #1 and #4 on mine similar symptoms as yours, found a poor coil connection... Are the coils new? How do they ohm out of not. Typical of coils going when they get hot.... Let us know what you find!
 
No need to apologize Mech. I reckon all things are possible. Even if parts are new. It wouldn't be the first time parts were bad out of the box
On the fuel system....Tank was thoroughly cleaned and a new Pingle universal petcock installed. New hose, the clear hose with nylon braid, and brand new carbs.
Two new coils from Dime City (http://www.dimecitycycles.com/vintage-cafe-racer-caferacer-bobber-brat-chopper-custom-motorcycle-electronic-ignition-parts-universal-12-volt-ignition-coil-si-47.html) and new plug wires. I had to change the terminals on the coils from round pin to blade. The connections were checked and re-checked. Of those, I am very confident. The only thing I am unsure of is the coil polarity. These coils have a yellow wire and a black wire. They are not marked for positive or negative. I ran the ignition hot wire to the yellow wire, and the black wire is the trigger or negative. Could they be backwards? Does it matter?
The old plugs, NGK D8EA, were sooty around the base, and the porcelain was grey. There was no build up. I replaced them with D7EA...one step hotter and gapped at .028"
Like I said before, when it cuts off, it's like a switch. Not like a gradual lean out effect like cutting fuel off. Then when it comes back on, it's just as sudden. Like a switch being turned on.

At any rate, I'll have a pair of GM HEI ignition modules in hand on Wednesday. Rather than cut into the harness, I'm gonna make jumper wires to adapt the bikes OEM connections. Then see what happens!
 
I think the original coils are like 3 ohm... (checking) wire color (checking that too!) .... the mounting tabs are metal, are they mounted/grounded? or on a painted surface?
 
I checked the original coils before buying these new ones. They were 5 OHM. The mount surface on the frame is powdercoated, but the coil housing on the new coils is plastic with embedded studs. A bit different from the originals which had a laminated metal strip protruding from each end and also acted as the mounting point to the frame with a metal spacer. The original coils were not marked + or - either.

Do you think they need a dedicated ground to the mount studs?

BTW there was no documentation with the coils.
 
Well, going thru my build journal I had an intermittent running issue that was solved by grounding the ignitor box. Here is the wire diagram for your bike. I would connect the black on the coils to B/W on one and the White on the other. the o/w SHOULD BE CONNECTED TOGTHER AND TO THE YELLOw. oops dam caps
 

Attachments

  • 300 ign.JPG
    300 ign.JPG
    50.8 KB · Views: 381
Thanks Mech. Much appreciated!

I'll double check to see how I actually have it.

BTW, When I reassembled the bike after powdercoating the frame, I did in fact run a dedicated ground from the steel tray that the ignitor sits in directly to the ground terminal of the battery, and the ground terminal of the ignitor to the tray itself.
 
Mike Lawless said:
The original coils were not marked + or - either.

Do you think they need a dedicated ground to the mount studs?

Dyna's aren't marked either. The polarity on the primary side of the coils doesn't matter, they will work either way.

I provided a dedicated ground to my coil mount just to be on the safe side.
 
Mike Lawless said:
Thanks Mech. Much appreciated!

I'll double check to see how I actually have it.

BTW, When I reassembled the bike after powdercoating the frame, I did in fact run a dedicated ground from the steel tray that the ignitor sits in directly to the ground terminal of the battery, and the ground terminal of the ignitor to the tray itself.
Sweet. Think about the ride, also.... Did it happen during a rough section of road? Dont rule out crud in the carbs even if they are brandy new... heck I heard one guy had his fuel line disconnected overnight as he was going to change the fuel filter but didnt have one on hand.. bike wouldnt start the next day after the fuel filter was installed... 3 fuel filters later... and a carb disassemble and cleaning... Finally replaced the fuel line, bike started up... Found a spider jammed itself and its webby egg sack in the fuel line causing a clog...
 
Did a little testing today while my oldest son was here to help out. He is an electronics tech at a high performance automotive shop. He specializes in electronic fuel injection.

We fired the little black bitch up today and it ran on both holes. He taps on the control box, and it dropped a hole. We put a timing light on both plug wires. The right side was dead. That confirmed that it's been an electrical problem all along.

So, he brought along a few GM HEI modules. I made up some jumper wires, and mounted a pair to the electronics tray under the seat. After a little fiddling, it fired up, but wouldn't idle. But, it fires easily. Both holes running sweetly with a little throttle. On ignition timing for this model, the trigger plate is fixed. There is no mechanical advance. The advance is controlled in the control box. The HEI modules don't have timing controls, so, the key is to find a fixed advance where it starts, idles and runs reasonably well.

I removed the trigger plate from the engine, and slotted the mounting holes so I could rotate the plate a little one way or the other to adjust the timing. At any rate, the test was successful! A little tweaking here and there and making the module wiring permanent, and getting to a timing "sweet spot" and getting a decent idle is left to do.

Looks like we're back on the road soon!

The cool thing is that these modules are time tested and easily obtainable for about $20 each. And I can carry spares.

suzuki30.jpg
 
Big win there! Definitely seeing why I like older bikes lol, all of that which you typed is going over my head.
 
Believe me, I would have rather had a point type ignition. Much simpler, not much to go wrong, and no "VooDoo Magic"

That was the next step if I couldn't get the HEI thing to work. Still, it has to be tested for durability, so the jury is still out on it. At least the damn thing runs now!
 
Nice! Glad you got that sorted. I do recall seeing that mod on a forum somewhere. LOL @ the voodoo magic and point type ignition.. now yer your arse on the machine and lets see some video of the beast!
 
mechdesign2k4 said:
Nice! Glad you got that sorted. I do recall seeing that mod on a forum somewhere. LOL @ the voodoo magic and point type ignition.. now yer your arse on the machine and lets see some video of the beast!

That is exactly what I intend to do!
Now that the ignition problem has a solution, I can confidently move on to other things. Rear fender, rebuilding the forks, fabbing up some rear sets.....

But first, I wanna ride!

Thanks to everyone who helped with ideas. Much appreciated!
 
Rode the LBB today to work, (Little Black Bitch) and it didn't miss a lick!

So, next I try to find a fork seal kit and rebuild the fork. Being relatively new to the mechanicals of bikes, I have a question.....

are there different viscosities of fork oil? Or can I change the stiffness of the front end by using a higher viscosity oil? It's pretty squishy. Dives pretty bad when you get on the brakes hard.

Thanks guys!
 
Yes, there are different fork oil viscosity and that will have an effect on the dampning. Personally I use ATF.
Proper level and being equal side to side is more important.
 
Geez, I take a few weeks off and you go from mouse turd to nice bike...

Does the HEI module totally bypass the factory black box? If so, right that puppy up for the novice wrench to understand. Suzuki spark boxes are still expensive, still unreliable, and still not moisture proof...

Don't forget to set your idle to roughly 1000 rpm, the oil pump is pretty weak at anything less.

Nice work.
 
Thanks Scruffy
On a bike like this with existing mag pickups, the conversion was easy. The original black box is completely gone. I simply mounted two GM HEI modules, and ran the existing wires from the pick-up to the modules, an ignition hot to each module, and a coil negative. Done. Once I was certain it was gonna work, I pulled the existing wires out of the plastic connector thing-a-ma-bob and terminated the wires for the modules. Eventually it would be good to find the GM HEI plastic connector thing-a-ma-bobs, so that it will be plug and play to replace the modules, rather than plug and pray that the individual wires went on the right way!

Downside, is there is no ignition advance. So, I ran the timing up to a point where it ran good and started easy. A compromise. The stock timing plate has only one position, so I slotted the mounting holes so it could be rotated.

Of course this puts the idle timing way up there and the downside to that is that it idles high. I'm sneakin' up on that by dropping the size of the pilot jets on the VM30s

The upsides far outweigh the minor inconvenience of a high idle. It starts, it runs, and replacement modules are $20 each new. I've been riding it quite a bit and it runs great. I still need to fine tune the carb jetting, but at least I can now ride it further than I'm willing to walk!

After I get it to idle better, it'll be time to find it a new home. I've learned a lot on this bike. But a new project has entered the picture.
 
I finally got around to changing the idle jets again. Dropped the size to 030. The carbs came with 050, and I had changed 'em to 045 a while ago and saw a bit of improvement. Enough to confirm (at least to me) that the idle was too fat.

What a difference! It really cleaned up the low end and made it much easier to ride. The 030 was the smallest I bought. I'm thinkin' I could even go a bit smaller. I haven't changed the main jet, but I did drop the needle one slot when I made the first idle jet change.
But, it runs really nice now. Idle is still a bit high. The bike doesn't have a tach, so I don't really know. If I were to guess I'd say somewhere between 1200 and 1500 rpm.

Now onto fork seals. I have those in hand now, so it's a matter of getting a "roundtuit"
 
My whole life, I've been all about learning new stuff...acquiring knowledge. Nothing does that better than going into the "uncharted territory" of a new project. Uncharted to me anyway, a car guy coming into a bike world. Many of you have been down the path before.
When I started my VW drag racer project years ago, I quickly learned the value of buying quality. "Cry once," as the saying goes. And in truth, I've never been sorry about spending a bit more for a quality product. I have frequently, FREQUENTLY been sorry for buying on price. Motorcycle components are no different. Even something as simple as a $30 fuel shut-off valve can bite you in the ass. Now, it wasn't the cheapest one. It wasn't nearly the most expensive either. And, it was even from a reputable vendor. This is something that coulda bit hard too. Leaking fuel in a closed garage is nothing to take lightly. Fortunately, this time didn't bite hard. The smell of fuel in my house got my attention and I was able to deal with it promptly.

Lesson learned. Be careful with your component selections my friends.
 
Back
Top Bottom