1976 CB360t Slightly modded, restored to roadworthiness - Workin' on Beauty

Re: 1976 CB360t Slightly modified restore to roadworthiness - Beauty later project

I had a feeling....CrazyPJ is good people....He can make the pods work.. I have bought a couple of things from him already. If I was getting my carbs done, he would be my first choice...
 
Re: 1976 CB360t Slightly modified restore to roadworthiness - Beauty later project

So, Today I did some serious teardown. Took the engine out of the frame, took off the lower case.

Notes to Self (and Others:

Remove Countershaft Sprocket while still on bike. Hard to turn bolts when case is open... :oops:

Remove Clutch while still on bike - See countershaft reason :oops:

Watch out for kick starter spring - it bites...

Kick start mechanism has more springs than the front suspension...

Buy a better snap ring plier.

Watch that bolt on the top case - easy to forget and wonder why case isn't loose.. :eek:

The rest went well....

The Transmission and bottom end look fine:

transmissionandcrankexp.jpg


Make sure the rubber plug is in place:
rubberplugverifiedincas.jpg


Make sure alignment posts are transferred over:

alignmentpostinstalled.jpg


Transfer Kickstarter to new case:
kickstarterinstalledinn.jpg


I checked the fit, And have a couple of more things to do before sealing it back up.

Been a long time since I opened a MC engine...was great to do it again...of coures, I will have my new notes to self to make it even easier.
It is ready for re-assembly...but I want some time so I can threebond it and immediately re-bolt it. Ran out of time today.

I did find the front sprocket worn (hook shaped), so I have order a new one from Dime City. Ordered some other stuff to save shipping costs.

Also, I'll have pictures later when I paint and change it, but I bought another Center stand, except this time for a CL360. The CL have a built in stop, and my chassis has the other side of the built in stop. So now the center stand won't hit the muffler at all.

Happy New Year Everyone.
 
Re: 1976 CB360t Slightly modified restore to roadworthiness - Beauty later project

It shouldn't matter, but is that 350 bottom case?
 
Re: 1976 CB360t Slightly modified restore to roadworthiness - Beauty later project

CB360t.

My Engine is a 1976, the lower case is from a 1974. My front motor mount was broken, this was the easiest and cheapest fix.

The CB350 is actually a different engine entirely. Both are vertical twins, but the castings, heads, transmissions, all entirely different. There are no shared parts between the 350 engine and the 360, other then plugs and points.

They look alike, but really aren't.
 
Re: 1976 CB360t Slightly modified restore to roadworthiness - Beauty later project

You may also consider bore-tech heavy duty clutch springs. they are certainly affordable. $14.90 for the 4. I put in mine and I do get less slip now.
http://bore-tech.com/product/350-clutch-springs-cs-4
 
1976 CB360t Slightly modified restore to roadworthiness - Beauty later project

Back when I bought the bike (1978) I had clutch slippage issues. I replaced the clutch springs with heavy duty ones then. The clutch is still firm and does not slip. Though you are right, if they were stock, this would be the right time for that. I didn't mike the plates yet, but will be. If they are out of spec I'll replace the springs and plates.


Sent from planet Earth using mysterious electronic devices and Tapatalk
 
Re: 1976 CB360t Slightly modified restore to roadworthiness - Beauty later project

mydlyfkryzis said:
CB360t.

My Engine is a 1976, the lower case is from a 1974. My front motor mount was broken, this was the easiest and cheapest fix.

The CB350 is actually a different engine entirely. Both are vertical twins, but the castings, heads, transmissions, all entirely different. There are no shared parts between the 350 engine and the 360, other then plugs and points.

They look alike, but really aren't.
I saw the 325 stamping on the inside, thought it may have been from a 350, that' all. Good to know about the non swap-able parts.
 
Re: 1976 CB360t Slightly modified restore to roadworthiness - Beauty later project

No pics today...needed to work and get done....

Installed the new lower case. Went very smoothly. Made sure sprocket seal pinhole lined up properly with oil feed line. (Took pictures of this, as it seemed important for others too- will post later).

Used Threebond 1184. Worked very well. I also was pretty generous with the anti-seize compound. when I was younger, I always worried about things coming loose. Now that I am older, and maybe wiser, I worry about things not coming loose.

I replaced all the external head area bolts with polished stainless (and anti-seize).

I did a little more scotchbrite polishing of the motor in areas I couldn't reach when installed.

The motor is ready to go back in the frame. After re-assembling, the bike is ready for some road work, weather permitting. It will be ride-able.

Also, order new spark plug caps (NGK), a front sprocket from DCC and also ordered and received 2 NGK spark plugs, the iridium type.

I'll have more pics once it is together, and if the snow melts, and I can roll it outside. I have no room to take a picture of the whole bike in the garage, as I have some other projects going on too....
 
Re: 1976 CB360t Slightly modified restore to roadworthiness - Beauty later project

Thanks for mentioning the sprocket seal - I'm getting ready to reassemble the bottom end of my 360's motor, and I did not know about that. I too had to replace the bottom case, but that was because the PO messed up the tensioner assembly.
 
Re: 1976 CB360t Slightly modified restore to roadworthiness - Beauty later project

Spent some quality time with Sophie. I put the engine back in the frame. We had some disagreement about placing the spacer on the rear lower motor mount. Just would not fit in. After finding 2 large screwdrivers, and a small hammer, I was able to get the spacer started into the space, then gently tapped it home. What a pain.

So the engine is in the frame, the motor mounts are still loose, the side covers and chain off. Hopefully I'll get a little more done tomorrow.

I am traveling a lot for work, so the weekdays are a no go for any work as I just am not home.

I am getting excited, as once the engine is assembled, I should be able to ride it if we have a warm day or two.
 
Re: 1976 CB360t Slightly modified restore to roadworthiness - Beauty later project

Some Promised Pics-

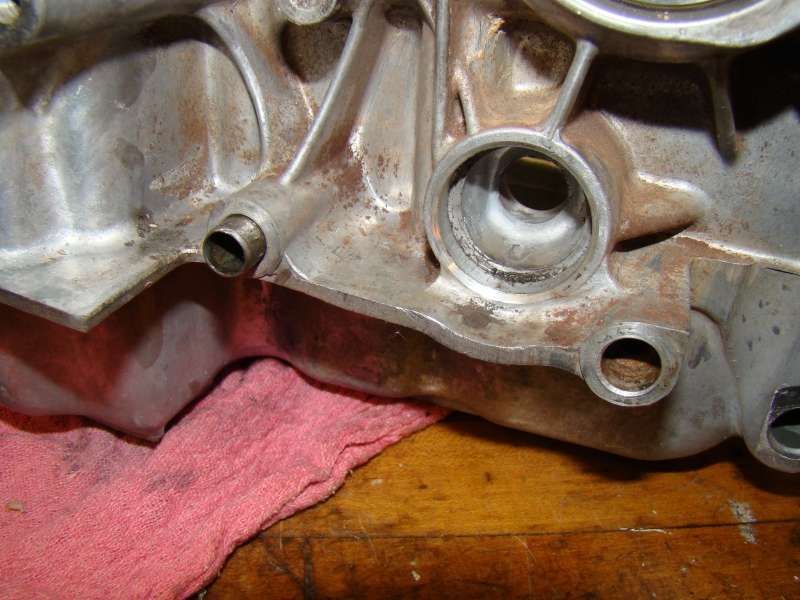
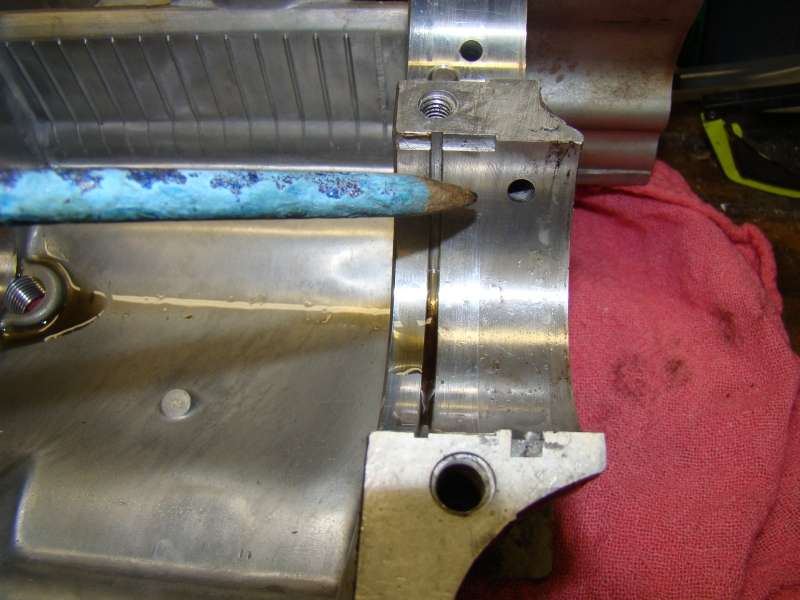
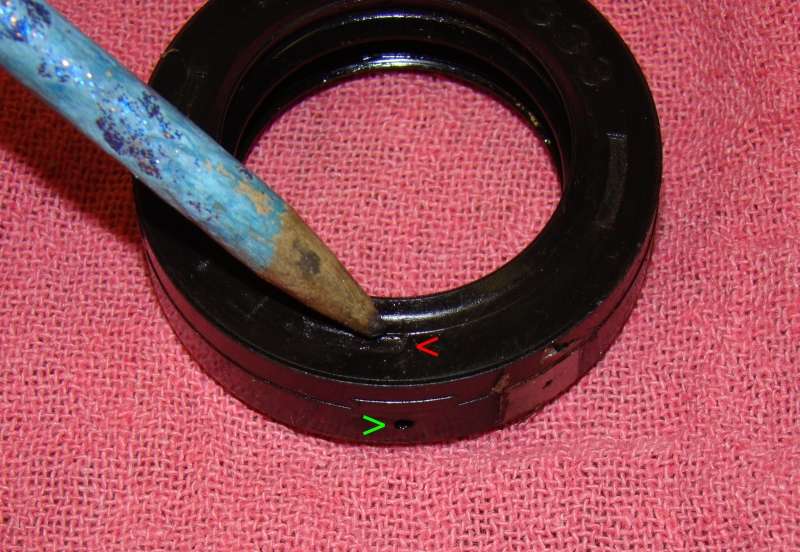
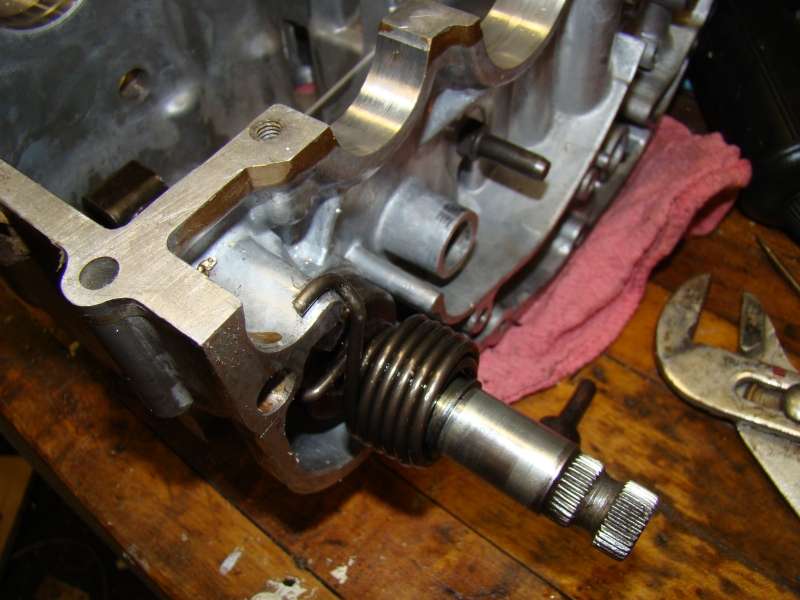
First - The Countershaft Sprocket Seal had an interesting feature. The oil for the countershaft is fed through the seal into the shaft. there is a small hole on the outside diameter of the seal that lines up with a hole in the upper Casting. It is important that you do not use sealant by this hole. There is a rubber tab and slot in the case to align the seal, but I found it to be a little sketchy. On my seal is some indented marks (Red Arrow/Pencil) that the end of the mark coincides with the location of the hole (Green Arrow). When I put the seal in, I made sure the hole in the seal was centered on the hole in the case. The transmission shaft likes to be oiled!!

Hole in Case :
transoilfeedholeinupper.jpg


Hole in Seal, Mark on seal:

countershaftsealoilhole.jpg


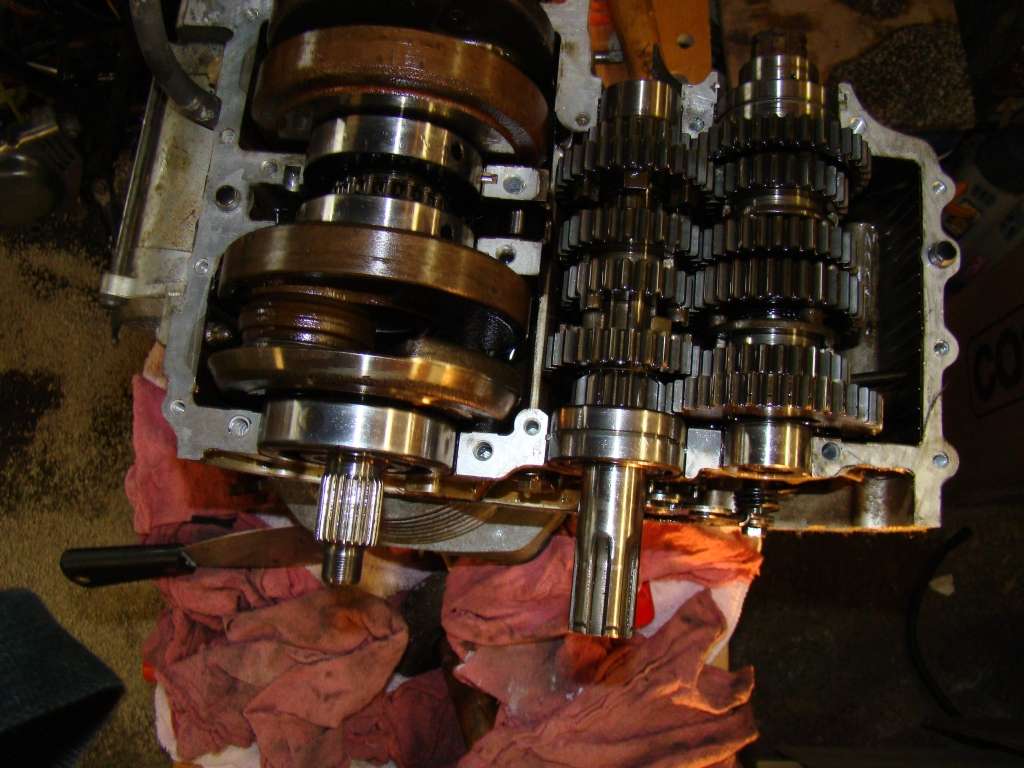
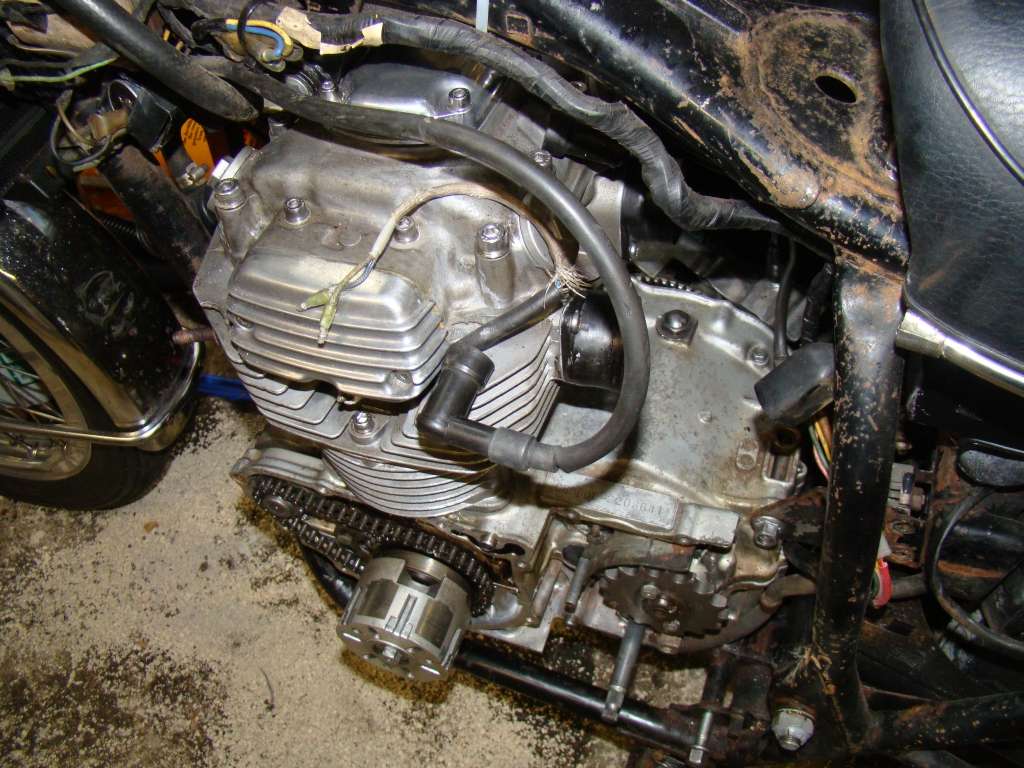
Another item I noticed as I was putting it together was the cam chain tensioner arm does not have a large flat spot on it as do pictures of older models. There is a slightly flattened spot, but much more subtle then what I have seen in the past, or what is shown in the manual. It works, but it was unusual.
camchaintensionerarmdif.jpg


Next, The evil Spring of KickStart. How many times did this spring come off, fly around, and whack my Hands? 4 I finally learned and left it off it's perch until I am ready to put the cover on the side.
kickstartevilspring.jpg


While I had the engine out, I did take a little time and polish the Engine Breather Cover. It won't be seen much, but you can see a little of it on top of the engine. So nice and shiny.
motorbackinframe.jpg


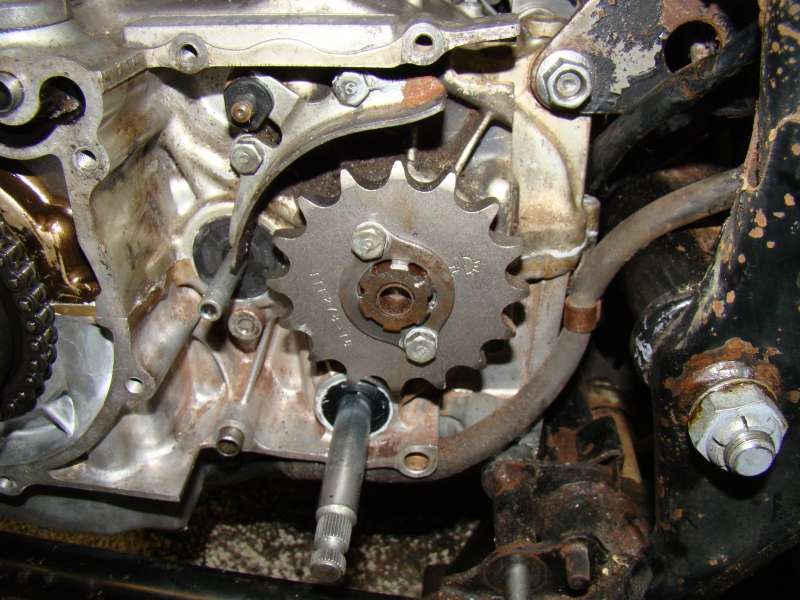
The new Countershaft Sprocket from DCC.
newsprocketinstalledfro.jpg


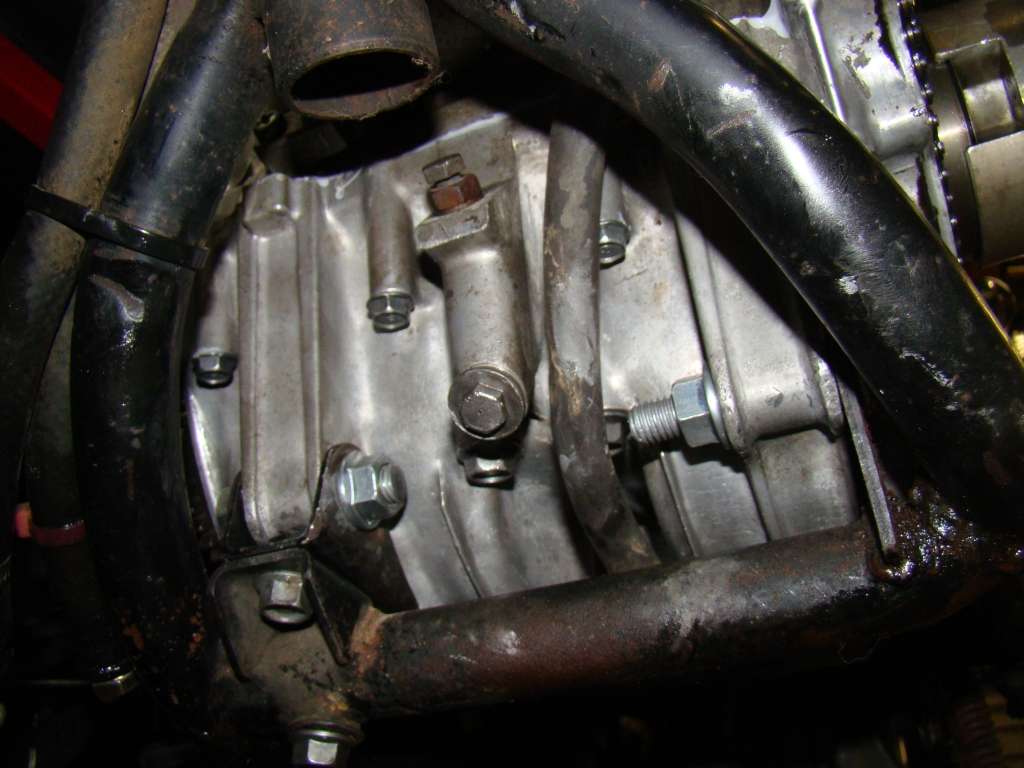
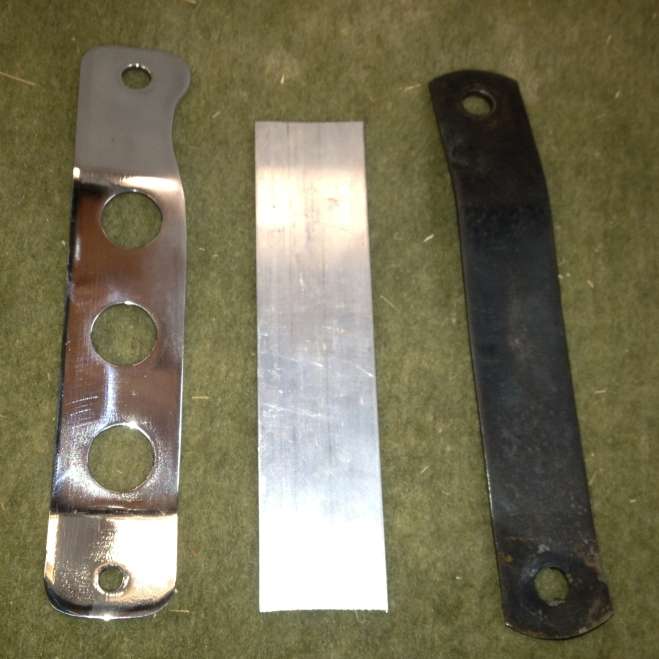
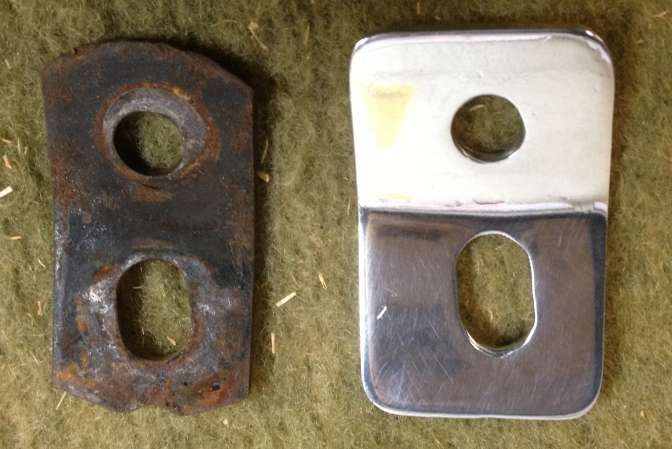
Finally, the reason I pulled the engine out. A picture of the new front motor mounts. The left side (Right side in the picture, Left when you are riding the bike) is now whole.
newlowercasemotormounta.jpg

You can see if you compare to the older pictures, I cleaned up the Cam Chain Tensioner bolts too.

I will need to adjust it before I run the motor.

So next is tightening, re-installing side cases, carbs, wires, Adjust Cam chain Tension and adjust valves again.

I have new Spark Plugs (NGK Iridium) and new spark plug caps (NGK from DCC).

Getting really close to "going for a ride."
 
Re: 1976 CB360t Slightly modified restore to roadworthiness - Beauty later project

Nice! I just sealed up the bottom end of my motor and used your info as a guide. Thanks!
 
Re: 1976 CB360t Slightly modified restore to roadworthiness - Beauty later project

No pics.
Made progress today.
Put Drive Chain on.
Put crank side case covers on, both clutch side and alternator side.
Tightened all motor mounts.
Put Tach cable on motor.
Installed kick starter lever and shift lever.
Installed foot pegs.
Replaced Kickstand and shouldered bolt.
Replaced Center stand. I bought a center stand from E-Bay as I had lost mine. I had it off because it hit the muffler. The OEM muffler has a rubber stop on it for the center stand. THEN, I noticed that the frame has the stop on it, the same as a CL360. I bought a CL360 Center stand and it has a stop on it that hits the frame piece. Not the center stand has its own stop and won't hit the muffler.
I also drilled a 7/16 "hole" in the center of my oil plug. Not all the way through, just about 3/16" deep. I had some small, 7/16 magnets that are very strong. I JB welded a magnet into the plug. The plug is now magnetic, and I installed it too.

I have the muffler and headers off. I opened the baffles, and what to my surprise. The hardware cloth, fiberglass packing are all gone. Not a trace. The rivets I used to hold them are there, but everything else must of dissolved. No problem. the baffles are still like they were originally, and in good shape. I am replacing the 2.5 Inch clamp that holds the muffler to the collector with a stainless one, replacing the mounting bolt in the middle of the muffler with stainless, and replaceing the baffle retainer bolt with stainless.

Re-install the Muffler/headers
Add Oil
Adjust cam chain tensioner and adjust valves
Replace spark plugs (Iridiums)
I need to re-align rear wheel/ tighten chain.
Re-install chain guard.
Re-install carburetors.
Re-install engine vent tube (Going to use some clear tubing and see how that works)
RE-install Muffler and header
Re-install gas tank.

After that, it will need a final look over.
Then wait for a relatively nice day and take it for a ride.

Also in the works, I have a 35w/35w H4 bulb, so I will be putting in the old 5 1/2 inch Headlight I had.

I have a friend in Lewisburg PA, who says he may have Stock head pipes and maybe a clean set of side covers.
I need to work out a deal with him. He also has a spare motor. Need to catch him in a good mood and convince him having some money is better than letting those parts lay around..LOL

So good progress today.
 
Re: 1976 CB360t Slightly modified restore to roadworthiness - Beauty later project

Today made more progress.
Cleaned up the exhaust pipes. I have a Craftsman "Mouse" sander. The kit came with steel wool sanding pads. The work great at cleaning up chrome.
The pipes are still well used, and have some rust spots. But they are shiny where they are shiny now. I am not finished, but I am fabricating and aluminum exhaust hanger, and replacing a kick stand stop bracket with an aluminum piece.

Replaced the hanger bolt in the muffler with Stainless, replaced the 1/4-20 bolt that holds in the baffles with stainless, and will be remounting the pipes shortly.

New Exhaust gaskets are in too.

I take some pics of the finished product soon.
 
Re: 1976 CB360t Slightly modified restore to roadworthiness - Beauty later project

Did a little today.

I found enough time to play with some pieces.

I'll have photos of the pieces on the bike later, but I was so happy with the result, I felt the need to show the parts.

First, I was putting on a bracket that hangs from the left passenger peg. I made the old steel one and used a truck mirror clamp to catch the side stand and prevent it from hitting the muffler. I'll post a picture of it installed later. The bracket was made from a strap steel piece I had laying around. It was black and rust colored. I decided to make an aluminum one to save a little weight, and just paint it black. The picture shows the remainder of the aluminum stock I started with. After making the bracket, I thought it might look better polished, and then I thought some lightening holes would even be better. So three holes, a little sanding, and some polishing, and a side stand retainer was born.

I did not sand the heck out of it, it has some small imperfections, but I am happy with the results. Much better then the old steel bracket.
Pic: NEW - Raw material in Center, Steel Bracket on Right

sidestandbracketoldrawa.jpg


The short bracket the the muffler connects to, which hangs from the passenger peg on the left side. It was a short piece of steel. I fabricated from a small piece of aluminum a similar shaped bracket. I was going to paint it vblack, but on a whim, polished it up. I like it..

mufflerbracketoldandnew.jpg


I had replaced the muffler mounting bolt, and then used an Acorn Nut for the the bolt, to keep it finished. No Pic, but the SS acorn nut polished nicely too.


that was my short exercise in restoring today...
 
Re: 1976 CB360t Slightly modified restore to roadworthiness - Beauty later project

Went to Pep Boys and bought a 2.5 inch Stainless Steel Muffler clamp. Was a little rough looking. The clamp is for the connection of the cone to the collector on the old MAC Collector. If you look at the first page of my build, and look at the muffler, you can see the old, rusty clamp.

I picked up some 600 Grit wet/dry sandpaper too.

So I sanded the clamp to get some of the marks off, and then polished it. Polished the u-bolt too. No pic today, but I will follow up. the clamp looks like a chrome clamp now.

That was all I got done today.
 
Re: 1976 CB360t Slightly modified restore to roadworthiness - Beauty later project

Look what the mailman brought today:

frontregwbox.jpg

edgeterminalviewreg.jpg

backofreg.jpg


Onan clone regulator/rectifier, 20 amp rated, $20 total shipped. E-Bay. The seller also has 15 amp models at the same price.

http://www.ebay.com/itm/ONAN-Voltage-Regulator-Rectifier-John-Deere-318-420-Onan-P-B-Engine-16-20HP-NEW-/321051305593?pt=Motors_Car_Truck_Parts_Accessories&hash=item4ac0262679

If it works (I think it will), I can replace the old parts on my bike. Sincet hey still work, I'll save them in case. My present Regulator allows about 15.5 volts max, which is the high side of the spec. Explains why I used to chew through batteries too.

The rubber cushion on the bottom of the battery box has hardened and cracked. I have been trying to think of a good material to put on the bottom of the box to cushion the battery. Inner tube rubber, maybe some gasket rubber. My wife asks what was I trying to do? I told here and she said, you have all those old mouse pads , they look like the right consistency. SO it is...!!

I am going to trim one of my older mouse pads. They have a foamy rubber material that seems to be the right thickness and softness to work...I take a pic when I do it...
 
Re: 1976 CB360t Slightly modified restore to roadworthiness - Beauty later project

Nice, I got my regulator / rectifier from the same ebay seller! I like the mouse pad idea too...
 
Re: 1976 CB360t Slightly modified restore to roadworthiness - Beauty later project

Looking good, man. I ended up buying two similar R/Rs from Amazon. 15A for $15.
 
Re: 1976 CB360t Slightly modified restore to roadworthiness - Beauty later project

From reading, I know which terminals are which on the new regulator. The regulator came with NO documentation at all....

Of course, previous experience tells me imported goods from China generally have instructions so poorly written/translated that no instructions may be an improvement.
 
Back
Top Bottom