
We noticed you are blocking ads. DO THE TON only works with community supporters. Most are active members of the site with small businesses. Please consider disabling your ad blocking tool and checking out the businesses that help keep our site up and free.
You are using an out of date browser. It may not display this or other websites correctly.
You should upgrade or use an alternative browser.
You should upgrade or use an alternative browser.
1987 GPz305 "Goldie"
- Thread starter animalrobot
- Start date
animalrobot
New Member
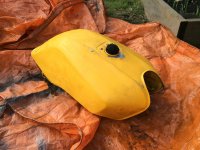
Back at this weekend. Yesterday I removed the carbs, so that I can clean them up. They were pretty filthy. The pilot jets had a bunch of gunk on them. If I can figure out how to remove the damn airbox without taking the back tire off, I'll do that today, as well. Also going to test out some paint colors on the cowl, which I may or may not keep on the bike.
I need to figure out what to do for a seat! Should I try to modify and reupholster my existing seat? This would allow me to keep using the cowl, which is a convenient space to store a battery, or tools. The other option is to make my own seat pan out of a skateboard. Either way, I plan on sewing the seat cover myself, which should be an interesting experiment.
I will post up some pics later...
warpedworm
I could agree with you but then we'd both be wrong
Good to see someone else on the Gpz 305 trail, there's a few of us now working on little Gpz's. 8)
Yellow is my favorite color, so I'll be painting one of my Gpz's yellow, maybe the dragbike.
Yellow is my favorite color, so I'll be painting one of my Gpz's yellow, maybe the dragbike.
animalrobot
New Member
Okay, here are some pics of what I have been working on...
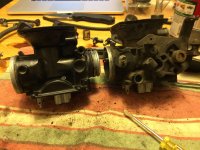
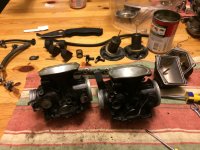
Here are some before and after shots of the carbs. They were covered in some type of primordial black ooze. I used vinegar to clean most everything off, then I sprayed it all down with some carb cleaner. After a couple hours, I wiped everything down with a damp rag, then I gave everything a light coat of WD40.
Here are some before and after shots of the carbs. They were covered in some type of primordial black ooze. I used vinegar to clean most everything off, then I sprayed it all down with some carb cleaner. After a couple hours, I wiped everything down with a damp rag, then I gave everything a light coat of WD40.
Attachments
animalrobot
New Member
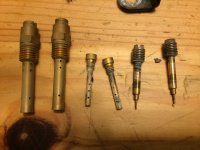
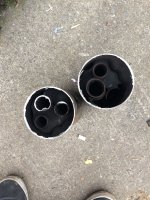
Since I am planning on removing the airbox and using pod filters, I rebuilt the carbs with slightly larger main jets.
The factory main jet size is #95. Since the increments on Keihin jets go up by 3 or 2, (instead 2.5 for each increment, as with Mikuni carbs), the next two sizes are #98 and #100. I ordered some #100 and #102 size main jets, and I installed the #100s.
I haven't turned the bike on, yet, but I will see how that turns out this weekend. I also spent some time trying to remove the airbox from the bike. I wasn't sure, but it looked like the battery box was bolted onto the monoshock. I didn't want to fuck with that! So, I PM'd WarpedWorm, a member of this forum who is working on several GPz305 projects. He sent me back some pictures that show how he removed the box. It was relaly helpful and I greatly appreciated it.
Unfortunately, it didn't really work out as I had planned...
Attachments
animalrobot
New Member
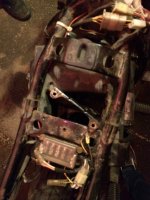
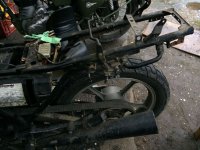
Once the airbox was out, I put the carbs back on the bike. What a difference! One amazing thing about this bike is that a lot of the electronics are already tucked away in smart little spots around the frame. The only thing that's really left after taking the airbox out is the battery box. I just have to find a clever place to stick a new battery and that whole area will be empty.
Attachments
animalrobot
New Member
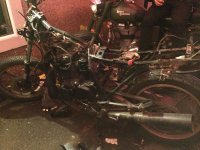
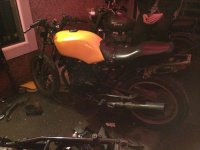
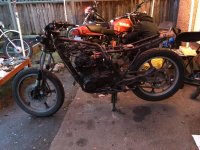
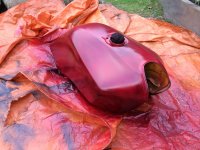
Now that the carbs were back on, I had to see what it looked like with the tank and seat.
Holy shnickies! It looks like a different bike! I think I'm going to ditch the cowl, entirely! It was a good place to hide an absorbed glass mat battery, but I just love the way it looks so much without it. I am going to have to chop the frame and do some welding, I guess. But, I am really excited about the new direction for this bike. For me next post, I will have to revise my checklist.
I think I've settled on a burgundy color, for the bike. I love the way it looks without that front fender, too. So, I am going to look into either replacing that fender or modifying it so it's much smaller.
Attachments
animalrobot
New Member
warpedworm
I could agree with you but then we'd both be wrong
You do realize that was the only intact Gpz 305 airbox in the entire world!! ")
animalrobot
New Member
Time to revisit my checklist....
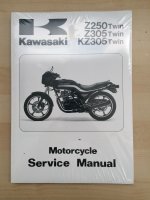
Workshop Manual
Oil
Intake
Paint
Seat
Engine Covers
Header
Exhaust
Tail light
Gauges
Bars
Dat Gap
Frame
Workshop Manual
Buy it[/li]
Oil
- Change Oil
- Inspect Oil Pump Drive Sprocket
- Inspect and clean Oil Strainer
Intake
Check for air leaksDisassemble and clean carbs- Replace carb boots
Remove air boxInstall podsRejet carbs
Paint
Remove front fender, gas tank, and cowl- Sand
Choose color- Buy DupliColor spray paint
- Do it this weekend
Seat
Get some samples of marine vinyl from upholstery shop- Buy foam - this may no longer be necessary
- Shape foam - ditto
Repair sewing machine- Sew seat cover
- Upholster the seat
- (optional: Order new seat in case I ruin everything)
- (optional: Skateboard seat pan)
Engine Covers
- Clean or sand these down (currently covered in dirt and gunk)
- Replace gaskets, if I can find them
Header
Order DEI Titanium heat wrap- Wrap headers
Exhaust
Check exhaust exchange for rattleYup, still rattling- Cut exhaust pipes and remove some of the baffling - Doing that this weekend!
Tail light
Order a new tail light with integrated turn signals- Install tail light
Gauges
Go to bent bike and find a new Speedo/Tach- FAIL- Replace instrument panel with new shit - I had no idea this shit was so expensive.
- OR - build a new housing for the existing instruments
- Find LEDs for neutral and turn signal indicators
- Find a cool housing for the fuel gauge
Bars
- Flip bars
- Find new grips
- Buy or make new control switches
Dat Gap
- Cut Fender
Move batteryMove stater- UnnecessaryMove regulator rectifier- UnnecessaryRemove belt guard- Remove center stand
Frame
- Chop the back - Hopefully this weekend?
- Weld on a loop
- Cut off all the excess crap
- Grind down rough parts
- Sand and Paint
animalrobot
New Member
warpedworm said:You do realize that was the only intact Gpz 305 airbox in the entire world!!
D4N63R said:could have sold that on ebay for like 46 million doll hairs!
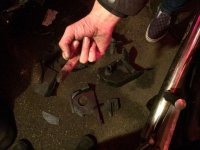
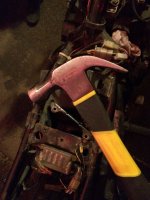
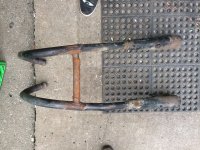
I, too, was disappointed with my behaviour. Had I taken the time to properly remove the air box, I would have learned more about my bike, and possibly been $48 richer. With that said, breaking it with a hammer was immensely satisfying. 8)
animalrobot
New Member
Okay, things have been moving along this week. I chopped my tail, chopped my mufflers. I painted my tank and fender (most of the way). My bike is starting to look the way I want, but I still have to tune the carbs to get it running properly. Since I started painting my gas tank, I am not going to be able to do that for a while. In the meantime, I get to satisfy myself with cosmetic changes.
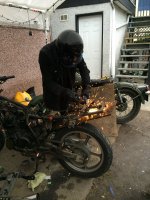
One thing that had been bothering me from the beginning was the rattle in the right muffler. WarpedWorm gave me some advice on where to make the cuts, so I put a cutting disc on the angle grinder and got to work.
One thing that had been bothering me from the beginning was the rattle in the right muffler. WarpedWorm gave me some advice on where to make the cuts, so I put a cutting disc on the angle grinder and got to work.
Attachments

animalrobot
New Member
animalrobot
New Member
Then I started painting the gas tank, and fender. The fender has a few coats of satin black, now. A big improvement over the yellow. I may finish it with matte black. I'm also considering blacking out the rims. And if I remove the wheels, that gives me an excuse to clean up the swing arm and maybe even paint it.
I scuffed up the paint on the fender and the gas tank with 120 grit sand paper. There were quite a few spots where the paint had bubbled, or chipped away. Some rust spots. I sanded everything smooth, and wiped it down with a damp cloth.
I used a full can of the duplicolor "todeador", which was about 10 light coats on the gas tank. Next time I get at it, I'll wet sand it, and then paint it again. And sand, and paint, and sand, and paint.
I'm going to buy some gold paint and brush "Goldie" on the side of the tank. I guess I'll have to practice that a bunch, so I get it right.
Attachments

animalrobot
New Member
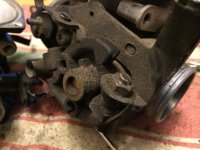
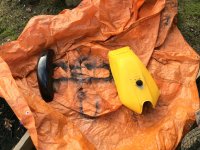
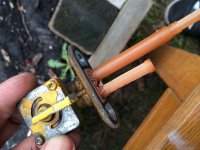
The petcock was pretty grungy. Not sure what that means. I am going to have to clean the inside of my tank, I guess. I need to grind the tabs off the side of it, too. I used a wire brush attachment on my dremel to clean up the metal parts of the petcock. But, I forgot to take a picture of it, after it was cleaned.
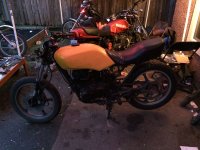
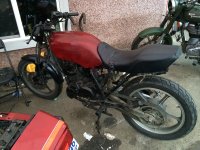
I also added a picture of how she's looking with the new tank and fender colors. I'm also happy with how the seat looks, now that the tail has been chopped. I'll probably trim some heights off of the front of the seat, when I sew my own cover. But, I will definitely try to maintain the overall shape.
I also added a picture of how she's looking with the new tank and fender colors. I'm also happy with how the seat looks, now that the tail has been chopped. I'll probably trim some heights off of the front of the seat, when I sew my own cover. But, I will definitely try to maintain the overall shape.
Attachments
D4N63R
Been Around the Block
Do longer stokes, all in the same direction, then angle them for the next coat and continue on that way next time you do the tank. That will help eliminate the tiger stripe effect. I would advise against going full flat black on the fender. After a bit of time flat black gets a white haze to it and looks like poo.
bike is coming along well though keep at it.
The GF will take the Enfield, and i'll take that red Suzuki from your pics hahahaha
bike is coming along well though
keep at it.The GF will take the Enfield, and i'll take that red Suzuki from your pics hahahaha
animalrobot
New Member
D4N63R said:Do longer stokes, all in the same direction, then angle them for the next coat and continue on that way next time you do the tank. That will help eliminate the tiger stripe effect. I would advise against going full flat black on the fender. After a bit of time flat black gets a white haze to it and looks like poo.
bike is coming along well though
The GF will take the Enfield, and i'll take that red Suzuki from your pics hahahaha
Thanks, D4N63R. I appreciate the advice on matte black paint. I was growing partial to the semi-gloss, anyway. The tank has a bunch of runs and tons of blotches. I am going to sand it down next time I get at it, and hopefully apply a more consistent layer of paint.
The Enfield has been a lot of trouble for my friend. He has been hunting down an errant electrical problem for several weeks, and he finally sorted it out this evening. Hopefully!! I took it for a rip after it was fixed and I gained a lot of appreciation for that machine. It pulls nice and hard, rides extremely comfortably, and looks amazing. I don't know if I'll ever get an Enfield, but it was a blast to ride around.
The Suzuki is a GS400e that another friend is working on. It's full-on rocket-stance on that bike. He has been tuning his carbs, since replacing the airbox with pod filters, and he finally got it running well, over the past few days. It's a lot of fun, too


