Follow along with the video below to see how to install our site as a web app on your home screen.
Note: This feature currently requires accessing the site using the built-in Safari browser.
We noticed you are blocking ads. DO THE TON only works with community supporters. Most are active members of the site with small businesses. Please consider disabling your ad blocking tool and checking out the businesses that help keep our site up and free.
here's a manual if you didn't have one already. The procedure should be in there.
https://drive.google.com/file/d/0B_ZumJE59-T4YjUwNjllMjgtZDNlYi00ZTcxLTgyNDEtZmIxOTlmM2ZlNTZl/view?usp=drive_web&ddrp=1&hl=en#
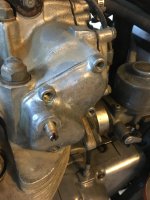
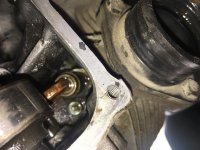
Yes!!! STOP!!! Those aren't the valve covers. That is the bushing that the cam spins in. The cam is no longer supported on one side. You could possibly have altered the cam timing and dropped the cam follower off of the valve.
Trust me. This is how I bent a valve in my engine and instigated a rebuild.
Listen to cxman.
The valve covers are the big covers on the front and back of the engine, sort of rectangular, right next to there. Above the exhaust and above the carbs held on with 8 bolts each. Take those off before you put this piece back on. If you put this piece back on with the cam follower (valve tappet) next to the valve instead of on it, you will bend the valve and you will have to take the entire top end apart.
Oh no! Too late. Hopefully he won't try to put the cam bushing back without actually checking that the valve tapets are in place and have not slid off the top of the valve stem and is now next to its side.
Dude, if you're not careful and try to put this "cover" back on hoping nothing happens, please stop. When this is removed the rocker arm usually slides off and falls next to the valve stem. And if you try to put the "cover" (really a bushing like Flug explained) you will bent the valve stem as you tighten those screws. If you wonder with it is harder to turn those screws in that expected then it's too late. Flight and I speak from experience. Not proud of it myself, but I learned a lot from this motor, from having to do a rebuild.
Thank you everyone for chiming in... I have not tried putting that cover back on.
I feel like a complete idiot, first time doing this.
I will take off the front and back valve covers (correct ones this time) and take a photo to make sure that I have put everything back in correct place before putting everything back together.
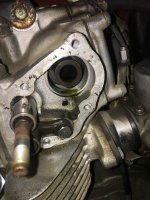
So as you can see in the photo, the rocker arm did slide off and fall off down near the valve (I remember hearing it fall... I feel like shooting myself!). Good news is that I haven't forced anything and quite certain that I did not bend the valve.
Is there a way for me to realign it from this point without tearing into the head?
Is there anyone in San Francisco or Bay Area that would like to come over to help? (I can throw you some cash for down doing so).
YES! I managed to realign the rocker back into place and slide that rod back through!! When I spin it, it moves the rocker up and down smoothly on top of the valve!!
So should I put this side cover back on before adjusting the valves? Should I align the rocker a certain way before doing so?
Thanks cxman, I really appreciate it... although with all of your guys' help (and maybe a little luck), hopefully I can button this bad girl back together.
Regarding gauge size for the adjustment... .004 on the front valves and .003 on the rear valves?
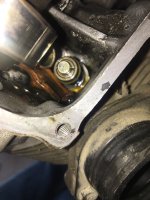
yes to putting the support cover back on carefully dont force anything
read the manual to familiarize your self with setting these
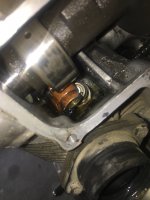
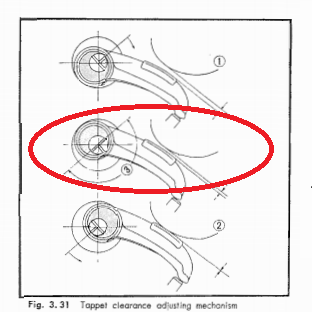
one of the adjusters is backwards to the rest
This picture helped me when setting mine. Basically the little notch on the adjuster should point kind of away from the spark plug.
Since you took the Cam Cover (cam bushing) off, I would also recommend that you check your cam timing to make sure that the cam chain did not shift teeth on you when it dropped down. When you set the cam timing, you are setting the position of the intake and exhaust cams relative to the position of the crank. The procedure is probably on Hondatwins.net somewhere. It is unlikely that the cam shifted, but is possible.
Hey thanks for following up, and thanks for the support... I'll definitely keep the thread updated as progress continues... I only have time to work on the bike during weeknights after work and/or the weekends, and have been battling a stripped bolt on the stator cover.
The last person working on this bike obviously has not heard of anti-seize, nor JIS screwdrivers... so many bolts stuck or stripped!
To ensure proper cam timing take the left circular side cover off the bottom half of the engine and align the LT mark on the rotor to the pointer. Look on the cams on the sides where those "covers" you took off originally line up against the cam. There's a mark on the left side that should line up with a mark on the cam. If you don't see either of the cam marks at the LT rotor position give the crank a full turn counterclockwise til you hit LT again. You should see both marks on the cam and all of the marks should line up EXACTLY. I love the Do the Ton forum but for these bikes you'll be better off going to Hondatwins.net there is an entire forum dedicated to this bike. Feel free to PM me with questions. Here's a picture tutorial from hondatwins about this valvetrain. It should answer all your questions. http://www.hondatwins.net/forums/1-project-logs/11792-cb450-cl450-valve-train-assembly-pictorial.html#/topics/11792
Just wanted to follow up not to leave an unfinished thread... I finally slapped everything together and got the bike running.
I didn’t want to remove the cam tensioner to avoid the cam chain skipping a tooth, so I just applied gentle pressure to the cam to allow that cover to slip back on... Adjusted the valves properly (this time), and she fired right up.
This site uses cookies to help personalise content, tailor your experience and to keep you logged in if you register.
By continuing to use this site, you are consenting to our use of cookies.