
We noticed you are blocking ads. DO THE TON only works with community supporters. Most are active members of the site with small businesses. Please consider disabling your ad blocking tool and checking out the businesses that help keep our site up and free.
You are using an out of date browser. It may not display this or other websites correctly.
You should upgrade or use an alternative browser.
You should upgrade or use an alternative browser.
Cb360 Reassembly Help
- Thread starter cb360j
- Start date
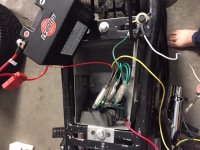
pidjones said:I swear, the fuse looks like it goes across the battery.
Now that you mention it, it does look that way. I can only assume that's not the case because that battery would pop the fuse in no time.
cb360j
Been Around the Block
cb360j
Been Around the Block
I undid that red ring terminal wire from the solenoid, put the one from battery + to the solenoid. And it all works! So God is great, I am glad it was such an easy fix. Makes a man look back and wish he hadn't gotten so frustrated over it.
Anyway, I didn't put the red wire with the ring terminal on battery + or the solenoid because I was scared it would just send 12v to the rectifier and fry it. Sound right?
Anyway, I didn't put the red wire with the ring terminal on battery + or the solenoid because I was scared it would just send 12v to the rectifier and fry it. Sound right?
cb360j said:Anyway, I didn't put the red wire with the ring terminal on battery + or the solenoid because I was scared it would just send 12v to the rectifier and fry it. Sound right?
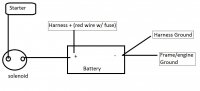
Not quite. That red wire from the R/R is your charging output. It needs to get connected to the battery + terminal or to the hot side of the solenoid (which is also connected to battery + terminal). You will fry your R/R without that wire connected.
cb360j said:Connected wire to hot side of the solenoid and magic smoke came off the red wire going to reg/rec.
indicates a short. or possibly if you ran the bike without the red+ wire attached it fried the reg-rec and that's the cause of smoke
cb360j
Been Around the Block
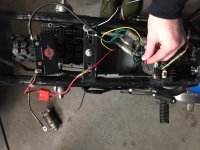
I’m not home. But the red wire with the ring terminal, don’t remember where it goes bow that you ask, was fried. And lots of smoke, tons of smoke cane pouring out of that area where only the red wire and the reg rec are located. Obviously smoke came from wire burning but I just wanted to make sure it didn’t ruin the reg/rec. is there a way I can test it ? (I’ll nake sure of all this when I get off work)
If you have a diode function on your multimeter you can test is by measuring between the pink wire and the red wire and then the yellow wire and the red wire. That should verify that the rectifier portion is working. The regulator portion cannot be easily tested at home unless you have an adjustable power supply.
If you inspect the wires on the unit and not just the harness, this should also give an indication of whether or not there may be damage.
If you inspect the wires on the unit and not just the harness, this should also give an indication of whether or not there may be damage.
Grab a multimeter and set it to 200Ω. Measure resistance between all five wires and you should get an Open Line reading for all of those.
Next, hook up the R/R to the adjustable power supply and set the APS to 13V. Repeat the measurements and you should still get Open Line.
After that, measure the resistance between the yellow and pink wires while you slowly increase the voltage on the APS. You should reach a point in the low 14V range where the resistance drops close to zero.
Finally, repeat the resistance measurements between the other wires and verify they are all still Open Line.


