The Bad Idea - VF750F Interceptor restoration

Greetings from Holland.

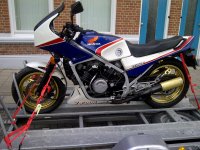
I was intrigued to find your restoration stories as I am currently bringing an orphaned Vf750f back from the dead and have an interest in the topic.

Mine is an 83 delivered to Germany which has 42k kms/26k miles on it.
I bought it from a dealer in Assen who maintained the bike for years. He told me all it needed was the carbs cleaned, plugs, oil and filters and the gas tank de-rusted and sealed.

I found the mechanics to be intact and in good overall condition, no cam issues.
With the crabs reinstalled (yes it was a real pain to get them back on, is that by design...) and low and behold it started and ran without smoking and had a smooth idle.

However Murphy works here so my question is this;

It will only start and run with the choke on...
It will shut down as you try to apply gas (twist the throttle.)
As it warms up the choke can be reduced but never fully shut off as it dies immediately.
So it runs and idles only on choke and cannot be revved.

If I pore a little fuel directly into the barrels it revs up so it seems to be a fuel delivery problem?

Any thoughts on this would be appreciated.

Cheers
 
Hmm, do you know if the fuel pump is working properly? I believe the pump is a diaphragm "points" style pump. These units use the pulsing of the pumping diaphragm to open and close a set of points, which provide power to the pump. When the float bowls fill up, the diaphragm stays in a position that leaves the points open, cutting power to the pump. When the bowls begin to empty, the pump activates again.

These pumps are a neat design, but the points are vulnerable to wear. Rebuild kits are available, however.

To test to see if this is the problem, I would bypass the fuel pump and fuel filter and run a fuel line directly from the tank to the carbs. You should have enough fuel flow without the pump to rev the bike a bit and perhaps take it for a ride.

The fuel filter could also be clogged, and you could also have a problem with getting power to the pump - there is a relay assembly that powers it.

Do you have a factory service manual for the bike? If not, I can send you my PDF copy.
 
I figure I should do a short update about the progress on my Interceptor. I finally have the "front" bank reassembled after a good deal of drama with the incorrect timing chain guide, a stripped bolt hole in the block, and other various dumb issues.

I took CrazyPJ's advice and removed the plastic sleeve over the tensioner spring. The sleeve can cause binding in the spring apparently, and all it does is dampen some spring noise. My next step is to remove the cams and tensioner from the "rear" bank and verify that the tensioner is working and also remove the plastic sleeve on that tensioner spring.

At that point, I'm going to check out the water pump and alternator and then re-seal the motor and get it back in the frame. I've decided that my goal is to get the bike a runner before I strip it down to the frame to repaint it.
 
Hi and thanks for your reply,

- I do have a shop manual, got a download as I couldn't find my original one, more on that later...

- I followed the manual for the Carb R&R.

- I also removed and cleaned the fuel pump and replaced the fuel filter.

- With the ignition on it shoots fuel 8 feet which I judge to be reasonable for its age and a clear indication it is working... (?)

I will take your advice and try by passing the pump just to be sure and send an update.

Now to let you know about my missing Vf750f factory service manual; I am one of the proud few to have owned a first year first production run Interceptor. I saw it at the Bike show in Washington DC Jan 2, 1983 and had my nose on the dealers door the next work day. A $500.00 deposit and 38 days later I rolled out of the shop and had the front wheel off the ground from 2 through 3rd and enjoyed it for 5+ amazingly fast and furious trouble free years to include my one and only WERA race...

Trouble free with the exception of an old man in a Subaru Brat who ran a stop sign and broke the bike and me. The track is safer thatn the street... A complete new front end, side covers, a tank and lots of all plastic later I got her back. It was in better shape than me but was fast and fun again. I sold the bike in 1989 to fund a honeymoon and missed it ever since. Treated me better than the now x wife. Crunch!

Cheers
 
Yea, sounds like your pump is working ok, heh. 8 feet huh, that seems to be working ok I'd say! ;D

I had similar problems on my '79 CB650, and in that case it was because it was running lean due to the air box not being properly sealed up. I don't think that's the issue on your Interceptor, but it does sound like it is running lean. Also, are you getting a good spark to all four cylinders?
 
It does seem lean or starving for fuel because it wont rev.

I had sent a hail Mary mail to an old buddy who used to work on these at my dealer and got the following back which may be of interest all round;

"Valve Clearances Are Critical. Can Be Hard To Judge, When Adjusting.
Goofy Long Wrench Required ,Hard To get proper clearances. Much Written About This. Tight Valves/No Idle. Slow To Return To Idle?

Hard To Clean those Semi Downdraft carbs ,Sounds Like Vents Clogged!

Those Idle Jet openings are extremely small.

Submerse in ultrasonic cleaner For Really Good Cleaning.

I may have some Service Bulletins In My Training Certificates/Books . I will Look."


Perhaps I did not clean thoroughly enough yet I would imagine at least one or two vents would work to cause rough running but this is not the case, hmmm...

And it does idle smoothly but only on choke...

The barrel slides needles and rubber are in very good condition and move freely when touched but don't seem to move by vacuum so again this seems to point to something being clogged, perhaps the vents as stated above.

I will spend some time on it this afternoon and see what I can find for the next installment.

Cheers
 
Yea, I had to spend some serious quality time with the carbs when I rebuilt them, and I put everything in the ultrasonic cleaner with a mixture of PineSol and hot water. I use thin strands of copper wire (like from speaker wire) to clean out the teeny jet orifices, and also use carb cleaner to blow through the passages in the carb bodies.

When you set the valve clearances, you need to use two feeler gauges at the same time, one for each valve in the pair of valves. This is critical.
 
Hi, I had a few things come up to keep my attention away but I am back.

I removed the carbs last night, will work this week to disassemble again and clean them better manually and with some boiling as I do not have an ultrasonic cleaner available.

Thanks for the speaker wire tip, I will use it.

More as it happens.
 
I hope the cleaning does the trick for you!

I got a little more work done on the 750 yesterday. I tore into the rear cylinder head and removed the tensioner assembly. As I suspected from the loose chain, the plastic sleeve on the tensioner spring was preventing the tensioner from fully tensioning the chain. I removed the spring sleeve as I did on the front bank and reassembled the head. The cam chain feels much better now!

I need to pick up some feeler gauges to set valve clearances, as I don't have the proper sized gauges for some reason, but I was able to do some other little things like reinstall the water pipe on the front cylinder head and check the water pump for wear or damage. The water passages on this bike are spotless! Like new from the factory spotless, it's almost unbelievable!

I also installed my new, lower temperature opening thermostat. This goes with the lower temperature fan switch to keep the bike cool. I'm hoping that this combined with some good ole Rotella synthetic 5w-40 will prevent wear and overheating in the bike.

uIhwJIfl.jpg


This thermostat has to be installed in a specific position otherwise it hits the temperature probe in the thermostat housing. I'll have to make sure that doesn't cause problems down the road.

Next steps are setting the valve clearances and finishing buttoning up the motor. Then the darn thing can go back into the frame and I can see if it will actually run!
 
Greetings from Sunny (Finally) Holland,

I had house guests 2 weeks in a row and needed one week to recover but I am back with good news.

I thoroughly cleaned the jets and vents, reassembled, put carbs back on (pain) and low and behold it idles, it runs and it accelerates! Amazing... :eek:)

I will need to make some minor adjustments to the carb synchronization and idle speed and it should be good to go as it doesn’t smoke and revs freely as I remember it.

Unfortunately the cooling fans are not running so I need to sort that out, however the coolant is clean and all checks indicate similar to yours the system is very spotless as well.

Next steps are to bleed the brakes/clutch and clean, lube and adjust the chain.

When I finally finish the de-rusting, cleaning and sealing of the Fuel tank (difficult shape) I can finally ride it and see how she goes.

So, good progress, and it was really nice to hear that V4 rev.

It sounds like your progressing. I can imagine you’re looking forward to hear it run.

I much appreciate all the good information, help and well wishes, it definitely helped get my bike running.

Once the Honda is mobile I will start on the clutch replacement on my Ducati Monster S4...

Never without a project here…

Proost!
 

Attachments

  • Utrecht-20130605-00573.jpg
    Utrecht-20130605-00573.jpg
    1.9 MB · Views: 552
Hurray for the bike running! Congratulations!

So with the cooling fans, I'd try to hook the connectors that go to the temperature switch in the radiator together to see if the fan runs that way. If it does, the temperature switch is probably bad.

I have my motor back together after a few more setbacks, including discovering that a corner of the "new" cylinder head was broken off. Sigh. Next step is to get it back in the frame, and hopefully I'll join you in the running Interceptor club!

The Ducati clutch replacement should be easy as pie next to working on the Interceptor ;D
 
Oh, what's this? Progress on the 750?!?!?

NUtOCVFl.jpg


943k2wkl.jpg


5DizV3pl.jpg


I forgot to get shots of the engine actually back in the frame, and have one last mount bolt to convince to get into place, but it's almost there. Hopefully I'm not far away from hearing her run. Then it will be time to repair the exhaust to replace the damaged collars and eventually strip it all down again to paint it. Or something...
 
I made a lot more progress on the Interceptor today. I finished up mounting the engine, and managed to get the carbs mounted. I used the process described [here=[url=http://users.metro2000.net/~cdc/magna/tech%20section%20and%20issues/carburetors/carburetor%20installation/carburetor%20installation.htm]http://users.metro2000.net/~cdc/magna/tech%20section%20and%20issues/carburetors/carburetor%20installation/carburetor%20installation.htm[/url]] to get the carbs installed on their intake boots, which was annoying, but ultimately successful.

5PphUpbl.jpg


I love the look of the velocity stacks coming out of the carb rack. The throttle and choke cables work well, with no binding, so thank goodness for small favors. I also replaced missing wire tape and mounted my new rear fender / tail light plastic. It's starting to look like a real bike, as you can see!

N9nOw5Il.jpg


However, when I tried to start the bike, I only got a click. I bypassed the starter solenoid with a screwdriver, and just got a few weak attempts for the motor to spin over. I knew I could spin the motor over easily by hand with a ratchet, so I decided to remove the starter.

When I opened up the starter, it smelled like burnt microwave popcorn. Not a good sign. I found that one of the four brush springs had broken, leading to about half power actually getting to the commutator. That's not going to do it.

zZcfOsql.jpg


I ordered a new spring for $5, and hedged my bets with a $19 good used starter off Ebay. The spring should be here before the replacement starter, so hopefully I'll be able to try spinning over the bike once that arrives.

In the meantime, I can check the fuel pump's functionally, as it is a points type diaphragm unit, and they often need to be rebuilt. I also want to replace the fuel lines, as they are pretty crusty. I should be able to reinstall some of the cooling system and get it filled as well as replace the spark plug wires and spark plug boots. Then I can reinstall the coil packs. Hopefully then I can try to start the bike!
 
Nice work!! Just so you know, you can run these things perfectly fine without a fuel pump. If it is going to give you trouble that is.
 
Good to know about the fuel pump. I was told the same on my '93 CBR900RR, but then I found that sometimes there wasn't enough fuel pressure when the tank was half full or I was in a tight sweeper, so I fixed the pump. It was either that or slow down, and that wasn't happening ;D

I think the Interceptor has a different pickup point for the fuel, however, and I don't think it is quite as thirsty as the 900.

How did you route the fuel line without the fuel pump? I was going to test run it with my gas "IV bottle", but that gives about 6' of fuel pressure, so plenty to fill up the float bowls.

DH6dU6ul.jpg
 
Ok, so I received the brush spring in the mail and rebuilt the original starter. I had to also replace the starter solenoid, as it was fried from the high current draw of the starter. I hooked everything up, and would get about two seconds of cranking before the battery went flat. Huh?

Some poking and prodding revealed the starter to be very hot to the touch, at which point I concluded that the armature windings had cooked the insulation off themselves. Fortunately my new to me $19 1991 VFR750 starter arrived yesterday. I had to do a little work to it, as whomever removed it torqued too hard on the power cable hookup and broke it off the wire to the brush inside. A few minutes with the soldering iron fixed this, however. The VFR starter bolted right up, but was perhaps 1/8" shorter than the original starter. This proved to not mater, however, as the o-ring on the nose of the starter still seals up the engine case properly.

I hit the start button and was greeted with an odd noise. I thought at first that the starter gear was not meshing properly with the starter clutch and whatnot inside the case, so I popped off the alternator cover. Nope, the new starter motor works so well the noise I was hearing was the motor spinning over very fast! :D

However, even with gas, starter fluid, and new plugs and plug wires, I wasn't getting it to start up. I verified the fuel pump was working and that I was getting gas to the carbs, but no fire. I pulled a plug and tested for spark. No spark, well there's my problem!

I went through the "no spark" troubleshooting in the manual, and came to the "check the ignition pickup" section. Let's see, trace the pickup wire - hey, where's the pickup wire? Not plugged into the harness, that's for sure. The pickup wires/connector were underneath the engine, as they had become pushed down there when I reinstalled the motor. Oops. I unstuck them and plugged in the connector and tried to fire it again.

Boom, we have ignition, but the idle was very low. Hmm. Wait, I didn't use the choke - vroom, we have high idle and can rev the bike!

At this point I was having trouble hearing myself think, as I did not have the exhaust connected to the bike, so I shut it off before I burned a valve. But still, it runs ;D ;D ;D

My next project is to replace the broken exhaust mount collar on the left front exhaust pipe. So far, I've cut off the pipe at where it goes into the collector box and removed the old collar and slid on a new one. Now I am working on prepping the collector box and the pipe to be welded back together with the help of a 1.25" ID to 1.5" ID coupler/adapter pipe. Some work with the angle grinder, and it looks like everything will go back together very nicely. We'll have to see how good my welding is, however! I might just tack it together and bring it to someone who can really weld, but I'll probably give the repair a try first. I can always grind down any booger welds I create. That and some black paint hide a multitude of sins...
 
On hold for a bit here, as I'm waiting for a new fuel level sender o-ring seal to arrive. It's a $2 part, but is a goofy 39.5 x 5 mm size, so I can't just get one at the hardware store. In the meantime I'm grinding down welds on the exhaust and getting it painted with hi-temp black after replacing the exhaust collar.
 
Ran out of cut off disks, picked up some more, ran out of 75/25 shielding gas, picked up some more, ran out of motivation.

I've got the exhaust pipe welded back together, but discovered a hole in the collector that needs to be patched up, so that's my next project on the exhaust before I paint it up and mount it.

Partzilla tells me my fuel tank o-ring should be here Friday, along with the rubber mounts for the front fairing and some other miscellaneous crap. I'll try to remember to get some pictures of hot steel on steel action and a cut off disk stripping...the rust and excess welds...off the exhaust.
 
In a happy turn of events, my Genuine Honda rubber bits arrived yesterday in the mail, a day early. As I have today off and I just sold my main running bike, the CBR900RR, I spent way too long in the garage working on the 750. I even took pictures!

56GtD26l.jpg


slurddgl.jpg


I'm still messing around with the welds and grinding on the exhaust part I had to cut off, but I'm almost done:

qw6GAuCl.jpg


Today I'll hopefully finish up the exhaust and get it hit with some hi-temp paint. It's going to be sunny and warm here today, so it's a good day for painting.
 
More progress today, and more pictures!

I was able to restore some of the oxidized black plastic pieces with a liberal application of lemon Pledge. Thanks to the Internet, I learned that lemon Pledge is a pretty effective plastic restoration chemical.

I also recovered the seat with some black marine vinyl, as the original seat cover was torn in several places. The foam and seat pan were intact, however.

Crappy cover:
tt0flDWl.jpg


Cover off:
flCOVHel.jpg


Materials gathered - as a side note, this stapler was terrible. I returned it and bought a Stanley power stapler for about $5 more than the manual:
gyuPf8Gl.jpg


I forgot to put the vinyl in the dryer, so I had to spot heat it with a hair dryer. Don't forget to put your vinyl in the dryer for ~10 or so. You don't want to melt it, but you do want to make it stretchy.

Liberally apply spray adhesive to the seat foam:
ZCK0eWhl.jpg


I find it works best to start at the bottom of one side and the top of the other. That way, you can still stretch the vinyl to remove wrinkles:
cvr0CExl.jpg


Getting there:
NpGf8Djl.jpg


Ta da!
j8YlaN8l.jpg


Yes, I stapled the hell out of the cover:
lTFmU9ul.jpg


Looks nice on the bike!
lTFmU9ul.jpg


I also finished welding and grinding the exhaust to patch the hole in it. I cleaned it up with a wire brush on a drill and solvent, and then hit it with two coats of VHT primer, followed by three coats of VHT black. I'm going to have to be careful with the exhaust until I get it heat cycled on the bike, because it will be soft until it is cured. I'll work on installing it tomorrow after it has had overnight to dry.

ziYVj07l.jpg


The exhaust is the last part that needed repair. The cooling system can go back on and be filled and bled after the exhaust is installed, and then it will be time to go for a ride!
 
Back
Top Bottom