CB750K - First Build

ShaggyPit

Been Around the Block
Hey guys,

So back in the summer I started to really look into building a cafe racer style bike. I had no idea how broad that "description" turned out to be and then the variations such as bobbers and trackers and brats. I found this site and starting cruising the builds and enjoyed each style and each build I looked at. A small fire started burning inside me and I decided that I would try to find some cheap bike with the intentions of turning it into something that is at least a fraction of the coolness of many of the builds I have seen on here.

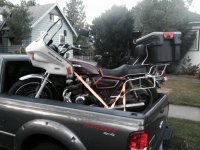
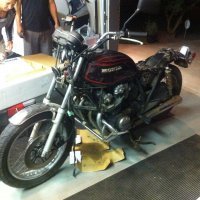
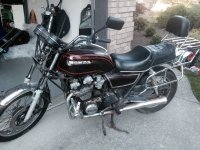
So being in my final year at university, I wasn’t willing to spend too much money on a bike and started scouring the local craigslist for a cheap bike. I had no idea what models were good for what style and started to do some research. Although I started riding a Ninja about 3 years ago, I am not the most mechanically adept person there is, but not afraid to get my hands greasy. I did basic stuff on the Ninja but never really took the time to learn the core of the bike and the process the engine goes through along with carbs and all that fun stuff. Anyways, I finally found a cheap cb750 and after seeing it a couple times was able to talk the guy down on the price a bit where I felt comfortable that if I had to pull the plug on the project I could (hopefully) regain my money or most of it at least.

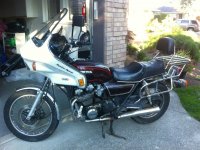
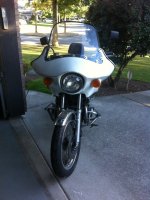
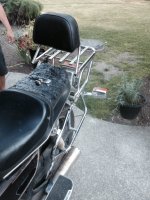
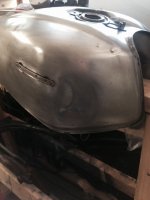
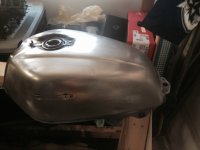
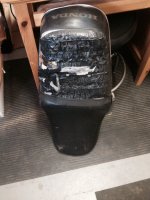
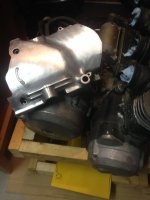
Now the bike did run, shifted, and rolled nicely. Wasn’t too sure how well it was running but it sounded as if it were in decent condition for its age. The guy stored it in an underground garage so it was nice and dry but still had some surface rust and tons of grime everywhere. But for my first project, I wasn’t too worried if it was a beater because I am sure I will be messing something up on it. The gas tank had a dent in it but figured I could get it removed and the inside was pretty clean from what I could tell. Now since i have been lurking on the forum for a while I was first hoping to change just the cosmetic things on it but soon realized that I should really look into the engine.

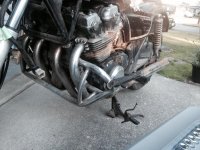
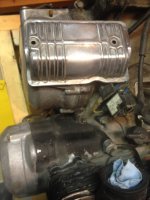
Now I am not gonna lie, the aspect of an engine tear down seems quite daunting. There are so many parts and patience required! I’m hoping I will be able to handle with the help from all of you good people on here. Now the PO said the carbs were done just before he put it away (I know, everybody says something like that), but the outside of them are very clean and the engine did sound like it was running pretty good considering it had sat for a couple months. The PO rode it up until May i believe then did not insure as he needed his truck for work.

Now this project is going to be worked on when I am not at school or working and when the girlfriend feels willing to help me out in the garage despite the cold! She is the one who will keep me from chucking wrenches and the engine out into the snow.

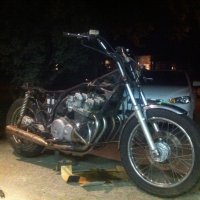
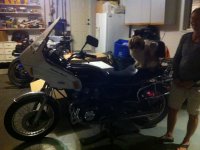
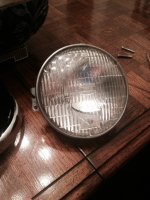
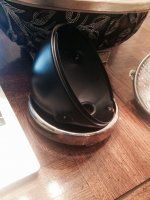
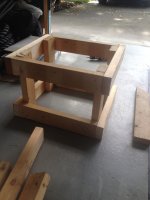
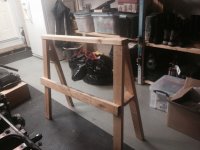
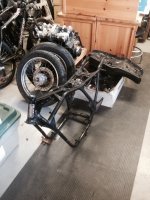
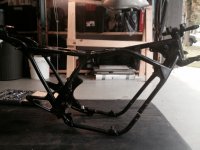
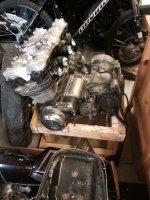
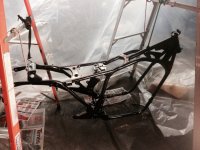
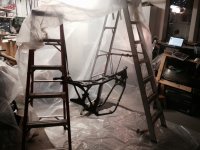
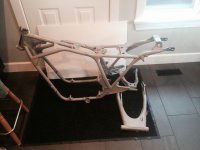
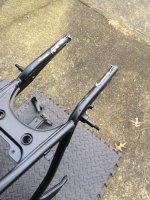
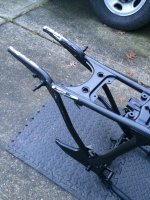
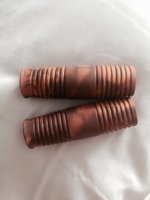
I have already started the build/tear down and haven’t taken as many pictures as I have hoped for but here are some pics of what I have so far and will be posting more as school is winding down for the semester.
 

Attachments

  • Loaded.jpg
    Loaded.jpg
    479 KB · Views: 401
  • Day 1 - WIndjammer Side.jpg
    Day 1 - WIndjammer Side.jpg
    608 KB · Views: 389
  • Day 1 - Windjammer Front.jpg
    Day 1 - Windjammer Front.jpg
    308.9 KB · Views: 1,484
The Windjammer had to go first!

also the highway bars were stuck pretty good and after a few days of soaking them in penetrating oil, and hammering at them with a mallet, cut through the middle of them to get them off.


Tank was in good shape rather than a few dents but have stripped it down already and will post a pic of it once I have a chance.
 

Attachments

  • Naked.jpg
    Naked.jpg
    653.5 KB · Views: 400
  • Seat and Backrest.jpg
    Seat and Backrest.jpg
    339.5 KB · Views: 1,609
  • Naked with tank.jpg
    Naked with tank.jpg
    729.2 KB · Views: 391
  • Maggie.jpg
    Maggie.jpg
    514.9 KB · Views: 418
  • Day 1 - Highway Bars.jpg
    Day 1 - Highway Bars.jpg
    193.9 KB · Views: 387
  • Day 1 - Full Body.jpg
    Day 1 - Full Body.jpg
    619.6 KB · Views: 379
ended up taking the headlight out of the windjammer and picked up a brand new bucket off CL recently and fitting is so close to perfect but I have no way to secure the headlight in the bucket as there are no mounts...any suggestions? I can post more pics if needed of this dilemma
 

Attachments

  • Photo 3.jpg
    Photo 3.jpg
    282.4 KB · Views: 1,728
  • Photo 2.jpg
    Photo 2.jpg
    277.2 KB · Views: 1,689
  • Photo 1.jpg
    Photo 1.jpg
    273.8 KB · Views: 1,586
As i mentioned in my first post, I am in university so money is gonna be pretty tight on this build

also being my first build I dont have any fancy tools, jacks, and lifts that some of you guys have.
Parents recently did a reno in the house and ended up having some spare 2 x 4's laying around so ended up building an engine mount and a saw horse which is doubling as a my tank holder at the moment ;D 8)

they are pretty ghetto but are proving sturdy and handy so far!
 

Attachments

  • Engine Stand.jpg
    Engine Stand.jpg
    214.1 KB · Views: 1,747
  • Sawhorse.jpg
    Sawhorse.jpg
    436.4 KB · Views: 384
ShaggyPit said:
ended up taking the headlight out of the windjammer and picked up a brand new bucket off CL recently and fitting is so close to perfect but I have no way to secure the headlight in the bucket as there are no mounts...any suggestions? I can post more pics if needed of this dilemma

Yep. I ran into the same problem with my CB125S.

Grab a 7" H4 reflector (I think it's a 7" for the CB750s... grab a measuring tape and check!) and use some silicon caulk to attach it to the trim ring. Make sure to clean everything really well and have it perfectly lined up before using the caulk and it should work nicely.

H4 bulbs will be a lot easier to find in a pinch than a sealed beam.

Here's a link to a 7" reflector with a short writeup of the things you need to consider when putting an H4 into an older bike:
http://4into1.com/candlepower-7-quartz-halogen-motorcycle-headlight/
 
Ah ya thats what I was thinking.. some sort of caulking.

glad to see someone has some experience with it!

Ill give it a shot and hopefully it will work out!
Thanks for the link as well!
 
Here is some pictures of the rest of the bike and how it sits at the moment

the seat is in pretty good shape but the passenger spot is all torn up in some weird grid pattern ???

but will probably be changing the style of the seat to get that flat look to it...probably gonna make my own.. never done it so should be interesting ;D

got the frame out of the engine a couple weeks ago as well havent touched it since then however

frame is in the process of slowly being degreased then I will be taking it to a local sand blaster to have it cleaned up fully and then i will be repainting and coating it

will also be keeping stock rims but will have to polish them up and make it look somewhat new again

also here are some pics of the tank after i stripped it and a look at its dent as well...anybody got sure fire ways to remove the dent? ive tried a few off youtube with no luck so far
 

Attachments

  • Tank right.jpg
    Tank right.jpg
    210.8 KB · Views: 1,774
  • Tank Left.jpg
    Tank Left.jpg
    375.9 KB · Views: 435
  • Frame and Tires.jpg
    Frame and Tires.jpg
    319.4 KB · Views: 1,719
  • Frame.jpg
    Frame.jpg
    381 KB · Views: 382
  • Engine.jpg
    Engine.jpg
    309.6 KB · Views: 1,700
  • Seat bottom.jpg
    Seat bottom.jpg
    264.6 KB · Views: 1,683
  • Seat top.jpg
    Seat top.jpg
    276.6 KB · Views: 1,670
So i recently lined the trim of the headlight bucket with some silicon caulking

I think it turned out pretty well as everything is still very clean and there is no excess amount of the stuff on outside or inside
also im still able to remove the trim from the bucket with a little bit of care to make sure not to apply unnecessary pressure to the headlight

Im sure there are better ways of doing this, like getting the correct bucket but for now this seems it will hold great! so i am happy with it ;D

next up will be to remove the stock seat bracket and bend my own rear loop as well as fabricate a seat pan.

would electrical conduit work fine for the rear loop or should i use some sort of other tubing?
 
You want to use something much stronger than conduit, and you want to use frame plugs. The frame is what holds everything together and keeps your ass off the pavement so not really a place to skimp. I also would advise against bending the loop yourself. Most of the good steel tubing you will use is going to be fairly thick walled and extremely hard to bend and not kink without a mandrel bender.

Long story short there are a few guys on here who sell seat loops at really reasonable prices and they do good work with the right bender and tubing.

If you still want to do it yourself however do a lot of research on the right tubing and methods of doing it
 
SaltCityCafe said:
You want to use something much stronger than conduit, and you want to use frame plugs. The frame is what holds everything together and keeps your ass off the pavement so not really a place to skimp. I also would advise against bending the loop yourself. Most of the good steel tubing you will use is going to be fairly thick walled and extremely hard to bend and not kink without a mandrel bender.

Long story short there are a few guys on here who sell seat loops at really reasonable prices and they do good work with the right bender and tubing.

If you still want to do it yourself however do a lot of research on the right tubing and methods of doing it

ahh okay thanks for the info!
 
Hey to anyone paying attention to this thread!

hope everyone here has had a merry christmas and enjoying the holiday season!


so tomorrow I am hoping to get my frame and some parts such as the swingarm and center stand into the sand blasting shop. Meanwhile, over the last few days i have had a chance to start polishing up some casings on the engine.

To clean the covers I have just been using some 220 grit sand paper to work away on the tough stuff then work my way up to 1200 grit. really like how the parts are turning out. The engine came from the PO with some paint and lots of grease and gunk on the engine as can be seen in the photos ill post. slowly making progress and once the I have the frame blasted I am hoping to cut the rear end and start working on a rear loop. Still intimidated to crack open the engine as of yet since it was running when I picked it up back in September. Anybody know of a good step by step document online detailing an engine rebuild..? I do have the shop manuals but another source never hurts.

SO..a question for all you out there...whats the best place to get a pipe for fabricating a rear loop in DIY fashion. I have researched lots of methods and jigs to make your own but have found little info on the best tubing to use and where is the best, cheapest place to purchase Any advice on this would be helpful!

Hope you all are making the best of the holiday season to work on your projects! ...and spend time with the family i suppose lol

Happy building!
 

Attachments

  • Photo 1.jpg
    Photo 1.jpg
    227.7 KB · Views: 1,203
  • Photo 2.jpg
    Photo 2.jpg
    180.5 KB · Views: 1,199
Happy New Year guys!

hope everyone's builds and bikes are doing well and that those in warmer climates are riding hard for those of us stuck in the more northern parts of the continent!

So a few days after Boxing Day, I took my frame, swing arm, and center stand to the local sandblaster with the girlfriend as a nice little date 8) she blasted the swingarm and stand while i worked on the frame. First time have sandblasted anything and it was a pretty cool experience. Definitely better than paying the "professionals" to blast it for me and it was cheaper as well. I felt we did a pretty good job as well. However, once we were done the guy who worked there mentioned we should prime it within a couple days to prevent flash rusting which i was unaware of occurs so quickly. So off to Canadian Tire to pick up some primer and straight home we went. scuffed the frame and parts, rinsed down, prepped with some denatured alcohol, made a make shift booth to prevent over spray from getting on everything and pissing off my mom, and got to spraying.

Have done quite a bit of research on painting and what not and this was my first go and spray painting and priming anything. Was a bit stressful and a quick learning curve on how far to hold the can away and how much to spray without causing drips and runs. After a day of letting the primer dry, looked it over and touched up any small imperfections then let it sit for another day again before wet sanding it down washing and prepping the frame for paint. So last night used the VHT Roll bar paint which seems to be the most popular choice from the research I have done. It looks great so far and went on to the frame really well. It is not super glossy but still has a nice shine to it. Have yet to paint the swingarm and center stand yet but those were primed during this process as well. Its not a show room quality paint job but I am more than pleased with how it has been looking thus far.

For those wondering on good steps to follow, the post on this forum called RATTLE CAN BLING by tWistedWheelz was a great source of information. I followed his post pretty well but not to the extent of 12 coats that he suggested. Rather took information from a variety of other sources. If anyone has any questions on the process I used feel free to ask and Ill answer to the best of my knowledge.

Again I have never done any sort of paint job such as this and yet the results, to me, are pretty good so far and am more than pleased. Just a bit of patience and attention to detail.

Will post some better pics, possibly later today, but the snow is starting to fall here in Vancouver suburbs and do not feel like going out to the garage at the moment! :p

Happy Building/Riding everyone!
 

Attachments

  • Frame Painted.jpg
    Frame Painted.jpg
    447.2 KB · Views: 335
  • Hanging Frame.jpg
    Hanging Frame.jpg
    398.8 KB · Views: 358
  • Blasted Frane.jpg
    Blasted Frane.jpg
    353.2 KB · Views: 334
  • Girlfriend Blasting.jpg
    Girlfriend Blasting.jpg
    180.2 KB · Views: 1,154
Something I forgot to mention...

in the haste to get the frame primed due to the fact that I didnt want it to flash rust and was unaware this would occur...I never got around to cutting up the tail section of the frame in preparation for a rear loop and seat pan mounts. I guess I will have to retouch up the paint once i cut and have the tail loop and mounts welded...anybody know of a specific way to do this to avoid any unnecessary damage to the paint (mainly in regards to the welding process as I have never welded or been around much welding).

kind of a weird question but do not feel like rewording it haha any help is appreciated, thanks!
 
Yeah always a good idea to get all your fabrication done first. Make sure you get any mounts or hoops or anything else that will be permanently afixed on before you paint or powder coat anything. A little flash rust won't hurt anything along the way
 
SaltCityCafe said:
Yeah always a good idea to get all your fabrication done first. Make sure you get any mounts or hoops or anything else that will be permanently afixed on before you paint or powder coat anything. A little flash rust won't hurt anything along the way

Ya i wanted to do some fab work but ended up sandblasting and once that was done and was told about the flash rusting I wasnt sure how much of an effect it would have so I played it safe and got it all primed

unfortunately I will have to touch up the paint once I do the fab work and I hope others reading this thread will learn from my newb mistake ;D

So here is a list of things I would like to accomplish within the next couple weeks (may difficult with work and school starting up):
- fab work on tail section
- make or order a rear loop/weld onto frame once acquired
- clean spokes/rims on wheels
- order new bearings for areas that need bearings (steering/wheels)
- touch up paint on frame and clear coat it
- clean up triple tree and repaint and clear coat
- finish painting/clear coat swingarm and center stand
- take dents out of gas tank/bondo/prime and paint


any suggestions on best ways to remove dents? I have tried some youtube methods and would like to try a couple more before I am forced to take it to a shop to have done...any suggestions on other areas is greatly appreciated! :)

happy building!
 
Hey guys

so got my hands on an angle grinder and managed to cut the rear of my frame in preparation for ordering and welding the rear loop on. First to go was the passenger seat bump then the pinched tubes at the back and then a helmet lock and another small tab. here are some pics of what it looks like. hopefully its up to everyones standards here and I know it could be better but at this point in time I am not too worried on getting anywhere near showroom finish on such a small aspect of the build :)
 

Attachments

  • Photo 1.jpg
    Photo 1.jpg
    375.8 KB · Views: 1,429
  • Photo 7.jpg
    Photo 7.jpg
    358.1 KB · Views: 1,468
just remember you cant put a flat seat pan on there the tire goes up there when you hit bigger bumps
be prepared for this,do this now before you go any further
bottom out the suspension, ALL THE WAY down hard and observe where the tire is and leave at least an inch vertical clearance
an easy way is to put on just one shock with the preload backed off then ratchet strap it down hard
the best way is to do the build with the springs off the shocks so you can easily check and verify as you go
 
xb33bsa said:
just remember you cant put a flat seat pan on there the tire goes up there when you hit bigger bumps
be prepared for this,do this now before you go any further
bottom out the suspension, ALL THE WAY down hard and observe where the tire is and leave at least an inch vertical clearance
an easy way is to put on just one shock with the preload backed off then ratchet strap it down hard
the best way is to do the build with the springs off the shocks so you can easily check and verify as you go

Thanks for the info xb! I will remember to take this into consideration!


Just wanted to make a quick post here regarding my new grips that I ordered from TownMoto.
They are the Mocha Marble and I am quite happy with the way they look. Slightly more orange in the brown than I had anticipated but I believe it will suit the look of the bike well. Shipping was incredibly fast from Toronto to Vancouver and would order something from them again. Anybody have any experience with these grips on the length of duration? Either way for the price and look I dont think you can go wrong with them.
 

Attachments

  • IMG_3993.JPG
    IMG_3993.JPG
    863.8 KB · Views: 300
Back
Top Bottom