We noticed you are blocking ads. DO THE TON only works with community supporters. Most are active members of the site with small businesses. Please consider disabling your ad blocking tool and checking out the businesses that help keep our site up and free.
You are using an out of date browser. It may not display this or other websites correctly.
You should upgrade or use an alternative browser.
You should upgrade or use an alternative browser.
GS-550L to GS-674 Frankenbike project
- Thread starter Toast
- Start date
Hoosier Daddy
Earache my eye...
Keep it up!
Toast
Been Around the Block
Thanks guys ") , the progress is slow but it's getting there.
, the progress is slow but it's getting there.
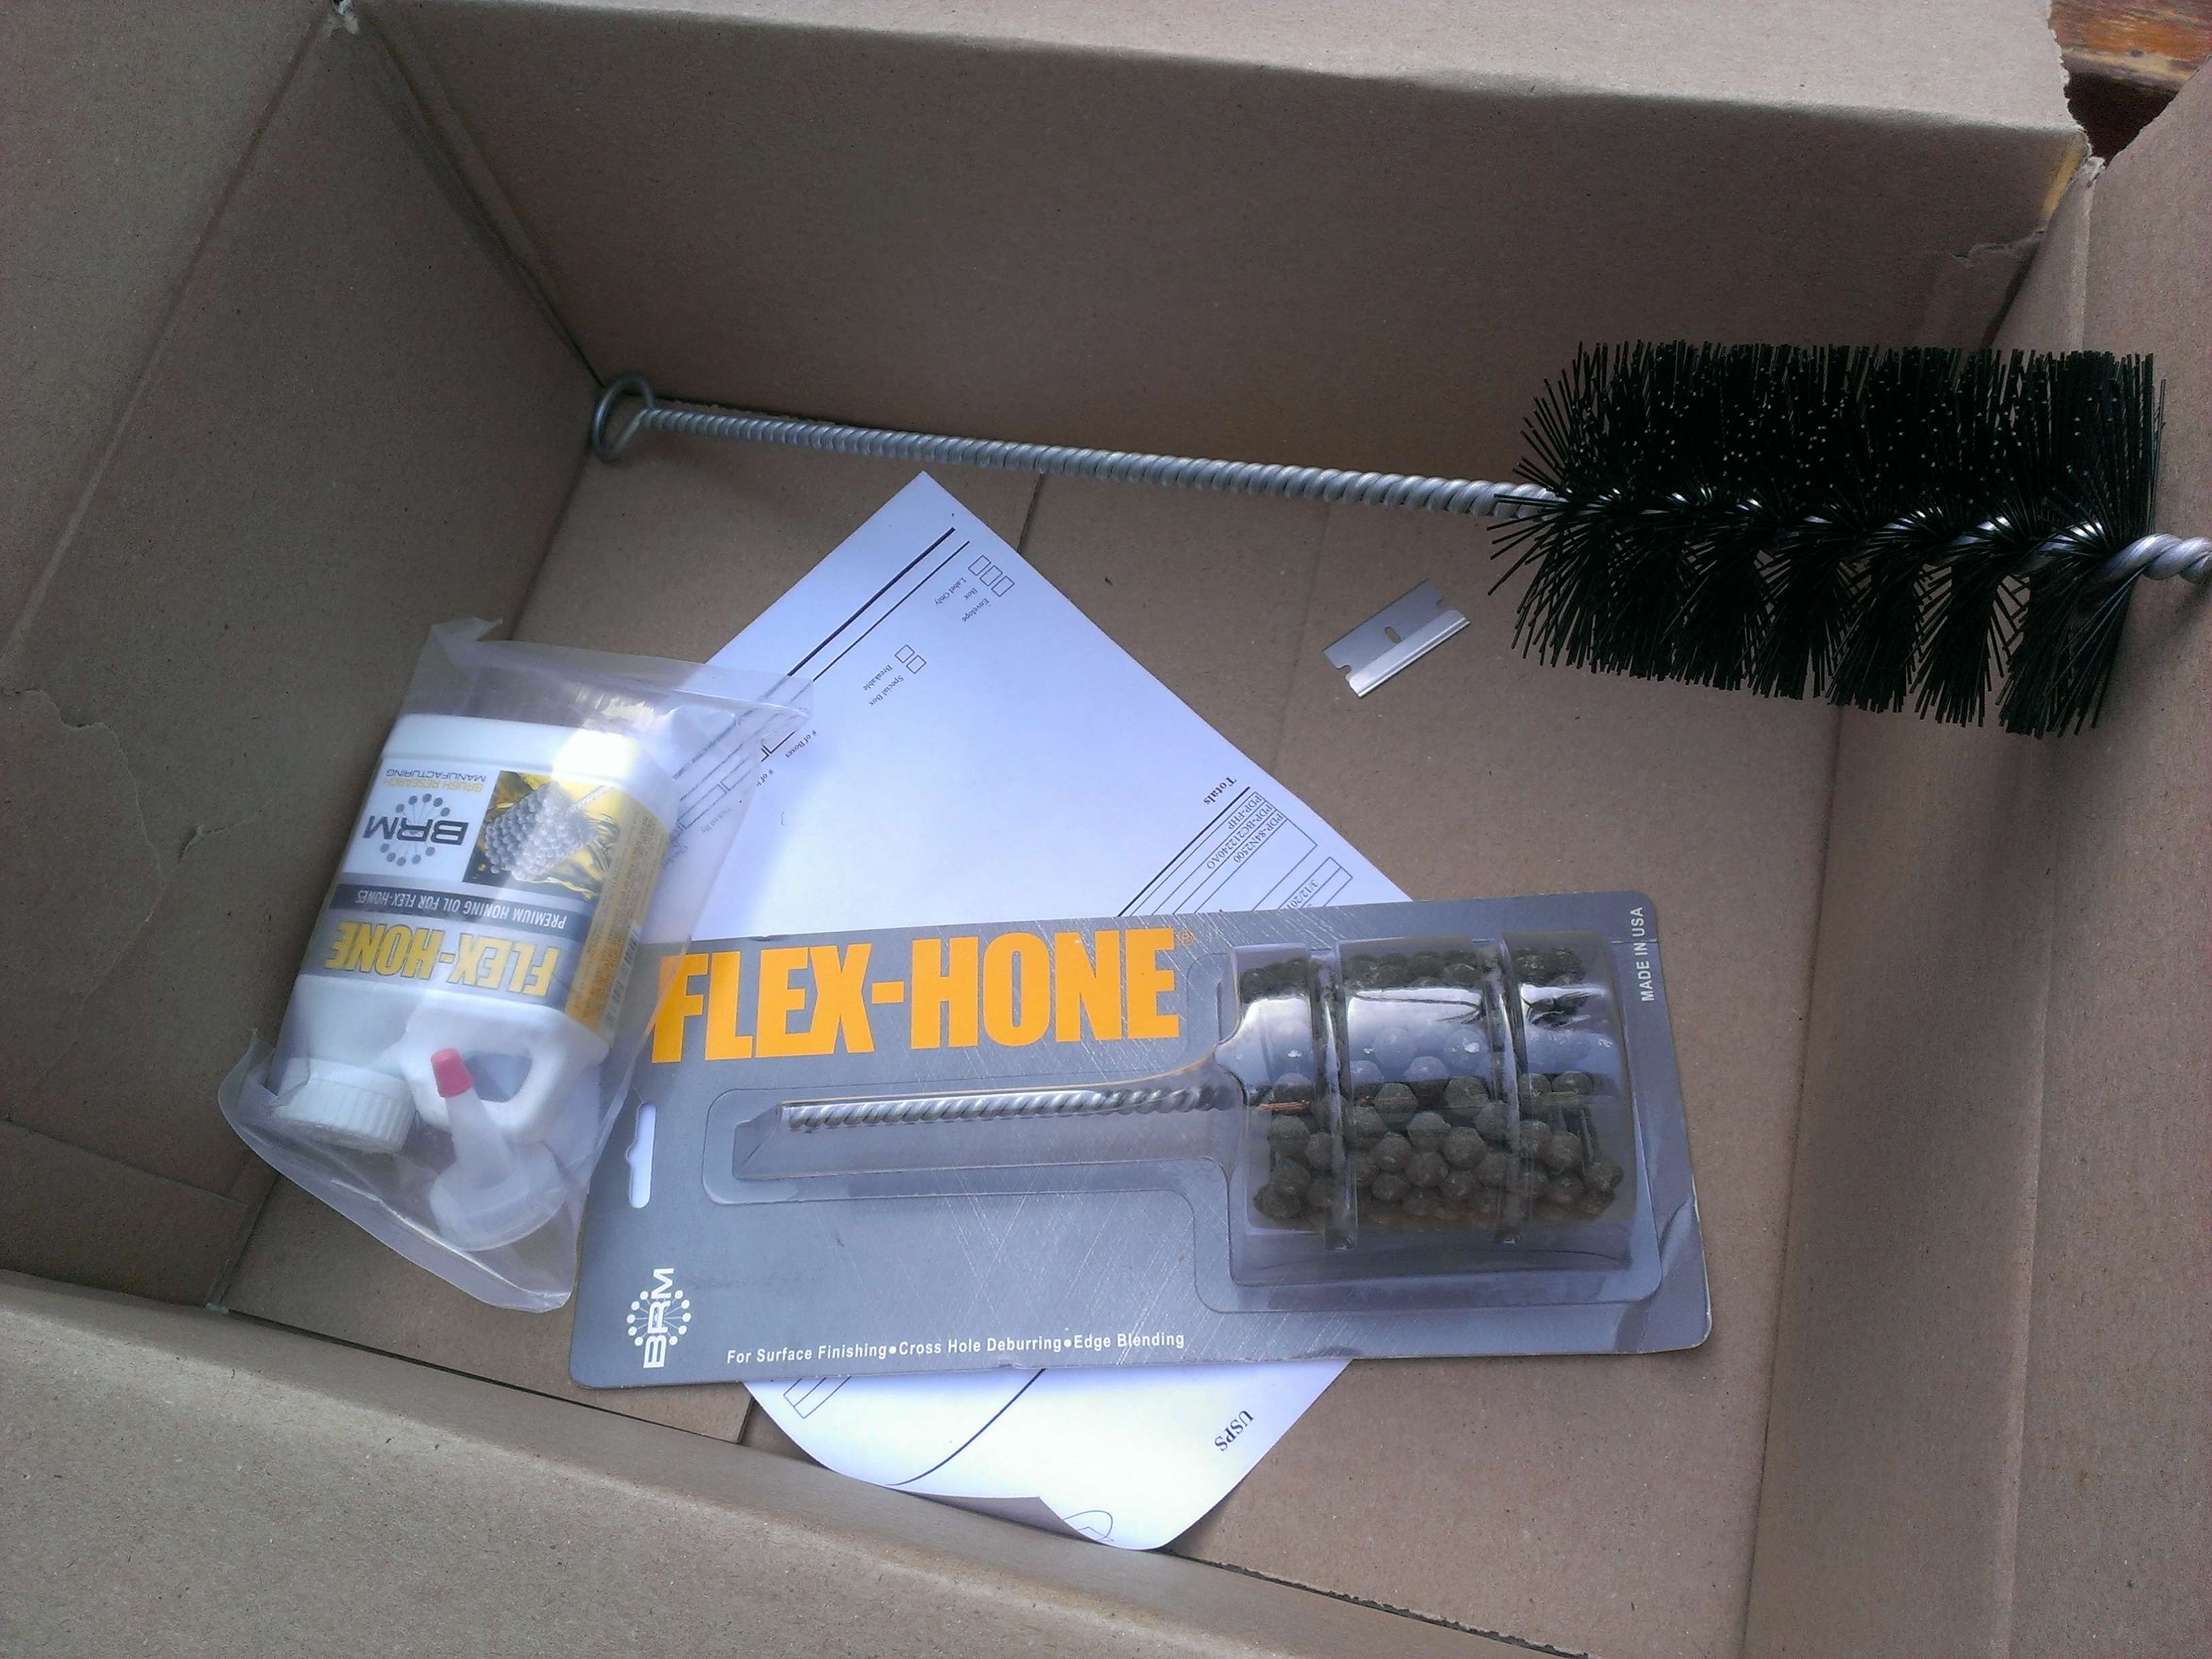
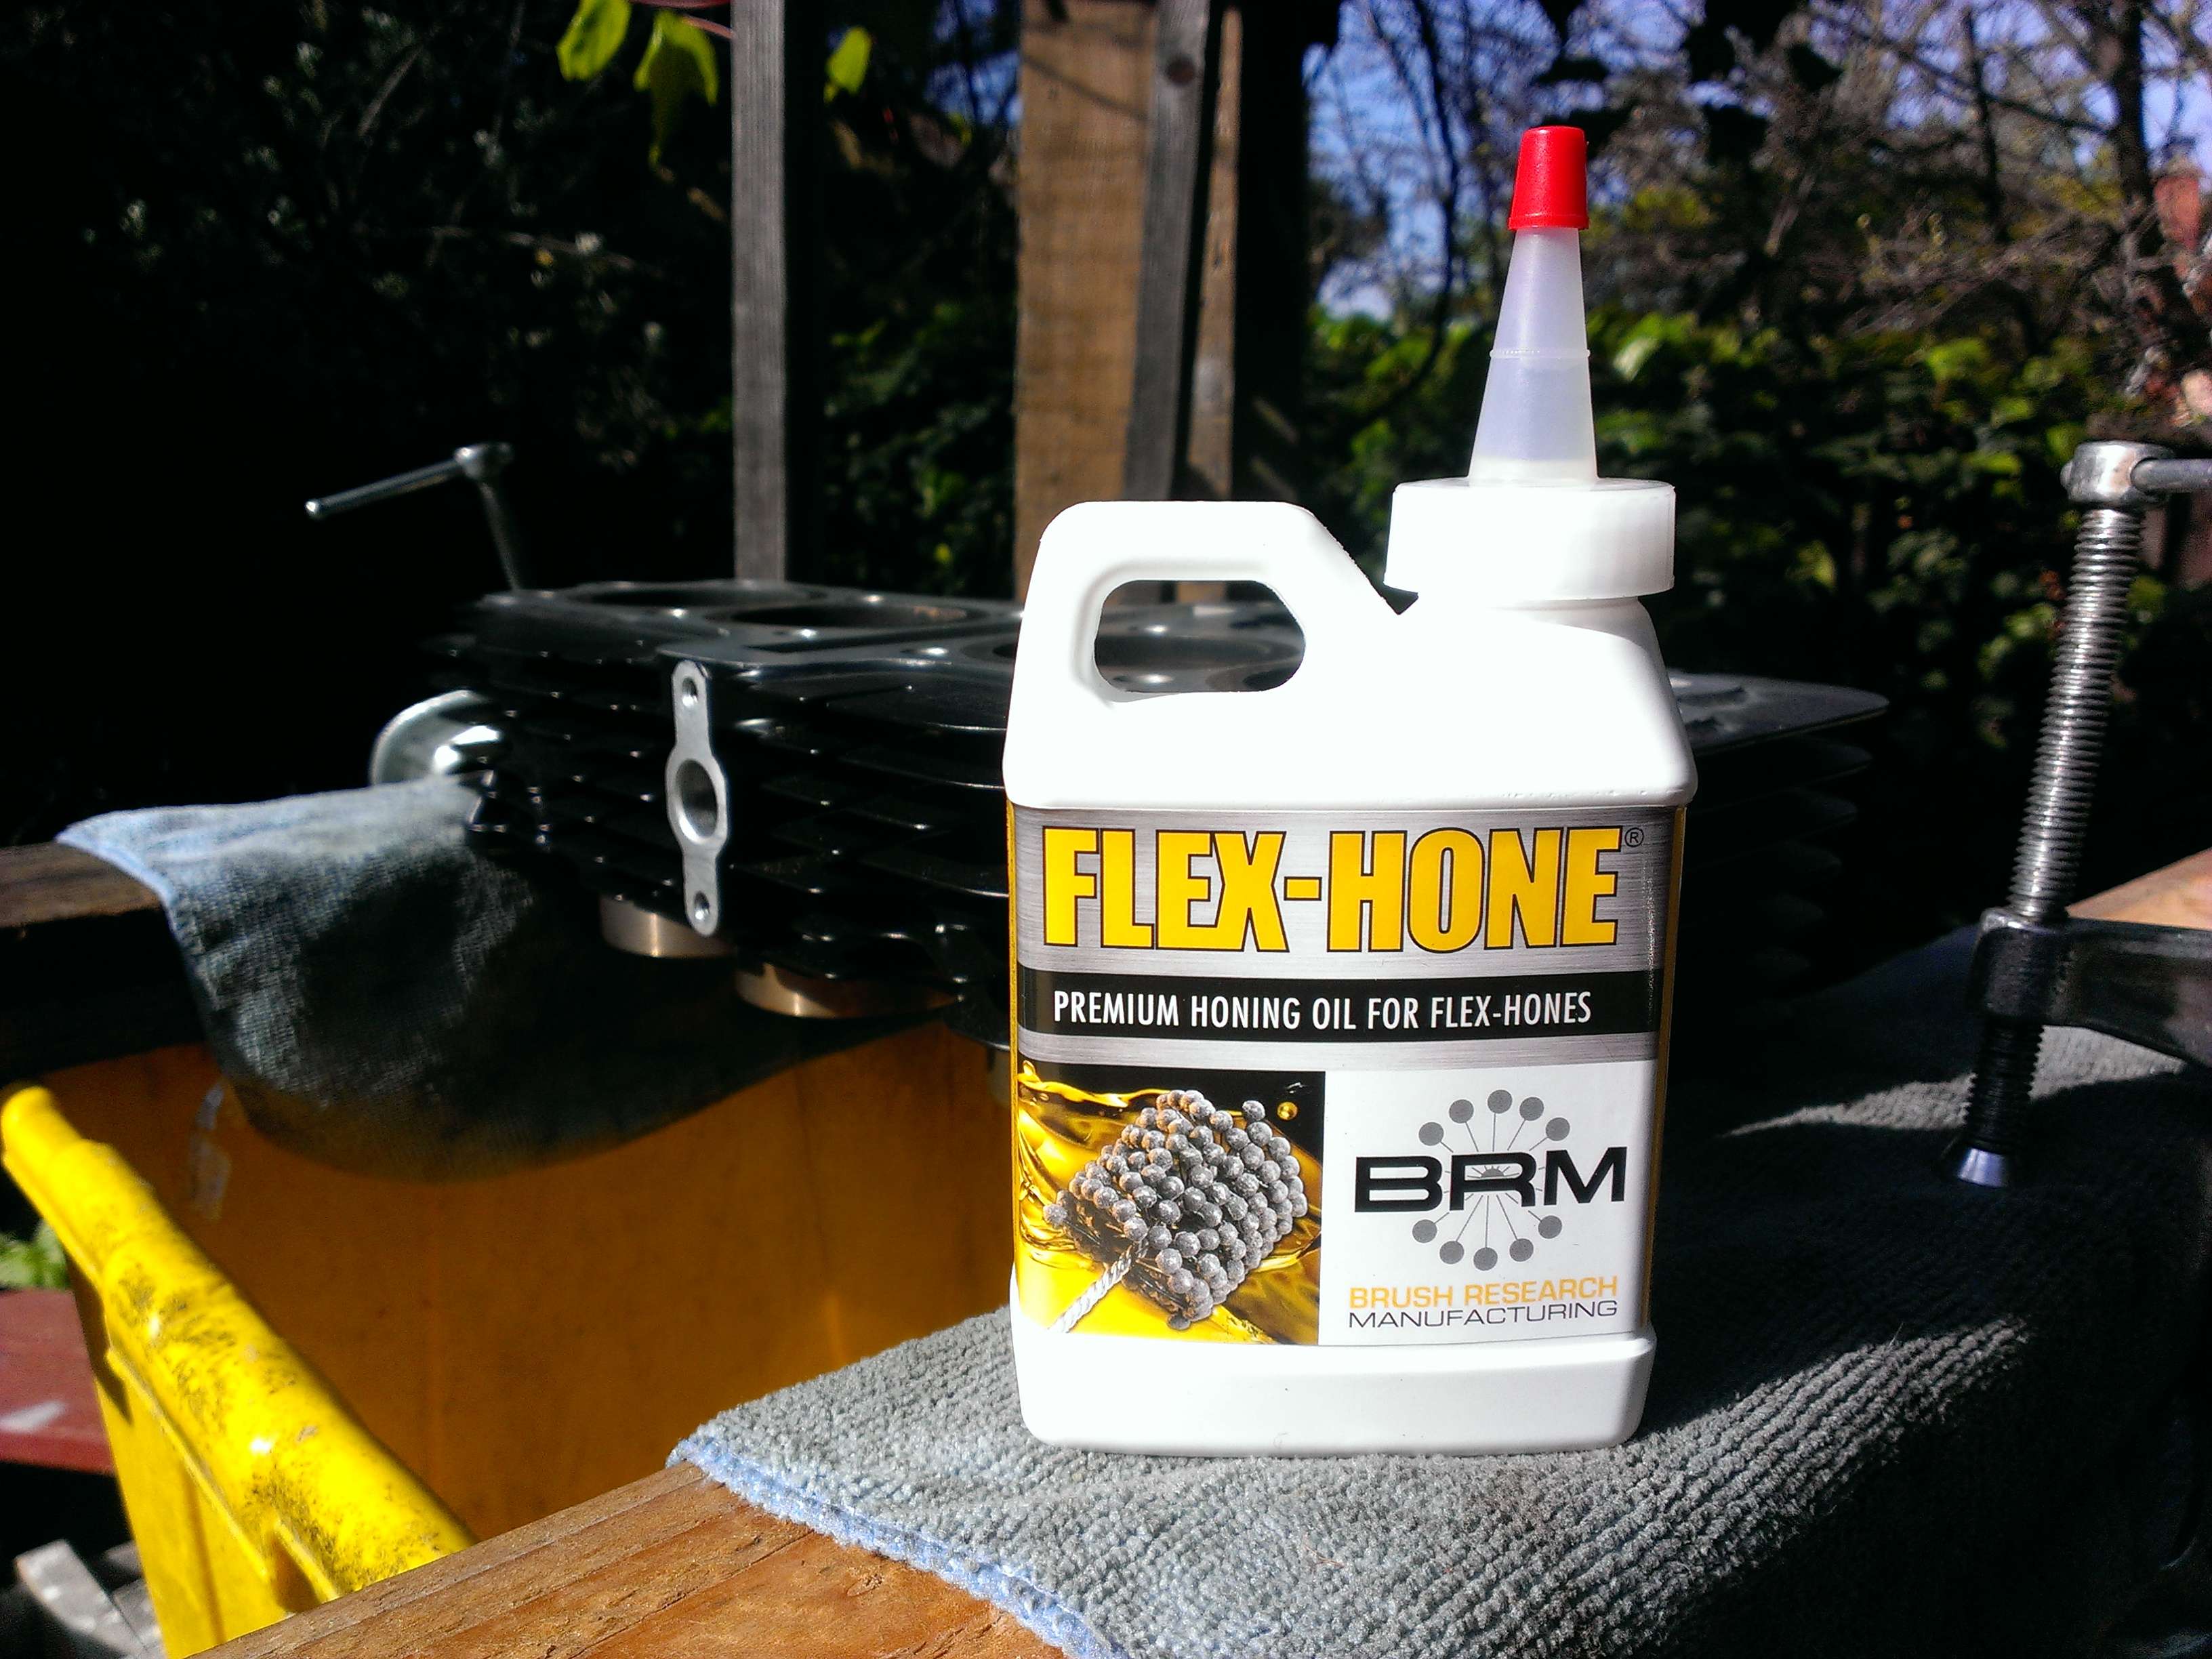
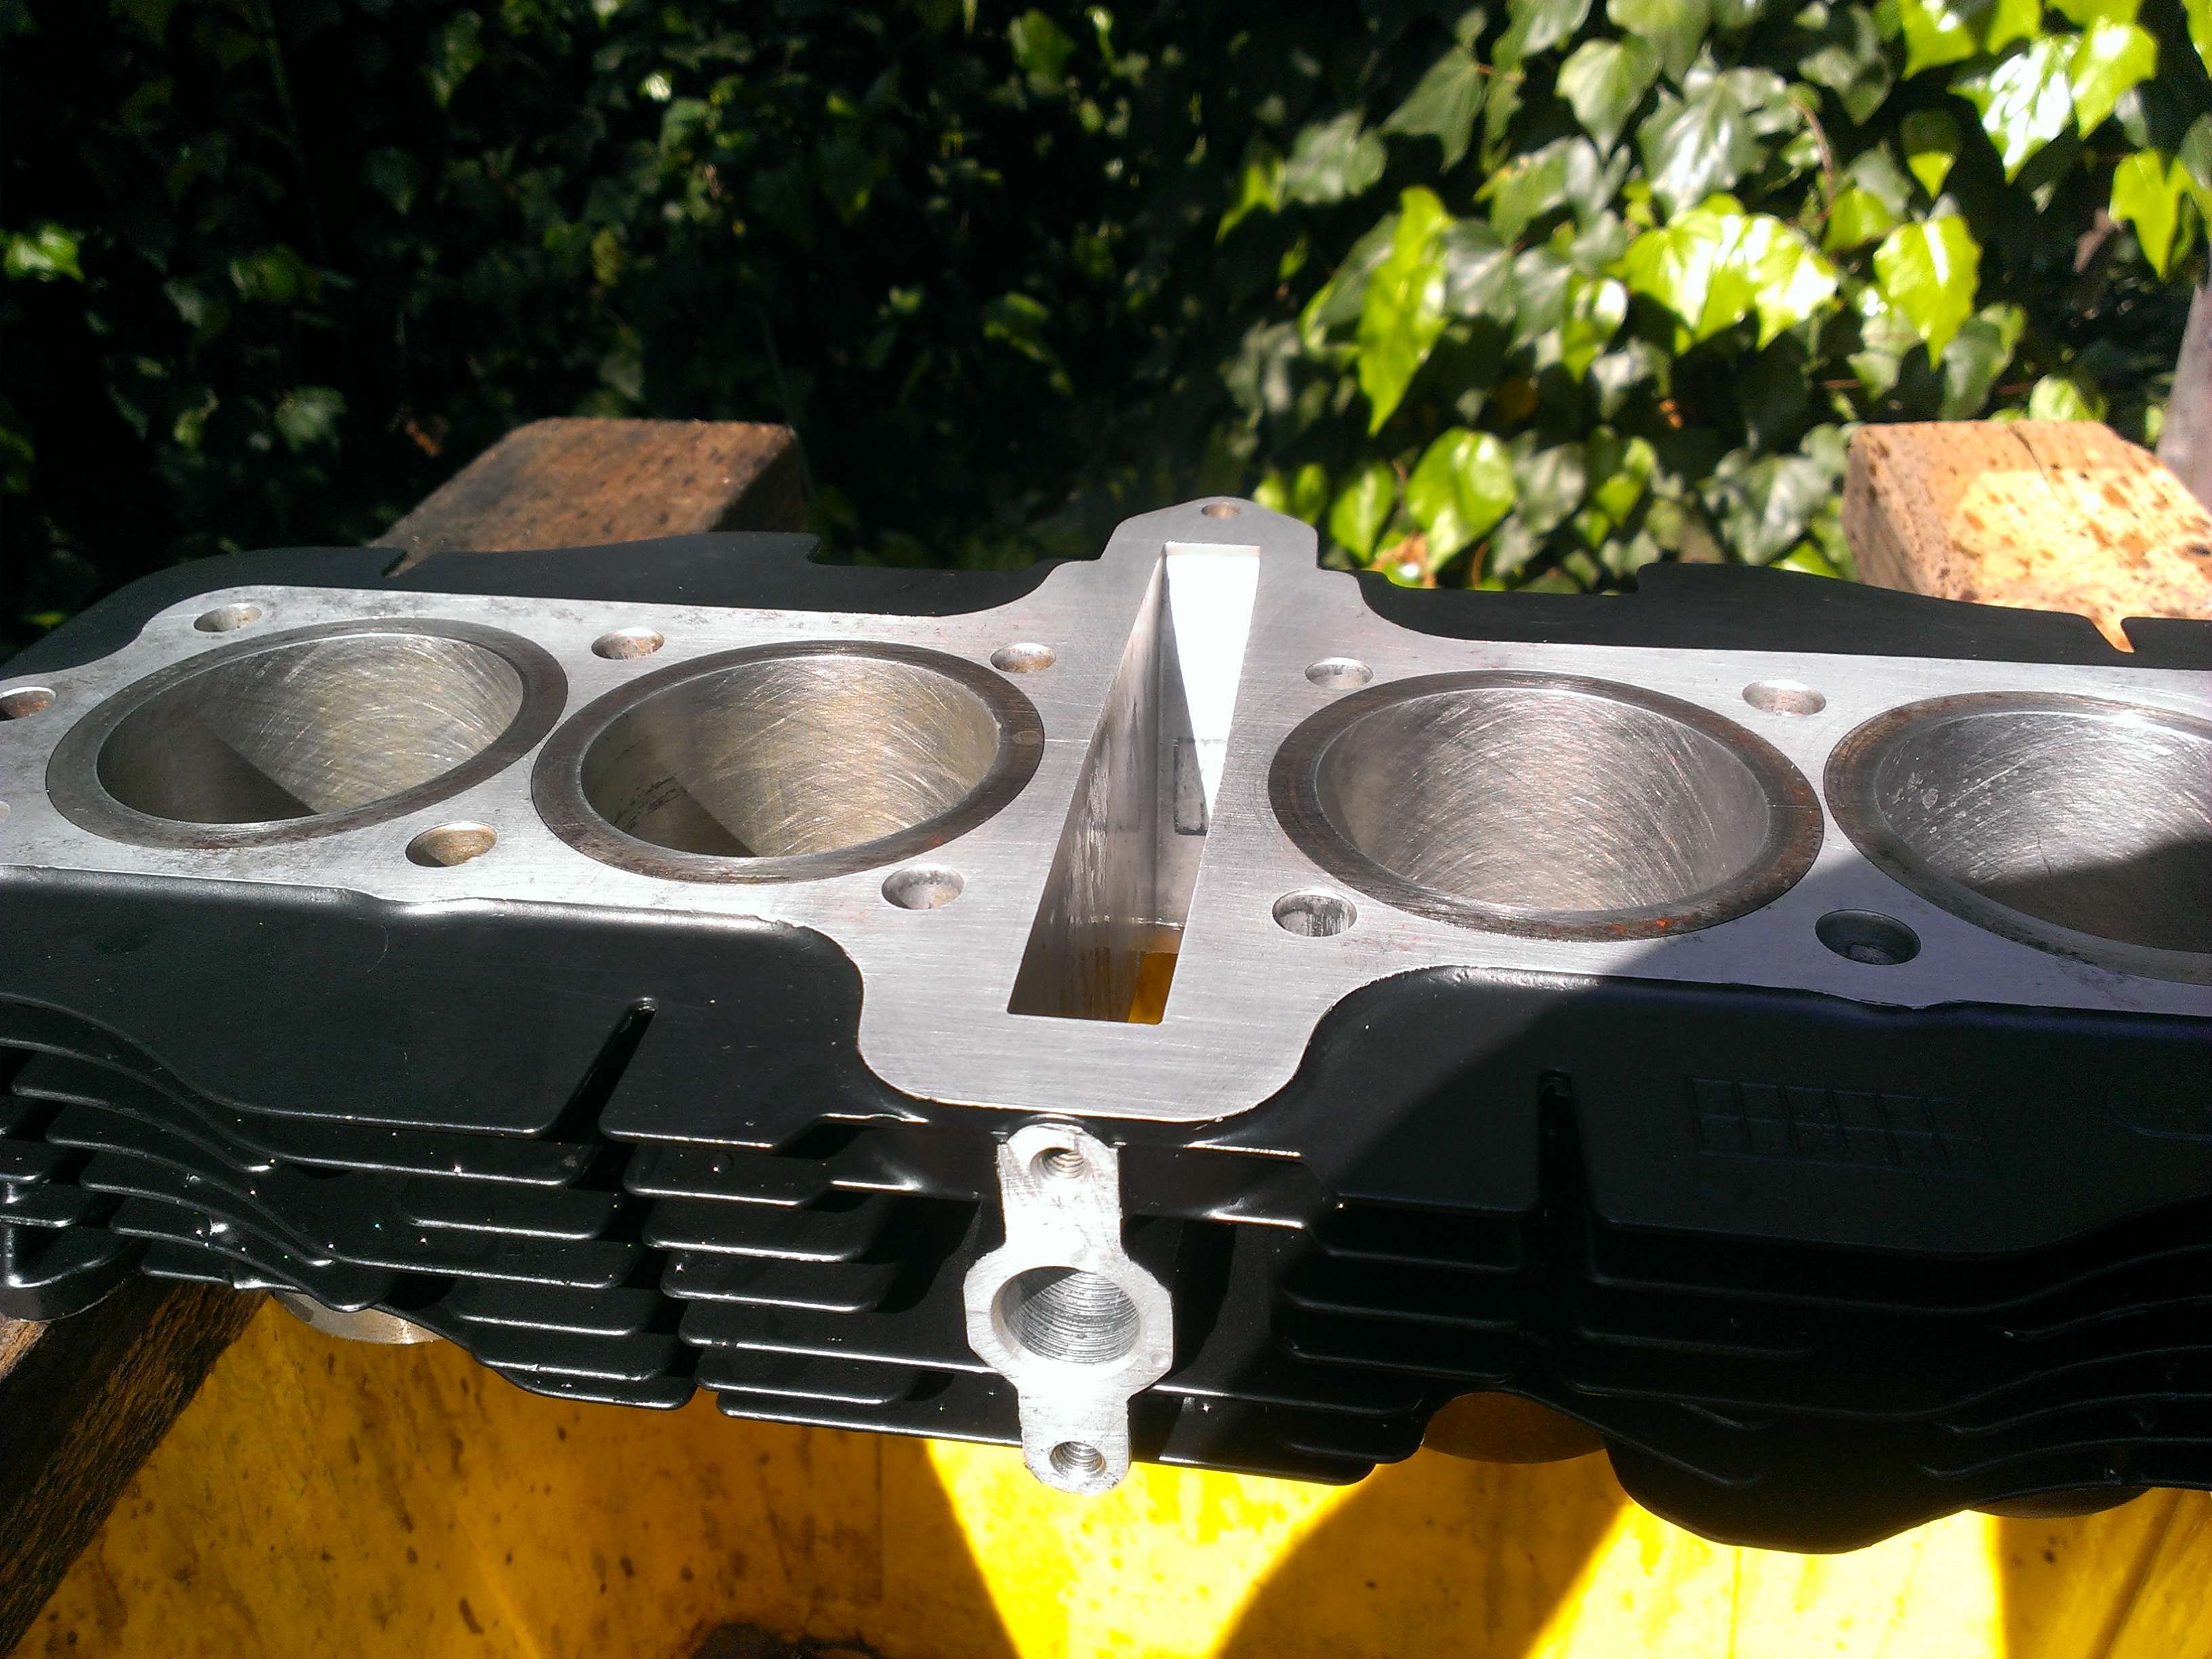
The honing supplies came in this week so today I decided to tackle doing that... After reading endless threads on on GSR about it I feel good enough to go forward.
Ready for honing.
The tools: 62mm aluminum oxide 240 grit ball hone, 62mm brush, flex hone oil (probably not needed but it wasn't expensive).
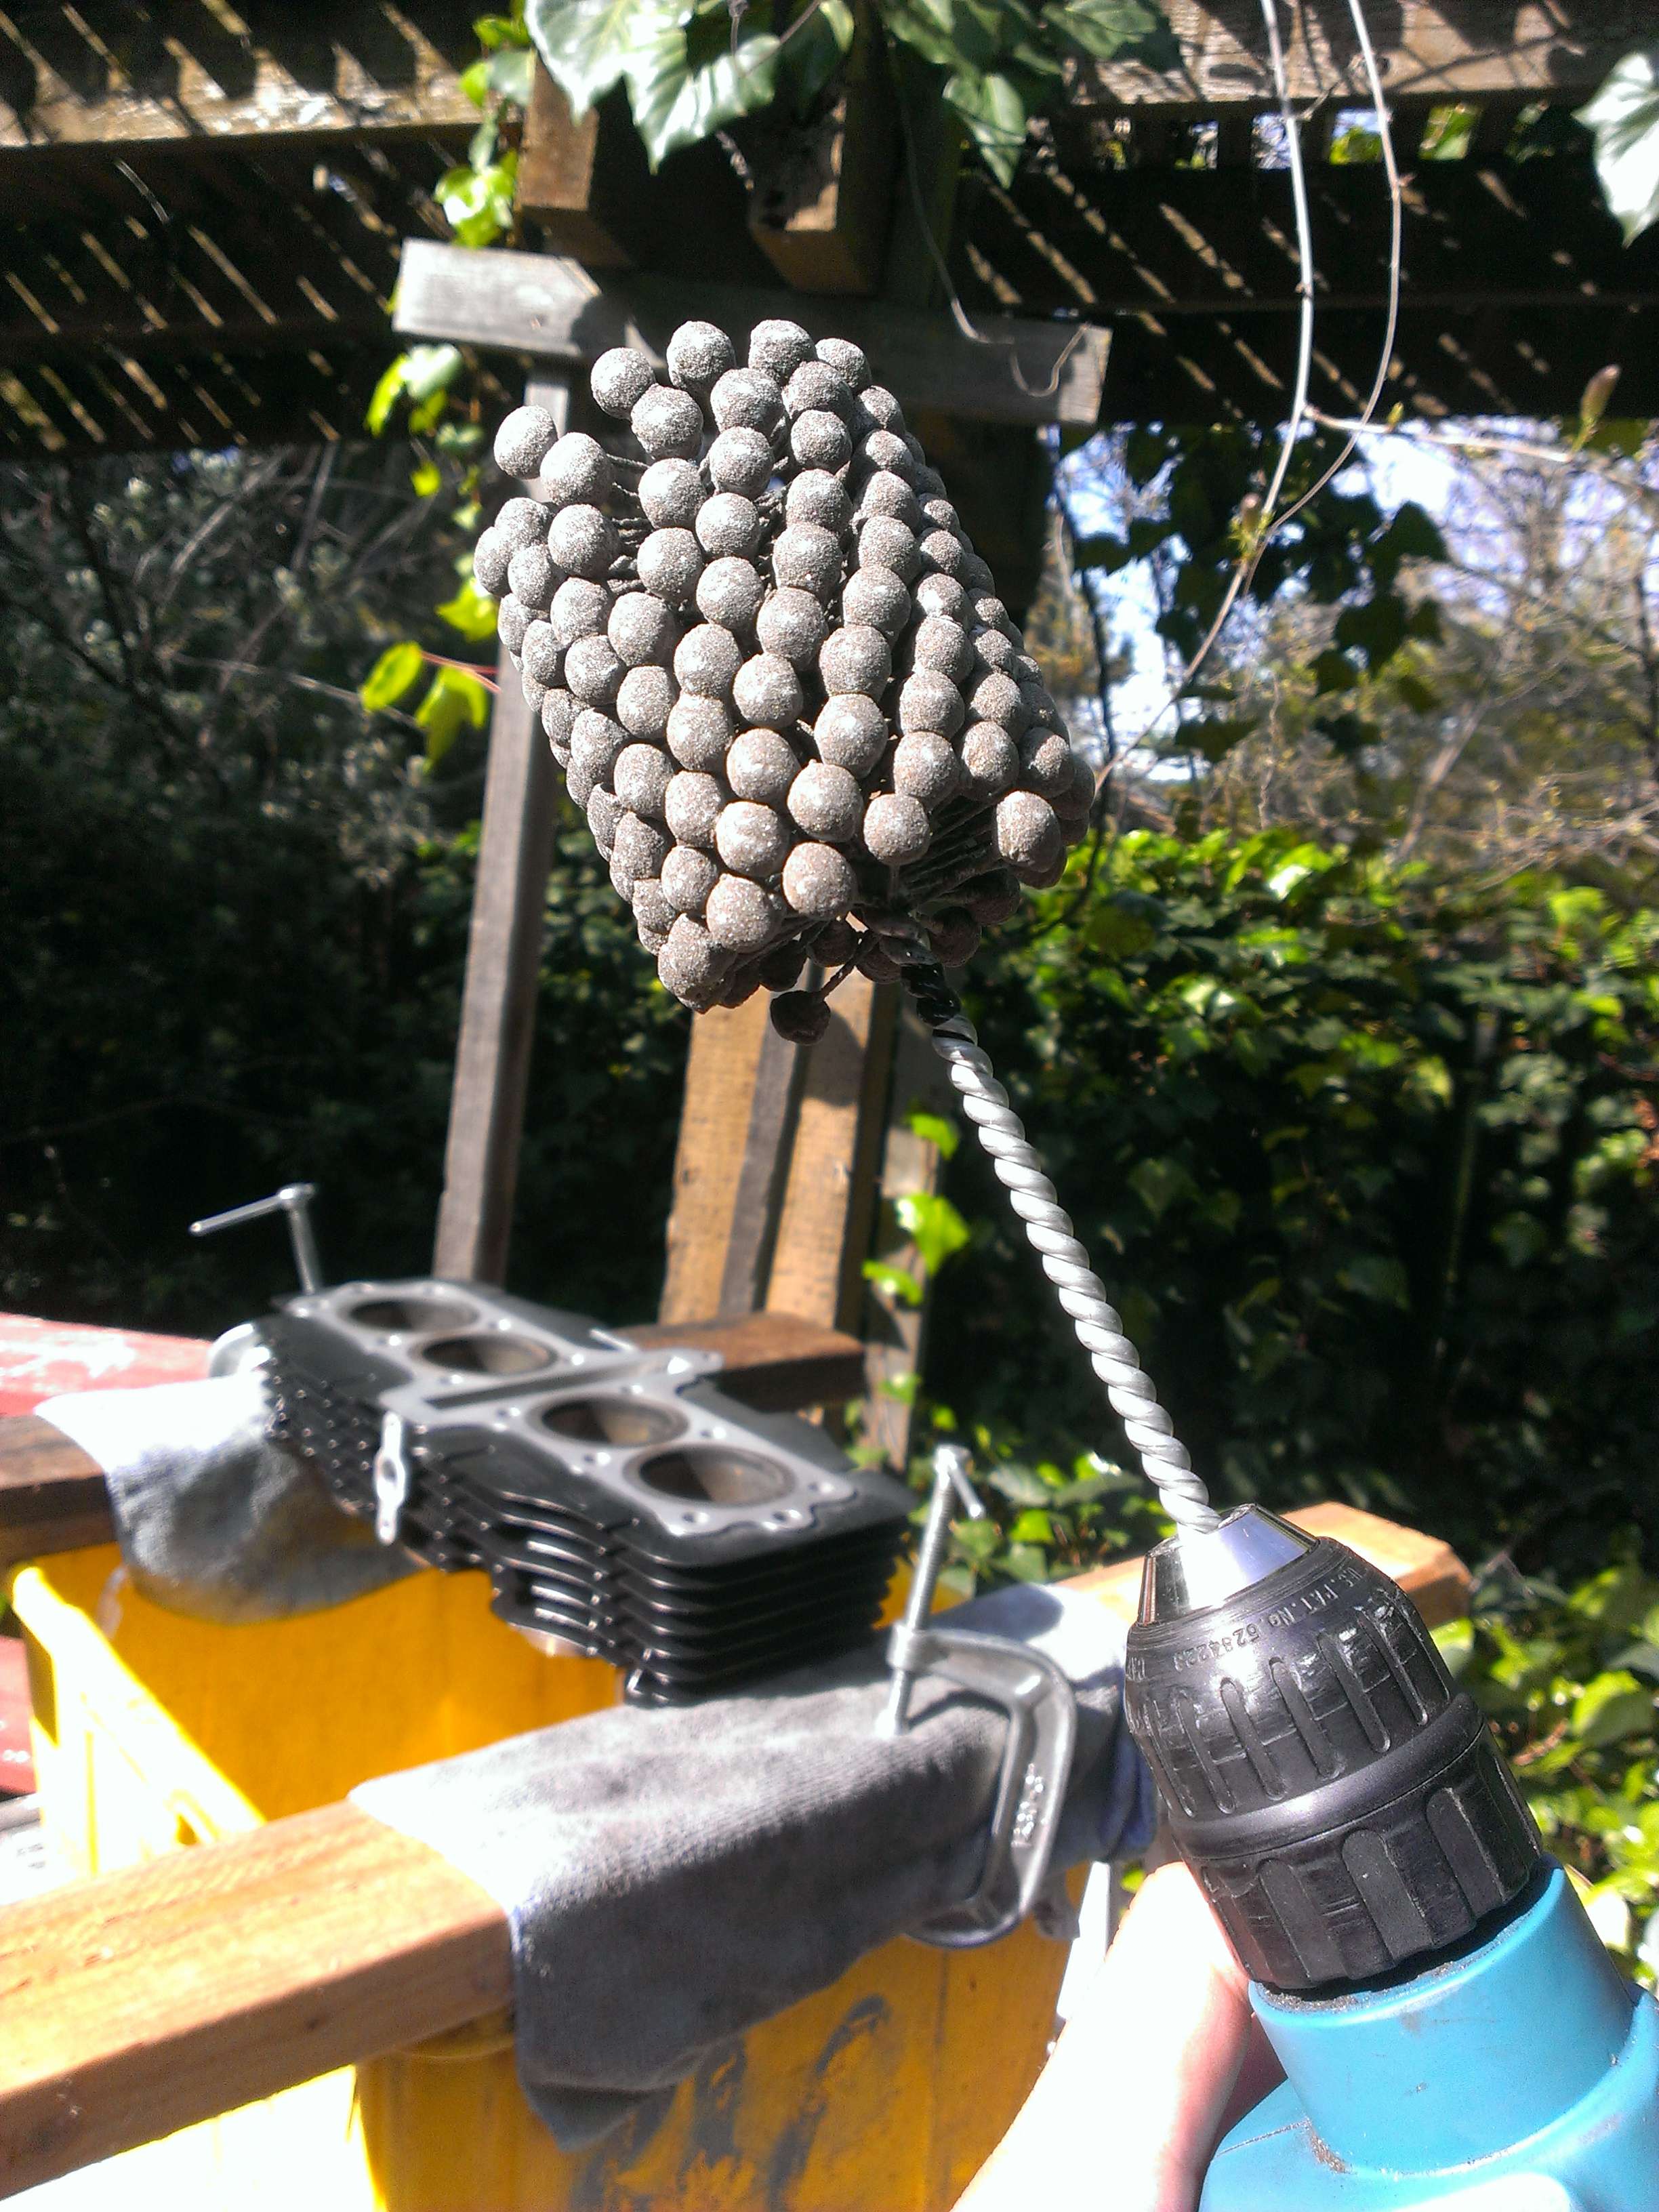
In the drill. I immediately switched to the cordless drill though, the plug in one was way too powerful for this job.
Oiled up.

Two down, the unhoned cylinders look nasty.
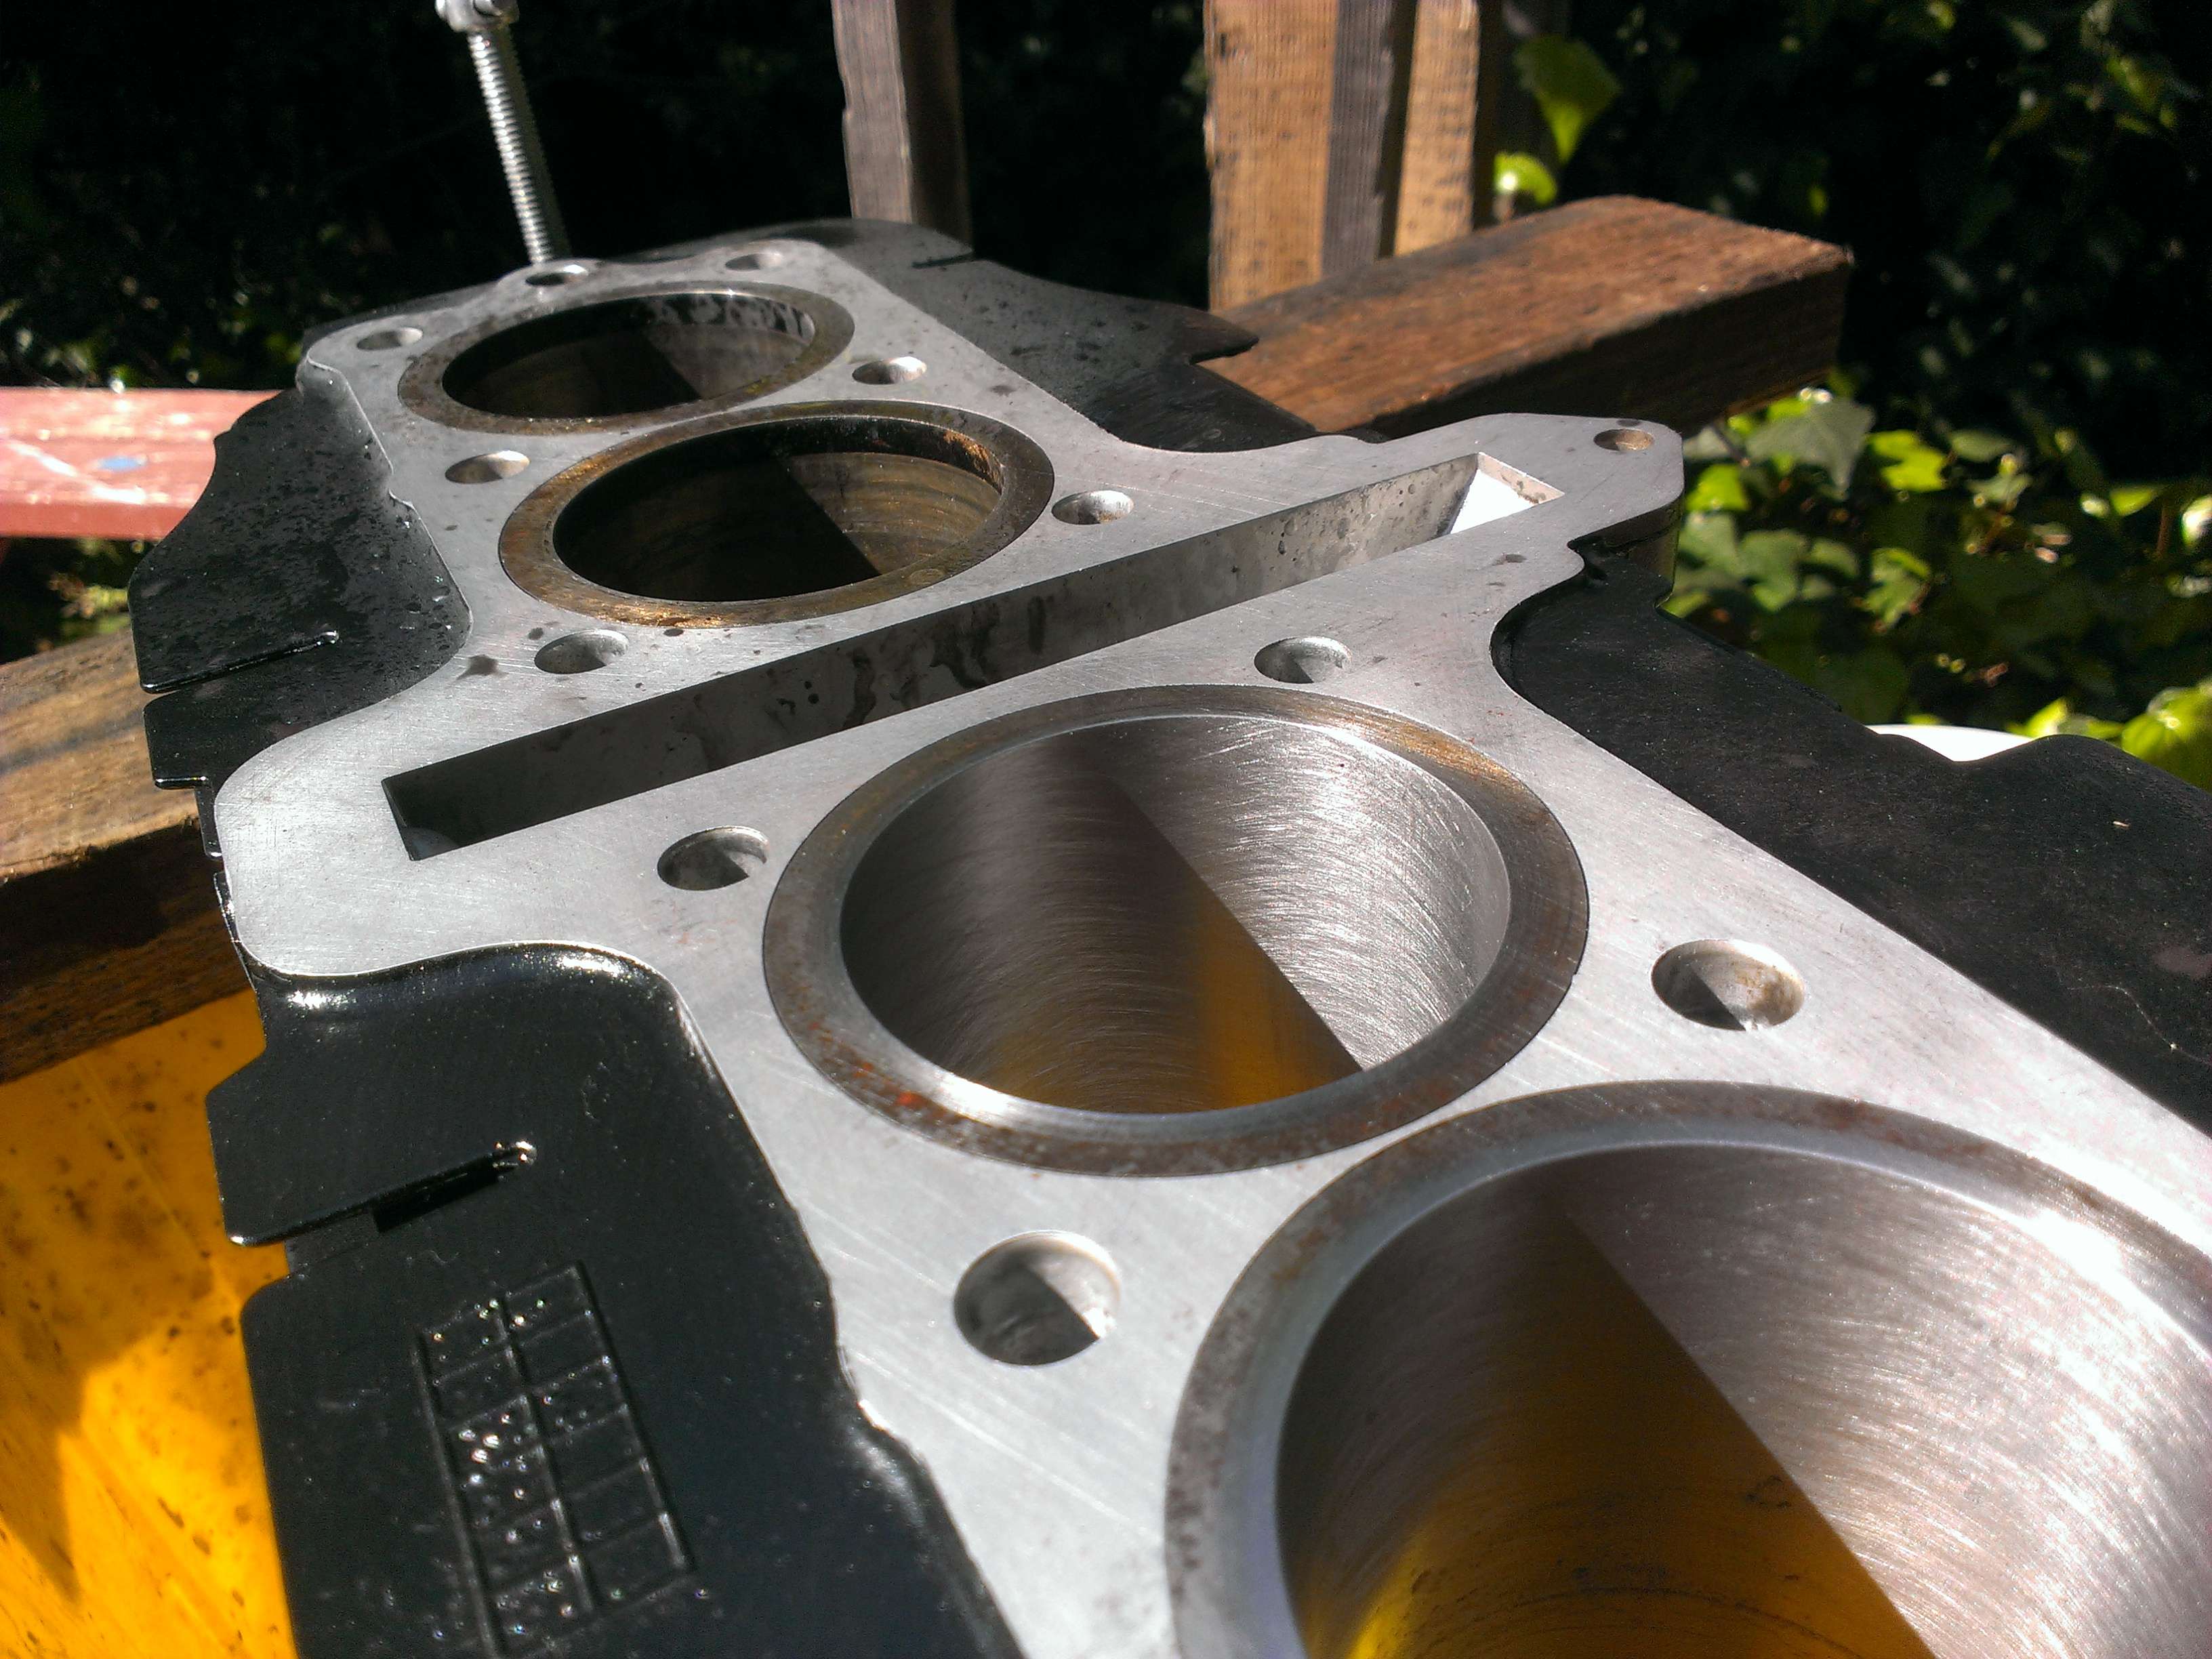
Done honing! I messed up at first, I went too fast and didn't get a cross hatch pattern. Go slow a few times and then pump it up and down fast to get the 45* pattern. I did it quickly on reverse too.
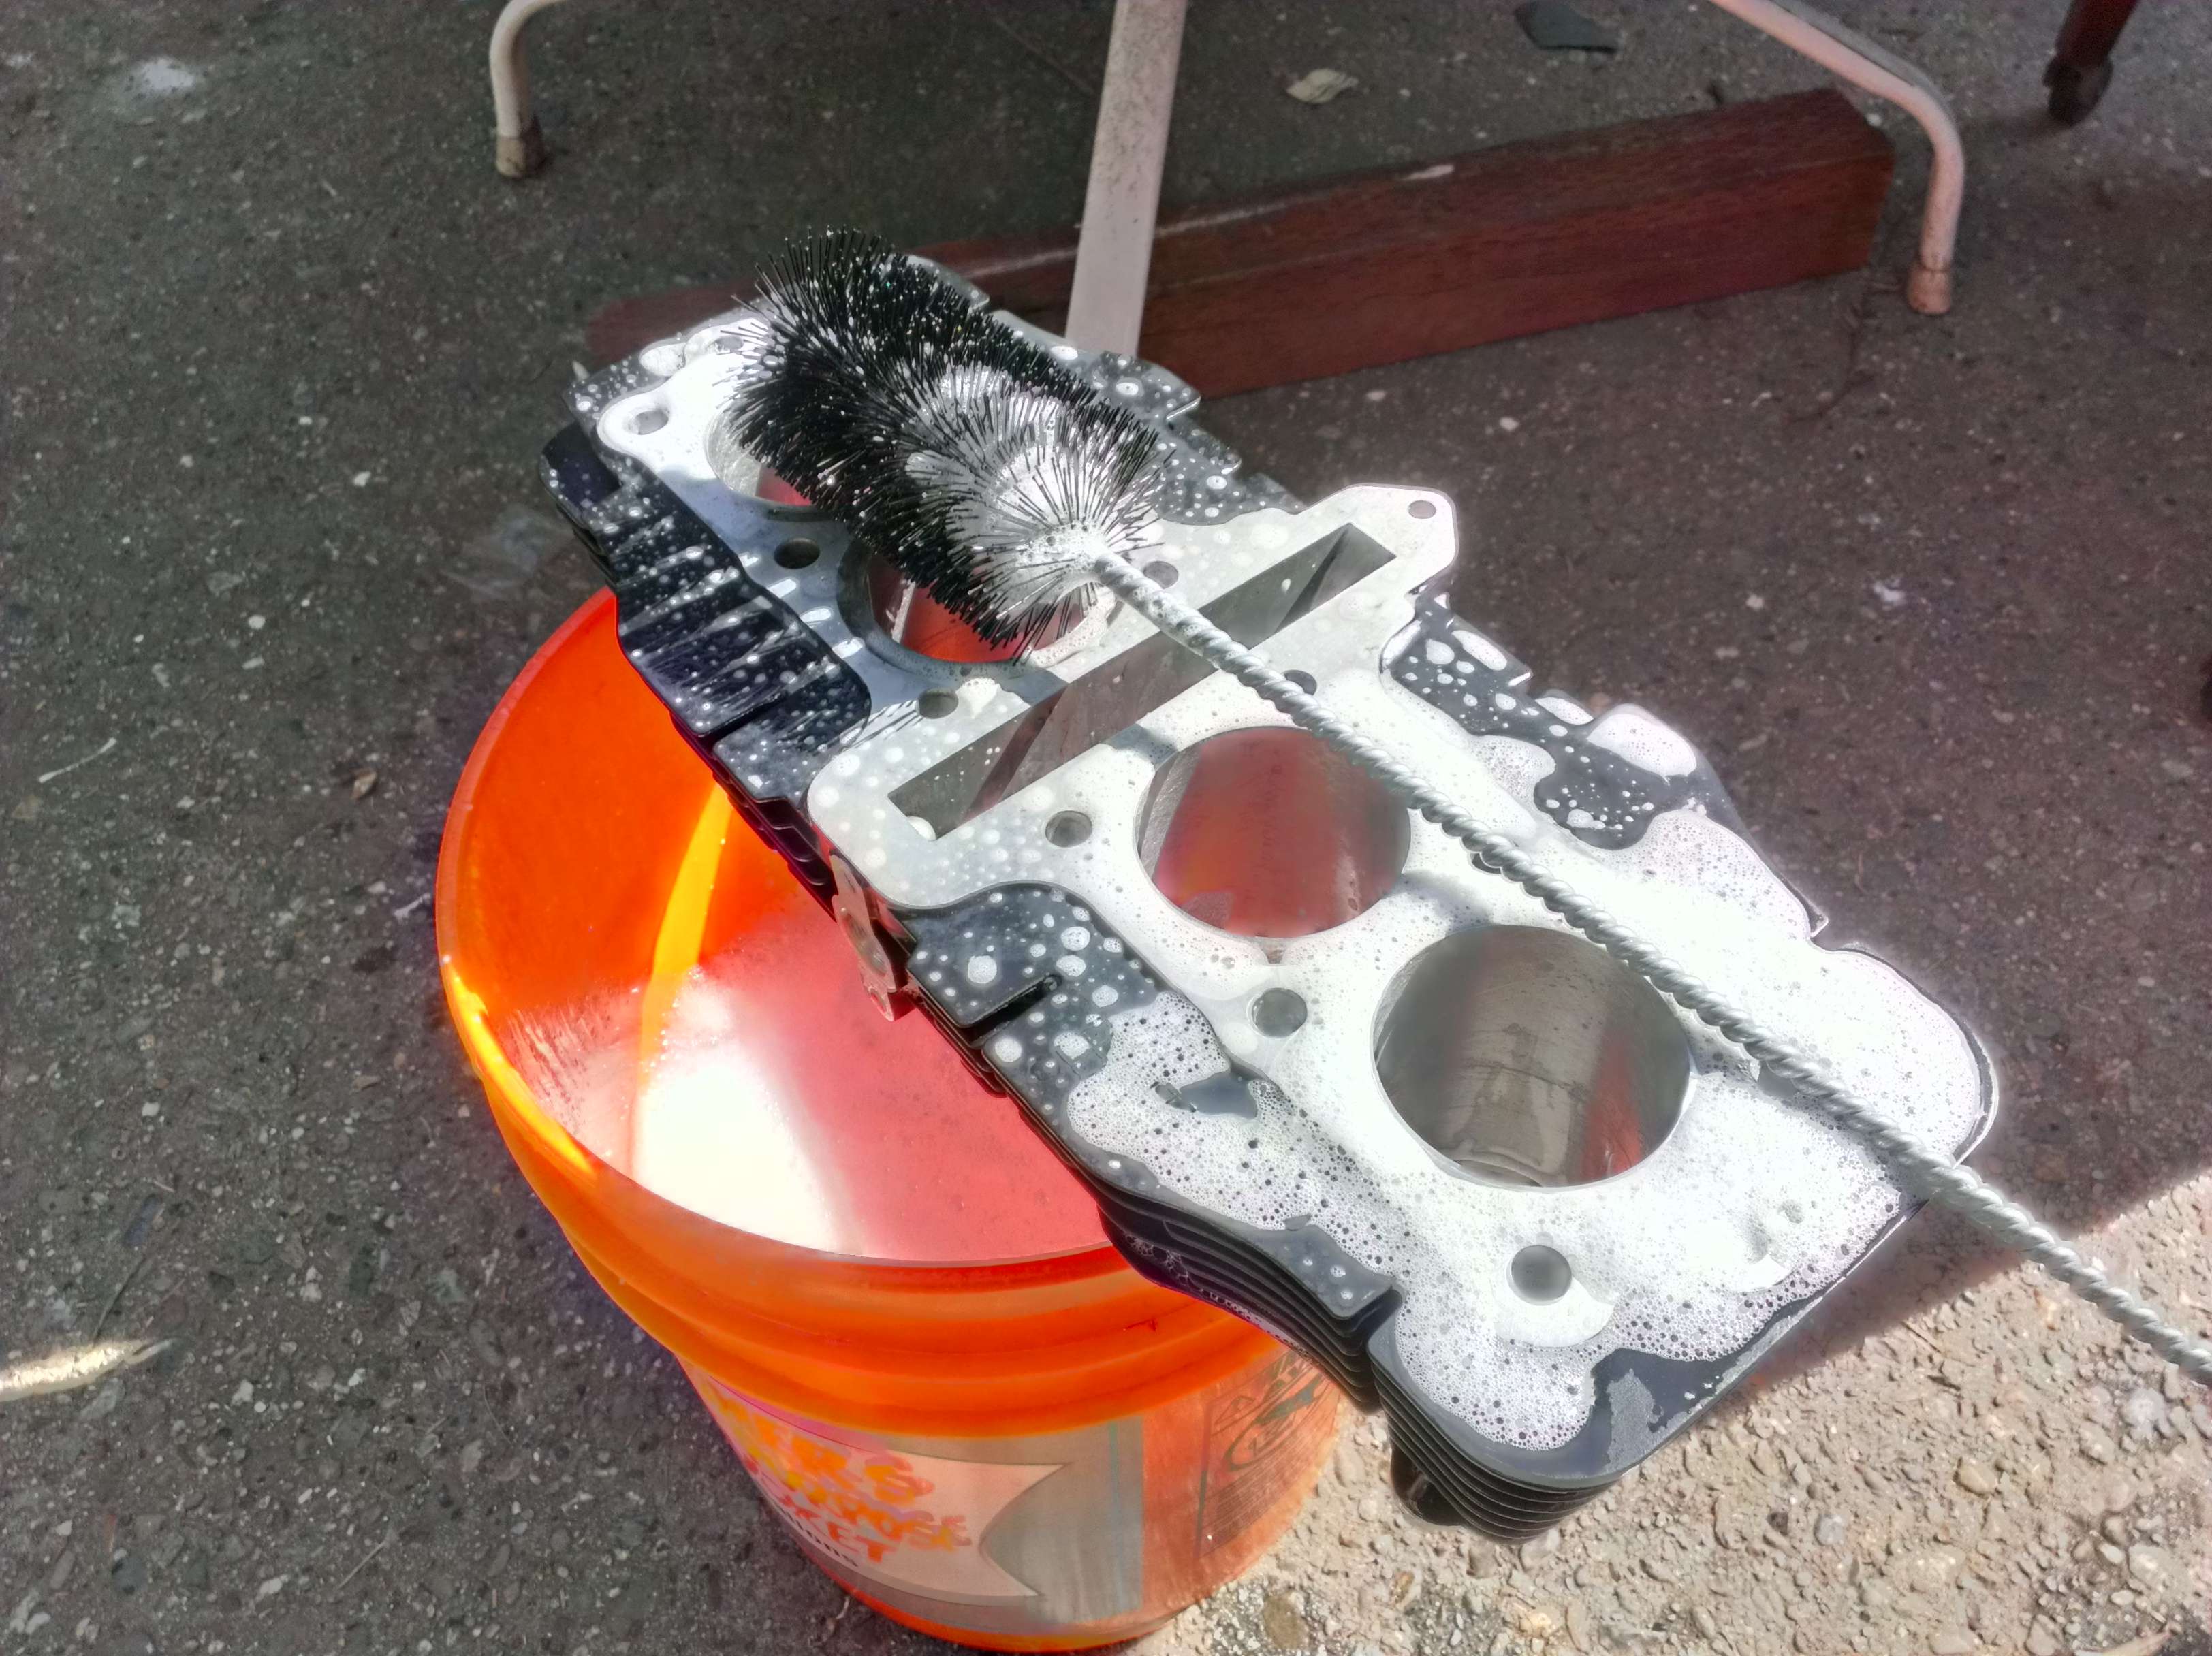
Washing with warm water and soap until all the metal particles are out of the cylinder.
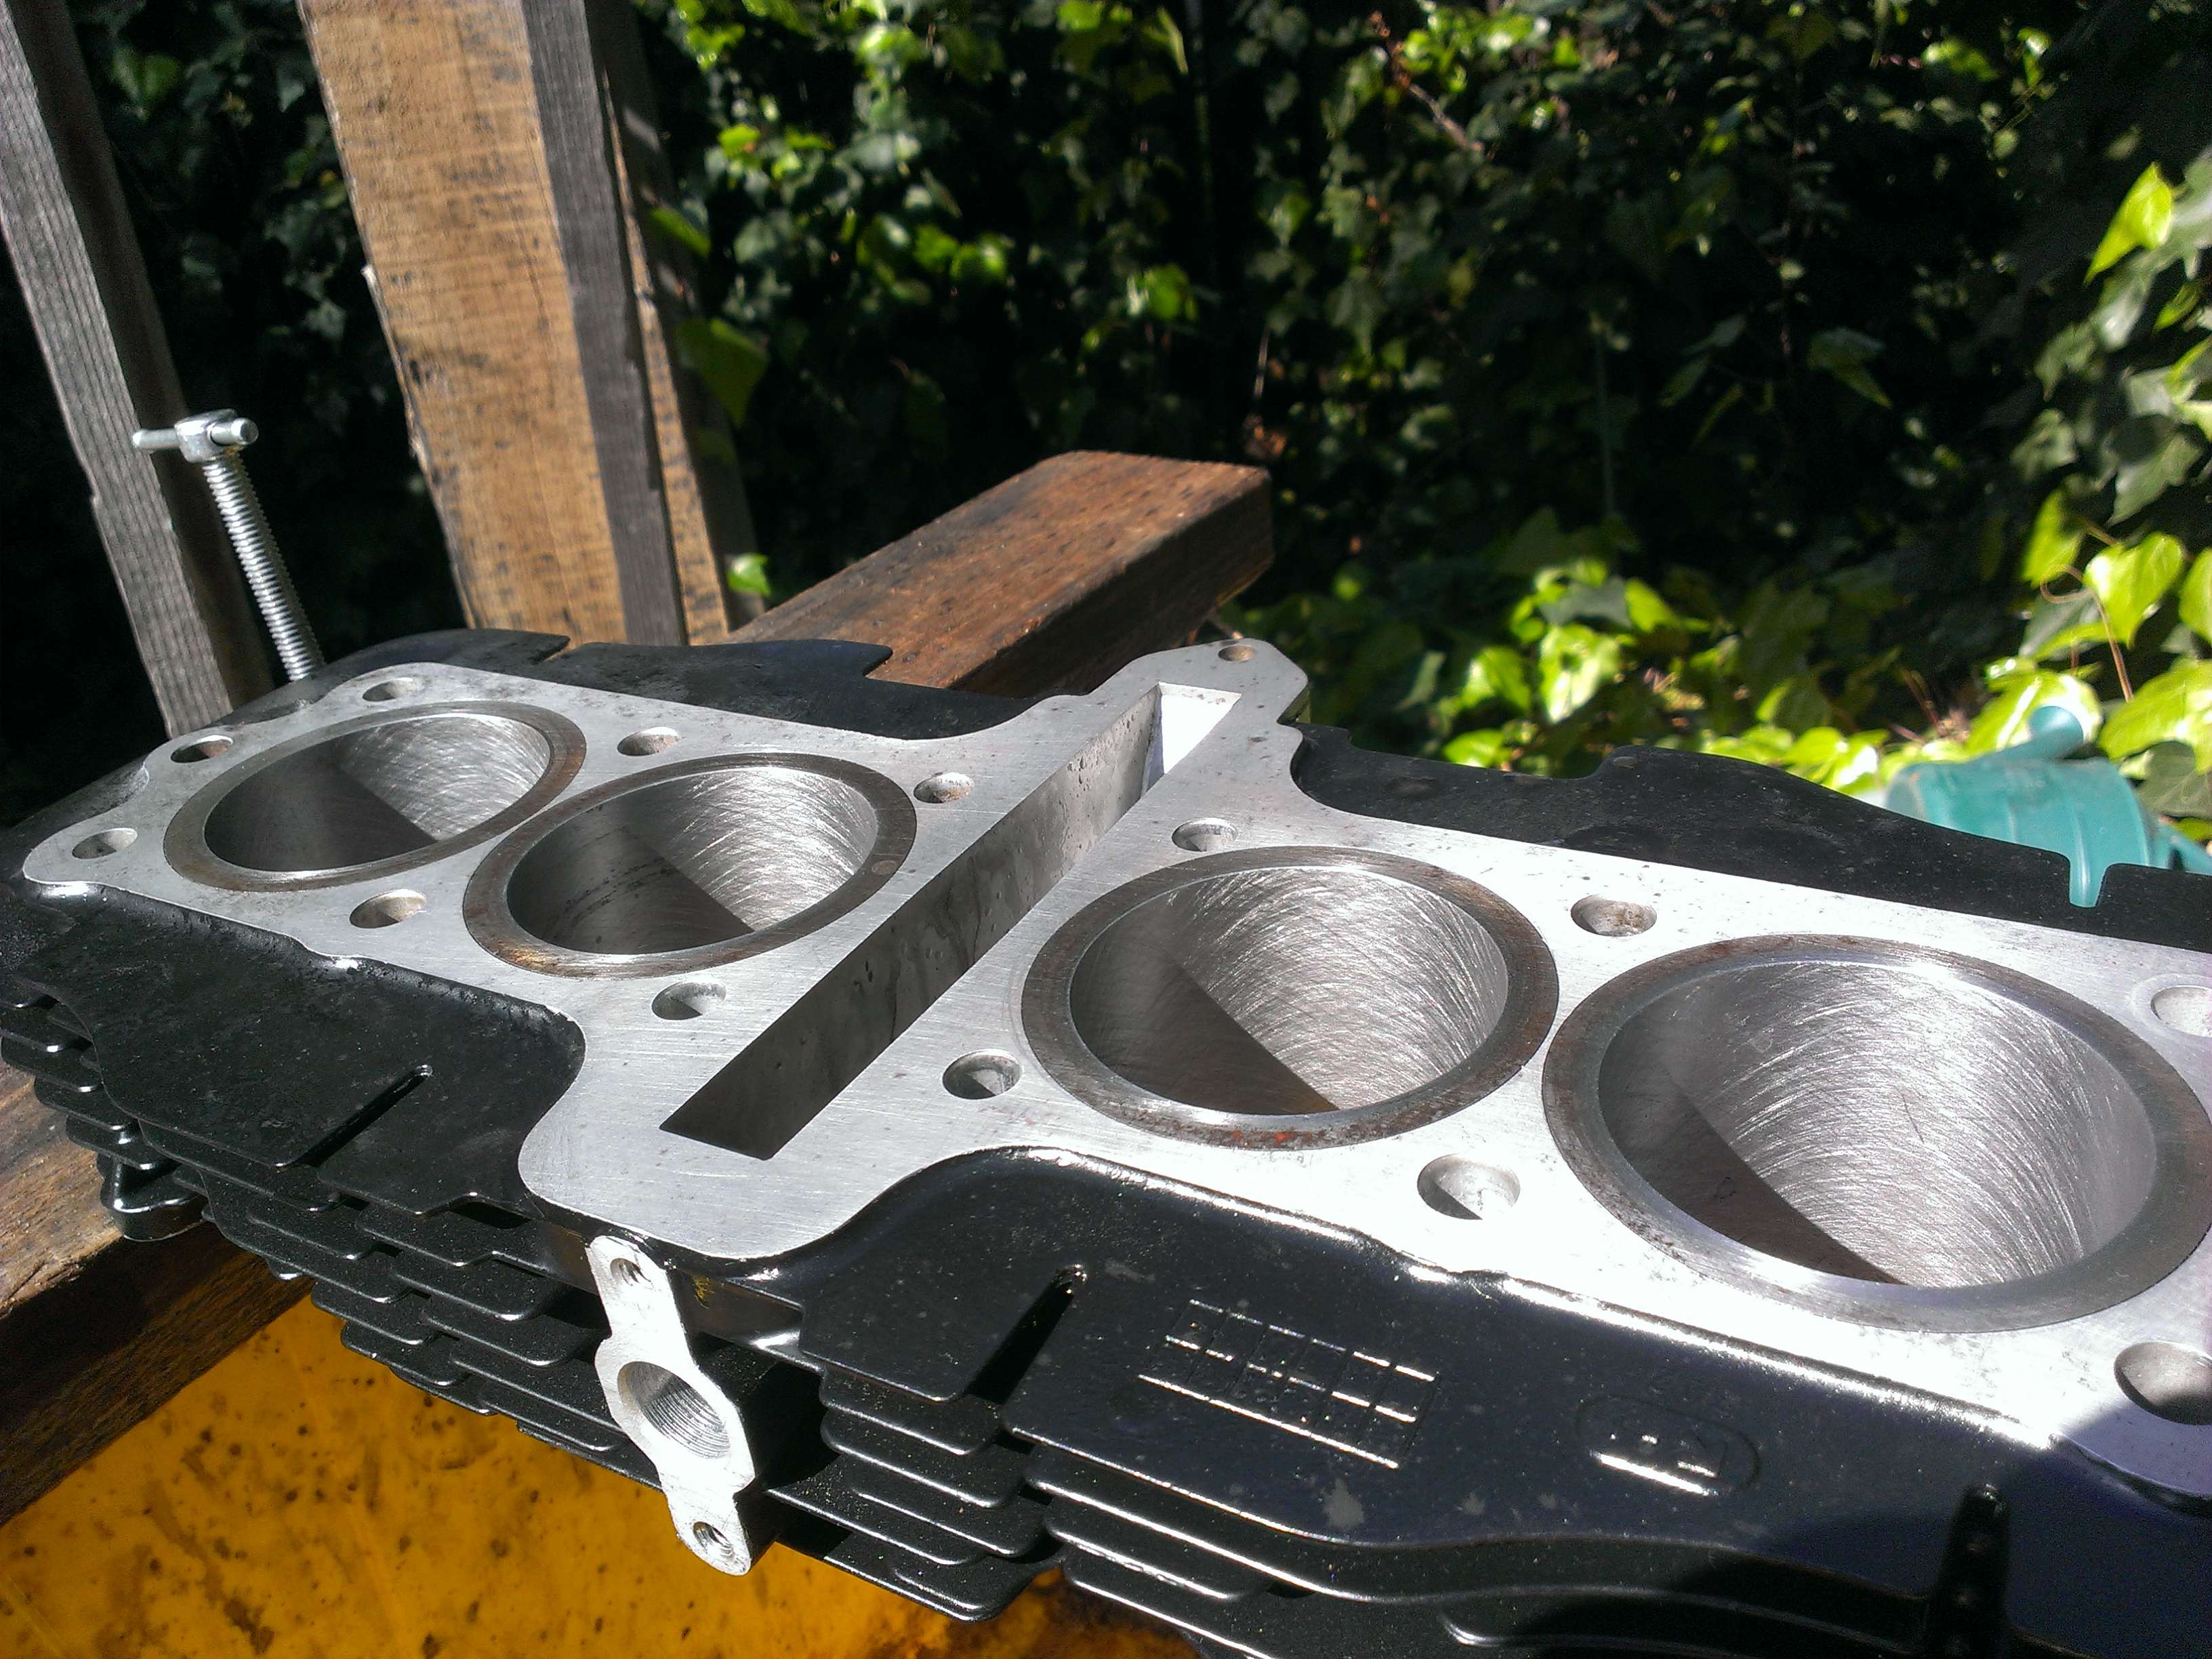
Clean and lightly oiled.
, the progress is slow but it's getting there.The honing supplies came in this week so today I decided to tackle doing that... After reading endless threads on on GSR about it I feel good enough to go forward.
Ready for honing.
The tools: 62mm aluminum oxide 240 grit ball hone, 62mm brush, flex hone oil (probably not needed but it wasn't expensive).
In the drill. I immediately switched to the cordless drill though, the plug in one was way too powerful for this job.
Oiled up.
Two down, the unhoned cylinders look nasty.
Done honing! I messed up at first, I went too fast and didn't get a cross hatch pattern. Go slow a few times and then pump it up and down fast to get the 45* pattern. I did it quickly on reverse too.
Washing with warm water and soap until all the metal particles are out of the cylinder.
Clean and lightly oiled.
Toast
Been Around the Block
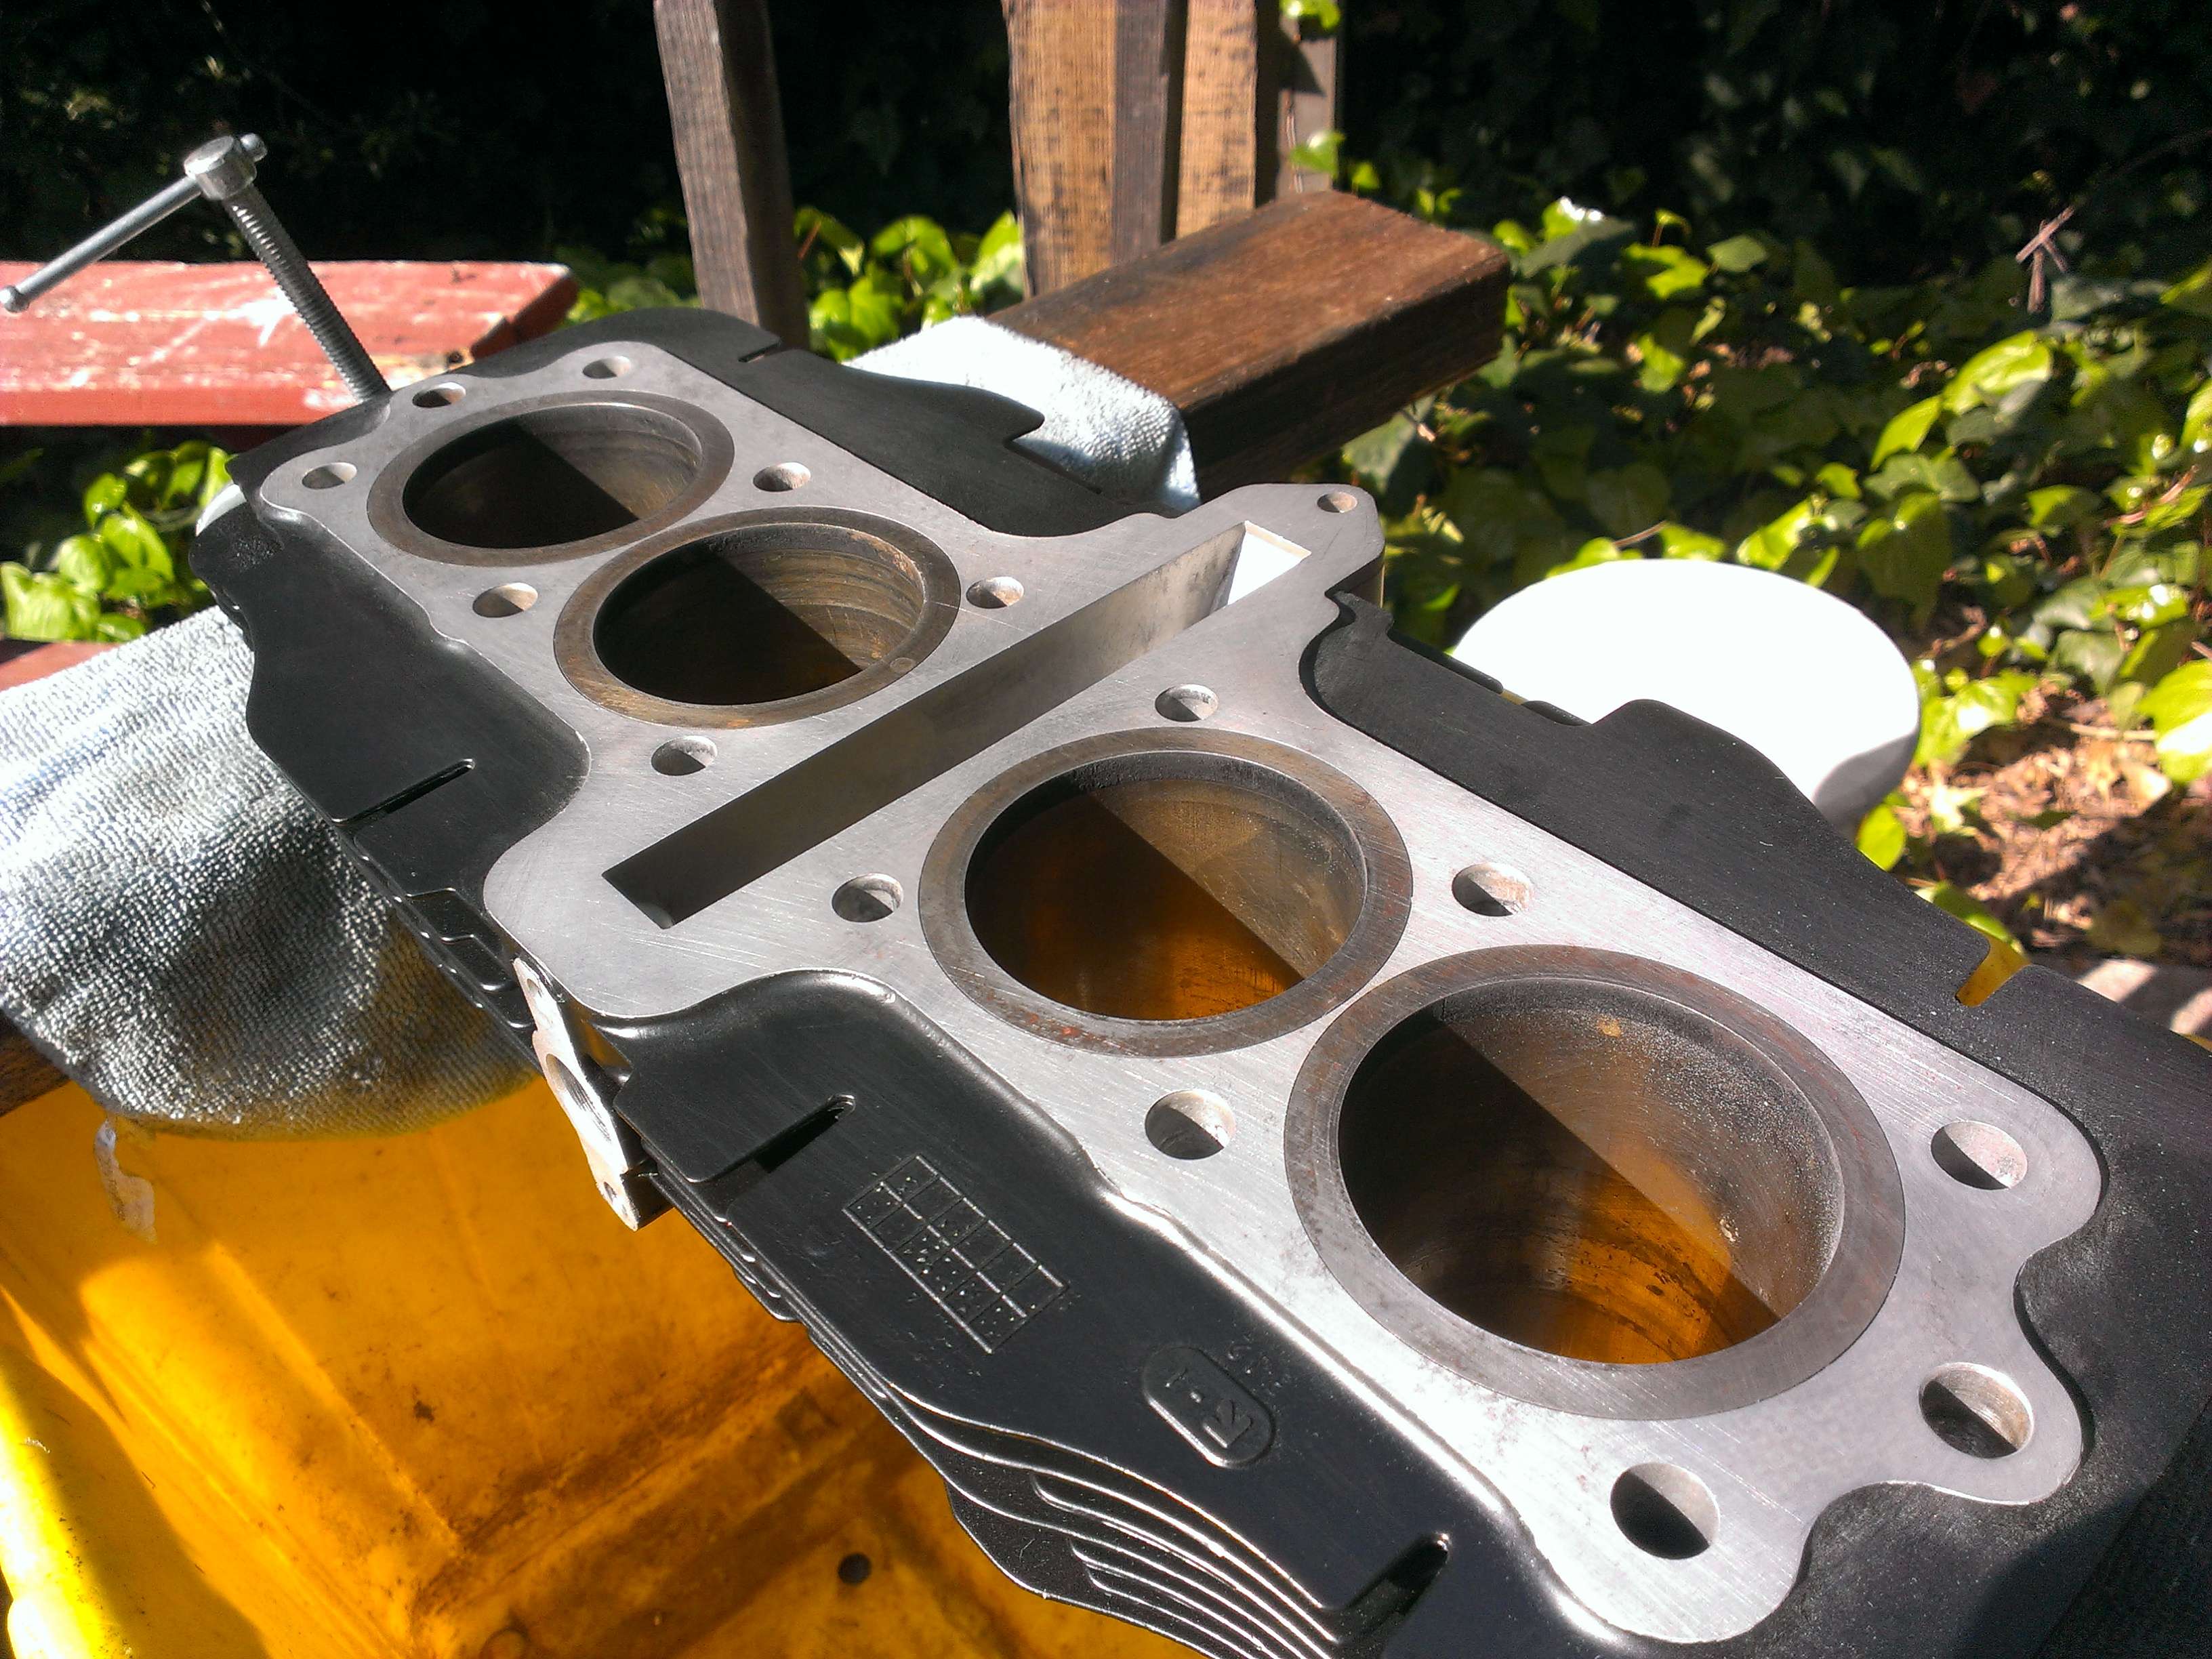
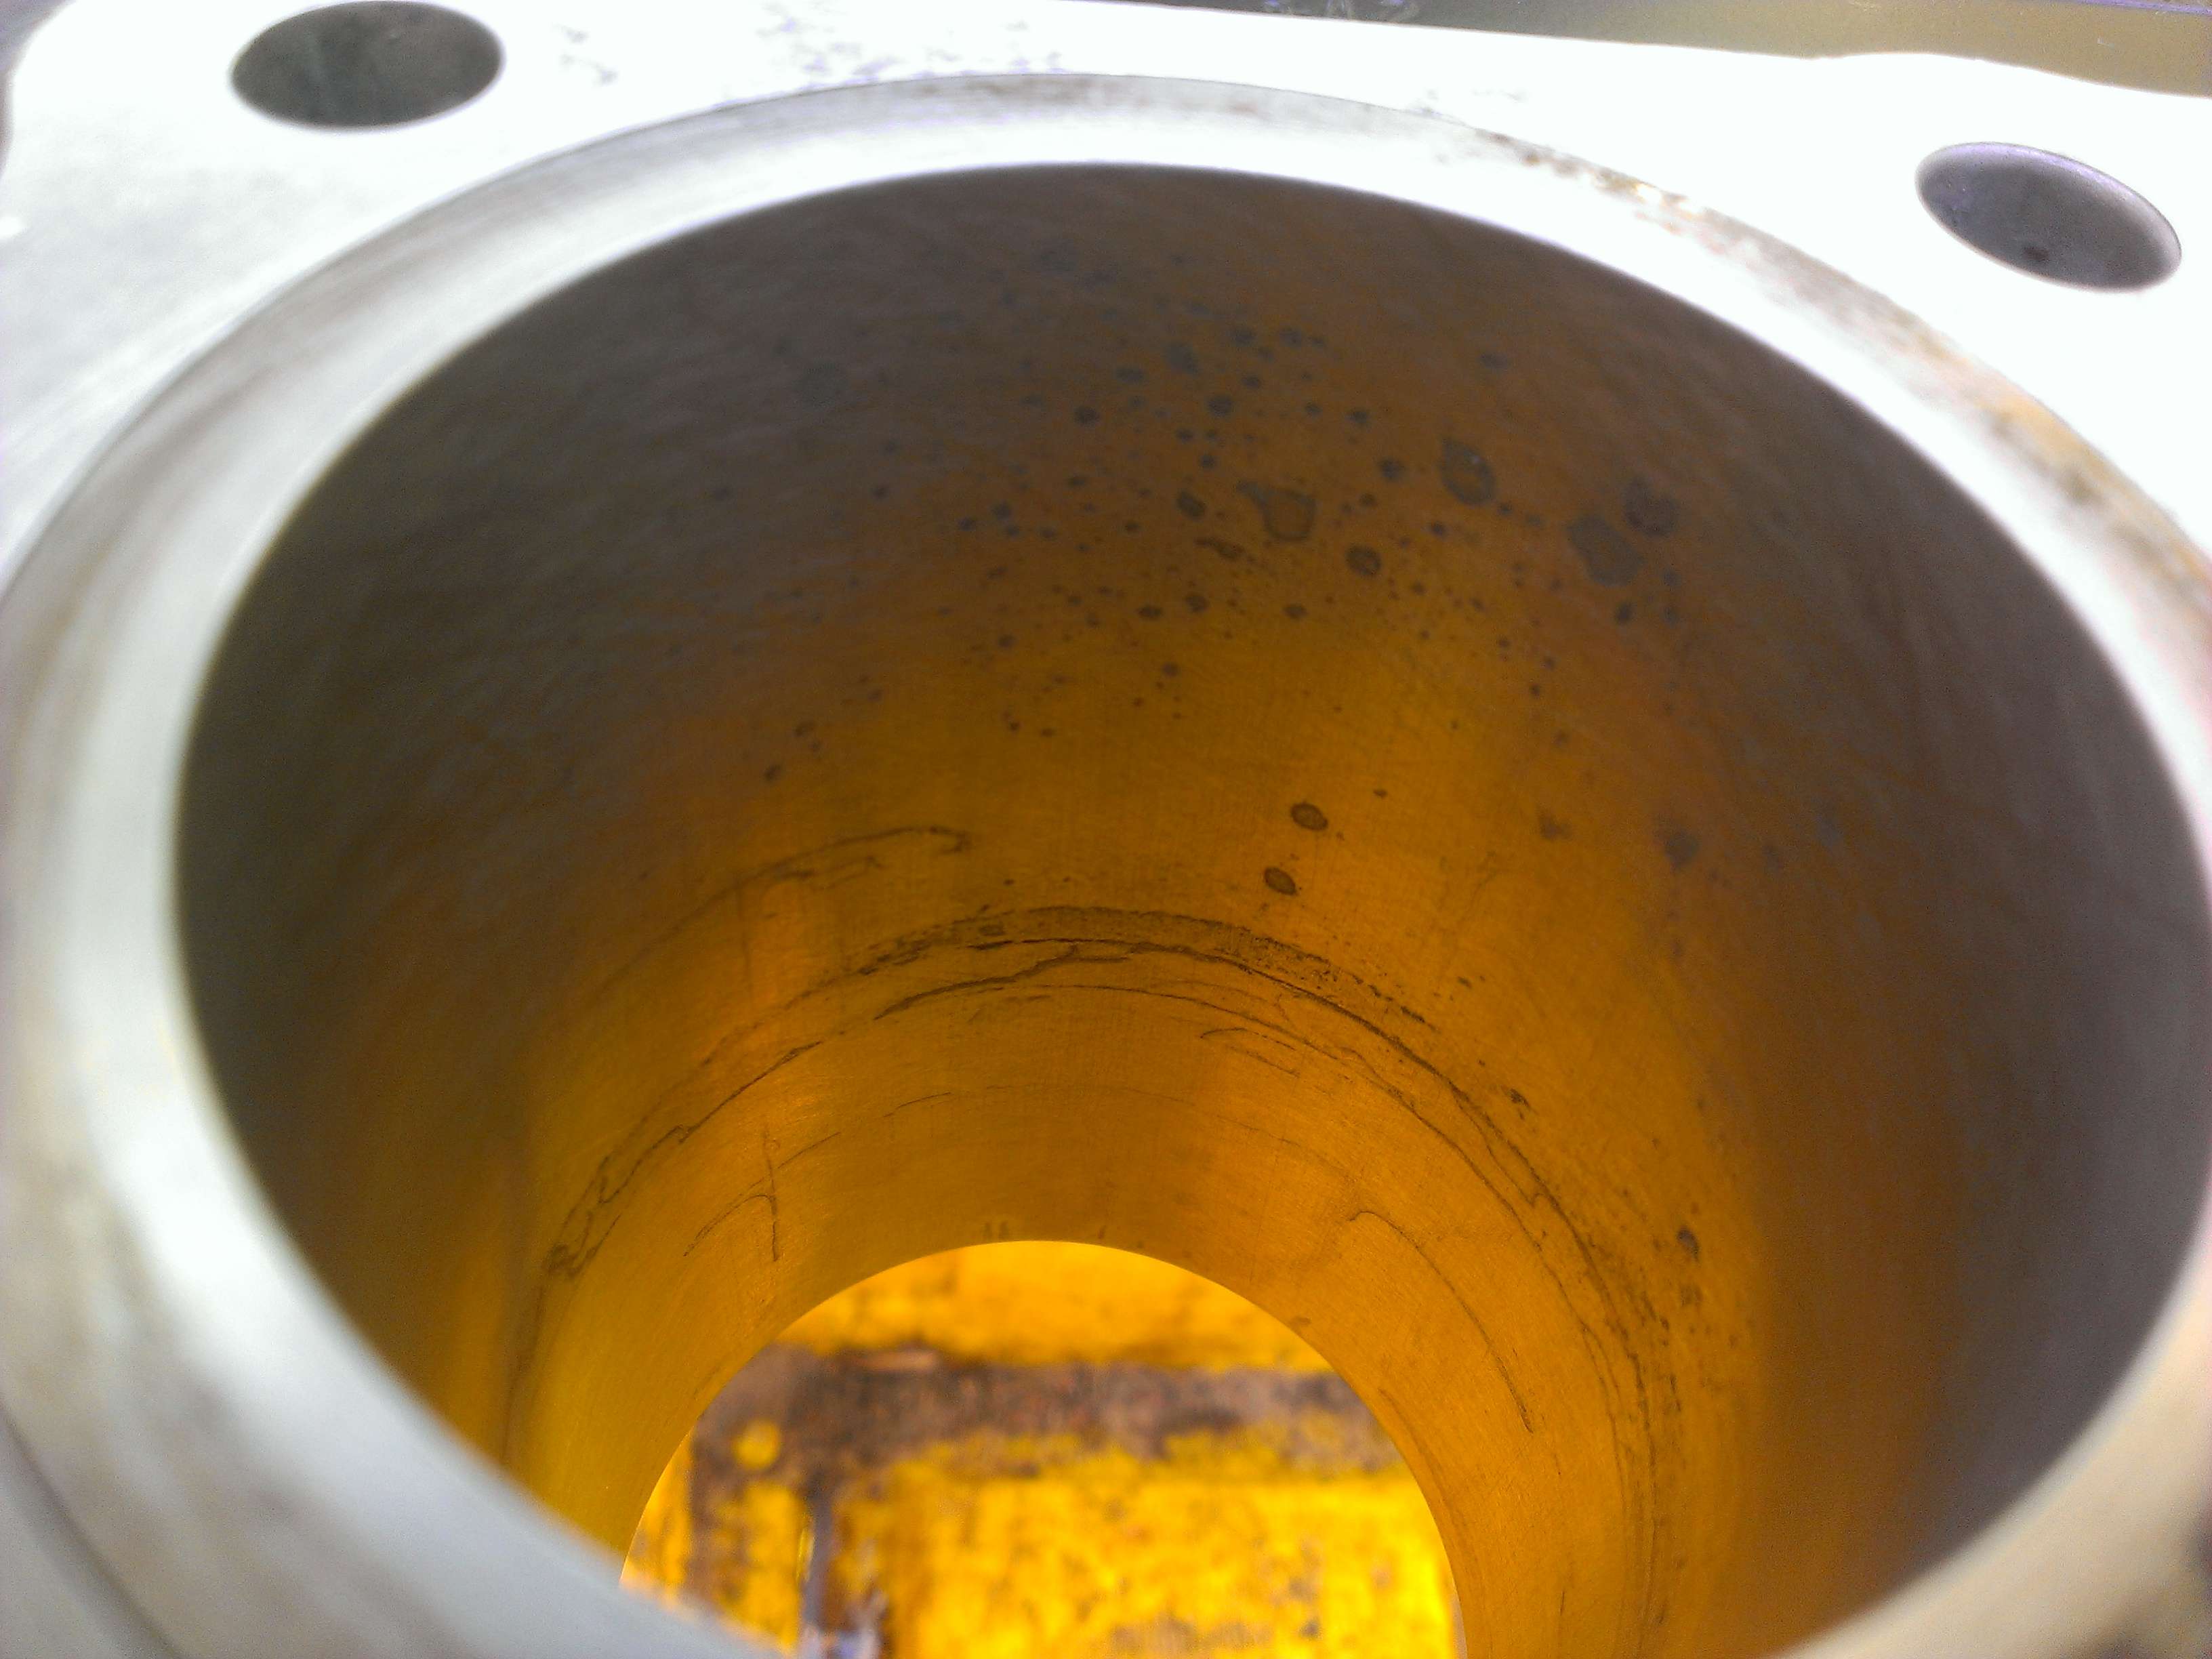
I'm worried about two of the cylinders though... I didn't notice prior to honing but two (1 and 3) have some pitting around were the rings were when the engine was sitting. It was originally from Florida but everything else is solid and not rusted at all.
Everything looks good in the sunlight

But in the shadow its easy to see... This is the worst of the two, and I can feel the pitting slightly in some spots
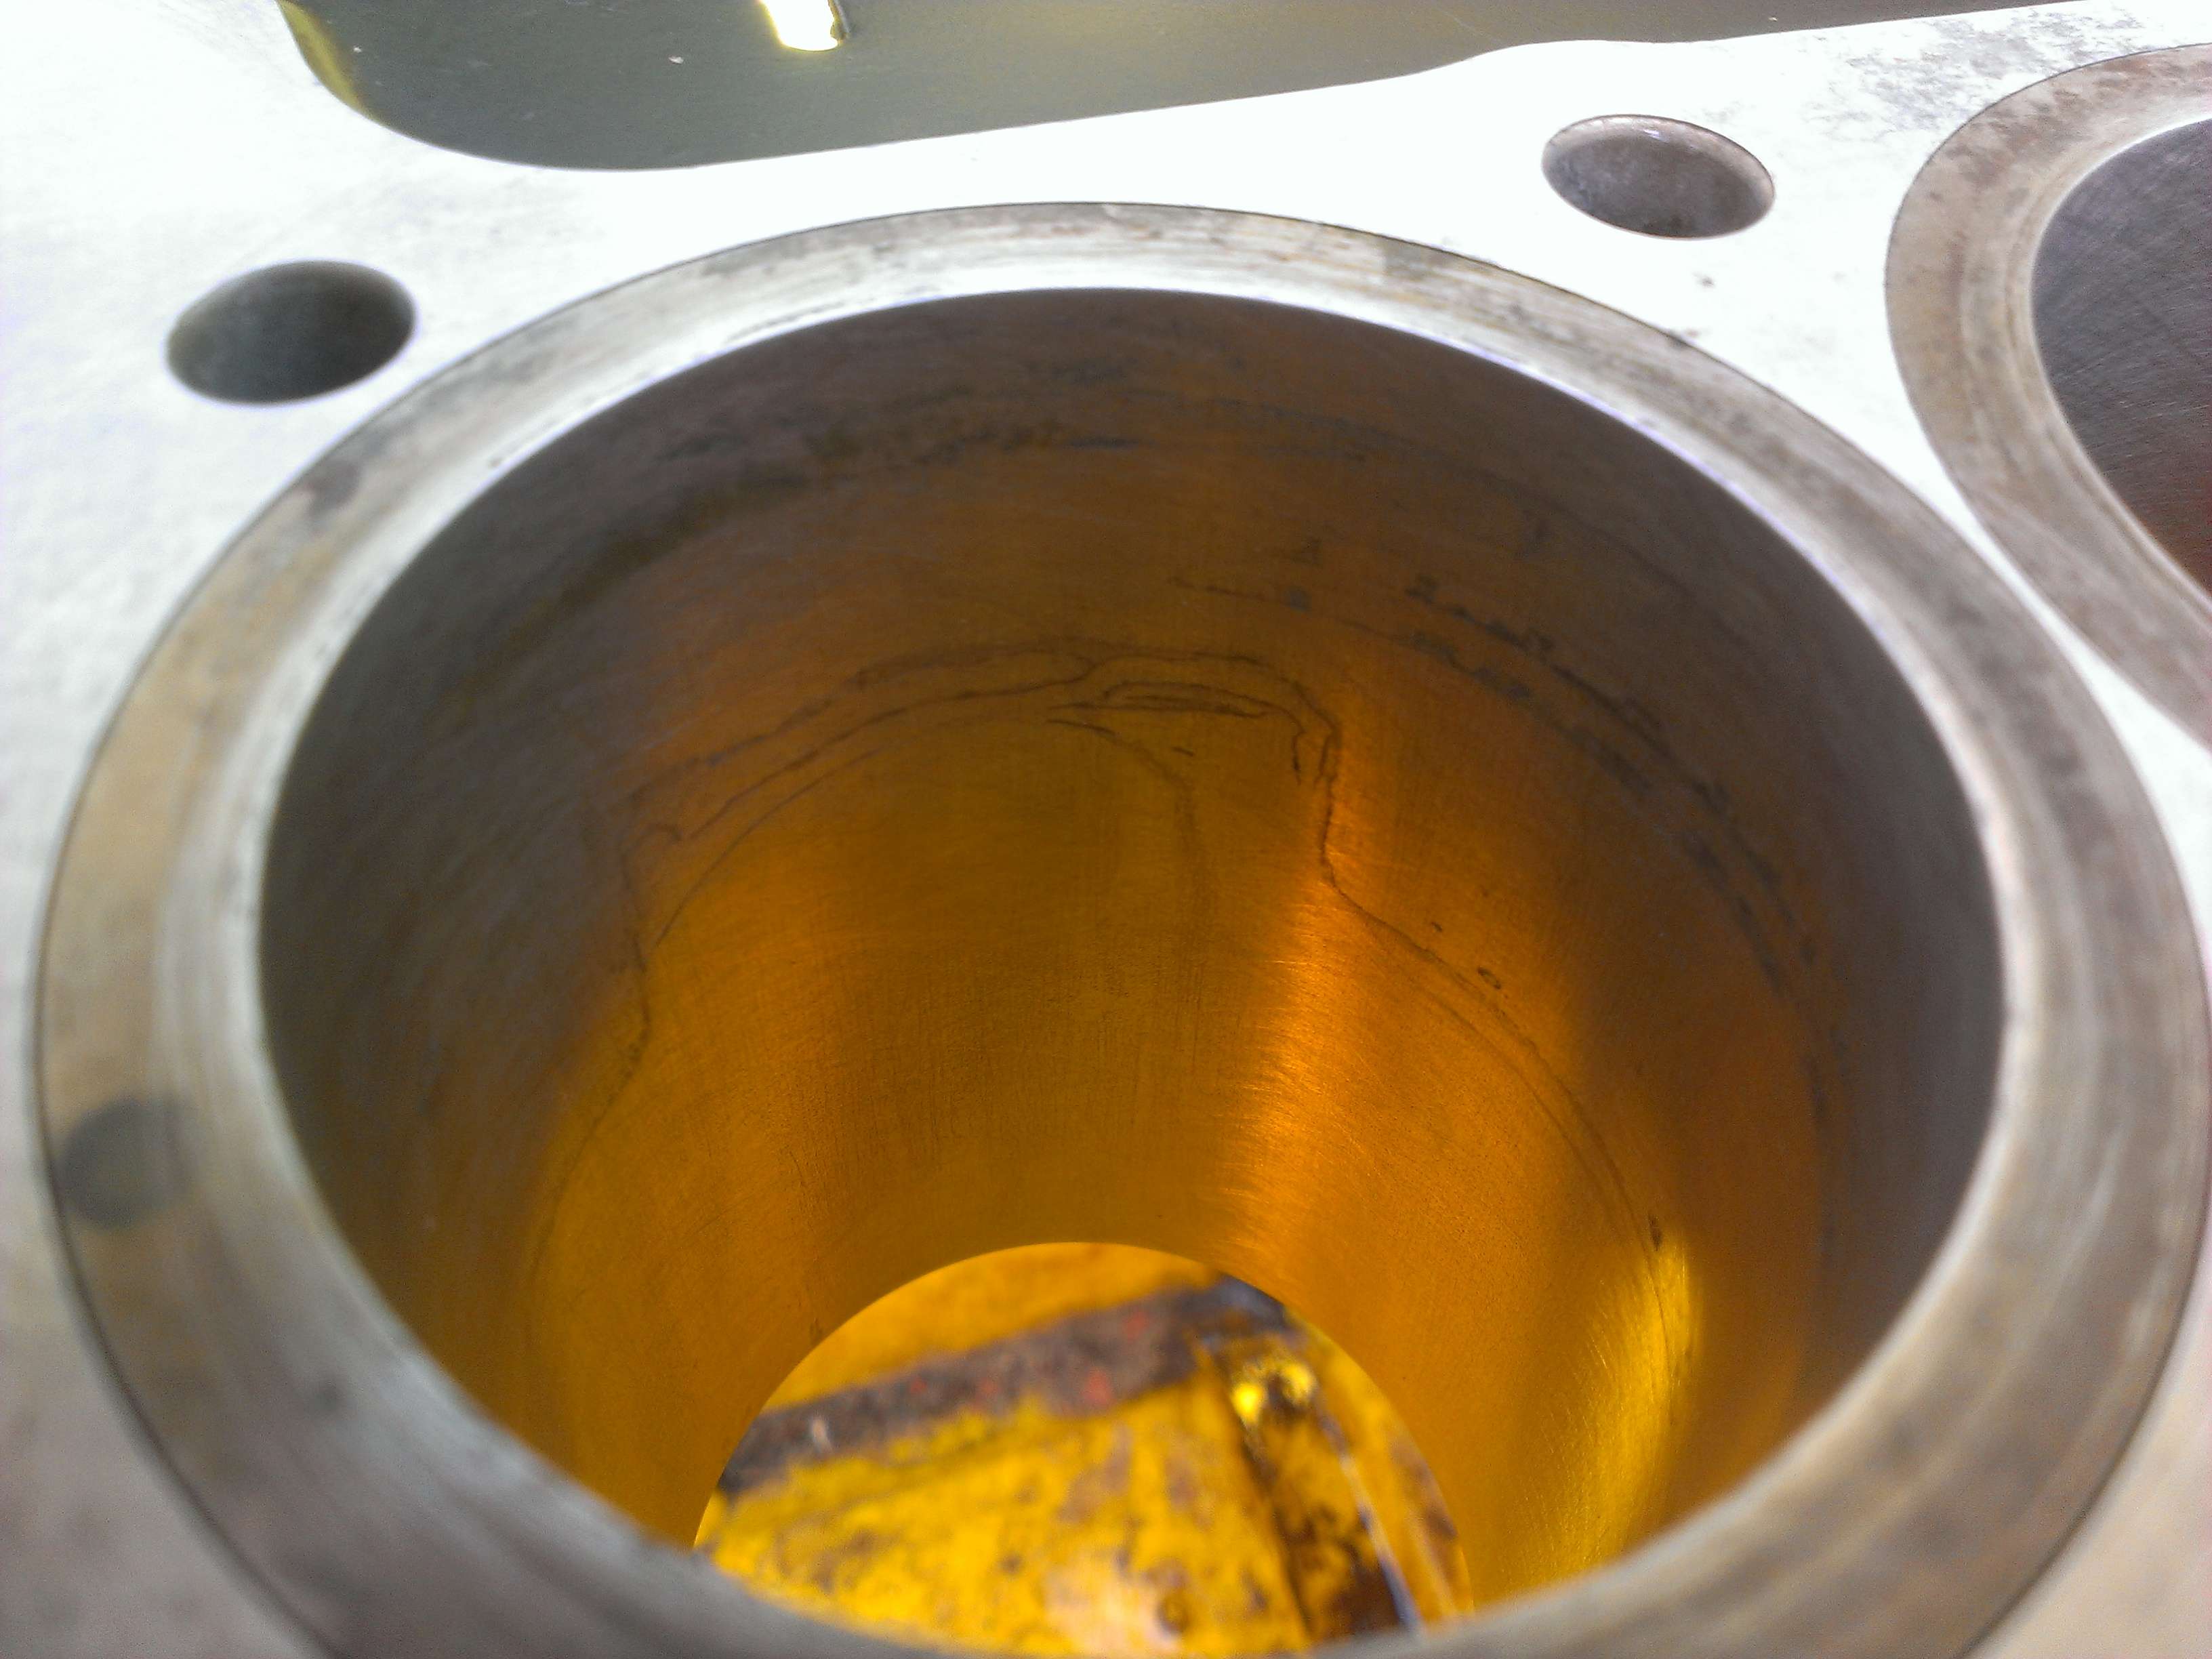
The other one
Am I worrying about nothing or should I be looking for another cylinder head? As much as I wanna get this thing back together I don't wanna risk wasting $200+ worth of gaskets and rings... There are a few good cylinder blocks on ebay but that's $60ish.
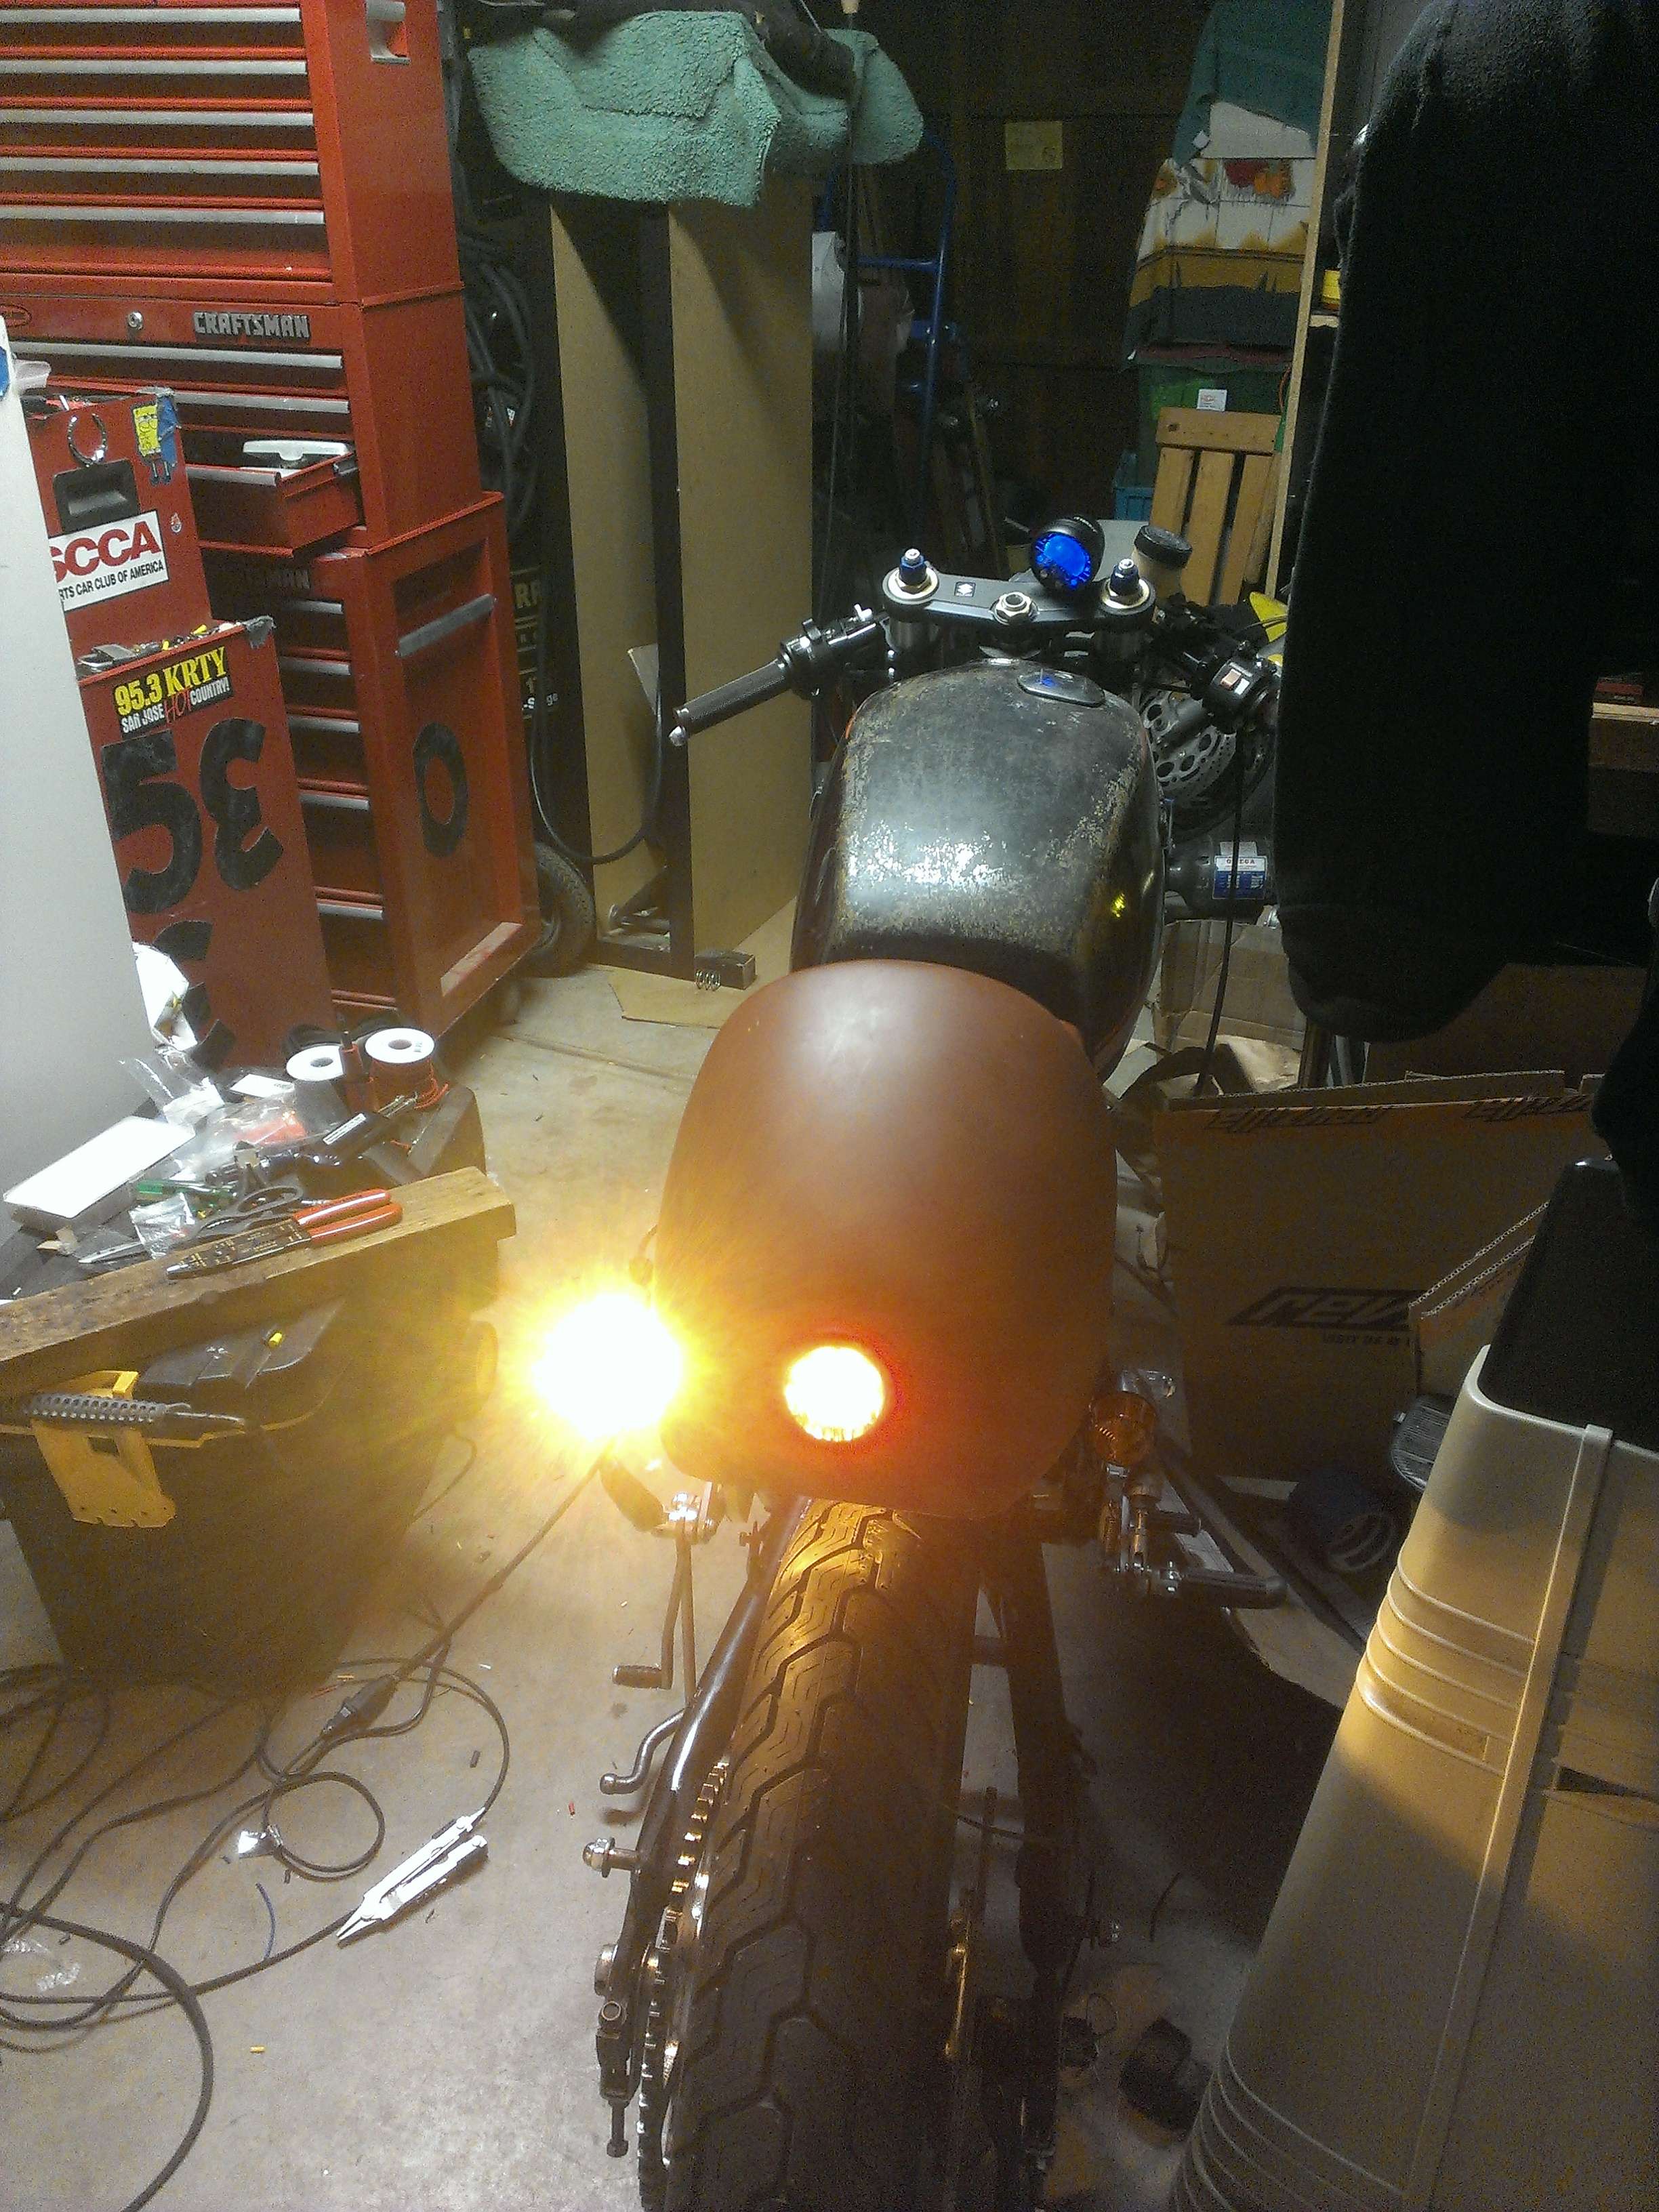
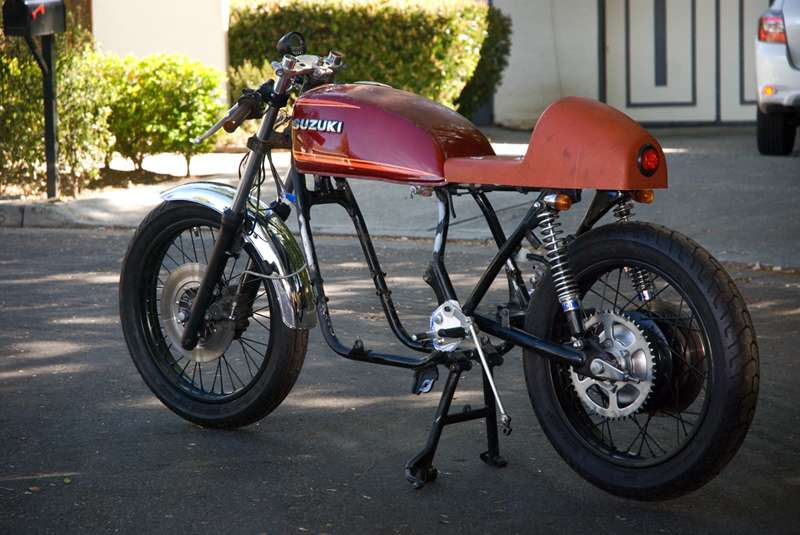
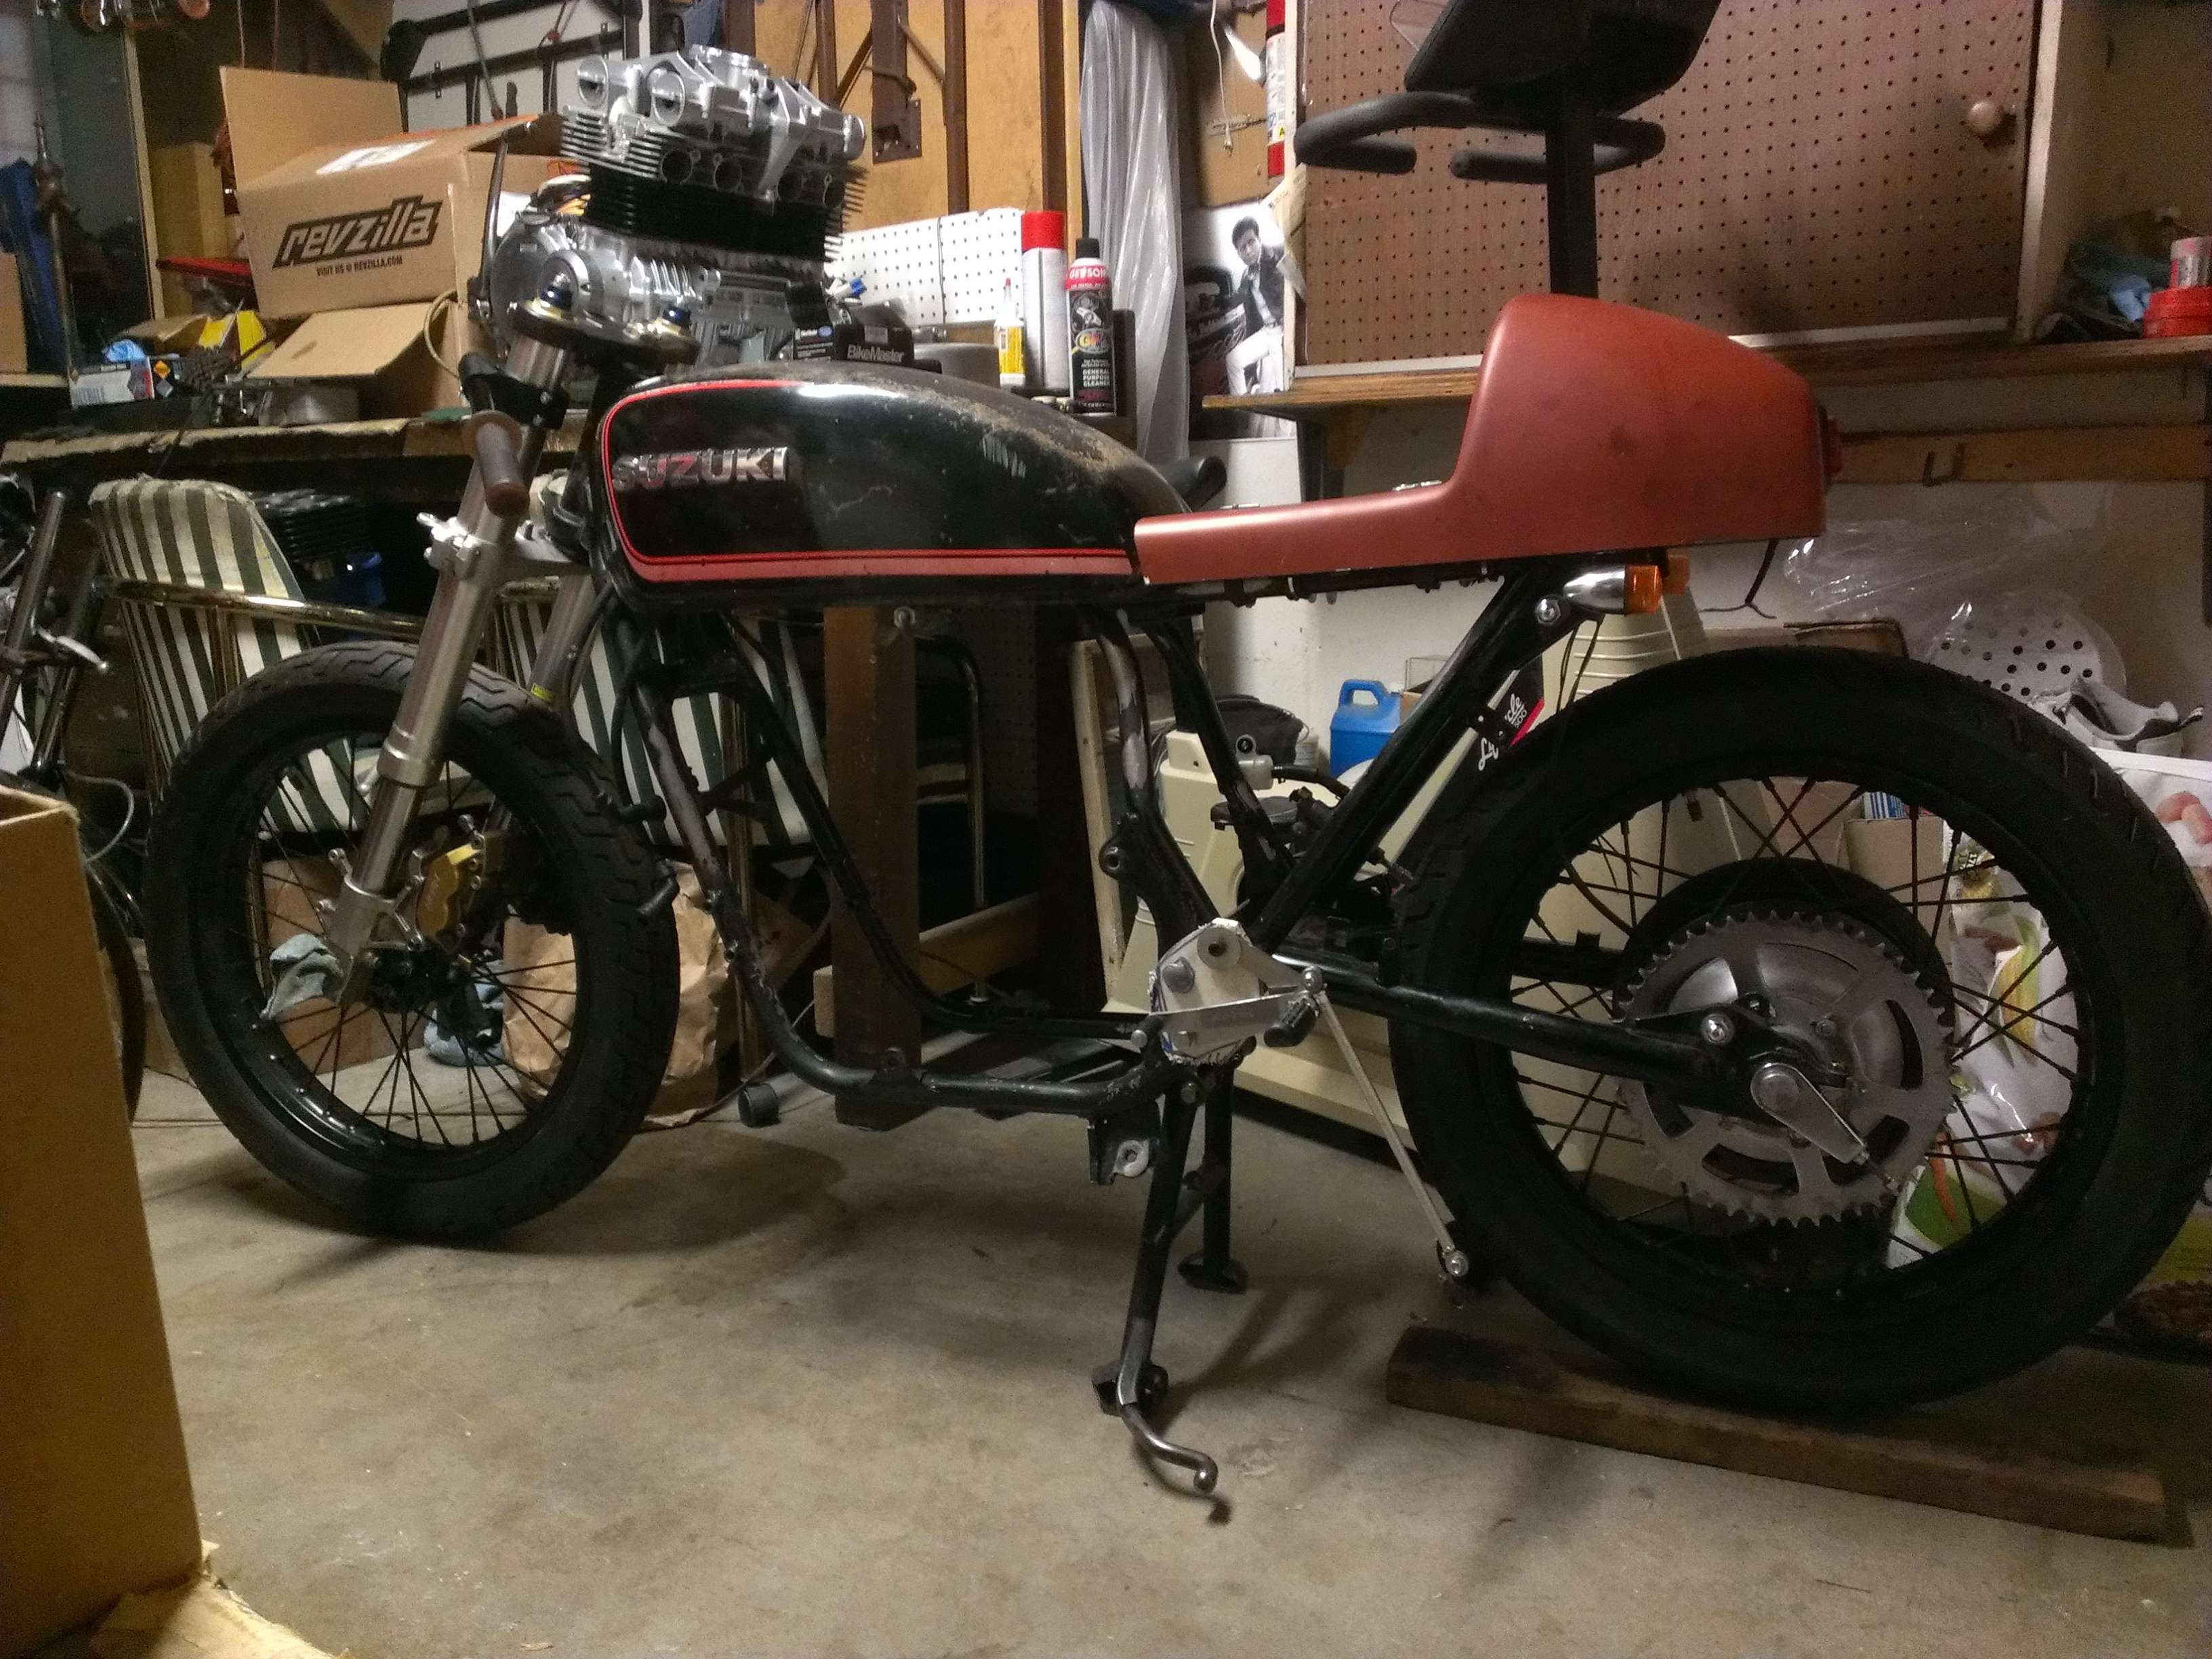
So to distract myself from the possible setback I took a pic of the bike ;D
I didn't notice prior to honing but two (1 and 3) have some pitting around were the rings were when the engine was sitting. It was originally from Florida but everything else is solid and not rusted at all.Everything looks good in the sunlight
But in the shadow its easy to see... This is the worst of the two, and I can feel the pitting slightly in some spots
The other one
Am I worrying about nothing or should I be looking for another cylinder head? As much as I wanna get this thing back together I don't wanna risk wasting $200+ worth of gaskets and rings... There are a few good cylinder blocks on ebay but that's $60ish.
So to distract myself from the possible setback I took a pic of the bike ;D
Toast
Been Around the Block
Parts are coming in for 550L version 2.0. I found myself at an impasse and just decided to go big .
I'm piecing together something pretty cool, the majority of the parts will be here by Monday and I can start moving forward again.
The front end will be:
- 2002 GSXR-750 inverted forks
- Honda 954RR calipers (superior to the GSXR stuff)
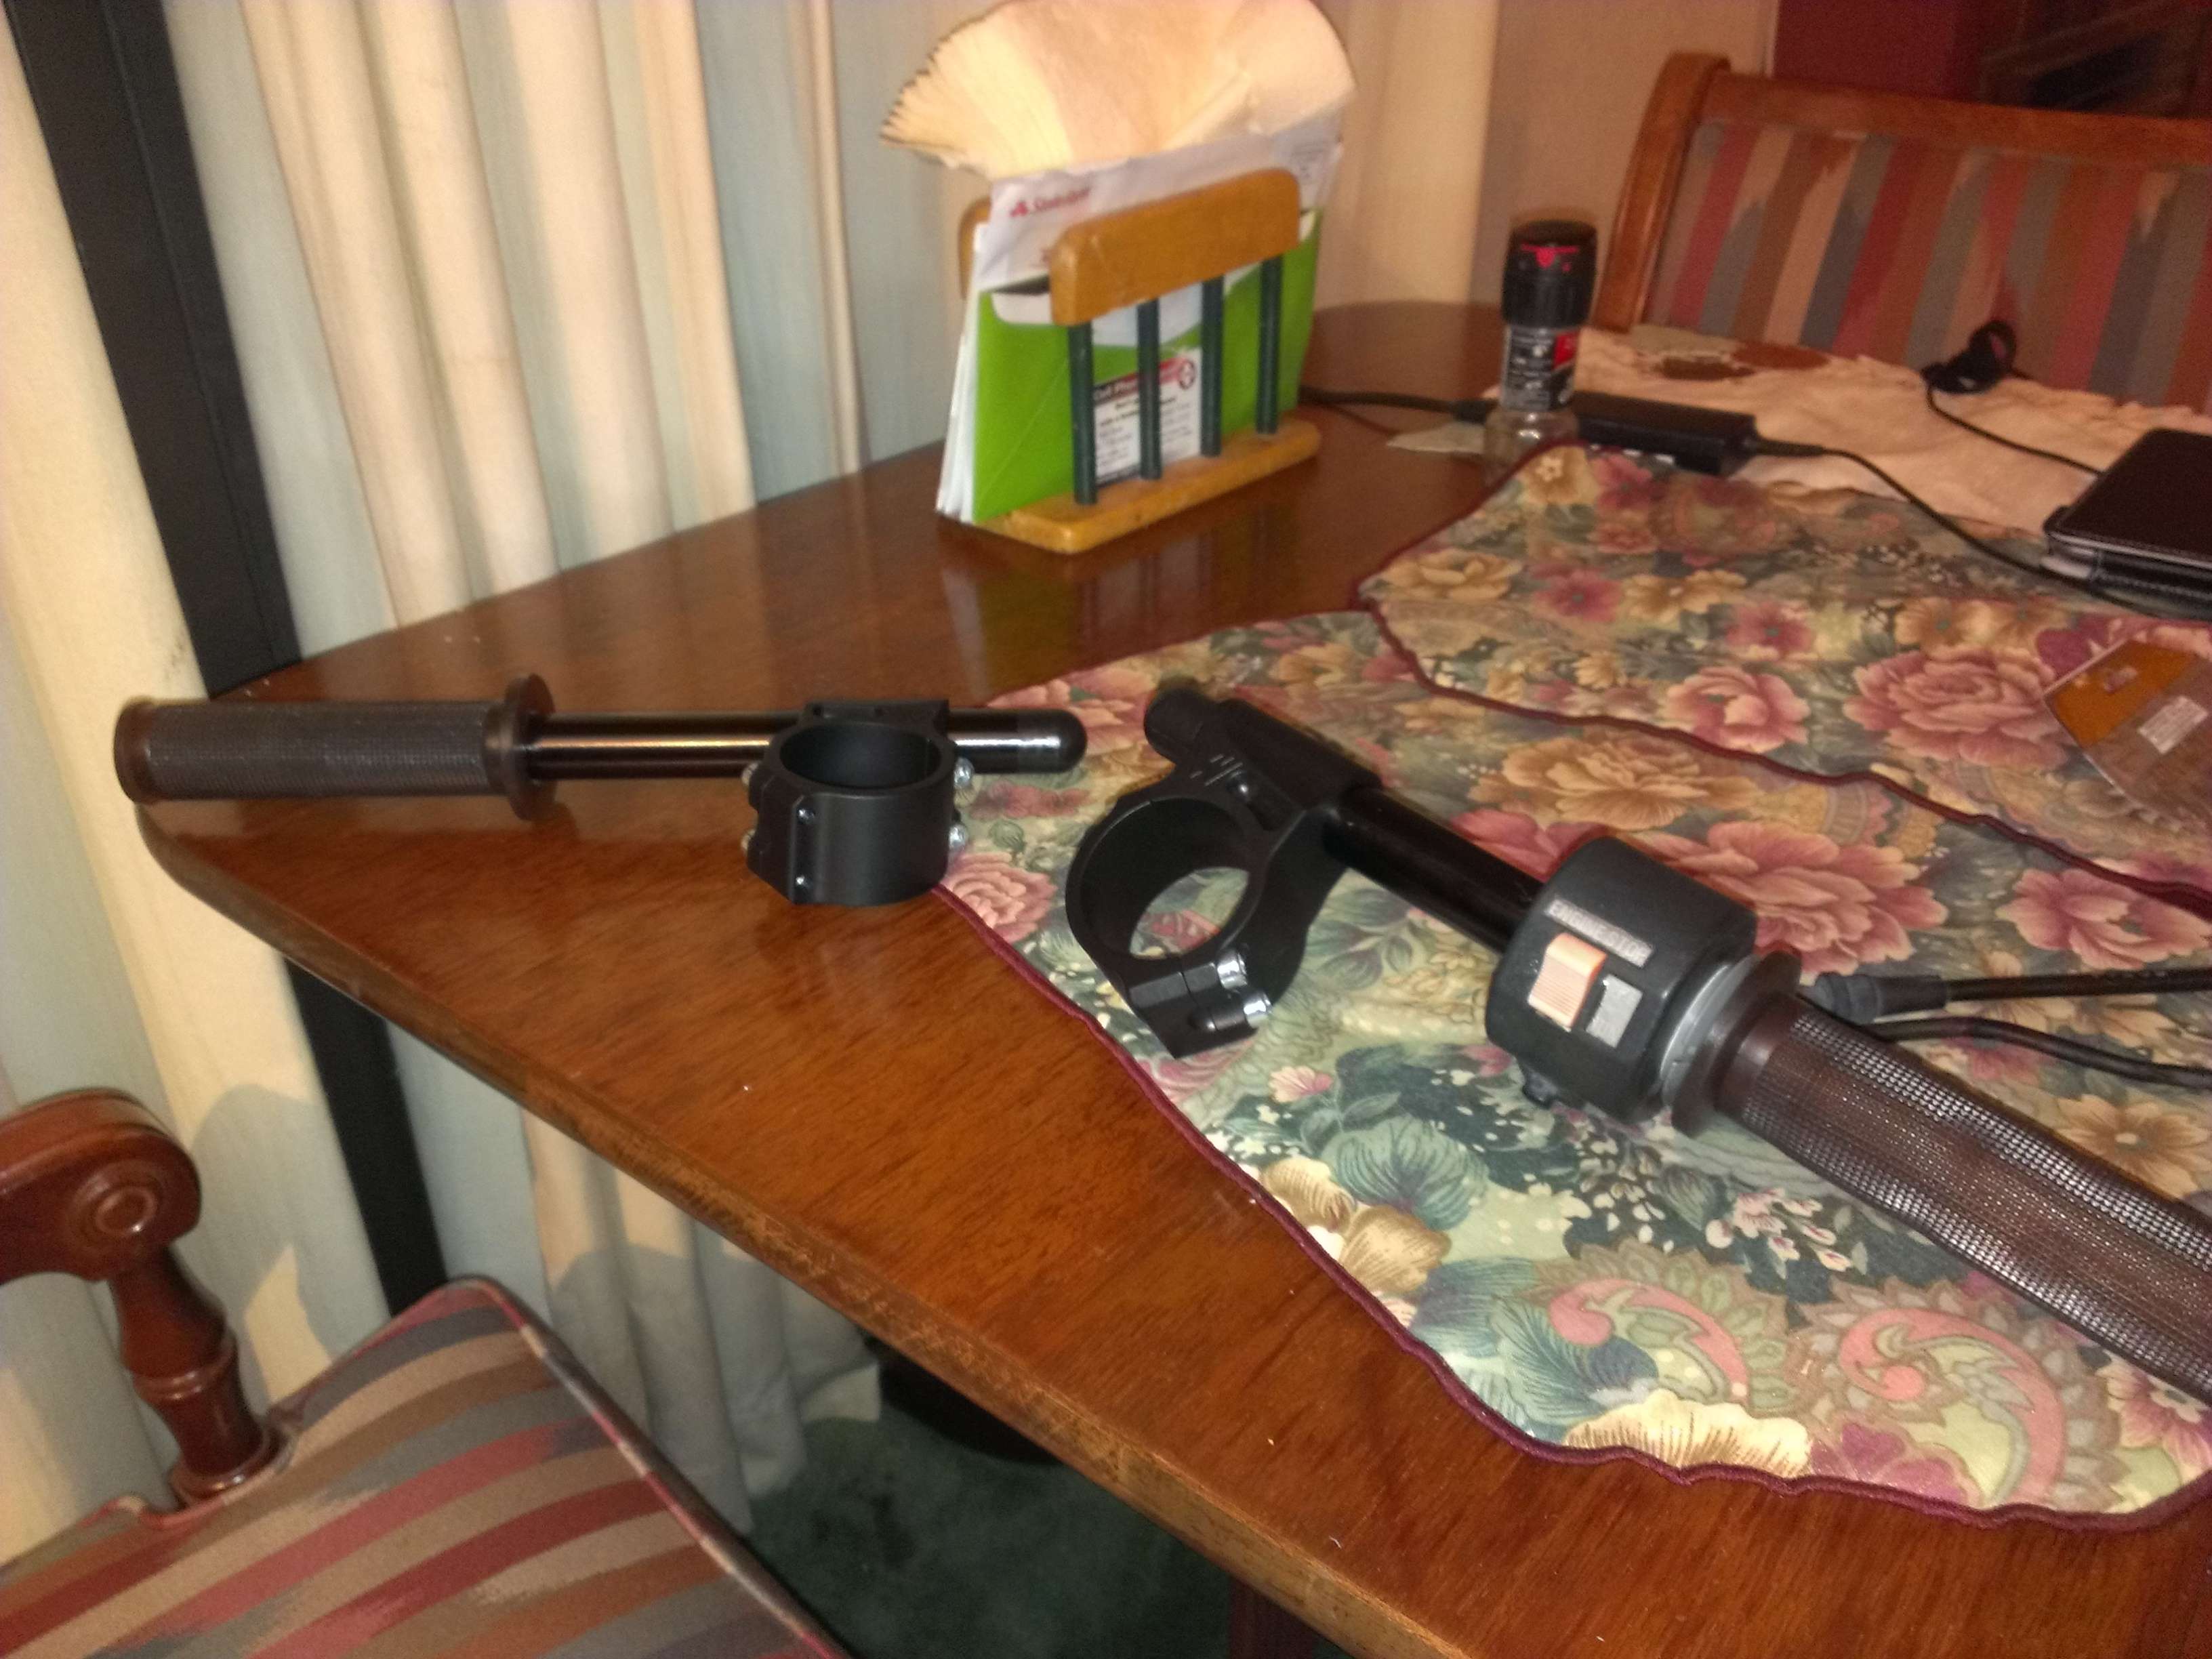
- 50mm Woodcraft clip ons
- 954RR clutch perch and master cylinder
- Black powdercoated GS750 spokes
- Custom aluminum spacer to attach massive 320mm Triumph rotors (from T8erBug on the GS Resources)
For the rear I have an aluminum GS1100E swingarm that I'll be using. I'm talking with a local machine shop to have some bronze bushings made up to replace the needle bearings and have the correct inner diameter to use my 550 pivot bolt. Shock wise... I'm not sure what to choose. YSS seems really nice for the price but I don't know if they offer eye to clevis. Works is legit but expensive and I wouldn't mind Hagons again but I would like some rebound/compression adjustment.
The sportbike take offs were not bad at all price wise. Apparently no one really cares about decade old forks... For a less than it costs to add cartridge emulators, performance springs, swapping to dual discs and adding good fork brace you can have modern adjustable stuff.
What has come in already:
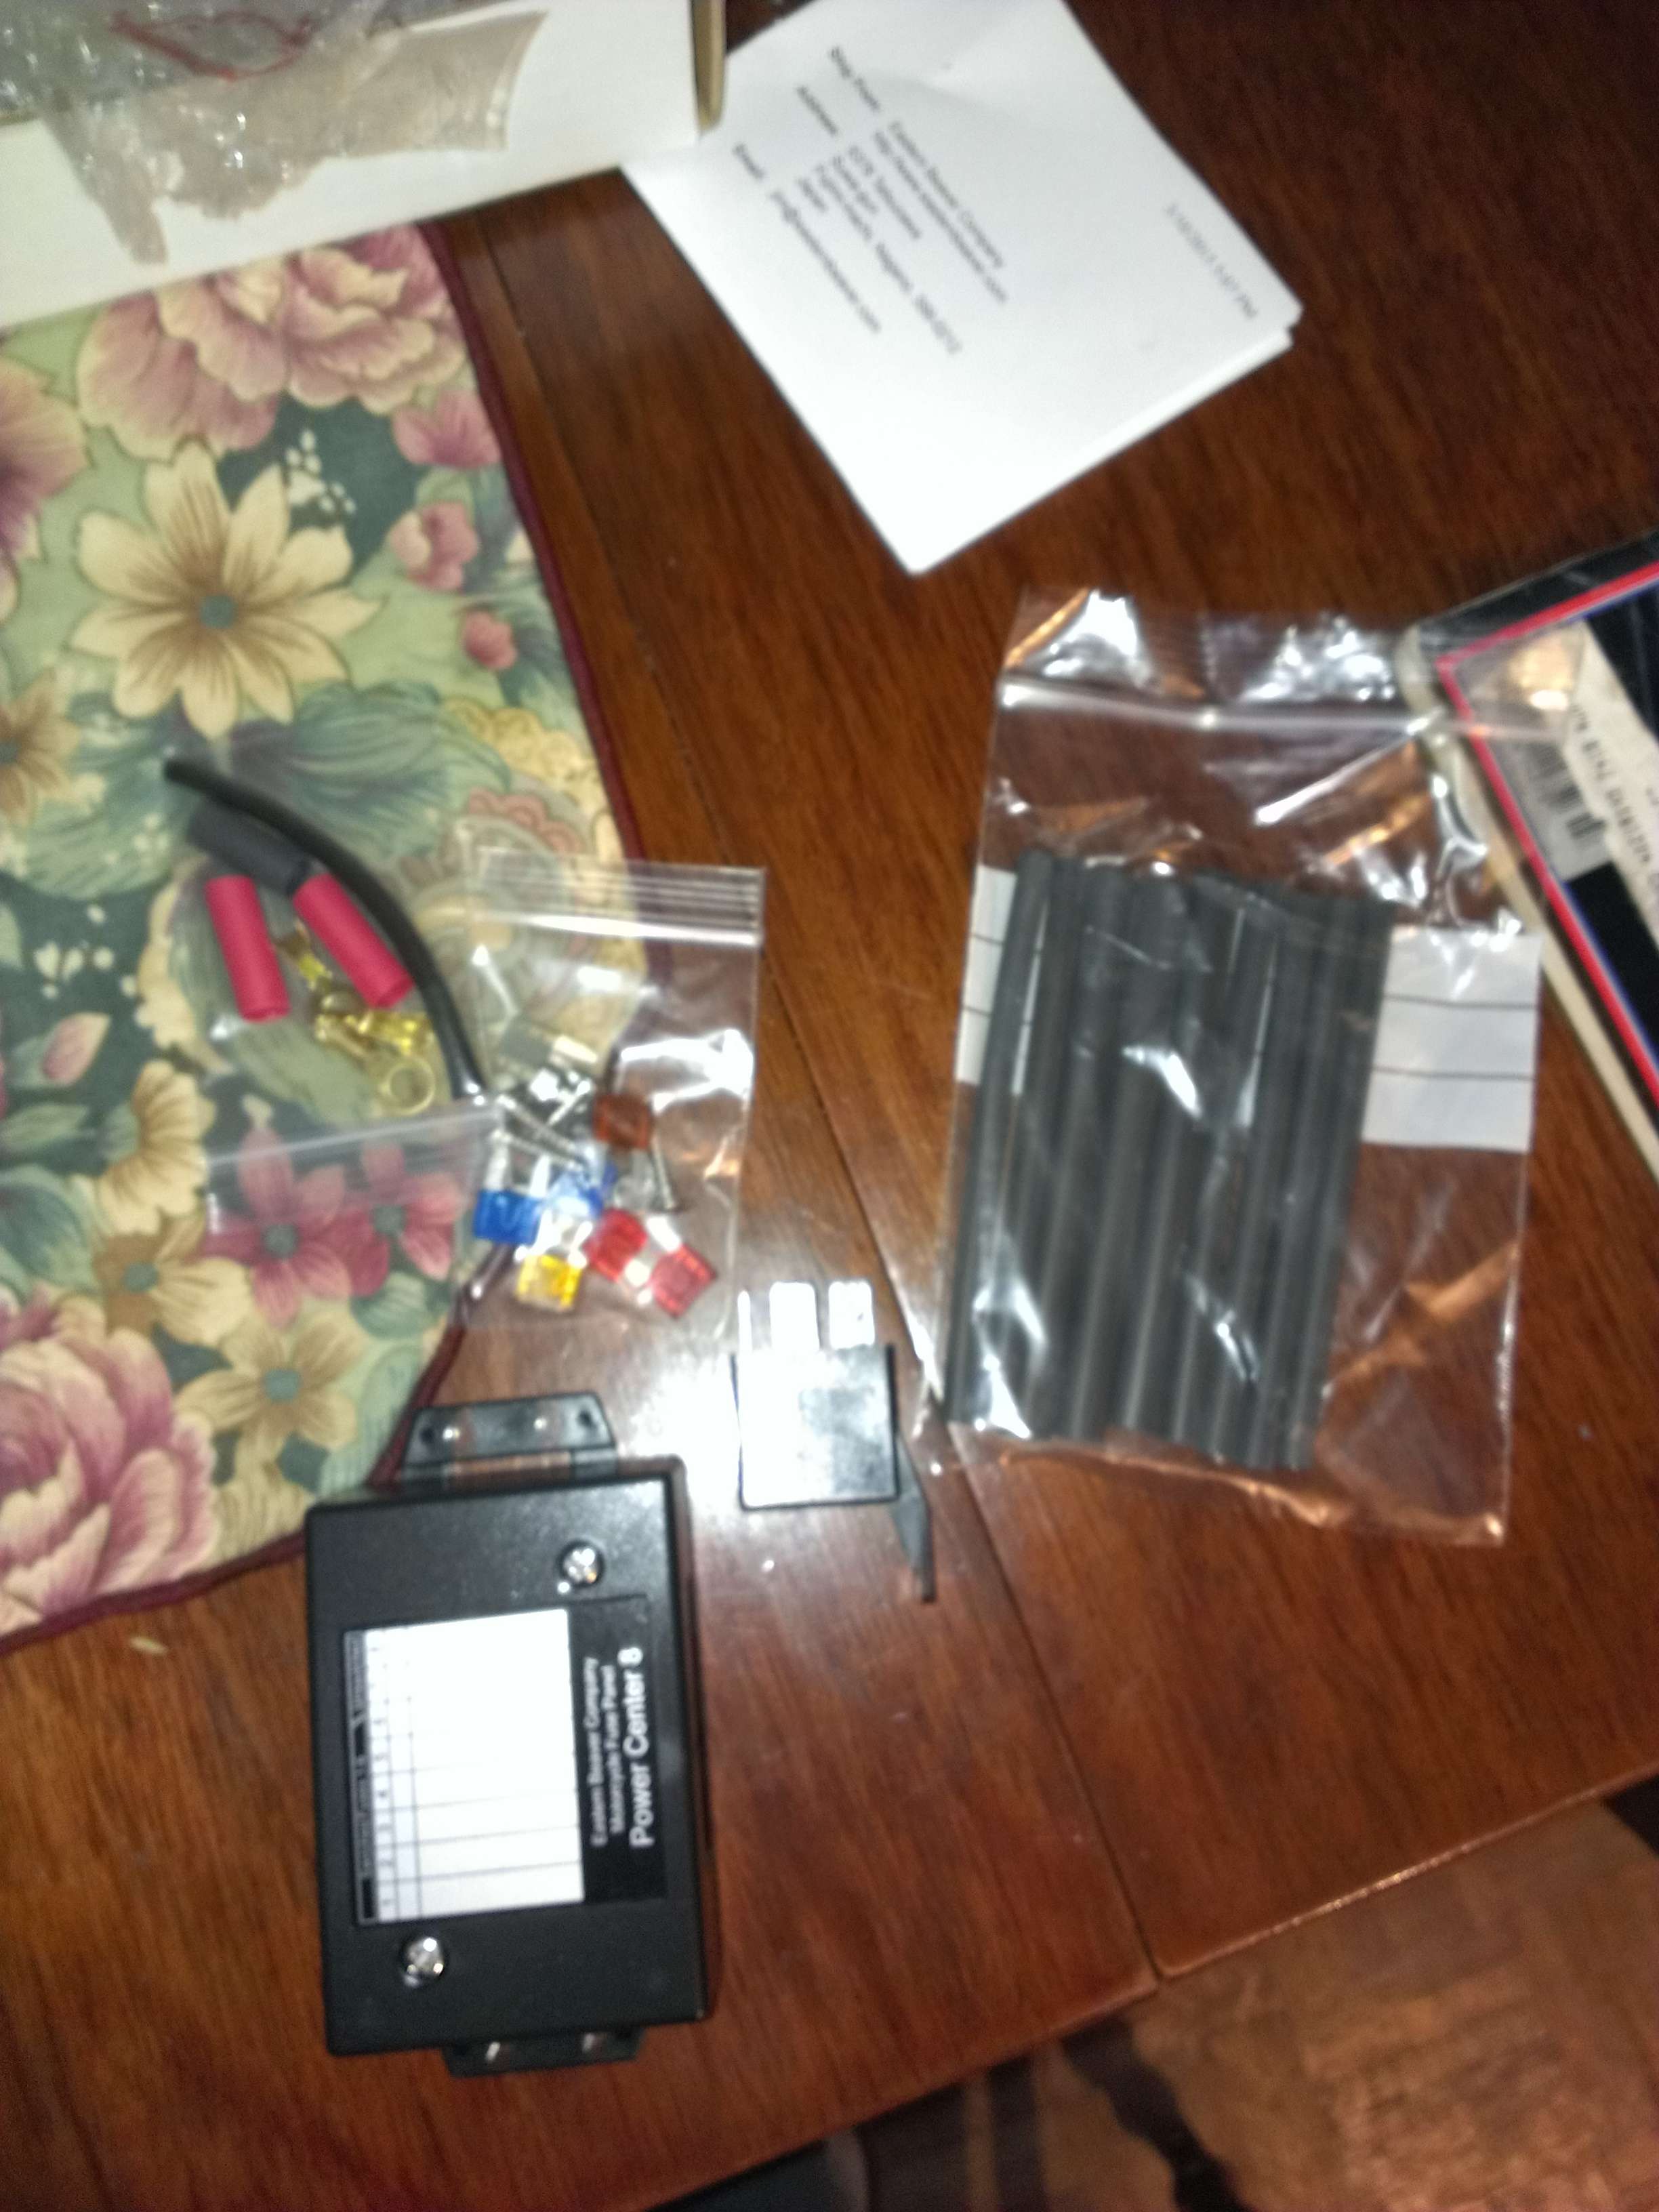
PC-8 fuse box
50mm Woodcraft clip ons (the ID is HUGEEEE)
954RR brakes
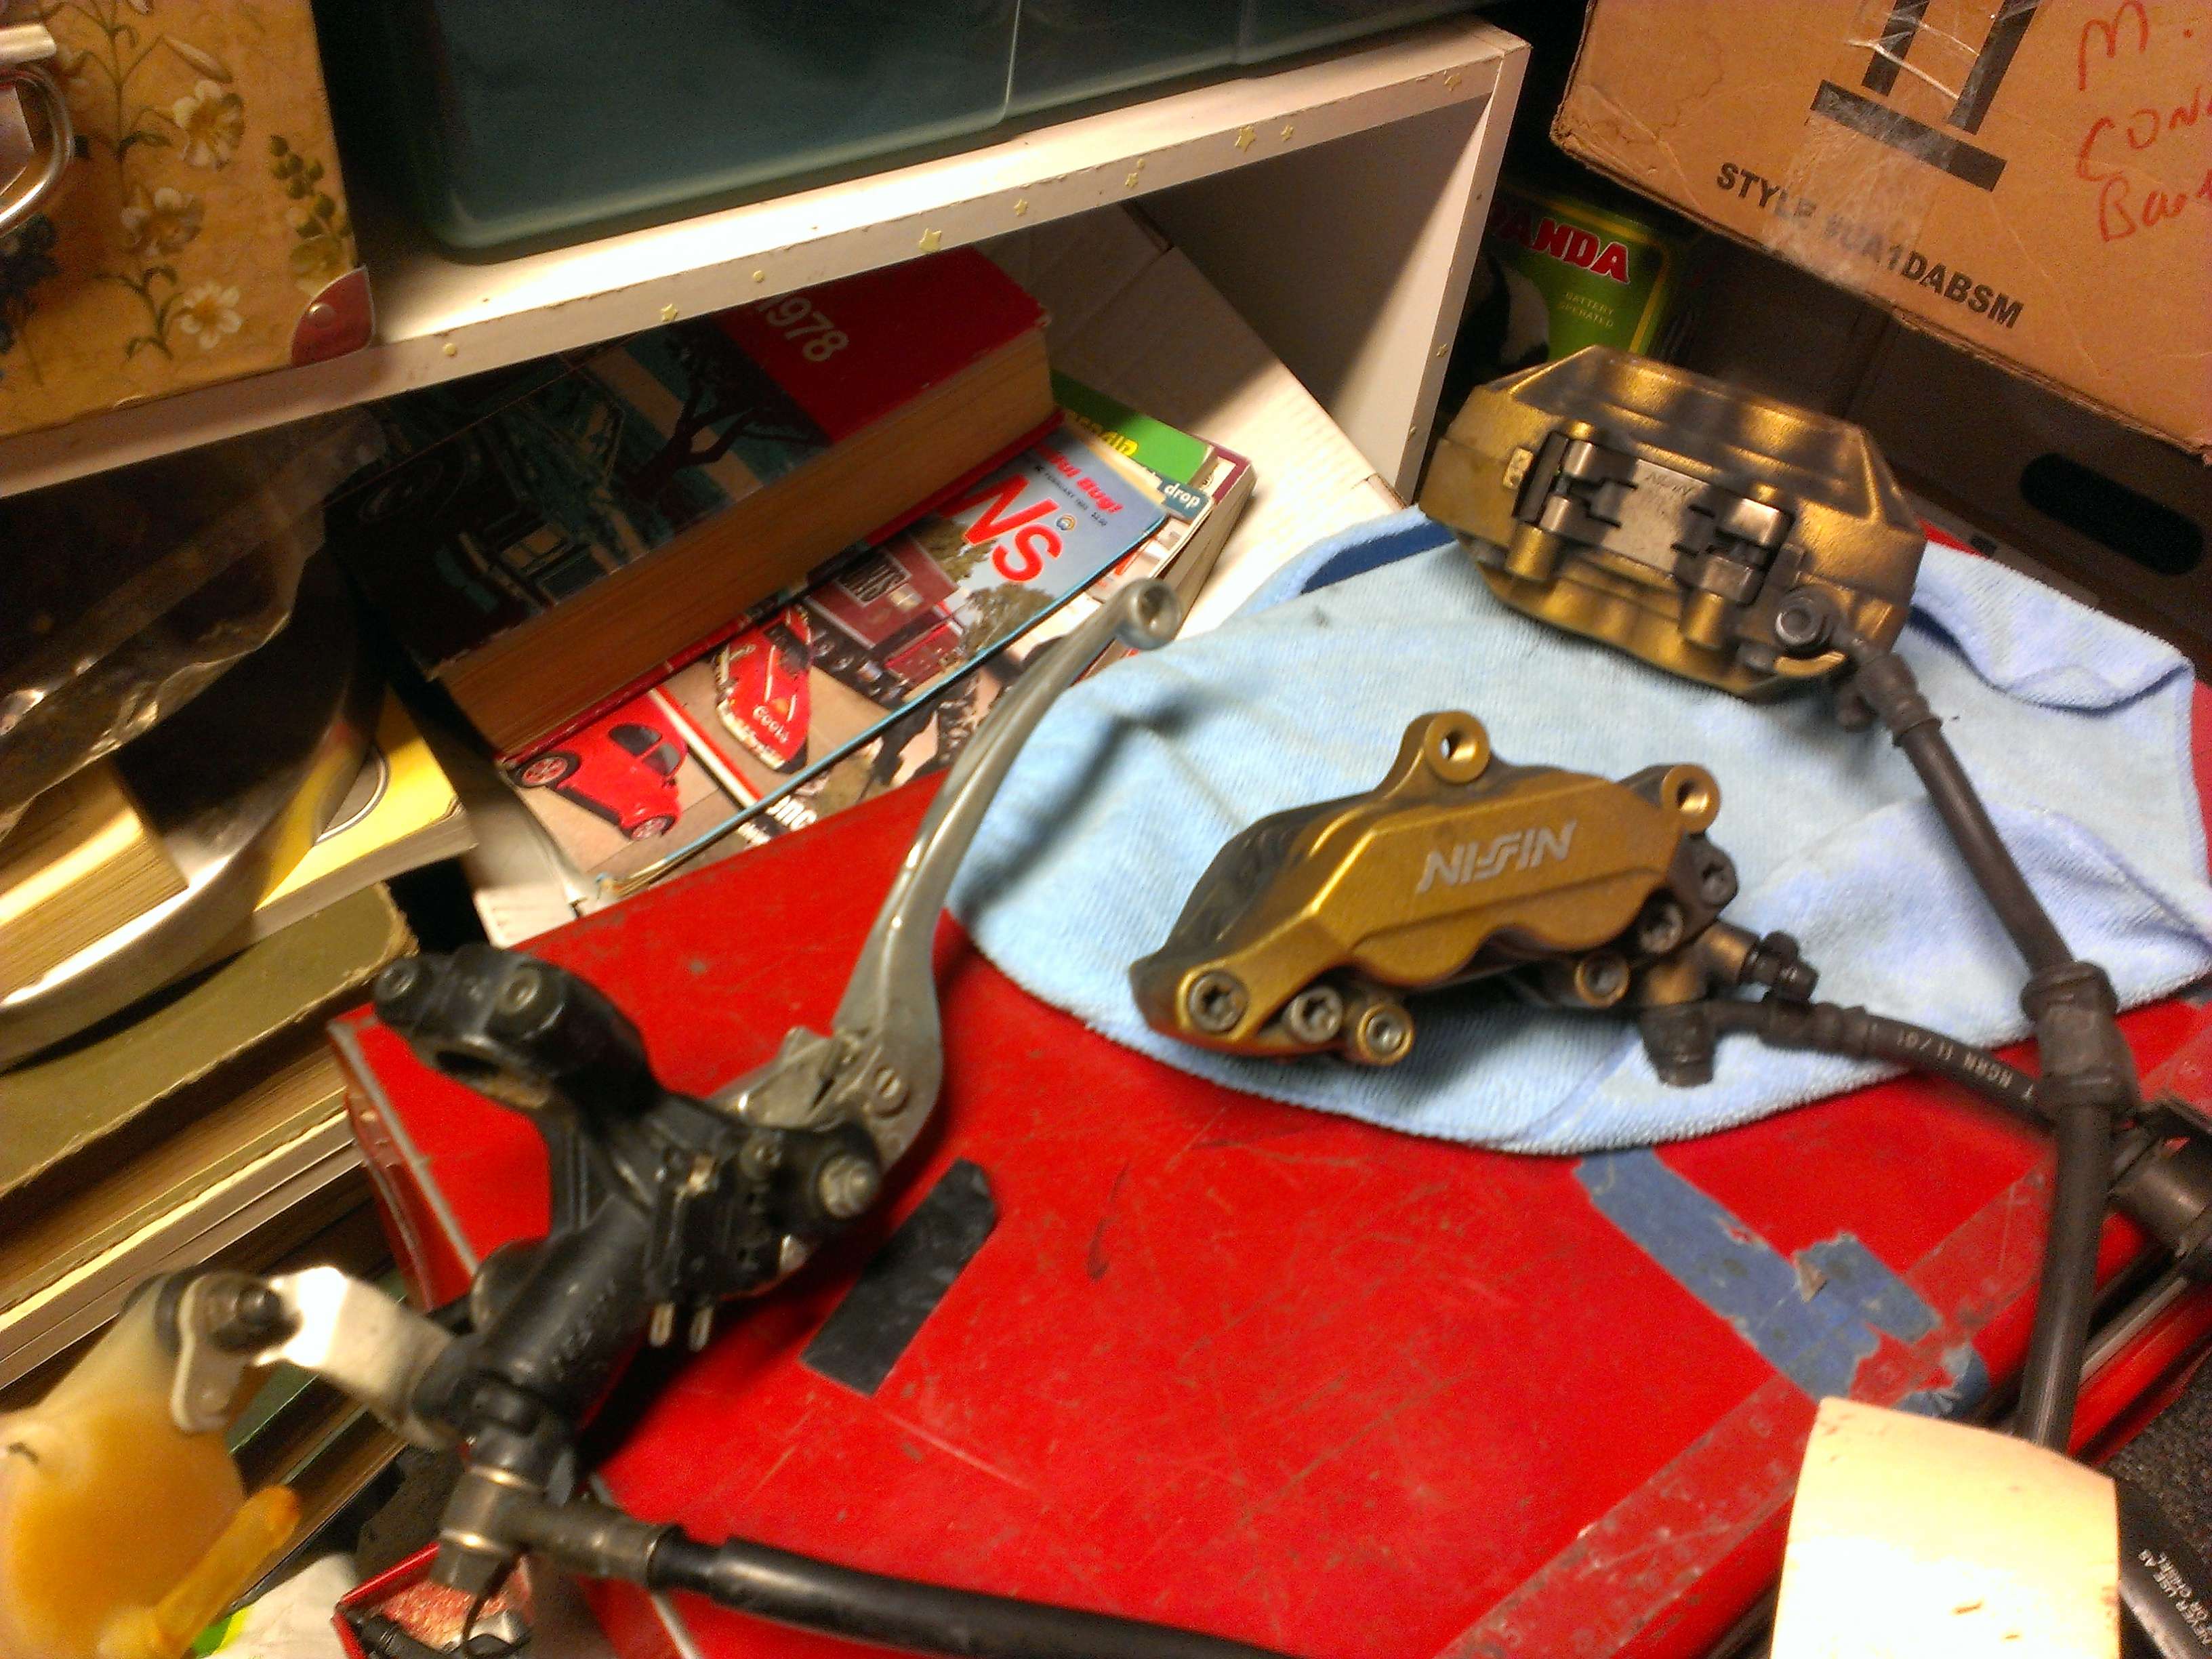
If this info is useful for anyone else, it is possible to use 954rr brakes on GSXR fork legs. This only works with non-radial mounts/calipers and 320mm rotors. The bolt pattern is the same, there is just a MM or two that needs to be filed off the inside of the caliper so it doesn't rub on the rotor.
I decided to go with Honda stuff because I needed brakes anyway and the calipers are known to be better (feel and performance wise). Plus the gold is just awesome :-X.
The things that are still in transit:
- GS650 block (9K on it and cheaper then machining my old one)
- USD forks
- Dime City order (battery and other smalls)
- Caliper bolts
- Clutch perch
- Wheel adapter (about a month away from completion)
- All Balls bearings
One last thing I picked up is this AWESOME voltage indicator LINK. Its a round LED that changes color/flashes depending on voltage. My friend with the GSXR got one and it's slick as hell. You can pop it out of the plastic housing and install it in a dash for a super clean voltage dummy light.
. I'm piecing together something pretty cool, the majority of the parts will be here by Monday and I can start moving forward again.
The front end will be:
- 2002 GSXR-750 inverted forks
- Honda 954RR calipers (superior to the GSXR stuff)
- 50mm Woodcraft clip ons
- 954RR clutch perch and master cylinder
- Black powdercoated GS750 spokes
- Custom aluminum spacer to attach massive 320mm Triumph rotors (from T8erBug on the GS Resources)
For the rear I have an aluminum GS1100E swingarm that I'll be using. I'm talking with a local machine shop to have some bronze bushings made up to replace the needle bearings and have the correct inner diameter to use my 550 pivot bolt. Shock wise... I'm not sure what to choose. YSS seems really nice for the price but I don't know if they offer eye to clevis. Works is legit but expensive and I wouldn't mind Hagons again but I would like some rebound/compression adjustment.
The sportbike take offs were not bad at all price wise. Apparently no one really cares about decade old forks... For a less than it costs to add cartridge emulators, performance springs, swapping to dual discs and adding good fork brace you can have modern adjustable stuff.
What has come in already:
PC-8 fuse box
50mm Woodcraft clip ons (the ID is HUGEEEE)
954RR brakes
If this info is useful for anyone else, it is possible to use 954rr brakes on GSXR fork legs. This only works with non-radial mounts/calipers and 320mm rotors. The bolt pattern is the same, there is just a MM or two that needs to be filed off the inside of the caliper so it doesn't rub on the rotor.
I decided to go with Honda stuff because I needed brakes anyway and the calipers are known to be better (feel and performance wise). Plus the gold is just awesome :-X.
The things that are still in transit:
- GS650 block (9K on it and cheaper then machining my old one)
- USD forks
- Dime City order (battery and other smalls)
- Caliper bolts
- Clutch perch
- Wheel adapter (about a month away from completion)
- All Balls bearings
One last thing I picked up is this AWESOME voltage indicator LINK. Its a round LED that changes color/flashes depending on voltage. My friend with the GSXR got one and it's slick as hell. You can pop it out of the plastic housing and install it in a dash for a super clean voltage dummy light.
Toast
Been Around the Block
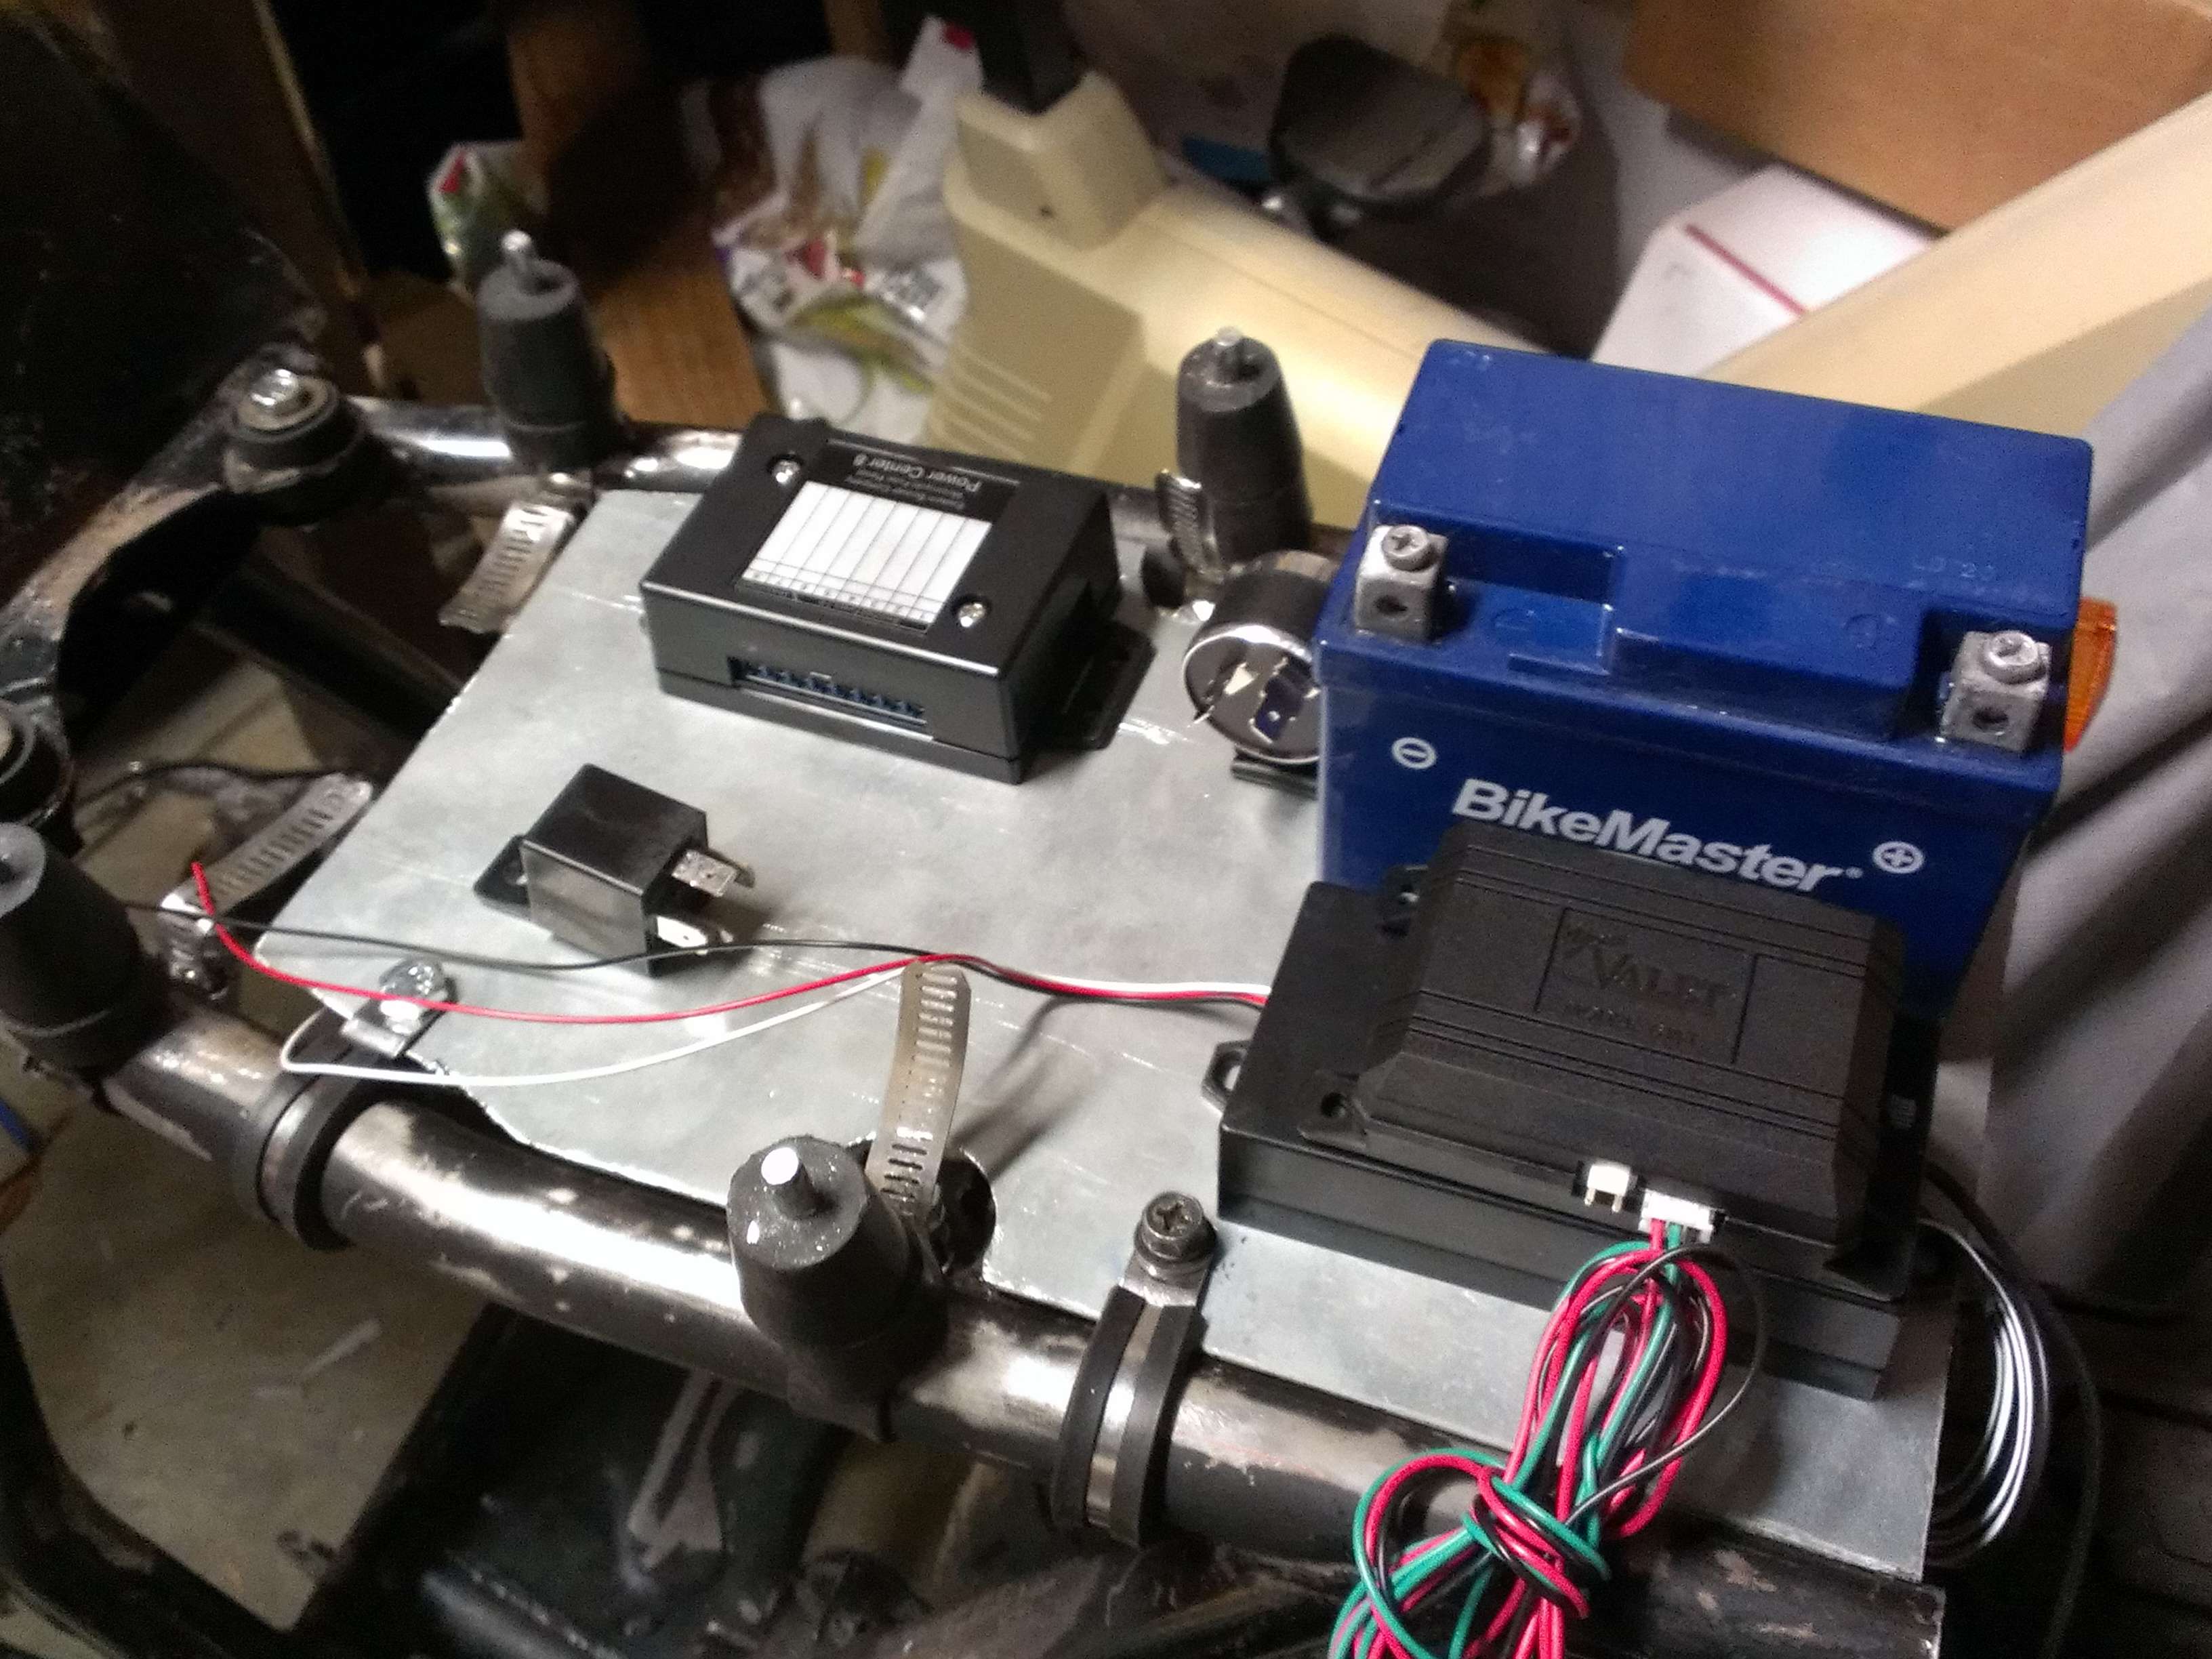
Yesterday a few more things came in the mail
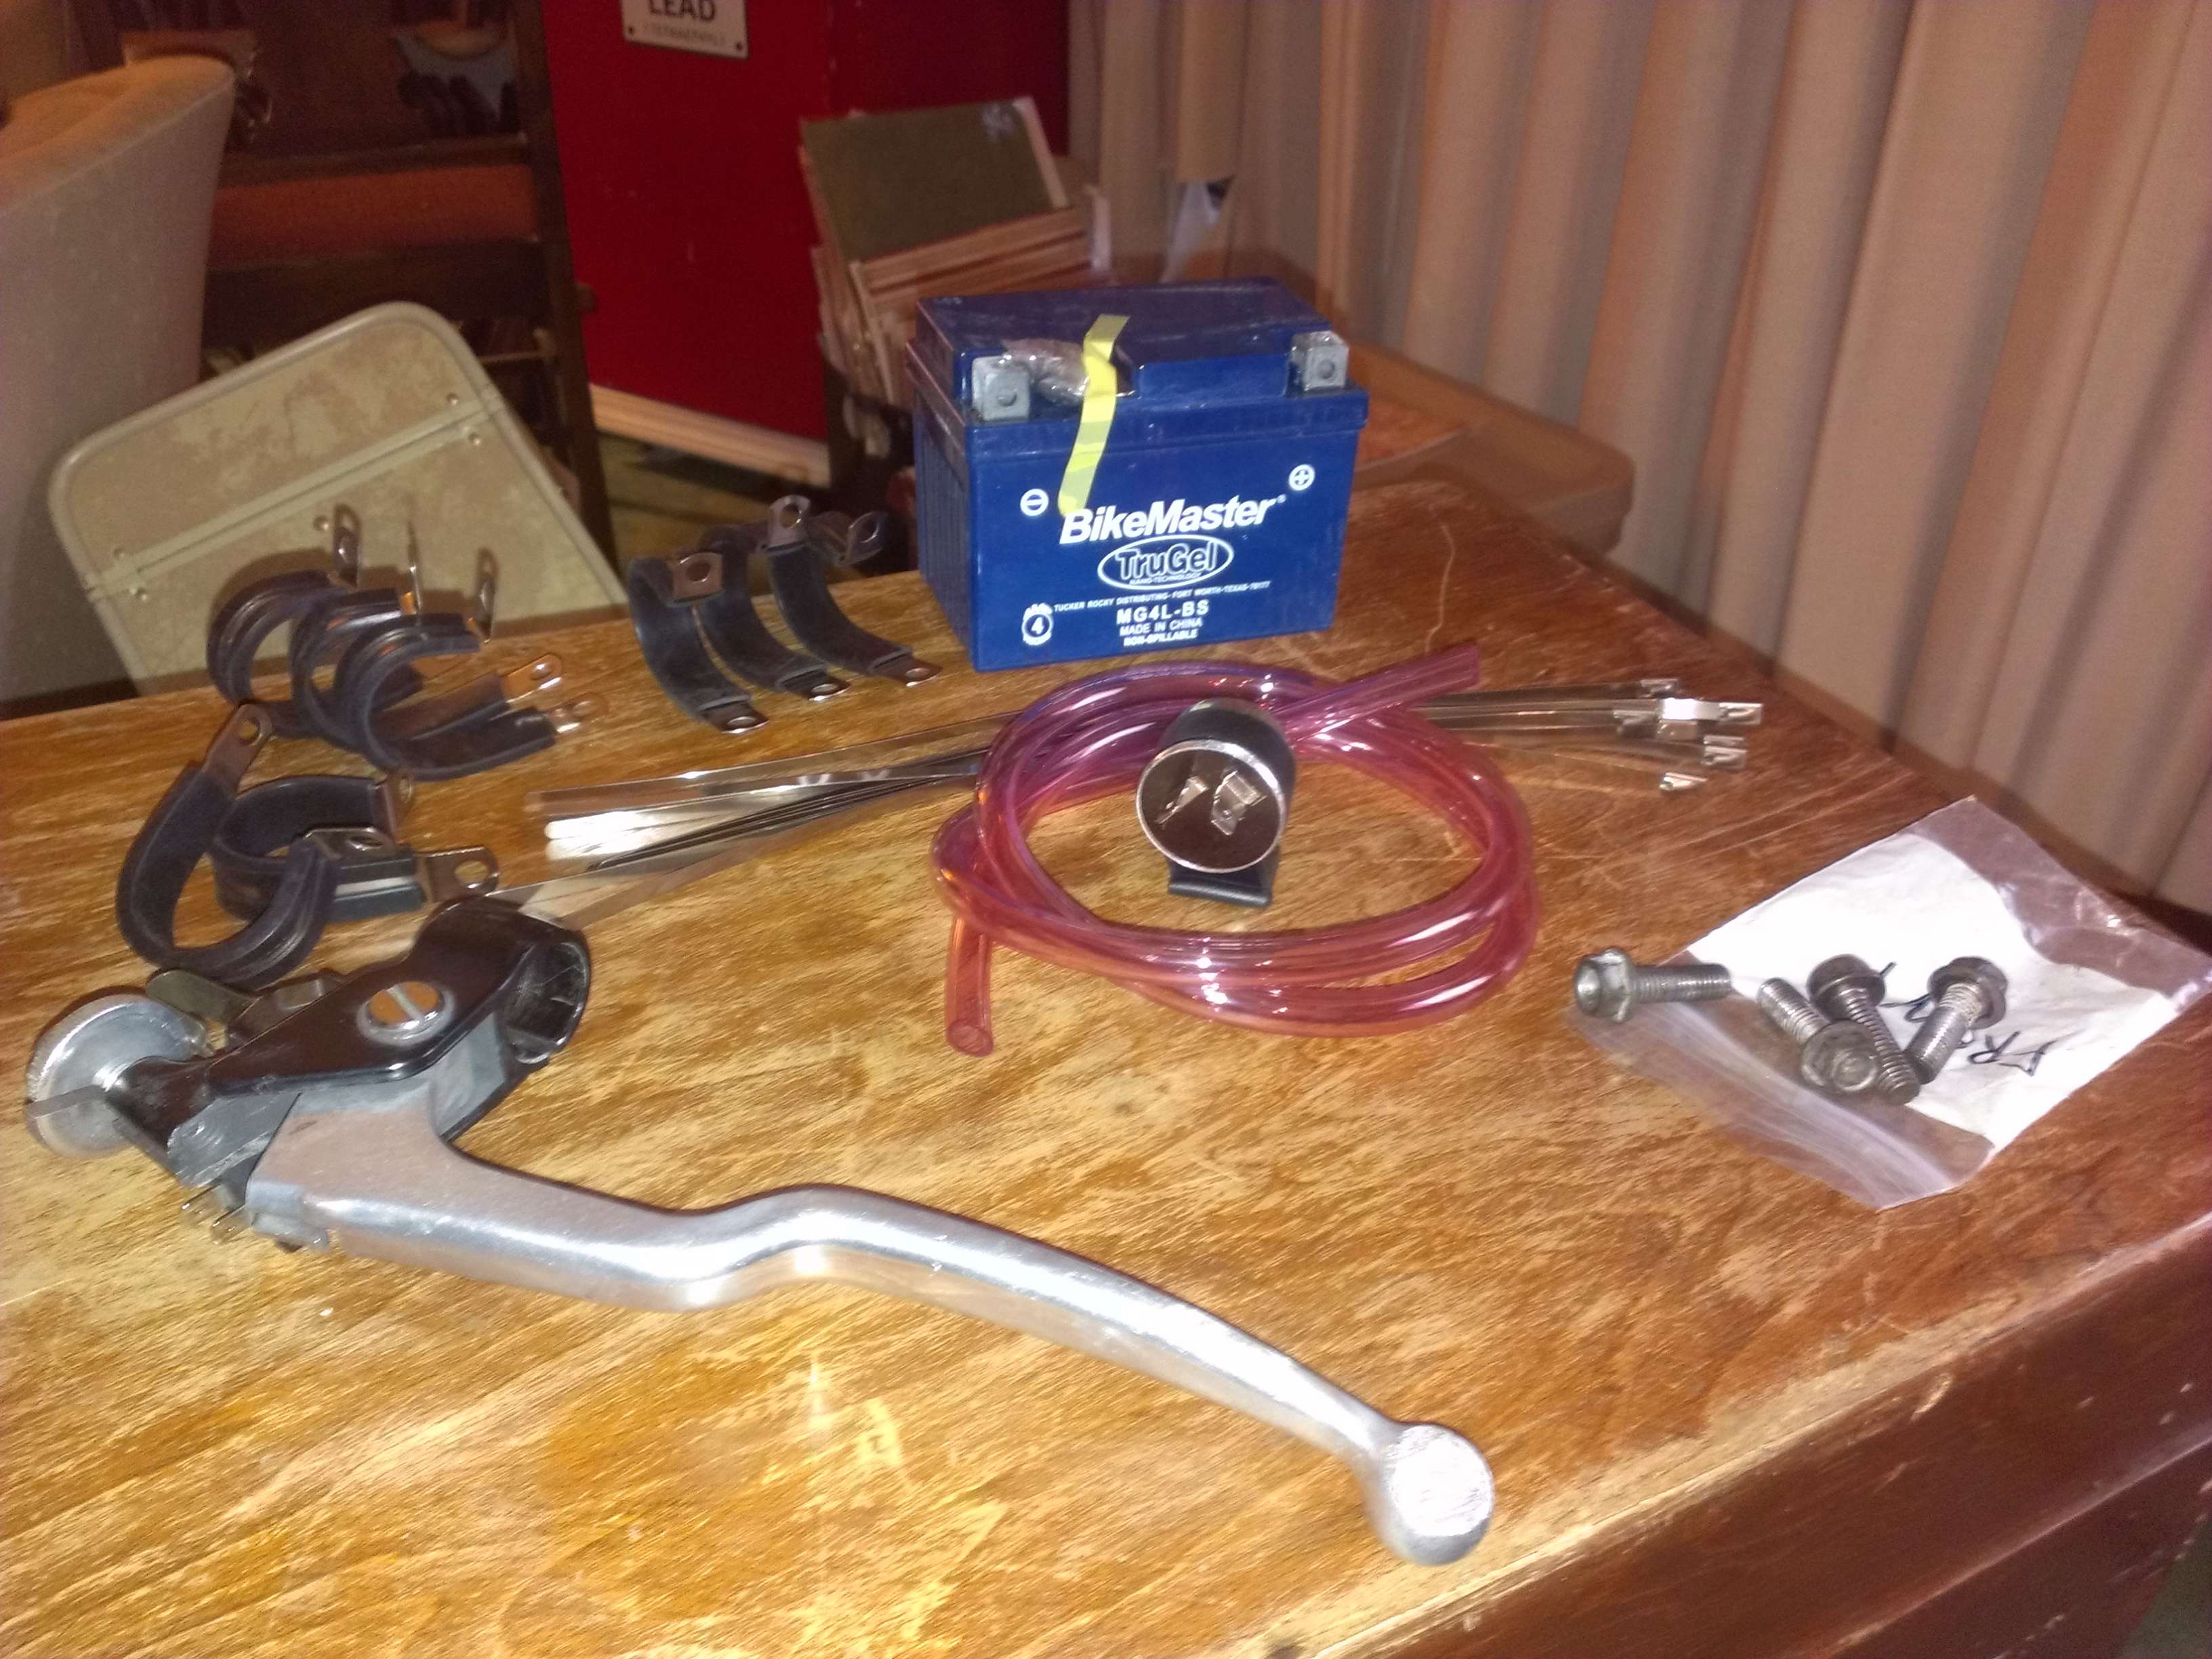
It was too late to work on anything when I got home so this morning I wanted to test out my keyless ignition system. I bought a few packs of alligator clips from Fry's a few weeks ago and I finally had a working battery so I dove right in.
It worked perfectly. I posted a wiring diagram earlier in the thread which was mostly correct. I need to change one of the ground connections for the solid state relay, there is no split coming off of the RFID receiver like the instructions showed.
Here's the video, excuse the mess I was drinking my morning coffee and had to make space on the table.
http://www.youtube.com/watch?v=NUr6XIznZ3U
Replace the headlight with the switched ignition on circuit and you're in business. Really simple.
The basic rundown of how it works again:
* Connect everything to power and ground
* RFID receiver gets pulse from Key Fob
* RFID unit sends low voltage pulse to the solid state relay
* The SS relay sees the pulse and is programmed to "latch on/off" using the dip switches
* Connect the brown wire to 12v+ and the yellow 12v+ OUT to the 12v relay. You can make the yellow send out 12v- if you connect the brown to 12v- but that's not what you need here.
* Wire the relay correctly and it will click on and off when the key fob is swiped.
It was too late to work on anything when I got home so this morning I wanted to test out my keyless ignition system. I bought a few packs of alligator clips from Fry's a few weeks ago and I finally had a working battery so I dove right in.
It worked perfectly
. I posted a wiring diagram earlier in the thread which was mostly correct. I need to change one of the ground connections for the solid state relay, there is no split coming off of the RFID receiver like the instructions showed. Here's the video, excuse the mess I was drinking my morning coffee and had to make space on the table.
http://www.youtube.com/watch?v=NUr6XIznZ3U
Replace the headlight with the switched ignition on circuit and you're in business. Really simple.
The basic rundown of how it works again:
* Connect everything to power and ground
* RFID receiver gets pulse from Key Fob
* RFID unit sends low voltage pulse to the solid state relay
* The SS relay sees the pulse and is programmed to "latch on/off" using the dip switches
* Connect the brown wire to 12v+ and the yellow 12v+ OUT to the 12v relay. You can make the yellow send out 12v- if you connect the brown to 12v- but that's not what you need here.
* Wire the relay correctly and it will click on and off when the key fob is swiped.
Toast
Been Around the Block
Here are some pictures from this weekend.
I made a pan for all the electrical stuff from a scrap piece of sheet metal I got from the local art/scrap place. I'll clean up the edges and use some black door trim on it.
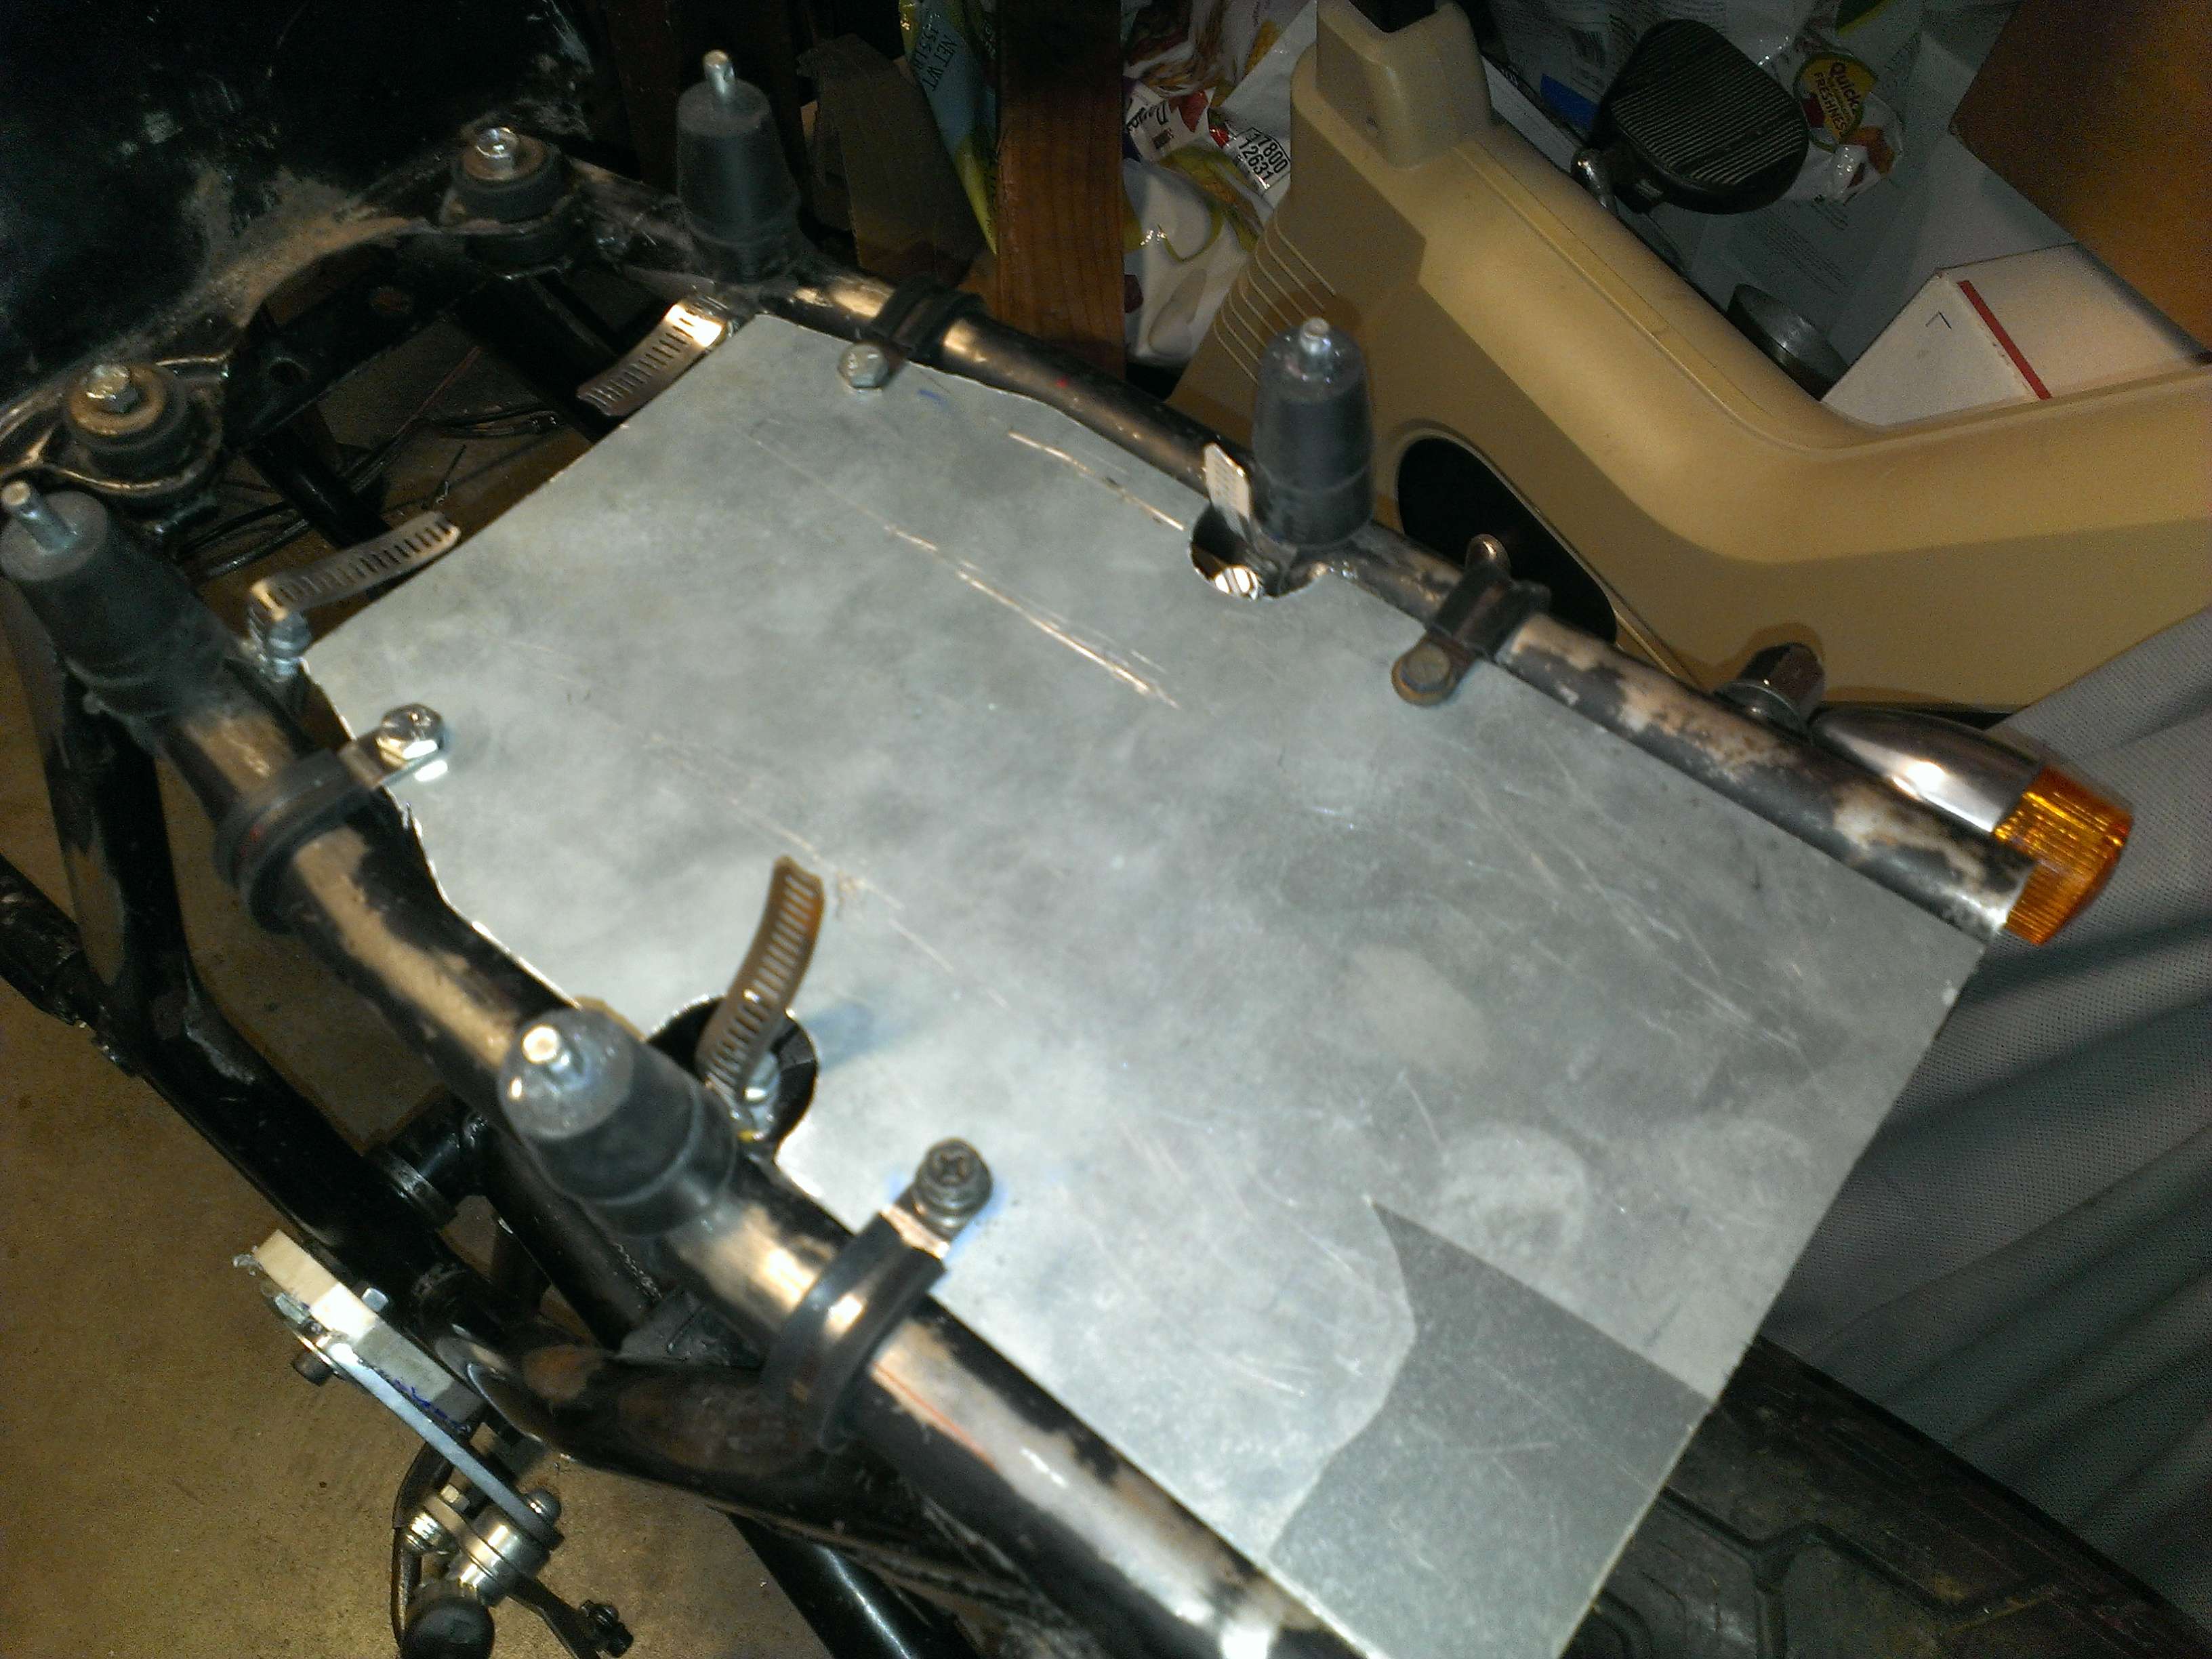
Figuring out where everything will fit
Draping wires. This weekend I want to start cutting wires to fit and testing circuits.
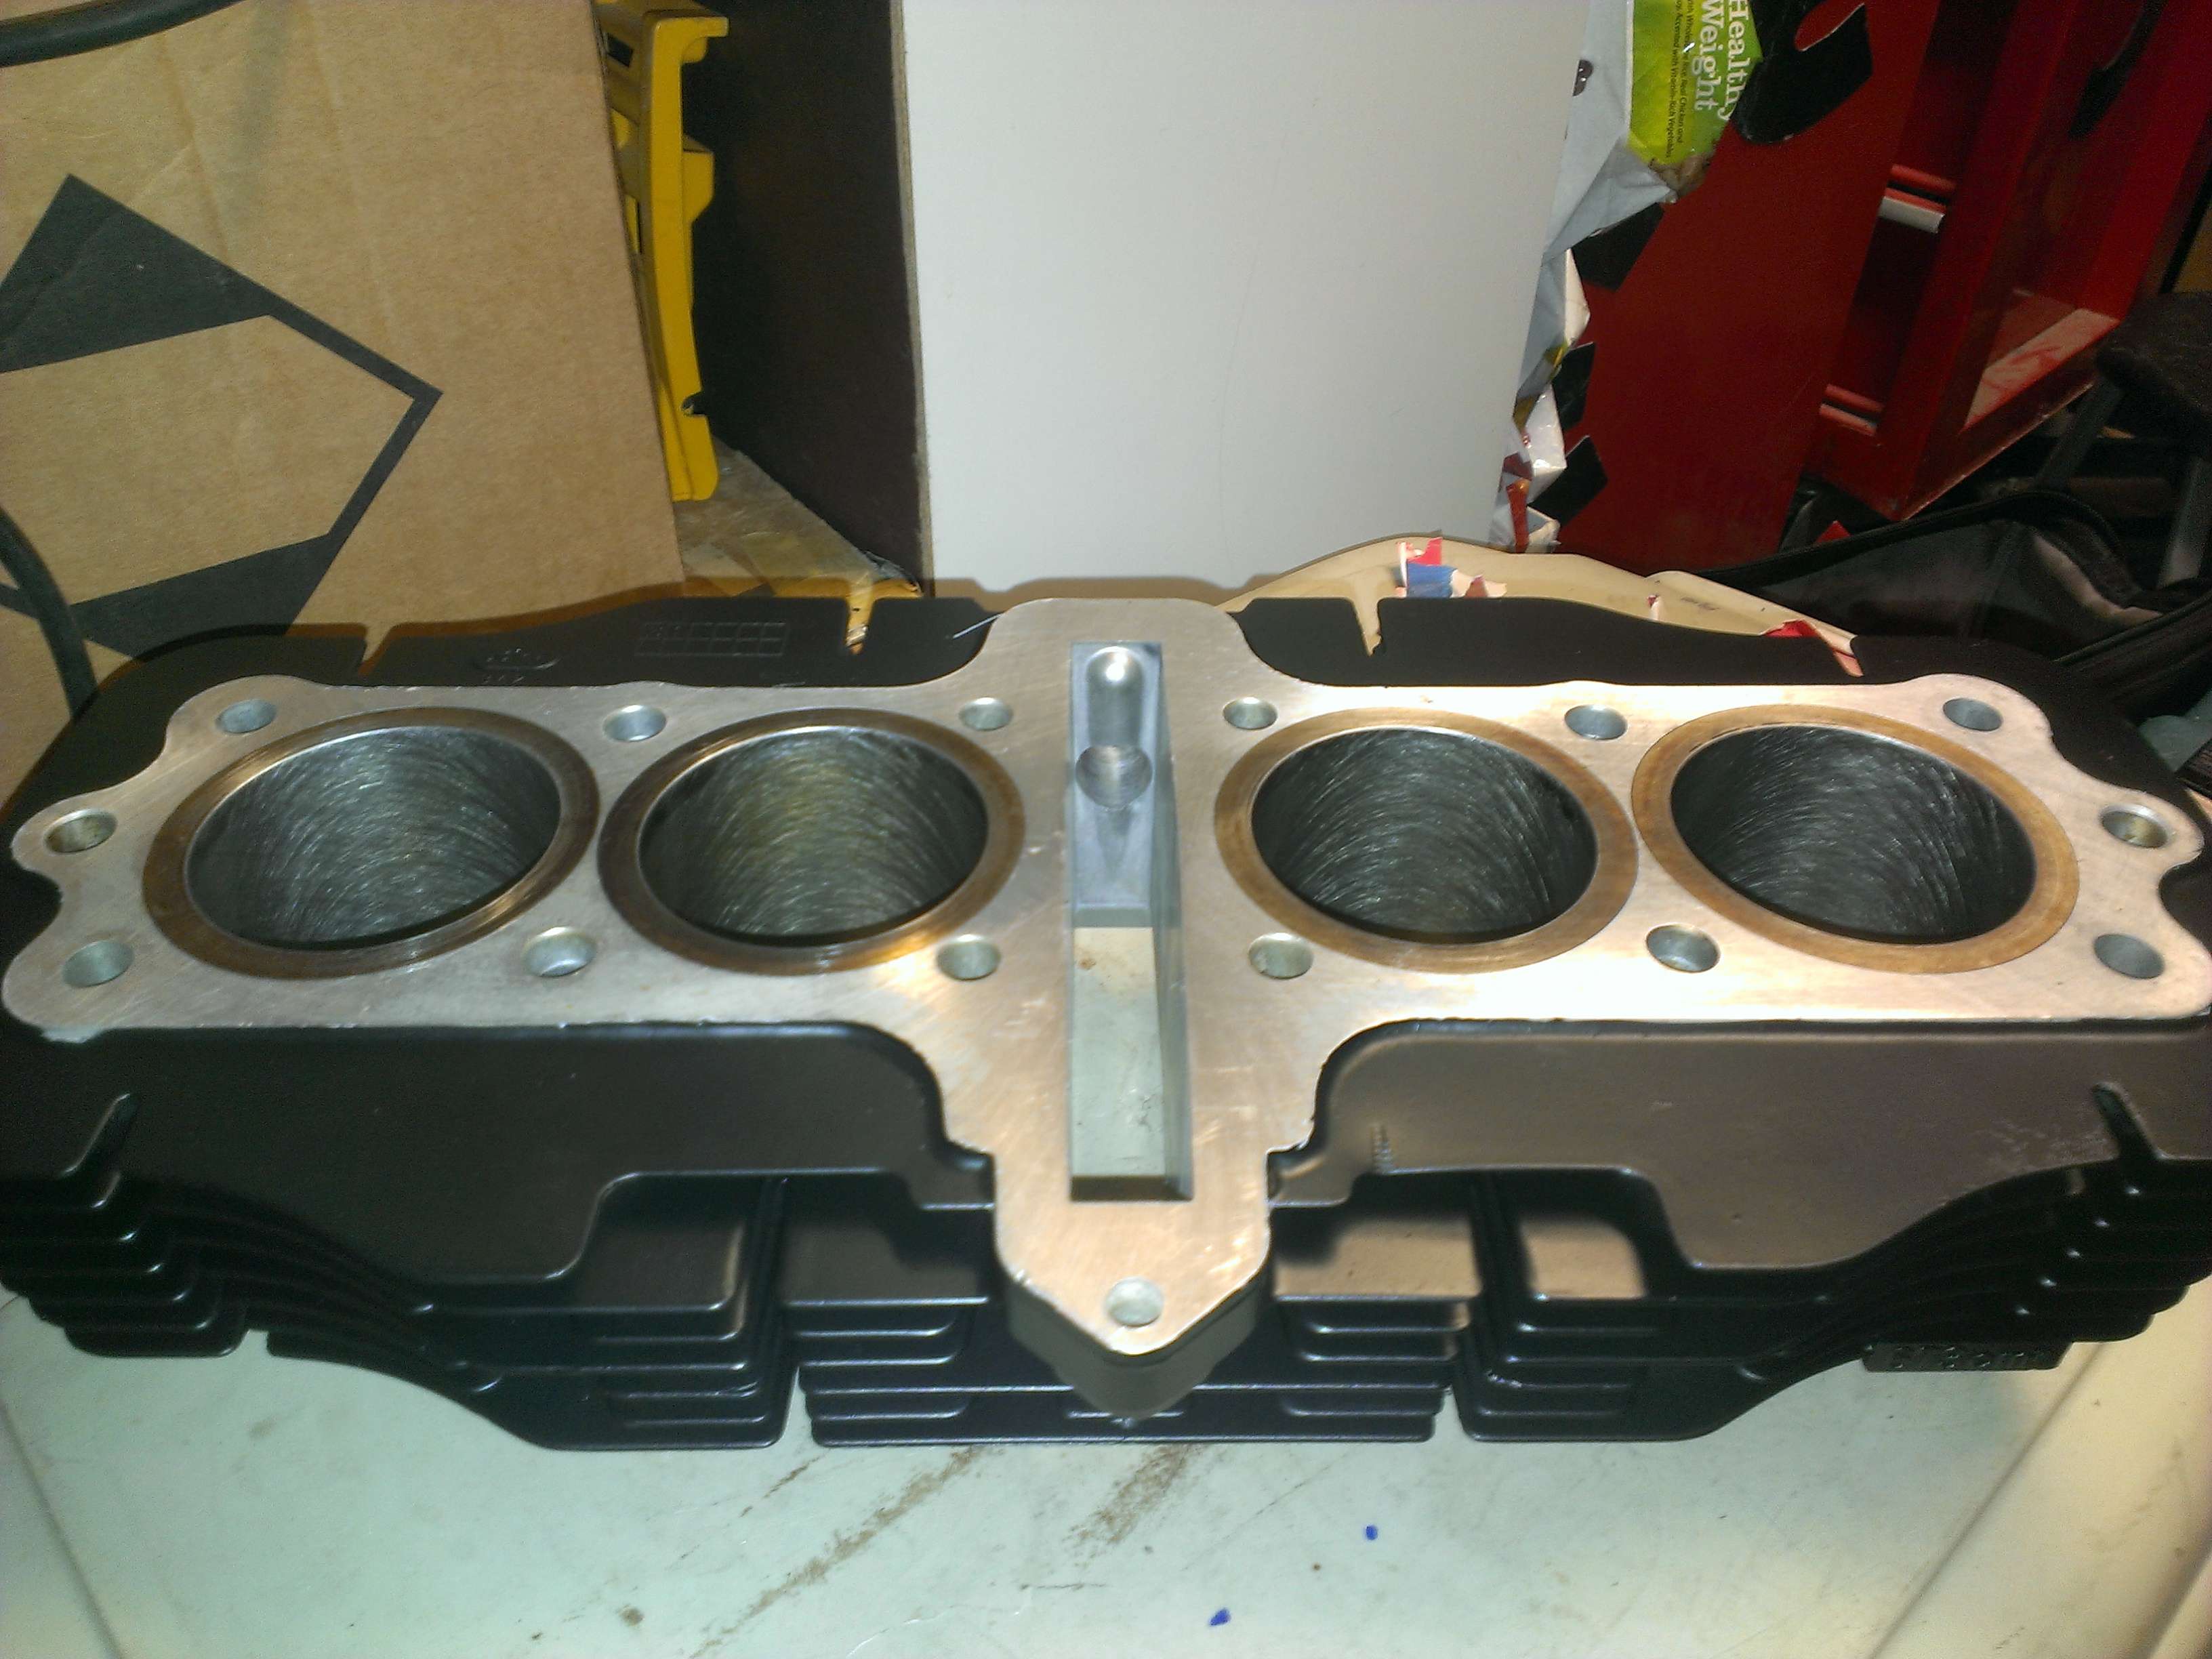
New jugs came in, 9K on these and no pitting. Painted them up and did a light hone.
I made a pan for all the electrical stuff from a scrap piece of sheet metal I got from the local art/scrap place. I'll clean up the edges and use some black door trim on it.
Figuring out where everything will fit
Draping wires. This weekend I want to start cutting wires to fit and testing circuits.
New jugs came in, 9K on these and no pitting. Painted them up and did a light hone.
Keiff Hardcore
Loves anything that burns oil
i just read through the whole thread.
i like how your combining different engines to get a performance increase. and it was a good idea to replace the jugs, as those pits will eat the piston rings and eventually cause oil blow by.
i like how your combining different engines to get a performance increase. and it was a good idea to replace the jugs, as those pits will eat the piston rings and eventually cause oil blow by.
Toast
Been Around the Block
Thanks guys , all the comments are really appreciated. I've worked on cars before (mostly Datsun Z cars) and when I bought this bike I was a total bike newb. This whole project has been one big learning experience, most of the stuff I've been doing was mostly just to try and do it ;D.
I'm gonna be running the bike as kickstart only, so the battery is mostly there to provide juice for the RFID system and my Acewell gauge. If I was using a starter that would be a different story, I don't think I would trust it to start the bike since it's only 4amps.
, all the comments are really appreciated. I've worked on cars before (mostly Datsun Z cars) and when I bought this bike I was a total bike newb. This whole project has been one big learning experience, most of the stuff I've been doing was mostly just to try and do it ;D. 2en0 said:Hi Toast, you are doing a great job!
Is de "BikeMaster" powerfull enough to start the engine?
I'm gonna be running the bike as kickstart only, so the battery is mostly there to provide juice for the RFID system and my Acewell gauge. If I was using a starter that would be a different story, I don't think I would trust it to start the bike since it's only 4amps.
Toast
Been Around the Block
I was wondering if I could get some input from you guys. I have been going back and forth on what kind of shock I should go with... I can't decide :-\
It has a fully adjustable gixxer front and I want to track day this bike. I've been looking at so many shock models it makes my head spin. I at least want threaded pre-load and rebound adjustment so I've been looking at the YSS Z302 and the Hagon Nitro shocks mostly. Works and Ohlins are way past what I would be willing to spend. I can justify $500 for some GOOD (mostly) adjustable shocks but I feel like if I spend that much why not just pay the extra dough for compression adjustment.
YSS Z-302 $459
- rebound and preload

Hagon Nitro $494
- rebound and preload

ORR
YSS G-302 TRCL at a whopping $699 a pair
- Rebound
- Compression
- Preload

I can buy it with my tax return but I don't know if I can stomach spending as much money on a pair of shocks as I got the bike for :-[ . Although I've already gone really far on this project whats another $200 bucks...
It has a fully adjustable gixxer front and I want to track day this bike. I've been looking at so many shock models it makes my head spin. I at least want threaded pre-load and rebound adjustment so I've been looking at the YSS Z302 and the Hagon Nitro shocks mostly. Works and Ohlins are way past what I would be willing to spend. I can justify $500 for some GOOD (mostly) adjustable shocks but I feel like if I spend that much why not just pay the extra dough for compression adjustment.
YSS Z-302 $459
- rebound and preload
Hagon Nitro $494
- rebound and preload
ORR
YSS G-302 TRCL at a whopping $699 a pair
- Rebound
- Compression
- Preload
I can buy it with my tax return but I don't know if I can stomach spending as much money on a pair of shocks as I got the bike for :-[ . Although I've already gone really far on this project whats another $200 bucks...
Big R
Heaven is so far away.
Toast, I sent a link to your thread to my local suspension guru, and here's what he said:
Ive been following his thread. Imho he should spend the extra money on the fully adjustable shocks to match the front. The weak link will probably be the frame and swingarm at that point.
Hope that helps!
Ive been following his thread. Imho he should spend the extra money on the fully adjustable shocks to match the front. The weak link will probably be the frame and swingarm at that point.
Hope that helps!
Toast
Been Around the Block
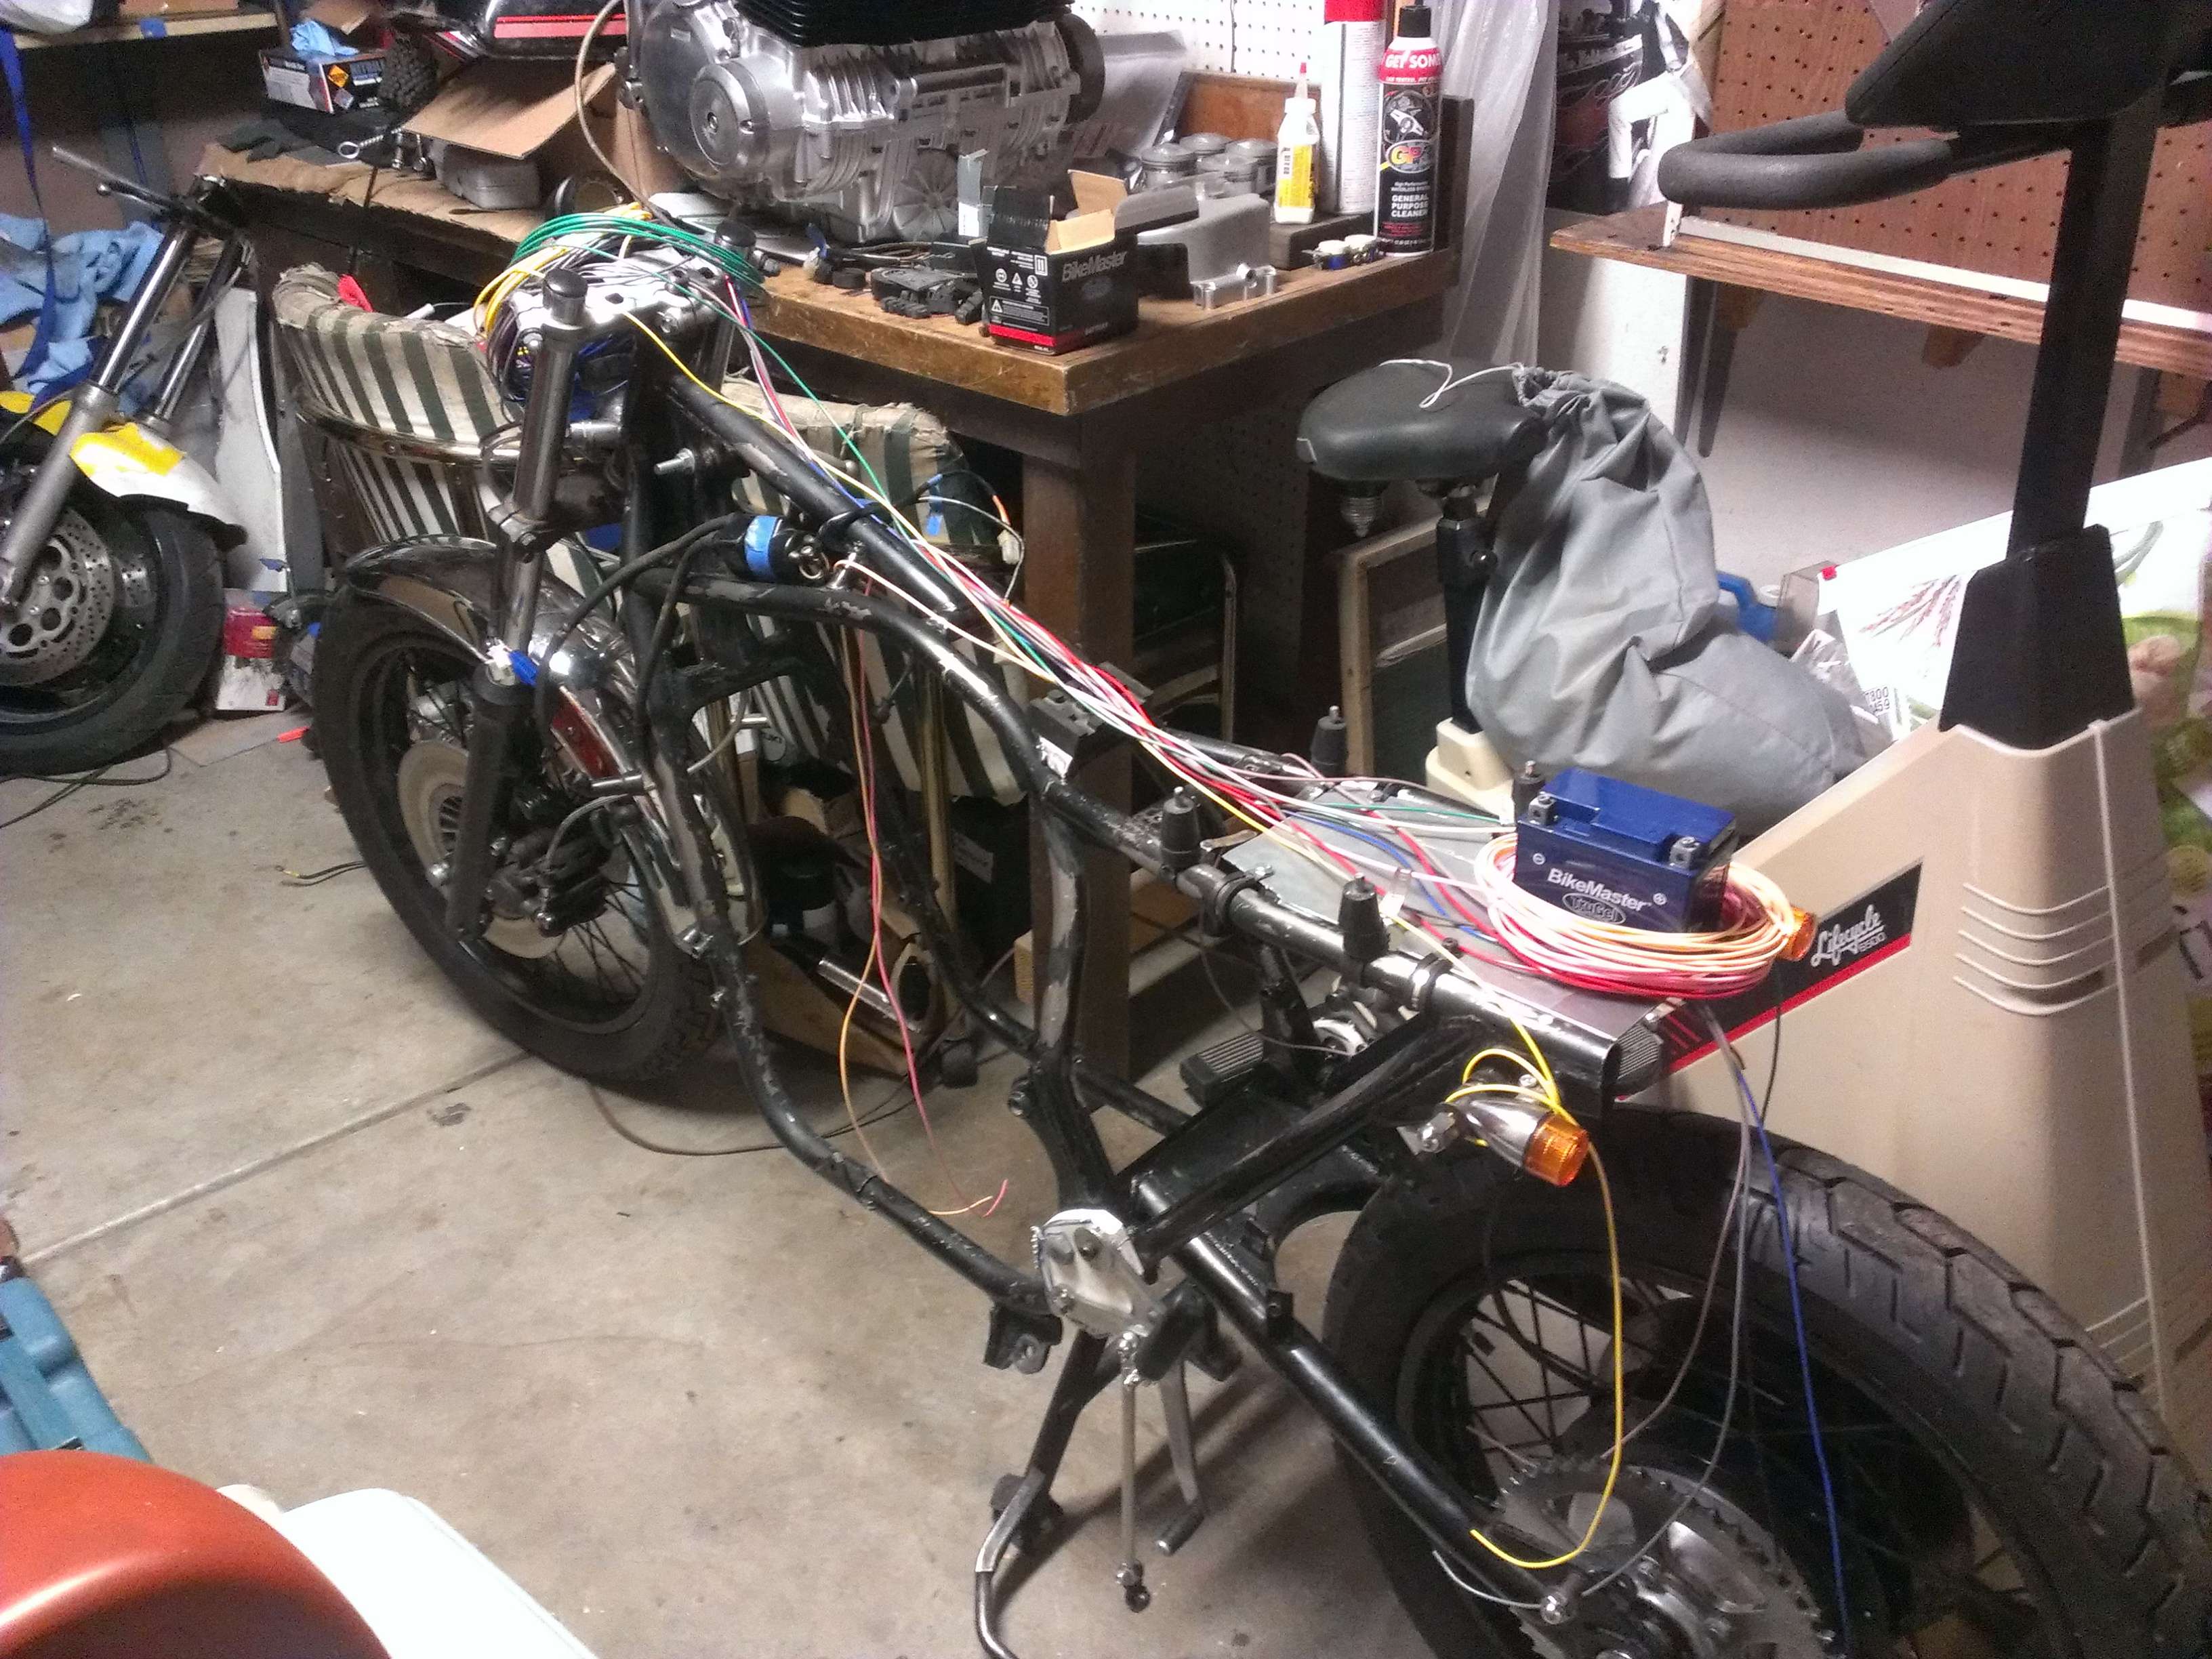
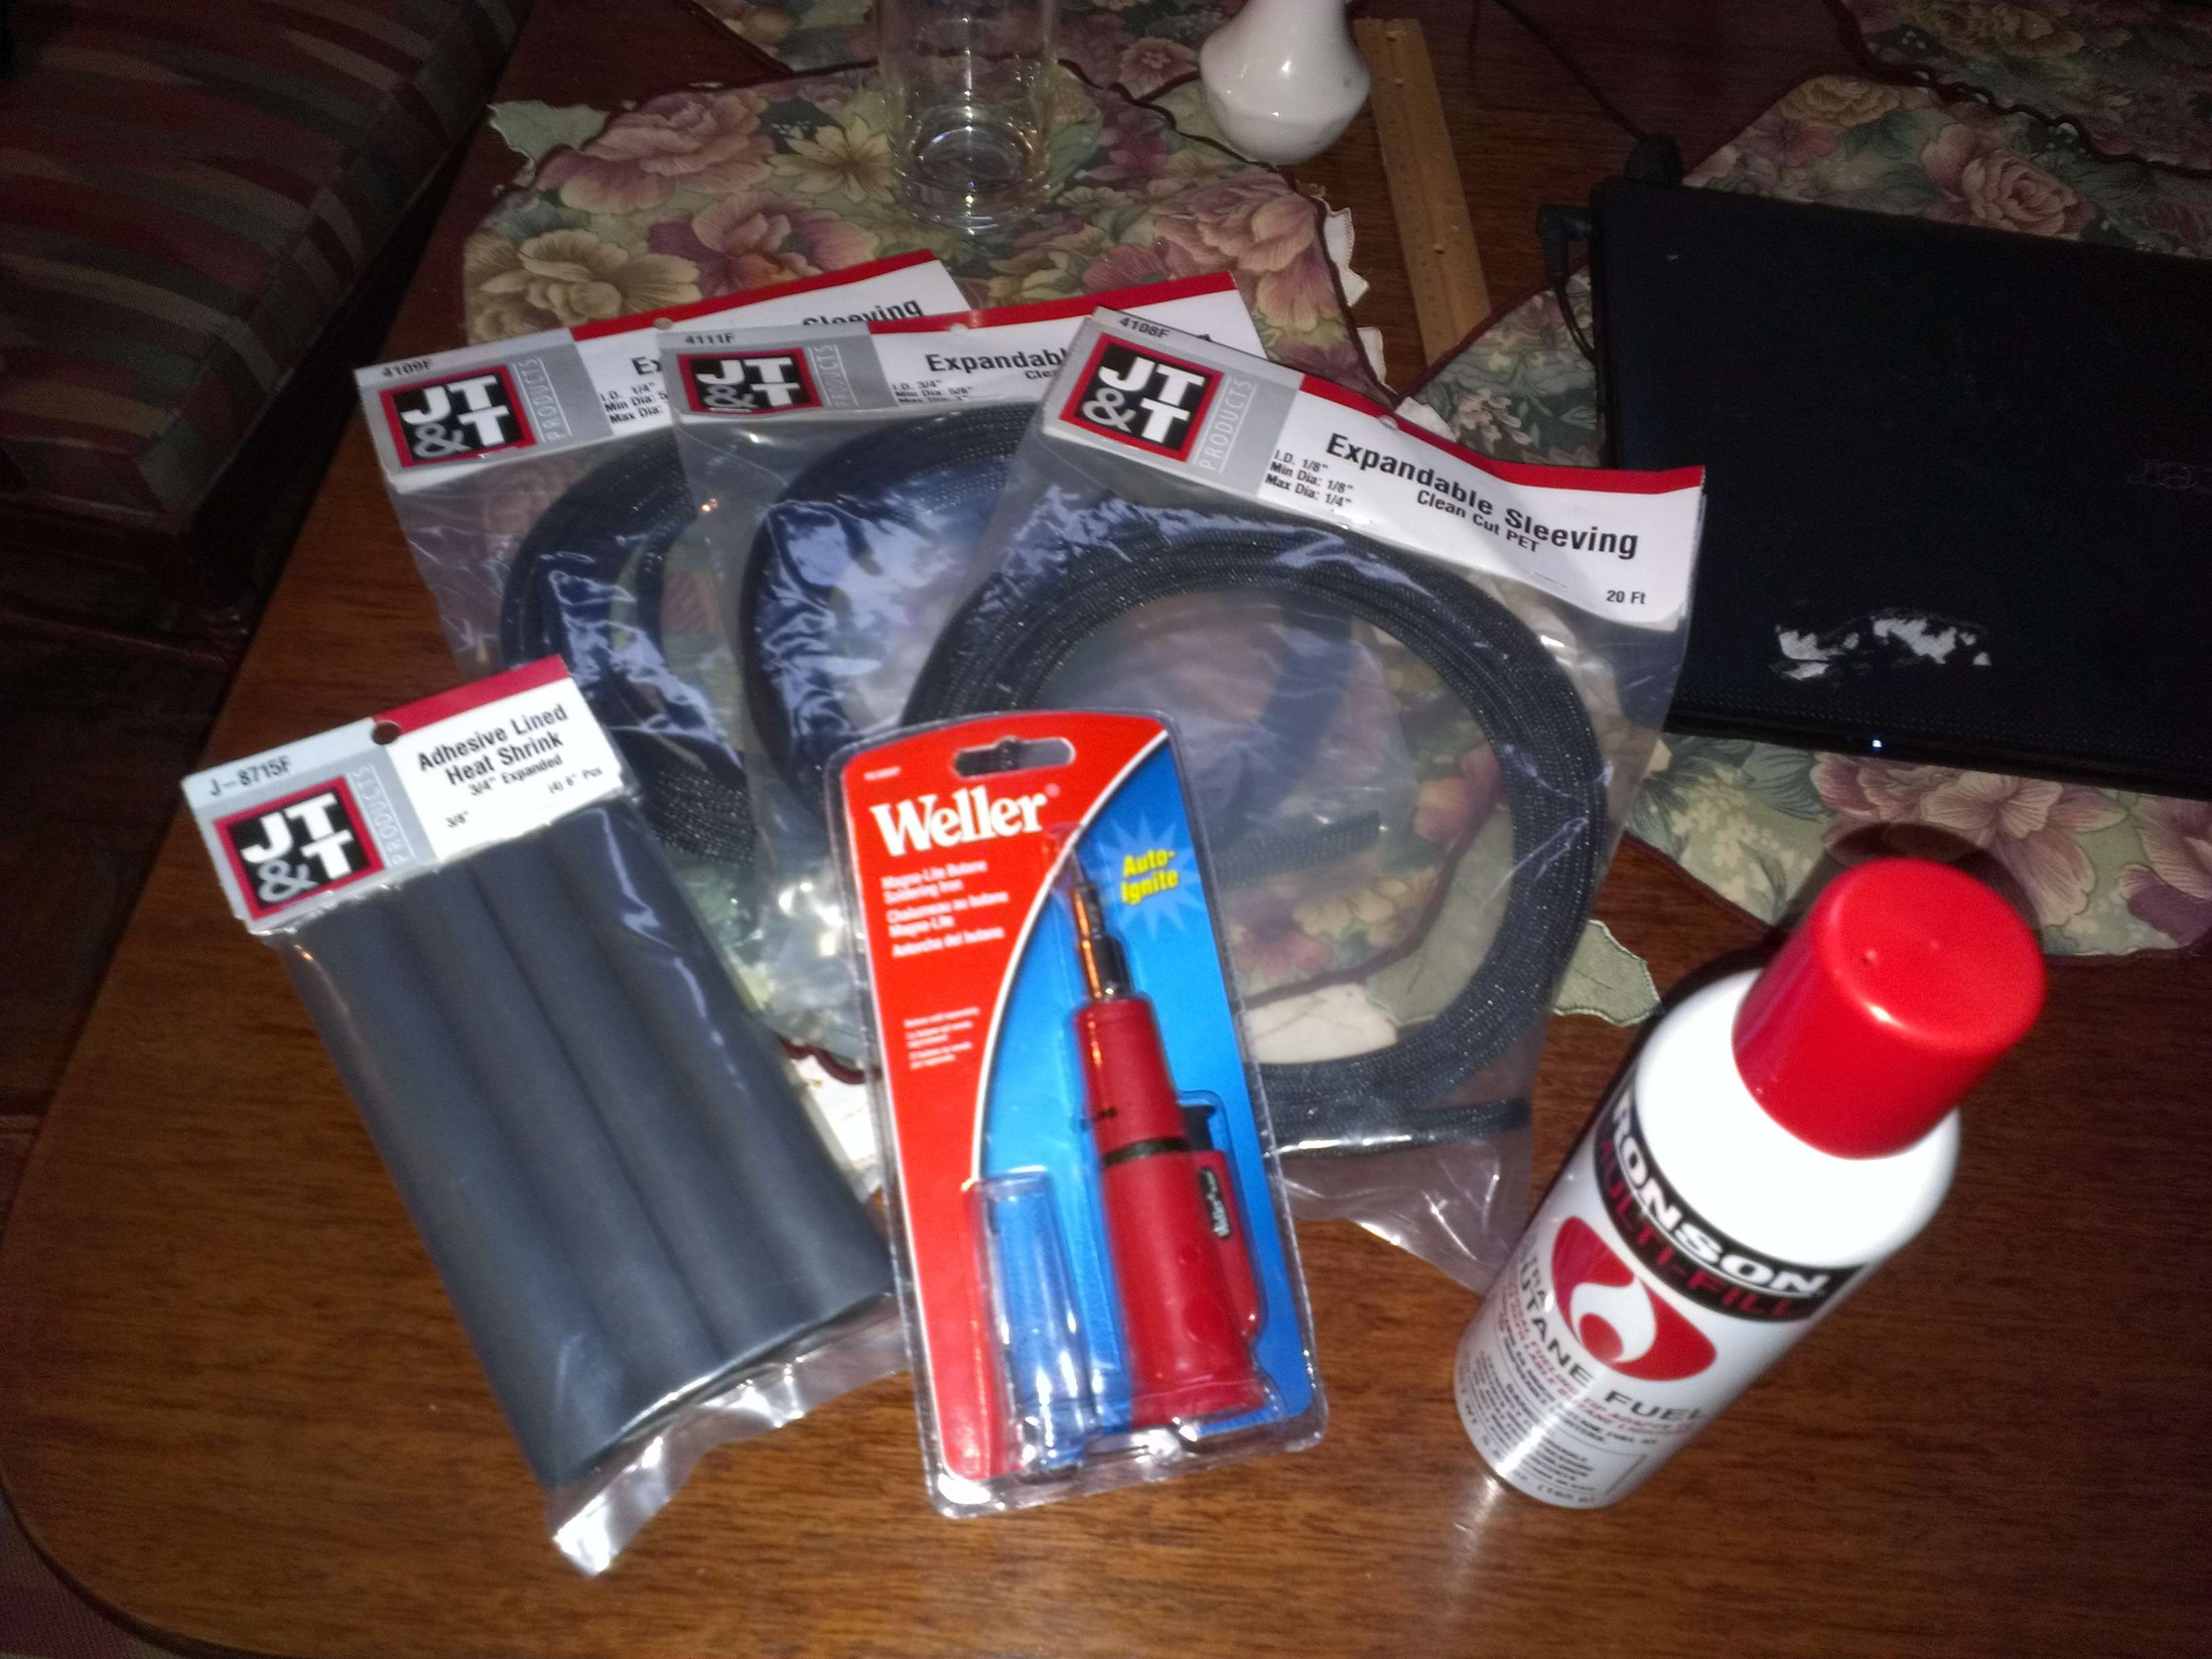
I had some family stuff this weekend on Easter Sunday so I only had Saturday to really get any work done on the bike. Luckily I had enough cash to get my wiring harness stuff from Frys on Friday.
Btw the clean cut nylon sleeving they sell is really high quality for the price. It's much better than the Techflex stuff, you can stuff more wires in it before the colors show though and it's less prone to fraying on the ends (before you heat shrink the ends).
I got a bunch of the sleeving, some larger heat shrink with the glue lining (it's only 2:1, I'd like 3:1 though but no luck). I picked up a little butane torch/soldering iron too, they're pretty handy because you can adjust the heat and you don't need to drag around a cord.
Saturday was a looooong day, I got home at noon and spent 9 hours straight working on the harness.
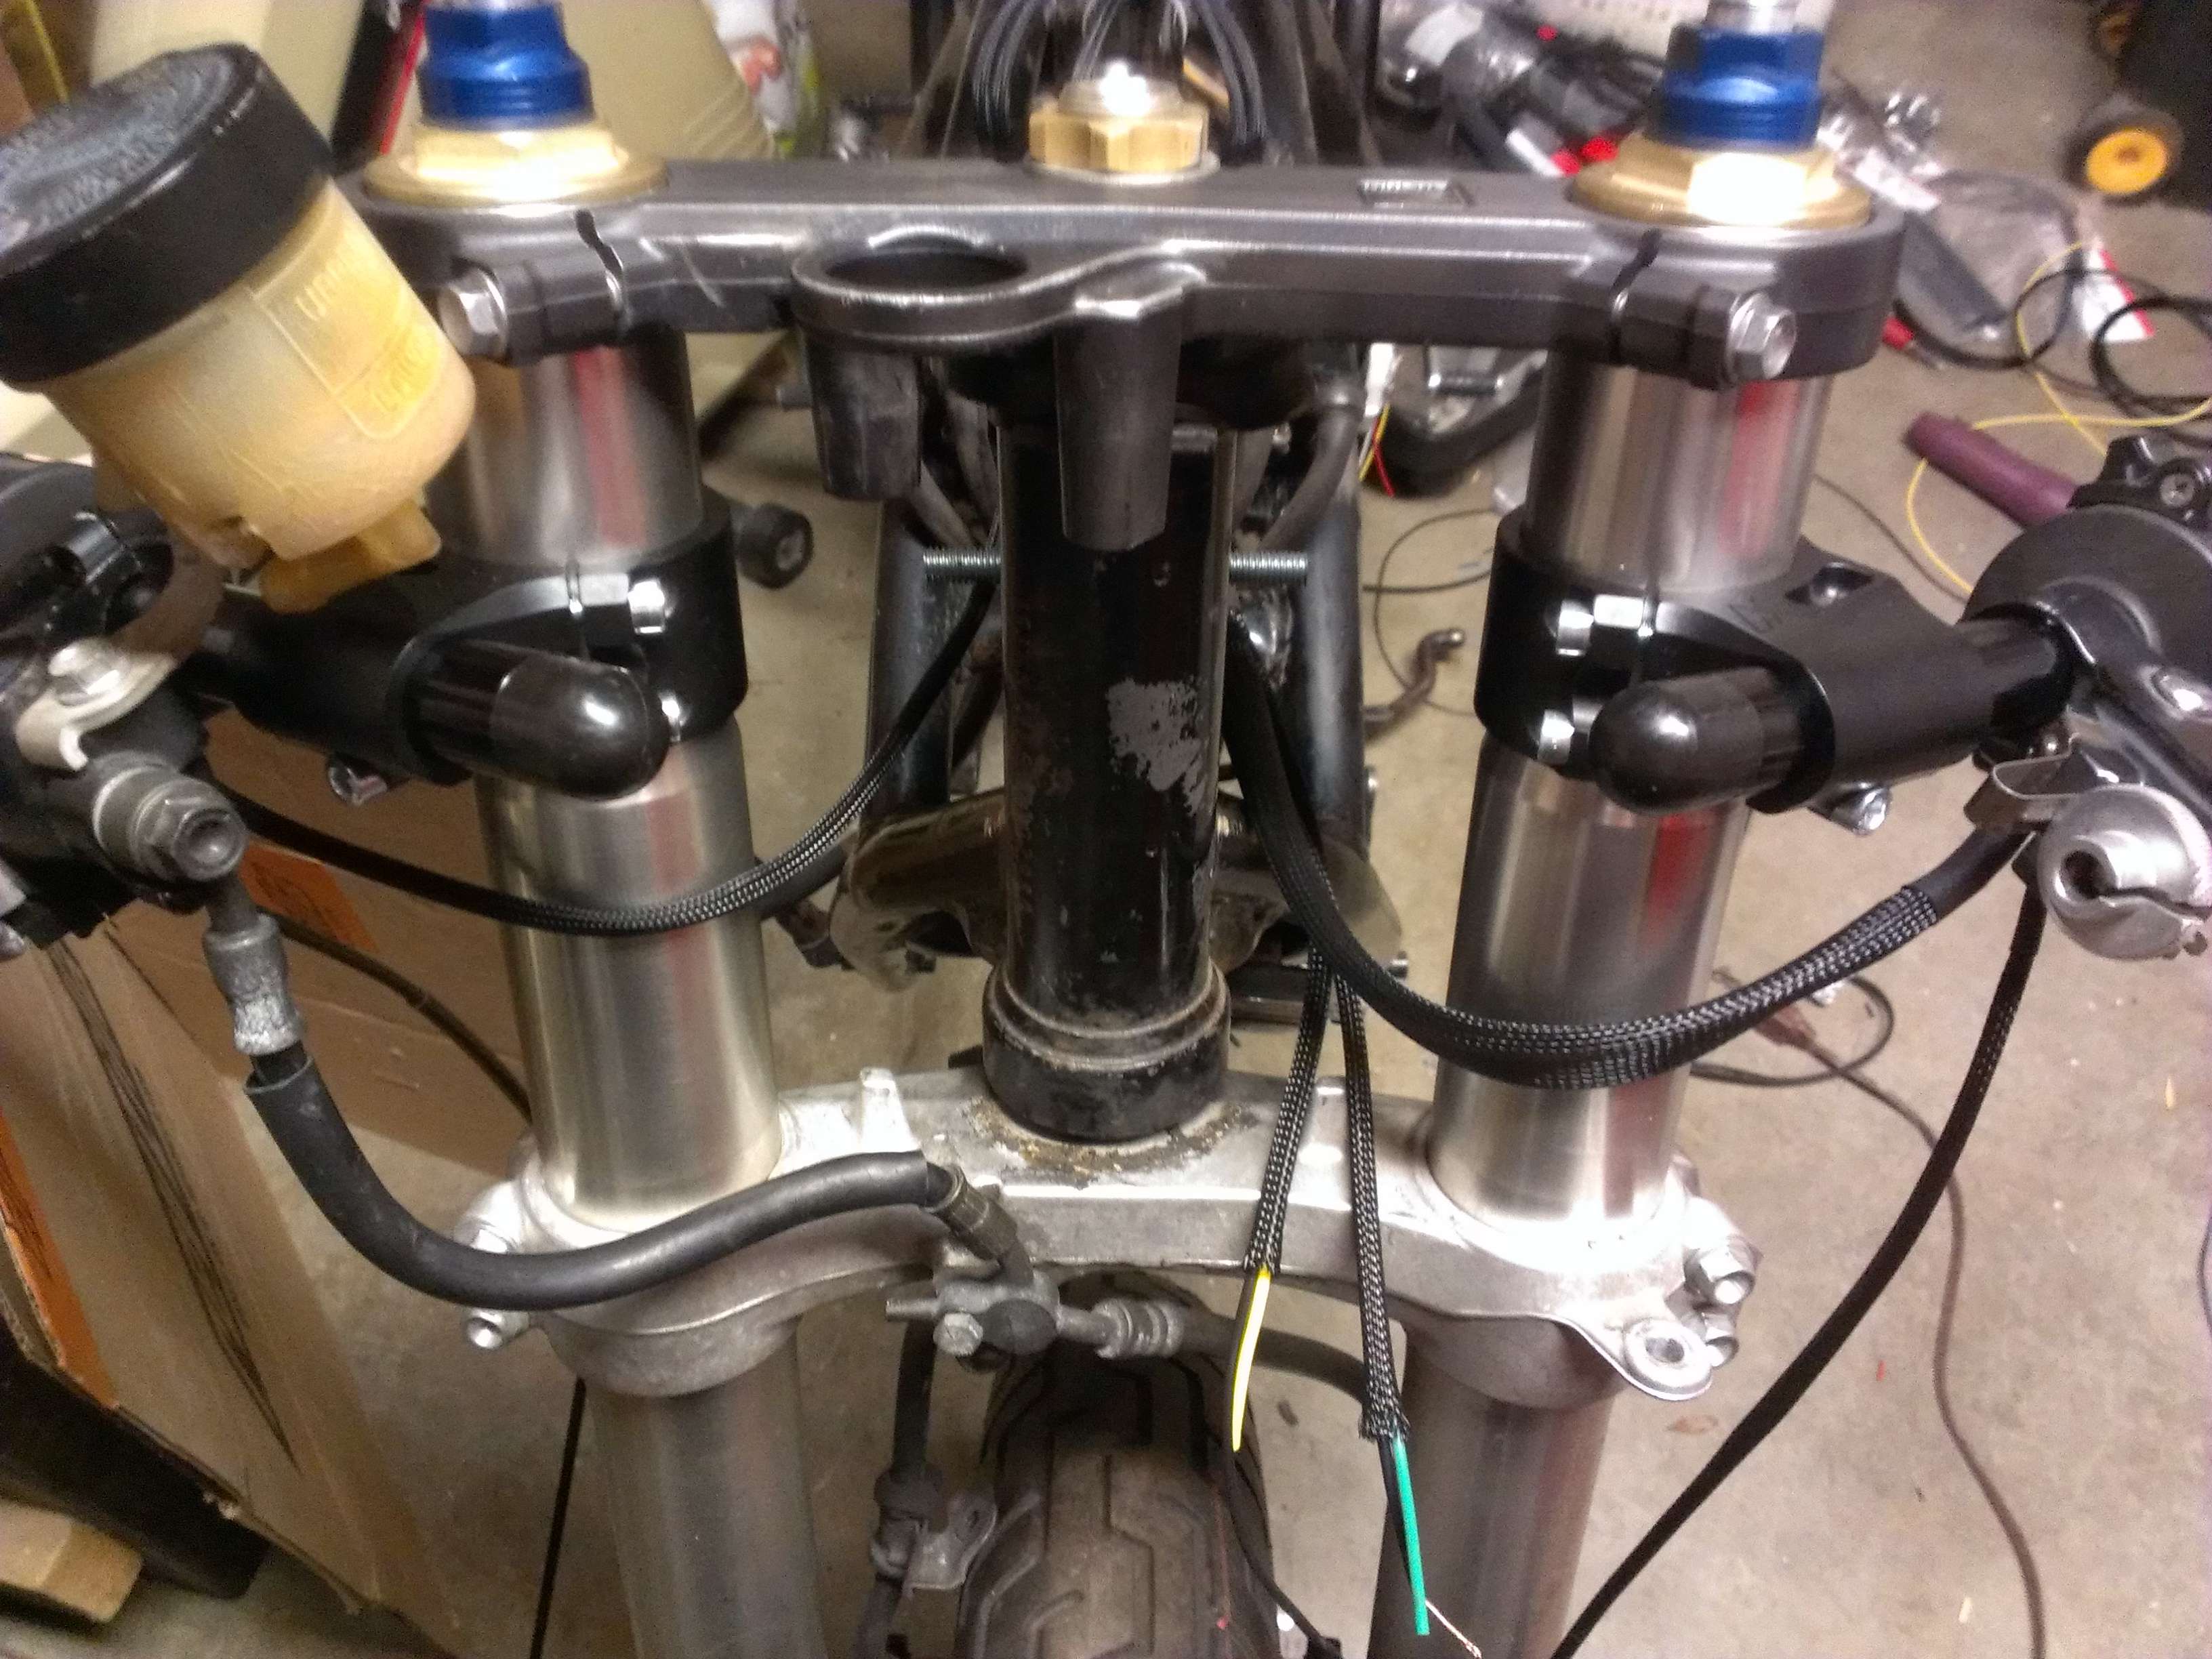
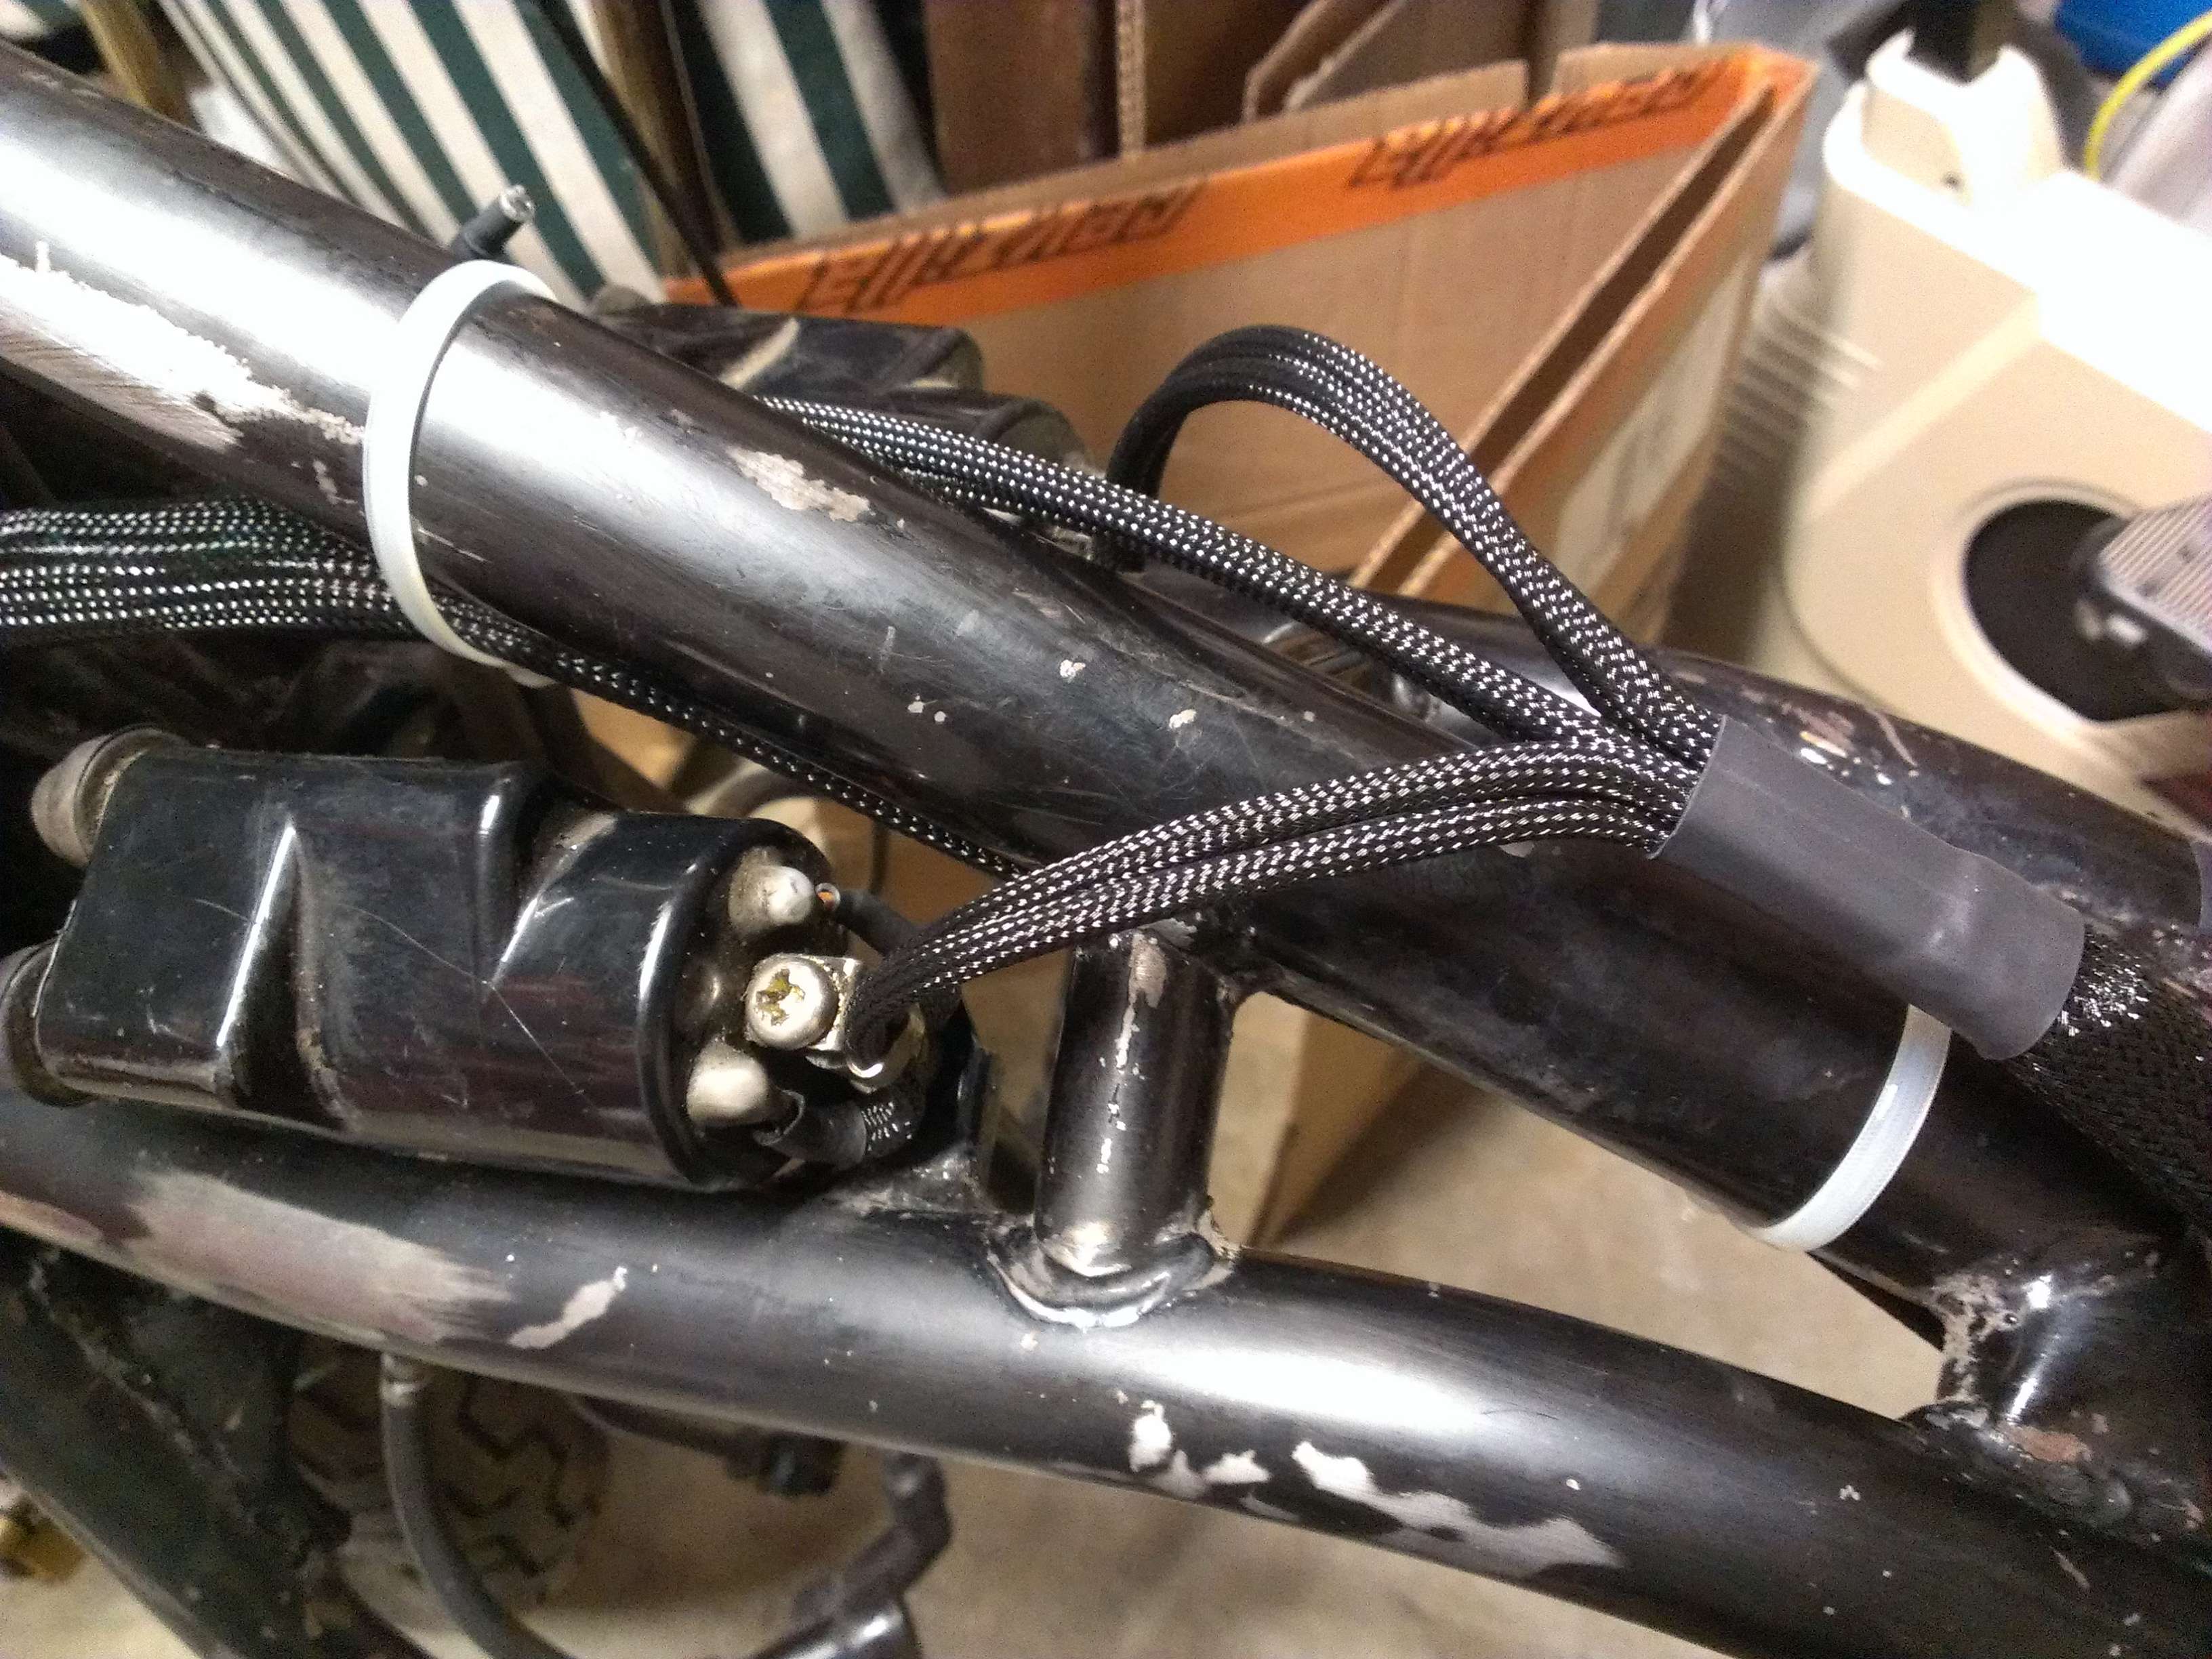
Starting off working front to back, from the hand controls
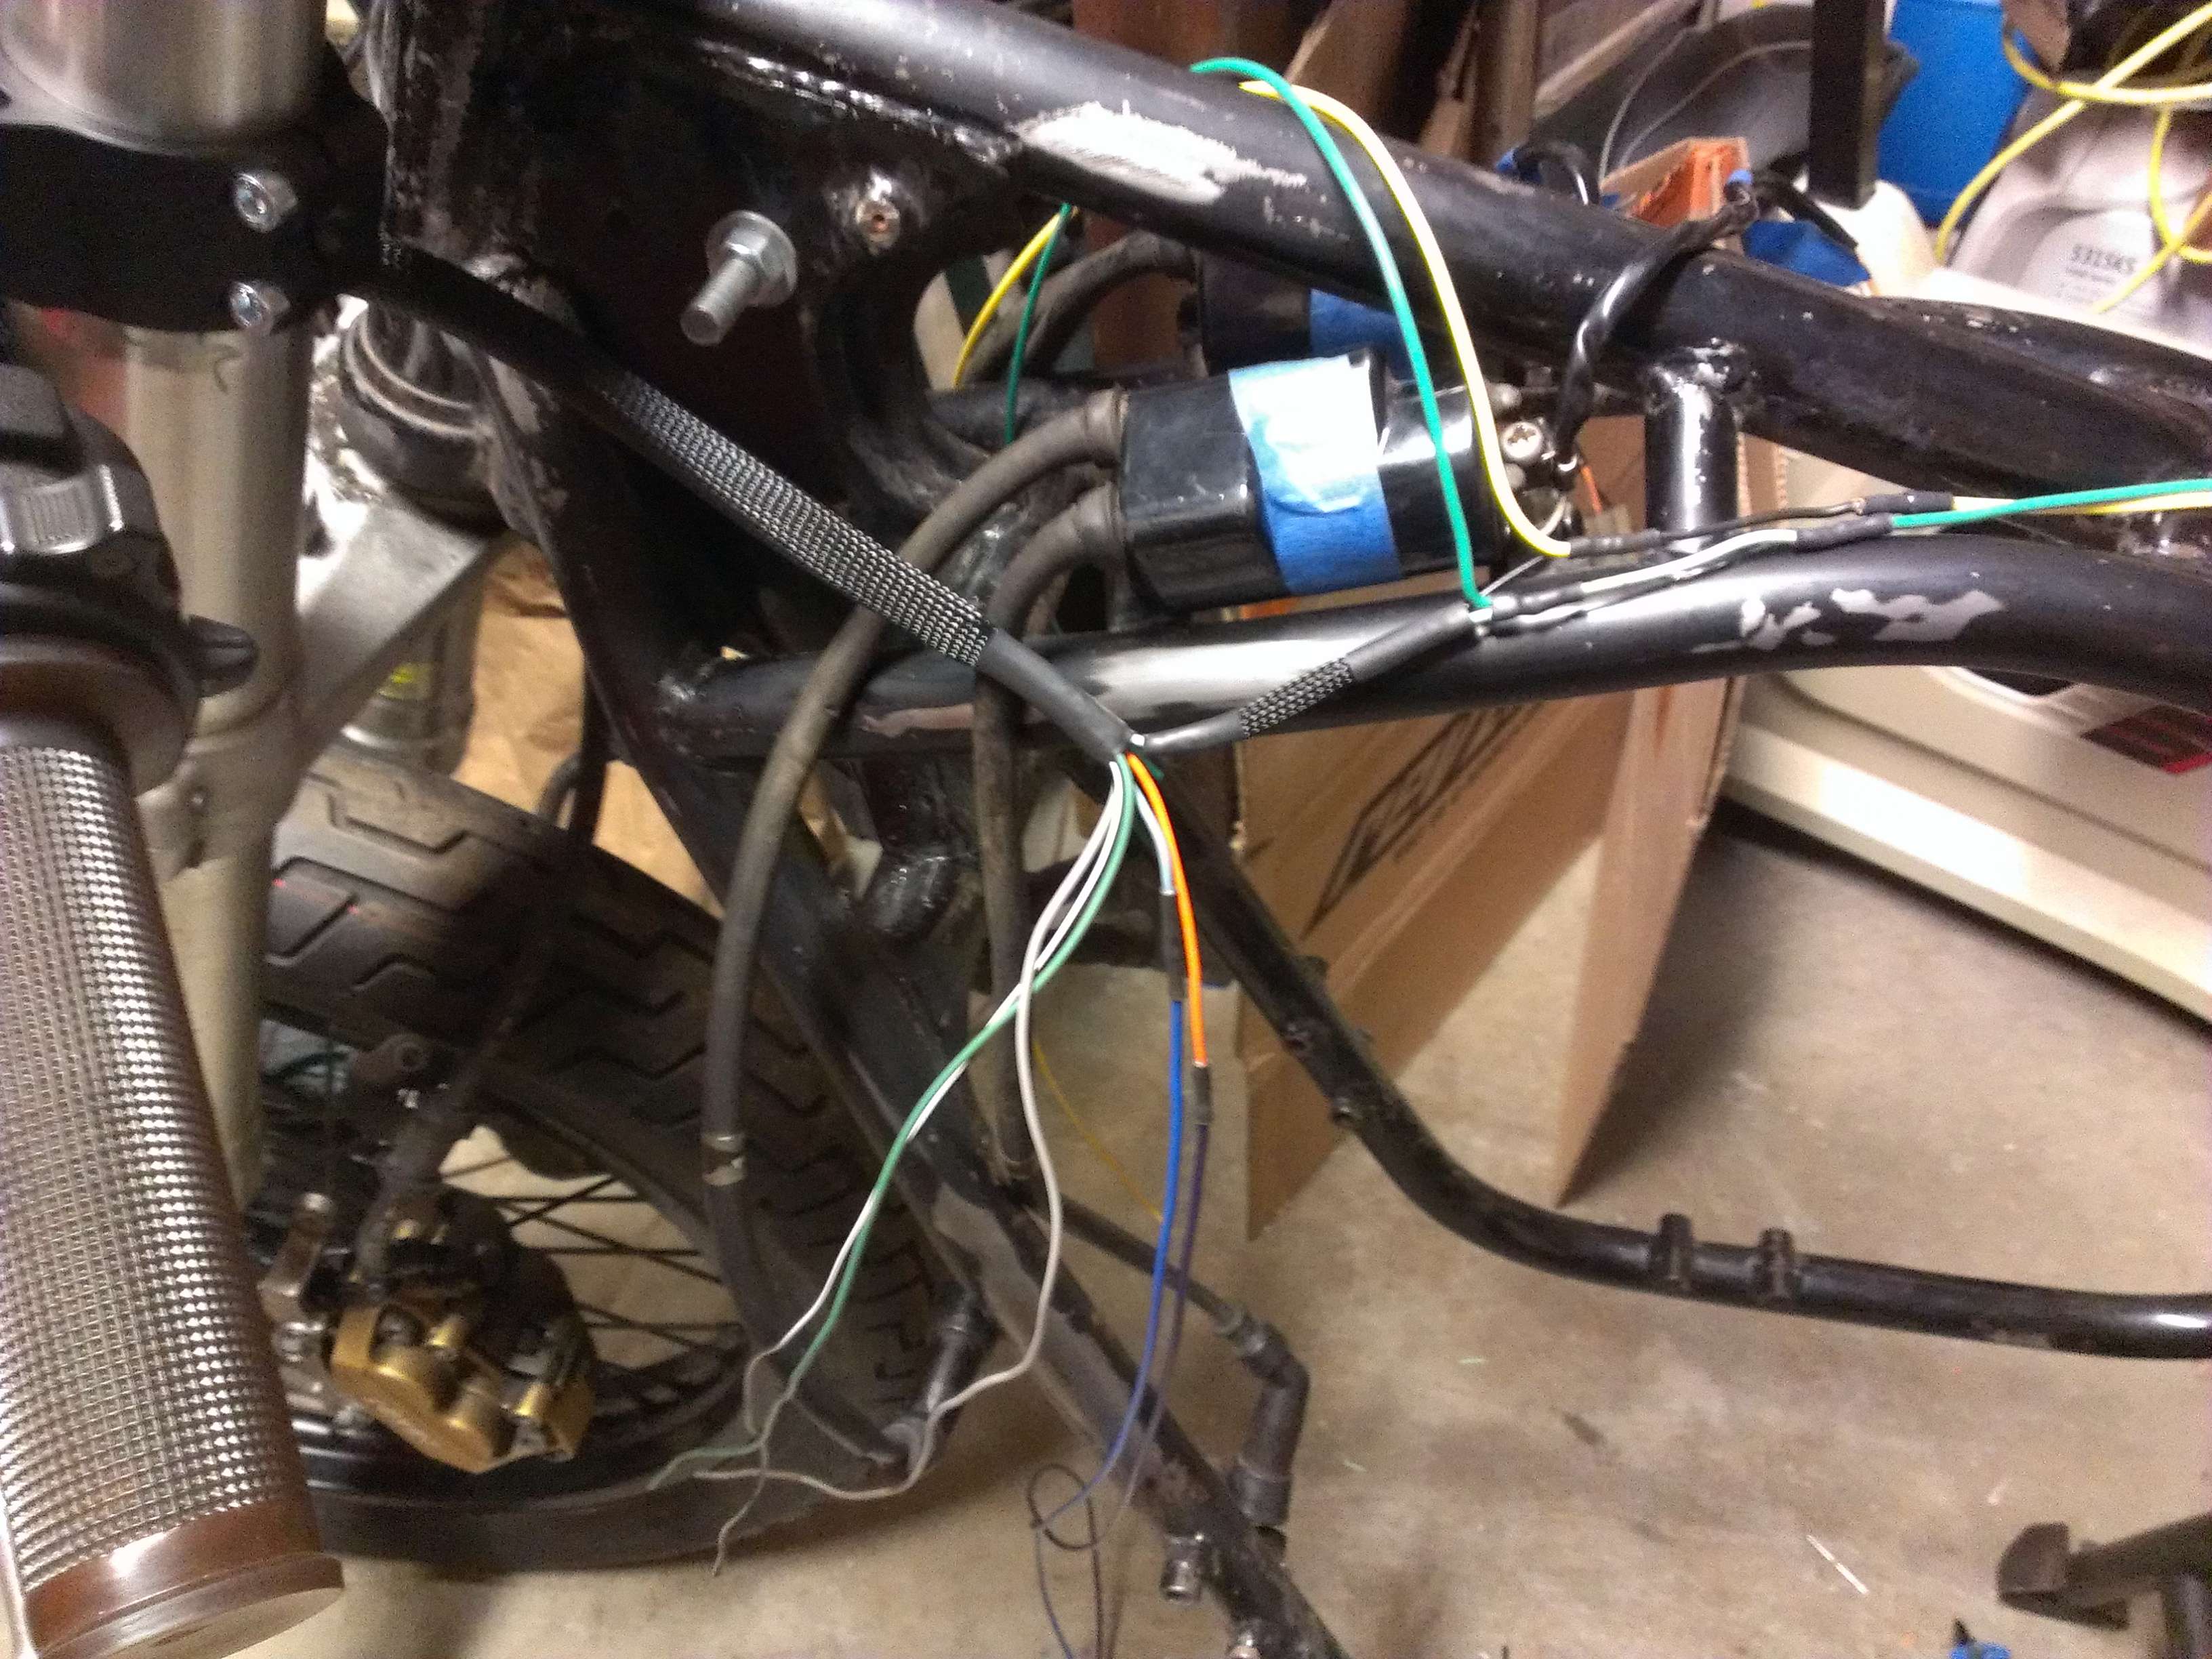
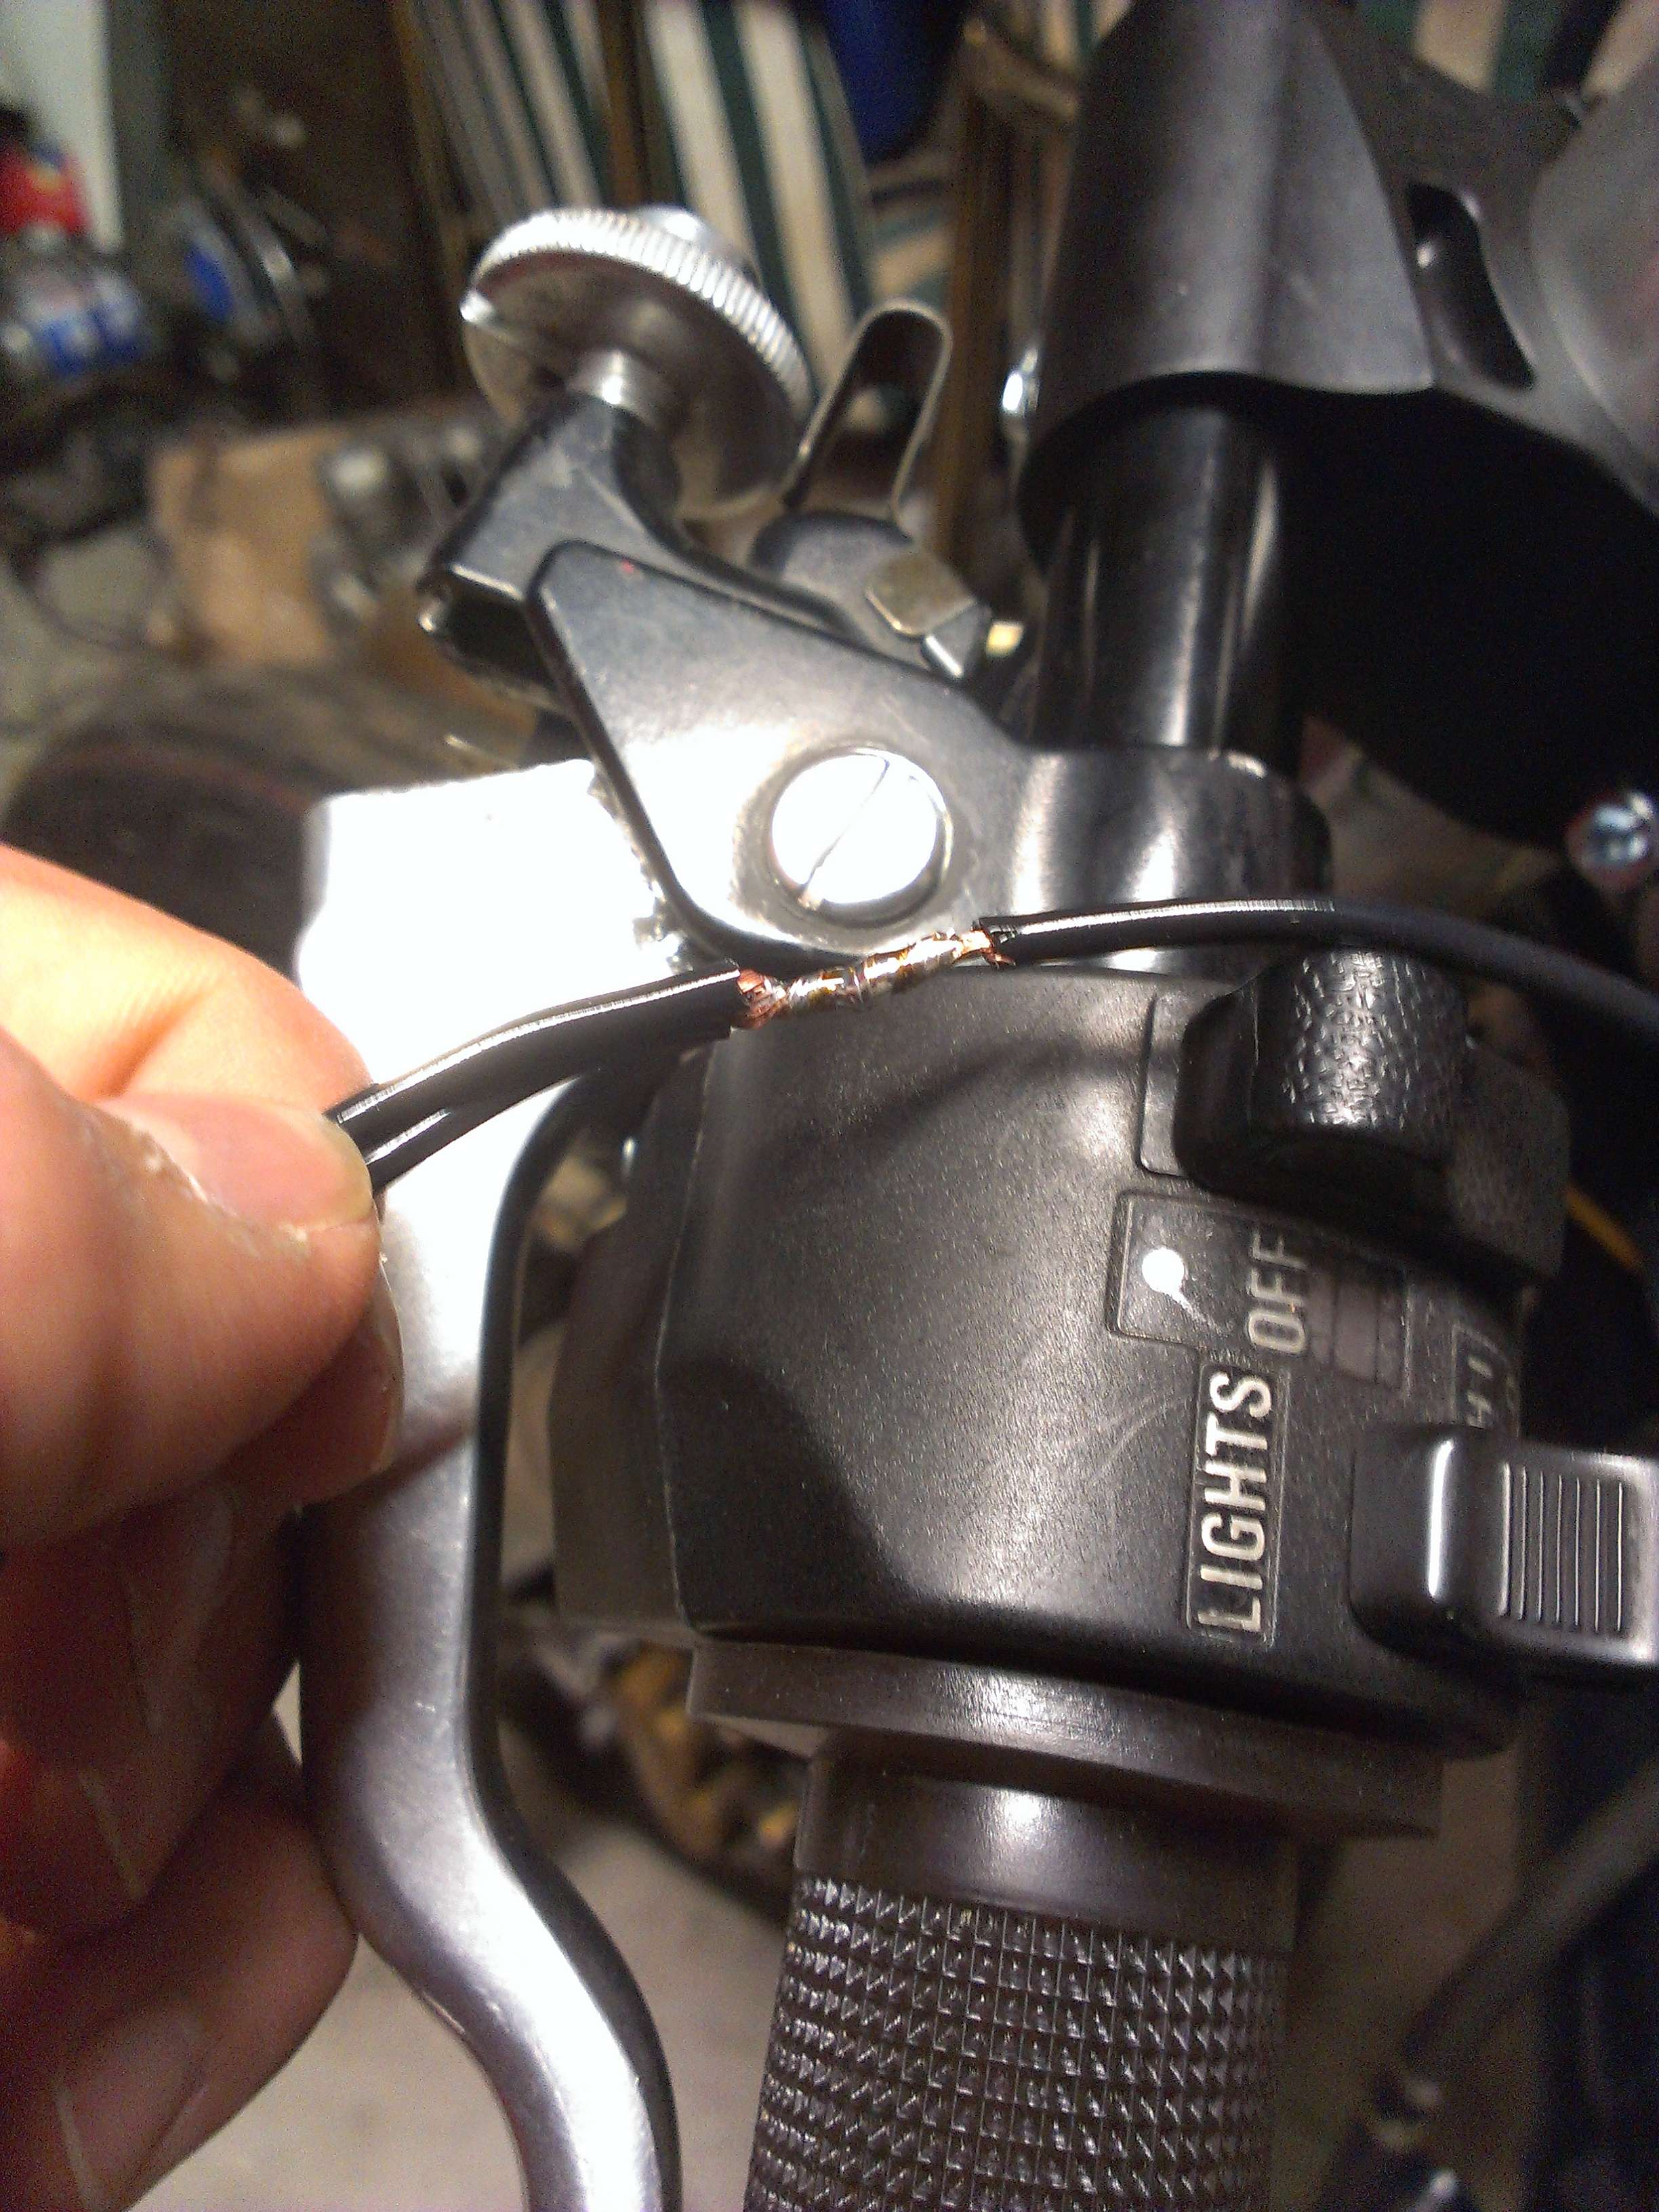
I didn't take many pictures as I was working on it, it was mostly just routing, soldering and heat shrinking. Once I'm done with this I shouldn't have any more wiring issues. Btw if you're gonna solder get good rosin solder and flux!
I tried to use the Western Union Splice as much as I could
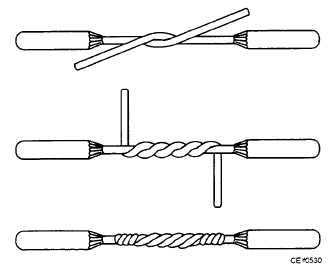
Apply some melted solder (not too much, not too little) onto the joint with flux, then apply heat with the soldering iron and you'll see the flux start to quickly bubble and solder will get instantly sucked into the fibers. I think they came out pretty good. I had some good Sumitube glue heat shrink I picked up from Eastern Beaver to put over the soldered joints. They should be totally solid.
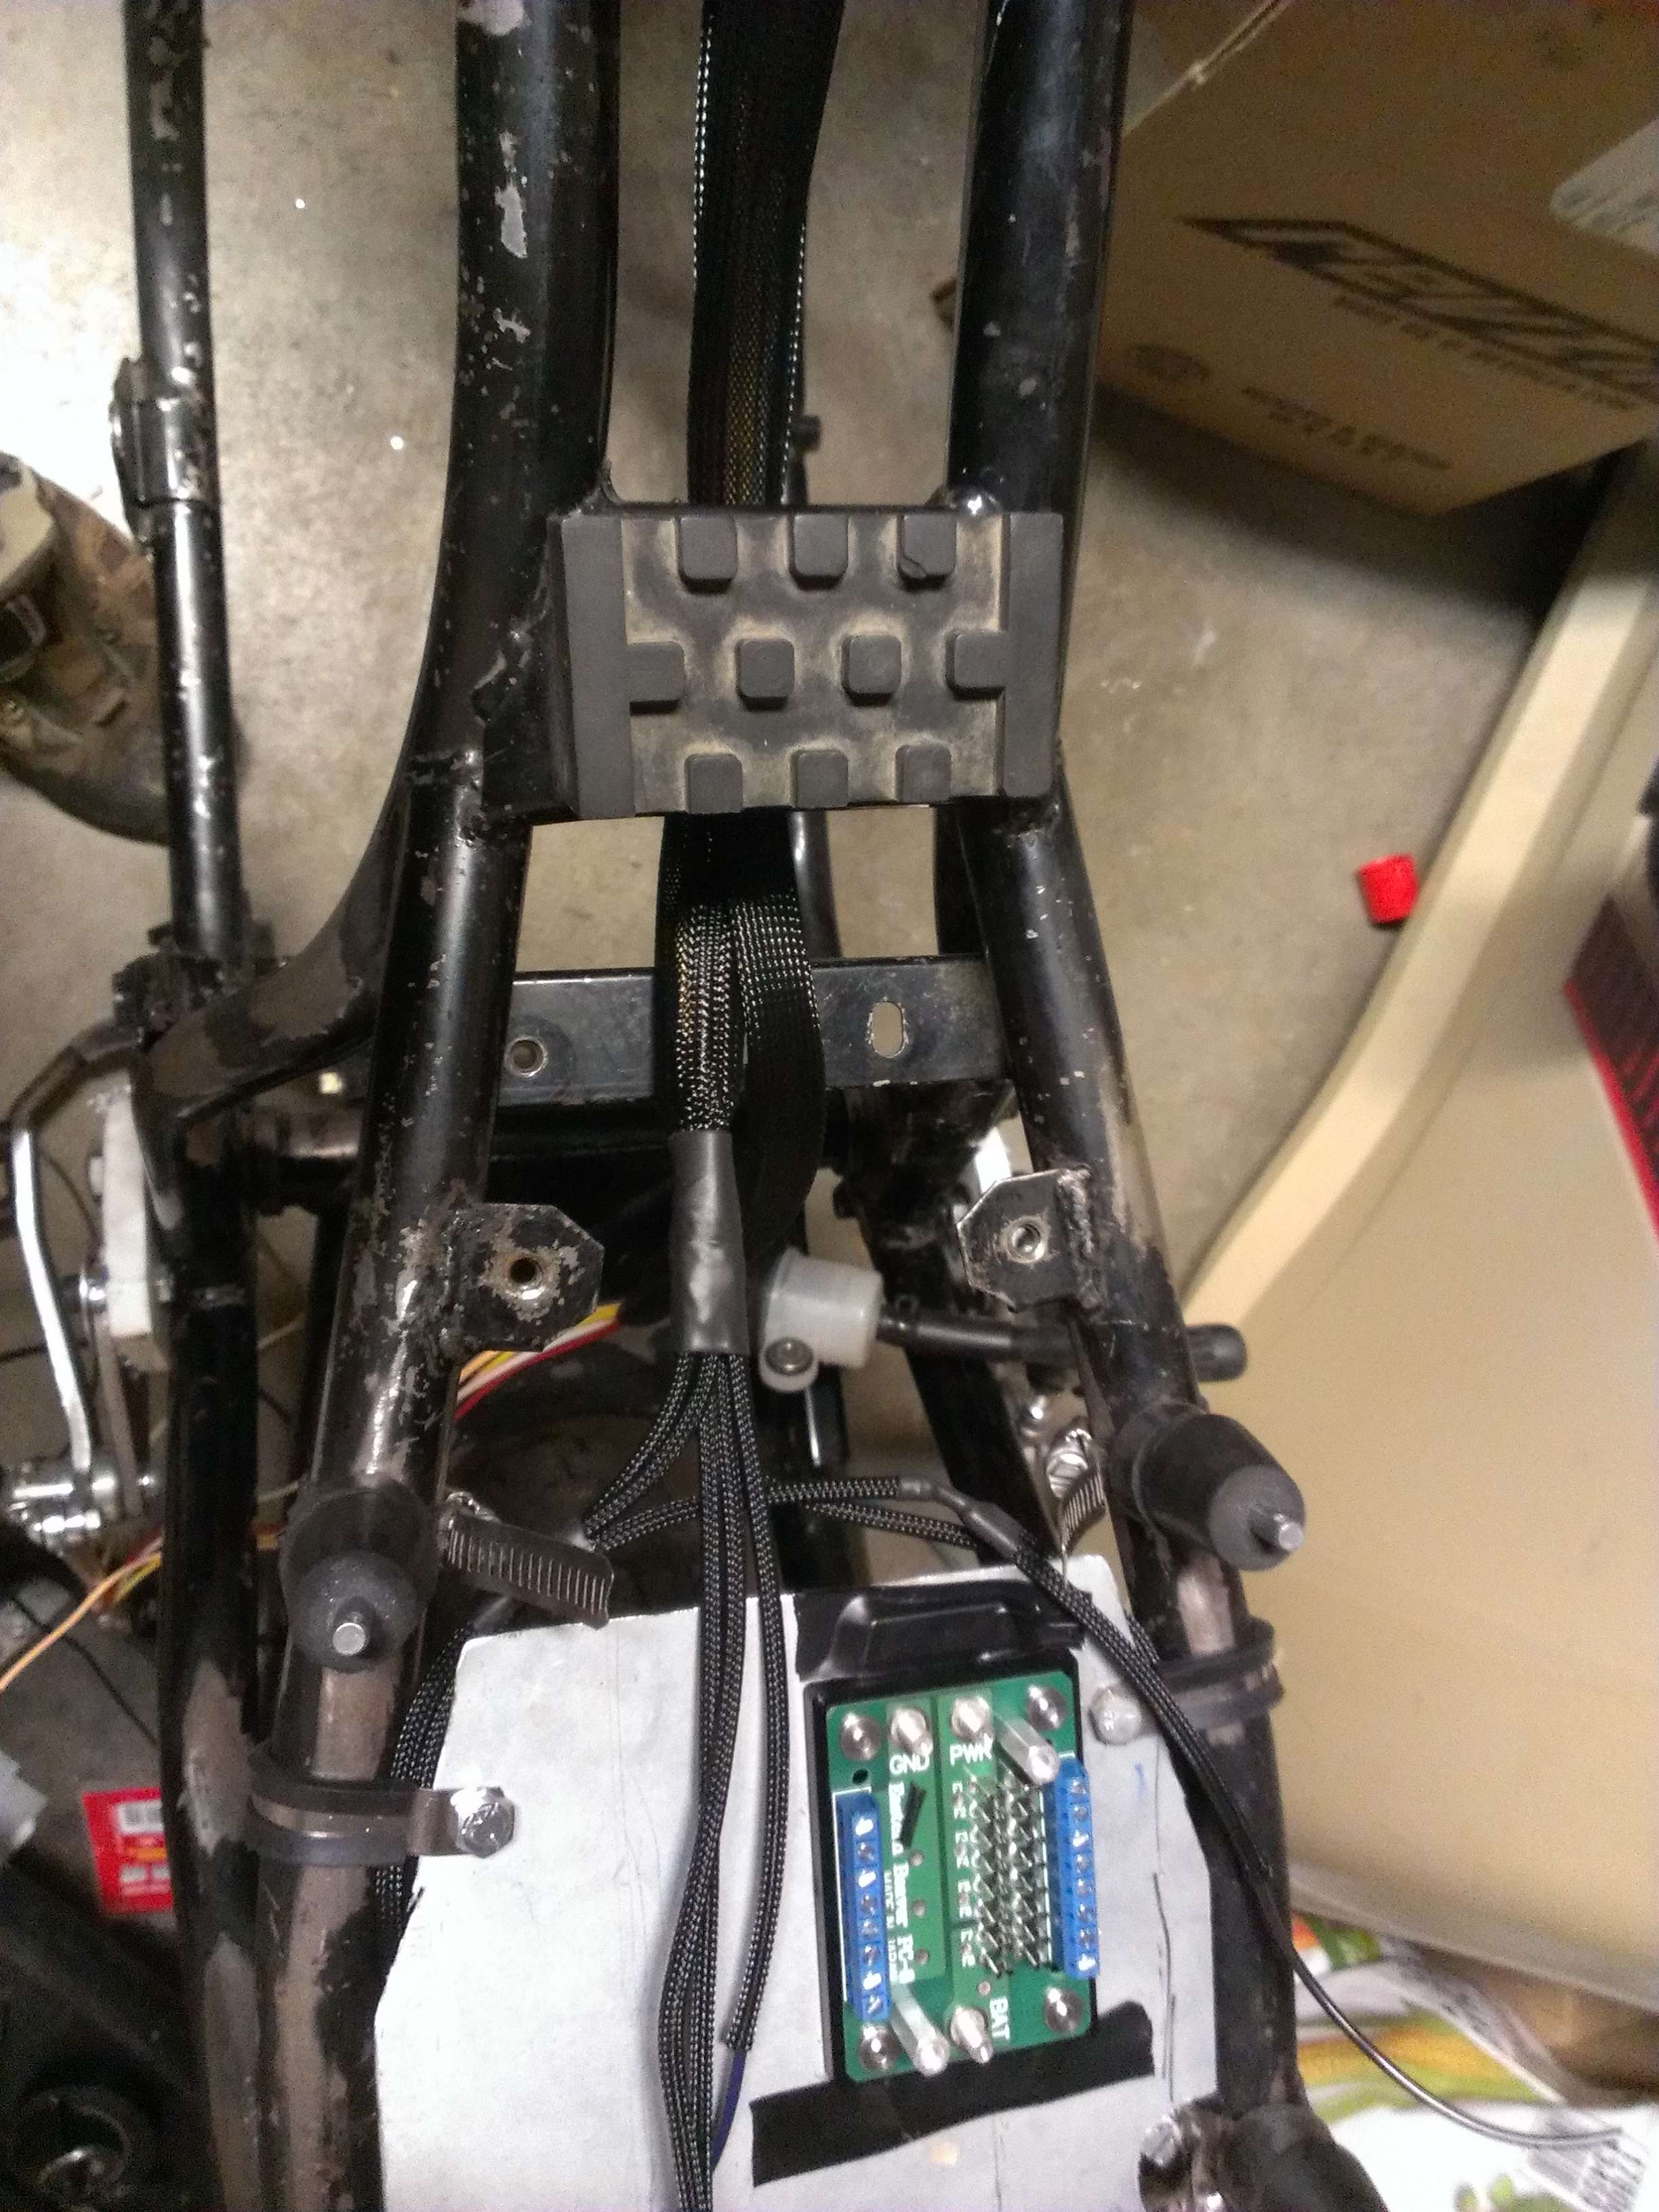
I got about 75% of the harness done by Saturday night. I still need to run the power to the front and rear brake switches, ignitor, r/r, wire up the battery/RFID stuff and finish up wiring the fuse box.
On Sunday morning I wired up the Acewell/accessory circuit but I need some good crimp connectors for the tail light and turn signals.
Btw the clean cut nylon sleeving they sell is really high quality for the price. It's much better than the Techflex stuff, you can stuff more wires in it before the colors show though and it's less prone to fraying on the ends (before you heat shrink the ends).
I got a bunch of the sleeving, some larger heat shrink with the glue lining (it's only 2:1, I'd like 3:1 though but no luck). I picked up a little butane torch/soldering iron too, they're pretty handy because you can adjust the heat and you don't need to drag around a cord.
Saturday was a looooong day, I got home at noon and spent 9 hours straight working on the harness.
Starting off working front to back, from the hand controls
I didn't take many pictures as I was working on it, it was mostly just routing, soldering and heat shrinking. Once I'm done with this I shouldn't have any more wiring issues. Btw if you're gonna solder get good rosin solder and flux!
I tried to use the Western Union Splice as much as I could
Apply some melted solder (not too much, not too little) onto the joint with flux, then apply heat with the soldering iron and you'll see the flux start to quickly bubble and solder will get instantly sucked into the fibers. I think they came out pretty good. I had some good Sumitube glue heat shrink I picked up from Eastern Beaver to put over the soldered joints. They should be totally solid.
I got about 75% of the harness done by Saturday night. I still need to run the power to the front and rear brake switches, ignitor, r/r, wire up the battery/RFID stuff and finish up wiring the fuse box.
On Sunday morning I wired up the Acewell/accessory circuit but I need some good crimp connectors for the tail light and turn signals.
danejurrous
Been Around the Block
Damn that is one clean wiring job!
Toast
Been Around the Block
sxecafe said:Wiring looks so great, man. I really need to redo mine.
You're in CA, right?
Yep, I'm out in the Bay Area
.It took a few nights after getting home but the harness is 90% complete, wiring up the undertail section took foreverrrr.

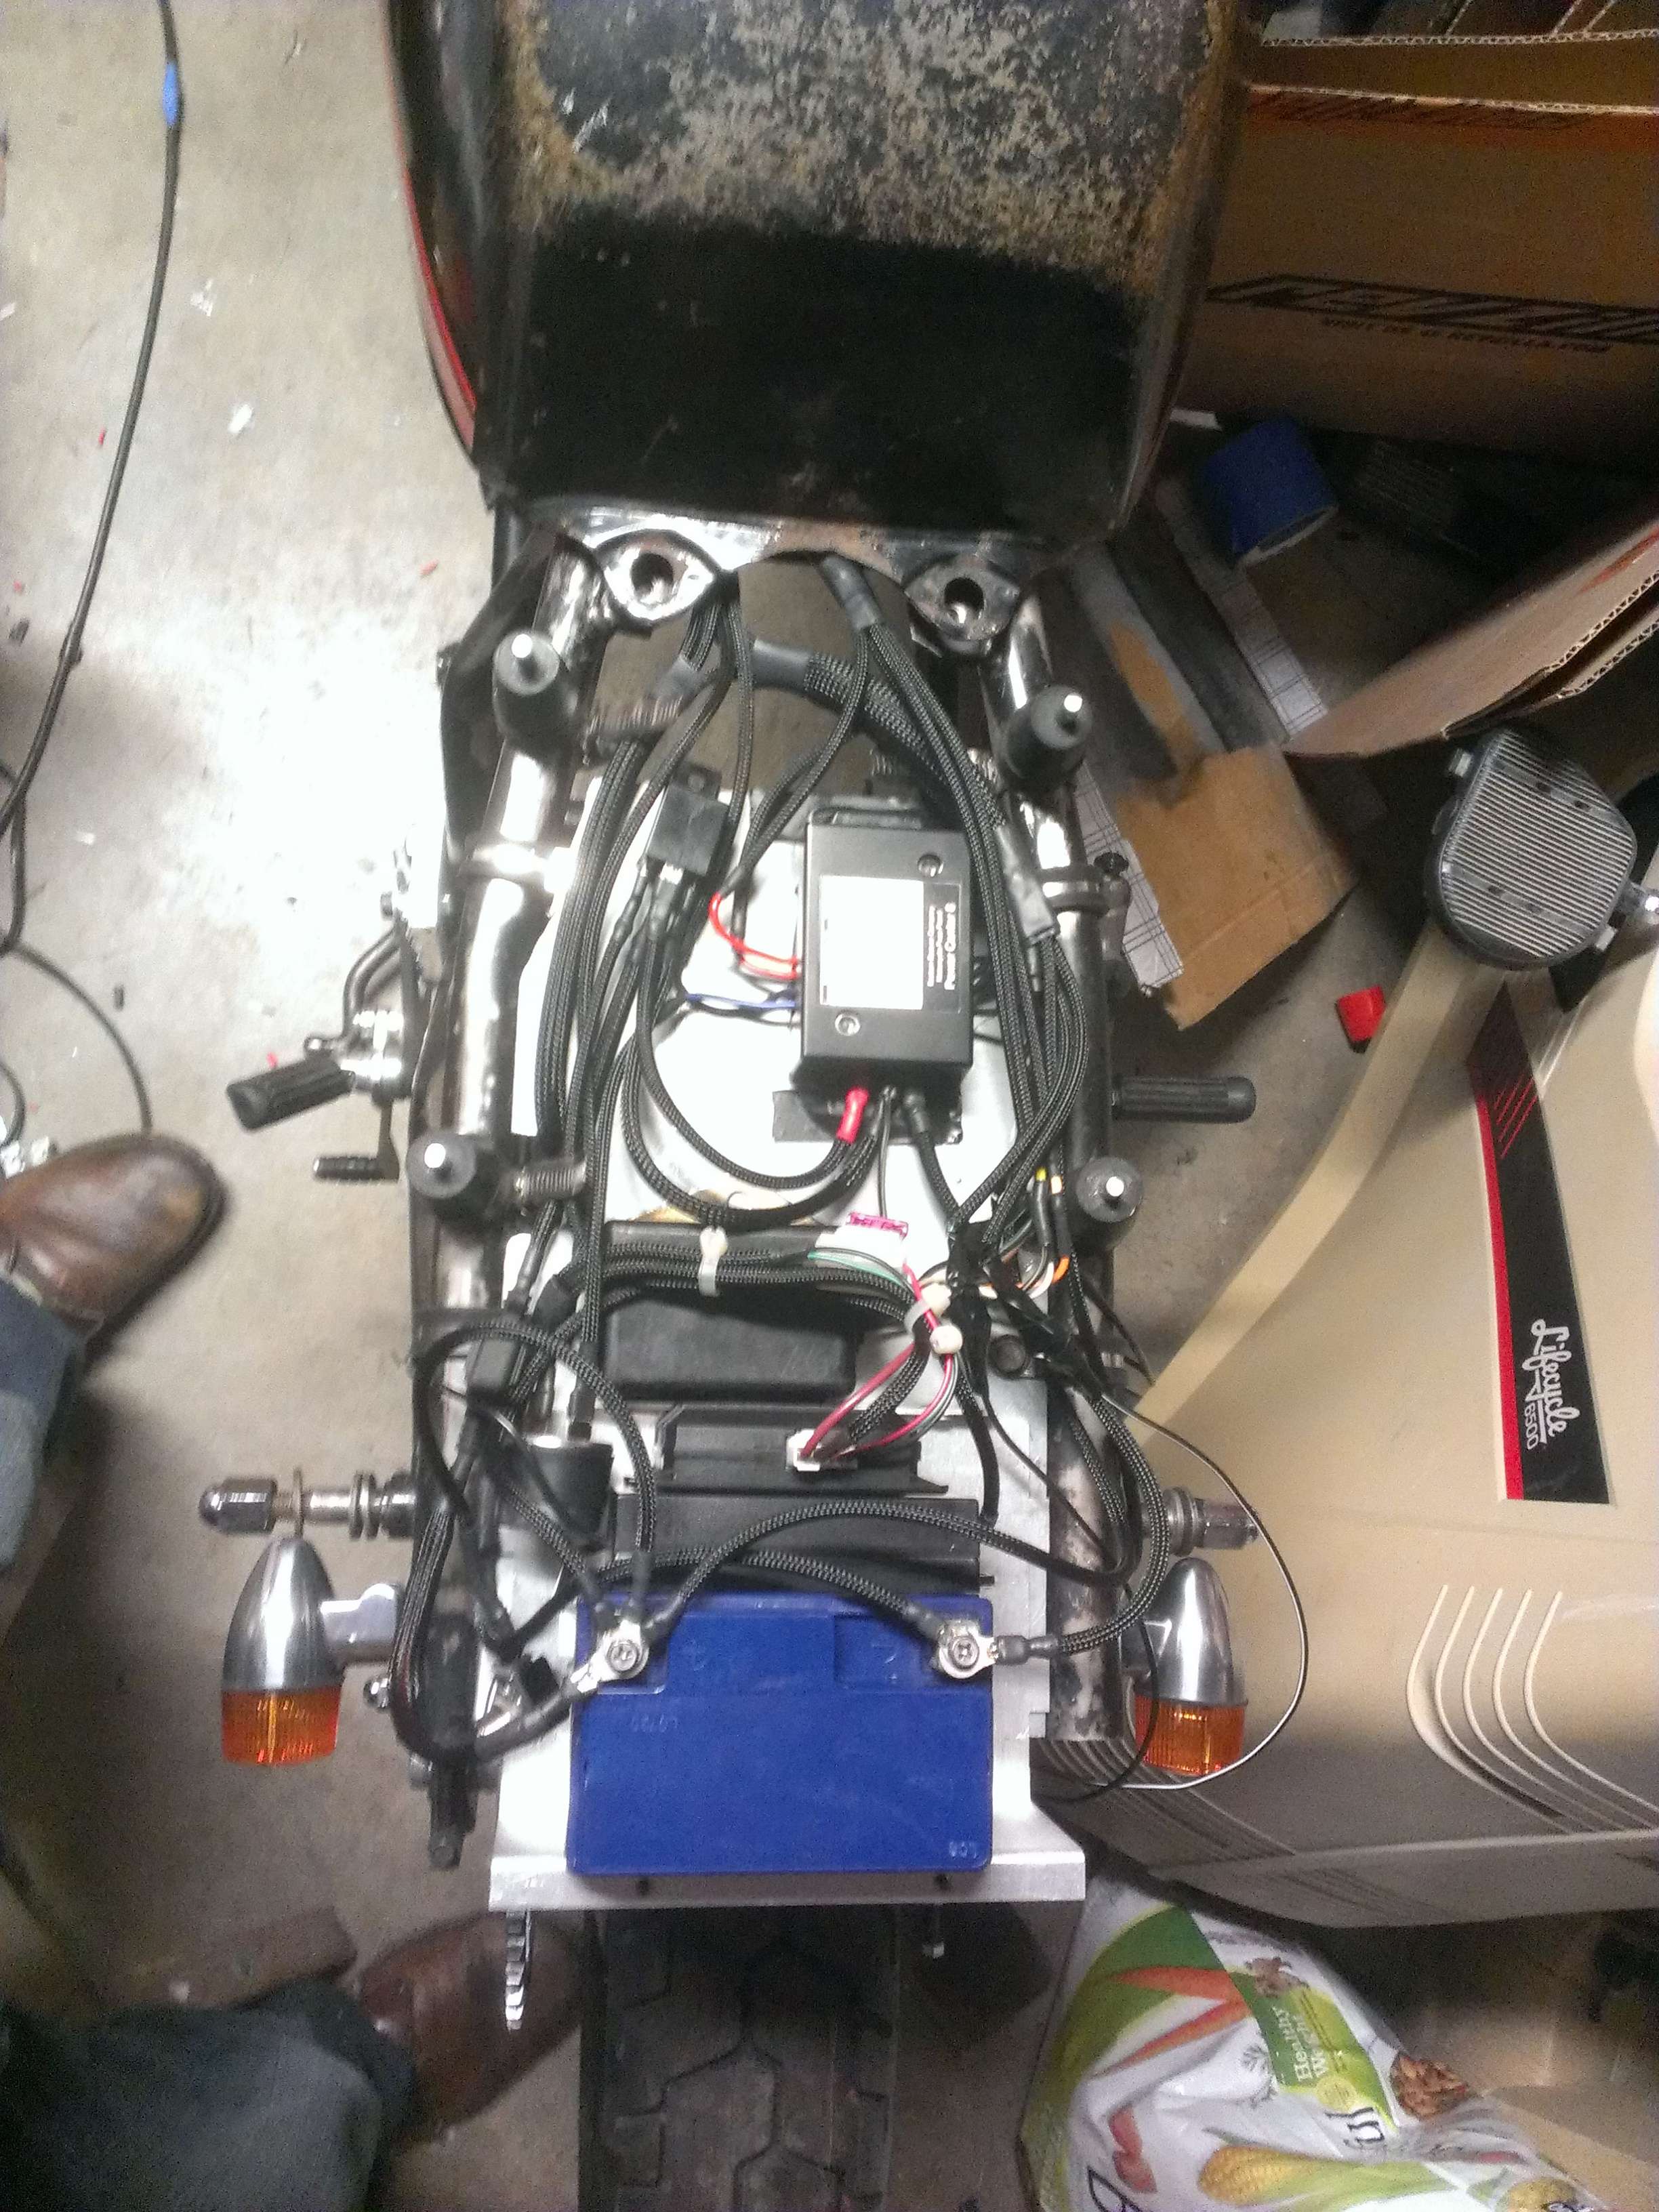
I need to wire some of the non switched stuff into the fuse box, I have the RFID system and Acewell clock hooked up to the battery and there are too many cables hanging off it
. There will be another two once I get the r/r hooked up.It didn't come out as organized under the seat as I'd hoped, but it works! There was a ton of stuff to cram under there.