We noticed you are blocking ads. DO THE TON only works with community supporters. Most are active members of the site with small businesses. Please consider disabling your ad blocking tool and checking out the businesses that help keep our site up and free.
You are using an out of date browser. It may not display this or other websites correctly.
You should upgrade or use an alternative browser.
You should upgrade or use an alternative browser.
Dr. Jekyll and Mr. Hyde ( a pair of KZ400s)
- Thread starter Nebr_Rex
- Start date
interceptor
Coast to Coast
Just started reading this thread. Wow! This stuff blows me away. Probably simple for you, but 90 percent of us probably don't know what the heck you just did and how you got there. Very cool.
Nebr_Rex
Coast to Coast
I'm just learning as I go. Just someone with only a high school education.
But I took 3 yrs. of machine shop, 3 yrs. of mechanical drafting and a semester
each of welding and electronics while I was there. The rest was learned on the
job or self taught. I'm no Einstein, just persistent. Anybody can do almost anything,
you just have to apply yourself. Get all the basics covered and then start doing
some research. When mistakes are made, then you know what not to do. Like the
old saying goes, 'experience is the best teacher'. All the greats screwed up many
times before they found the right way to accomplish their goal.
.
interceptor
Coast to Coast
Well said.
rockcitycafe
I make things.
cool, it would be interesting to see you do a camshaft from scratch, maybe use O-1 and just cut it yourself, looks like you've got the setup for it
Roc City Cafe said:also... why the hell isn't anyone posting on this thread? The stuff you're doing is awesome!
I am watching in quite. I don't have anything valuable to input to I will just sit and learn.
Keep it up Nebr. This thread as a lot of valuable information.
Nebr_Rex
Coast to Coast
All I'm doing is reducing the base circle. That allows me to alter the opening and closing
points to change lobe center and duration along with lift. To machine a cam from scratch
I would have to make the sprocket drive flange seperate then weld it together. And forget
the tach drive gear. Also my little tool post grinder would need to be replaced with a bigger
unit that would articulate with the to rotation of the lathe. That articulation would need to be
controlled by a cam master pattern to be copied onto the cam lobe. All far more complex
machinery than me just grinding material off the base circle. All I do is feed in the grinder a
few thousands of an in at a time and rotate the lathe by hand. The lathe is unplugged from
power while this is being done. On this John Deere cam I started with using a bench grinder
to get the majority of the material off. Then I take some more off with my big die grinder
followed by the tool post grinder and finally a file and emery cloth. This is because I'm taking
almost .100 in. off and my tool post grinder doesn't like taking to much off at a time.
.
Nebr_Rex
Coast to Coast
Brodie said:Keep it up Nebr. This thread as a lot of valuable information.
As long as I'm able to.
Nebr_Rex
Coast to Coast
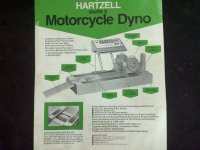
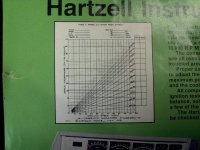
Bought a new toy. It doesn't look much like it did originally.
It's been cut in two and the control panel is gone. But the
pressure gauge is still hooked up and the nob for the valve
to restrict the oil flow is still there. I was problly the last one
to have a bike on it when it was in one piece about 6/7 years
ago.
Other than that been to cold to do much lately.
.
Attachments
")
Nebr_Rex
Coast to Coast
Not much to report on my projects. Been working on those mini sprint engines.
The one with the bad crank gear tooth is back together and was picked up
yesterday. Their old one is apart and parts are ordered. Bought another 2.3
engine for my ranger. Plan is to increase power output from the anemic 100
h.p. . Looking at some head work, better exhaust and bigger injectors. The 19lbs.
4 hole injector upgrade could also be used on Dr. Jekyll to cure the bikes lean problem.
.
Nebr_Rex
Coast to Coast
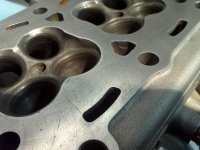
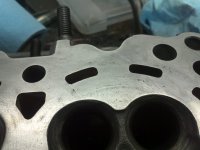
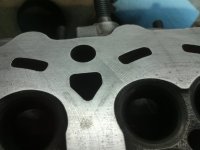
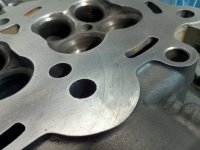
Cousin's old mini sprint engine is disassembled and parts are ordered. The aftermarket stuff
arrived within a week. The factory Yamaha parts at coming in piece meal. This engine is supposedly
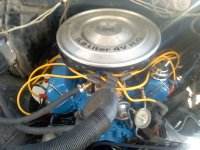
been worked on by someone in Omaha who also dynos them. The only thing I can find is a little
head work. The pics show the work 'done'. I don't think I will go to them anytime soon for any machine
work. What do you think. Weather should be getting warmer and I'll get some ambition back when it does.
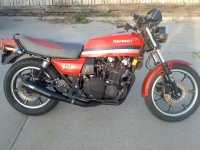
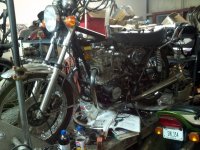
I've got a 351w for the pickup to do first then back to some Kawasaki 2 cylinder madness. Here is a pic
of the bike waiting on the bike lift. And then some of that Yamaha head.
arrived within a week. The factory Yamaha parts at coming in piece meal. This engine is supposedly
been worked on by someone in Omaha who also dynos them. The only thing I can find is a little
head work. The pics show the work 'done'. I don't think I will go to them anytime soon for any machine
work. What do you think. Weather should be getting warmer and I'll get some ambition back when it does.
I've got a 351w for the pickup to do first then back to some Kawasaki 2 cylinder madness. Here is a pic
of the bike waiting on the bike lift. And then some of that Yamaha head.
Attachments
Nebr_Rex
Coast to Coast
A little update.
Cousin has both engines now. They raced last weekend and said it sounded good.
Ran hot and would not pull any r.p.m. . They swapped carbs and it ran a lot better.
Got another John Deere A can ground. Just did the intakes, added about a 1/16 in.
lift. Done some porting on some Ford 351W and 2.3 heads. Need to start working
on the Windsor short block. When I get that engine in the truck I'll give more attention
the 400/440.
.
Nebr_Rex
Coast to Coast
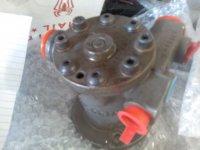
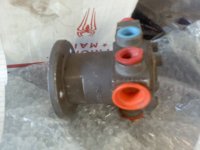
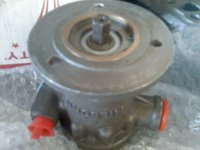
Still working on the head for the 2.3 in the ranger. And the 351 for the F150.
But I did acquire this little jewel for Frankenstein's mechanical fuel injection.
It's a small Hilborn fuel pump off a drag bike.
.
But I did acquire this little jewel for Frankenstein's mechanical fuel injection.
It's a small Hilborn fuel pump off a drag bike.
.
Attachments
Nebr_Rex
Coast to Coast
Guess I'm a big time engine builder now. Cousins kid won the last race events
A-main/feature in the wingless outlaw class. They ran their primary engine all year.
That is the black one I went thru that had the broken tooth on the crank gear.
They have yet to run the silver one I freshened up.
.
A-main/feature in the wingless outlaw class. They ran their primary engine all year.
That is the black one I went thru that had the broken tooth on the crank gear.
They have yet to run the silver one I freshened up.
.
Attachments

Powderfinger
Been Around the Block
Good work!