
We noticed you are blocking ads. DO THE TON only works with community supporters. Most are active members of the site with small businesses. Please consider disabling your ad blocking tool and checking out the businesses that help keep our site up and free.
You are using an out of date browser. It may not display this or other websites correctly.
You should upgrade or use an alternative browser.
You should upgrade or use an alternative browser.
DWMS Racing RD350 Cafe Racer! New Gold Leaf Lettering And Graphics!
- Thread starter joeyputt
- Start date
joeyputt
The green flag sets me free
Re: DWMS Racing RD350 Build! We started shaping the rear cowl today!
Thank You Brothers, I am very happy that you are enjoying this build!
Today we started designing the rear cowl, I glued some foam together and filed it to match the shape of the rear hoop that I built and then I spoke with Brother Bluesmokey to get some ideas of the final shape that he wanted and finished shaping the foam.
Here is a new photo of the frame now that I have the rear hoop and shock mounts that we built in place!
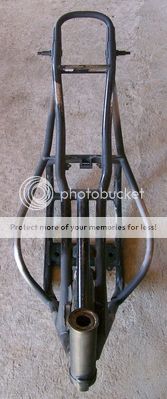
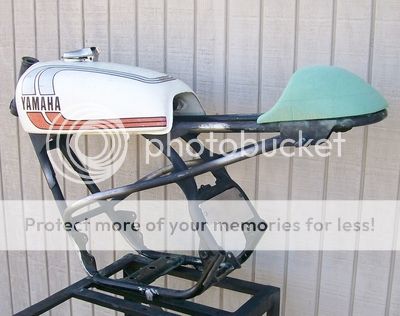
The seat pan and rear cowl will cover the side of the frame rails and the top half of the new rear shock mount plates that I built so that we can keep a nice clean body line that follows the bottom of the fuel tank all the way down the side of the bike to the end of the rear cowl when we are done however here are a couple photos that will give you all an idea of the shape we are using for the rear cowl.

Thank You Brothers, I am very happy that you are enjoying this build!
Today we started designing the rear cowl, I glued some foam together and filed it to match the shape of the rear hoop that I built and then I spoke with Brother Bluesmokey to get some ideas of the final shape that he wanted and finished shaping the foam.
Here is a new photo of the frame now that I have the rear hoop and shock mounts that we built in place!
The seat pan and rear cowl will cover the side of the frame rails and the top half of the new rear shock mount plates that I built so that we can keep a nice clean body line that follows the bottom of the fuel tank all the way down the side of the bike to the end of the rear cowl when we are done however here are a couple photos that will give you all an idea of the shape we are using for the rear cowl.
Re: DWMS Racing RD350 Build! We started shaping the rear cowl today!
That's not a bike - it's rolling art ;D ;D
That's not a bike - it's rolling art ;D ;D
axeugene27
Over 1,000 Posts
Re: DWMS Racing RD350 Build! We started shaping the rear cowl today!
will you be able to slide the engine in or will you have to build the top end while in the bike?
will you be able to slide the engine in or will you have to build the top end while in the bike?
joeyputt
The green flag sets me free
Re: DWMS Racing RD350 Build! I Finished Building The New Rear Tank Mount Today!
Thank You Brothers, as always your kind words mean more to me than you will ever know!
Brother axeugene27 when I originally designed the new side frame rails I left enough room to install the complete bottom end and then assemble the pistons, cylinders, and heads onto the engine once it was in the frame, now that I have the new frame rails on it looks like there may be enough room to install the complete engine however I am going to stay with the original plan to make sure I do not scratch the paint on the engine or the frame during final assembly.
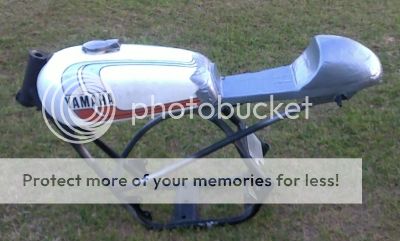
After talking with Brother Bluesmokey some more about the design of the body work we decided not to build a one piece body for this bike as we had originally planned as he has a couple of different ideas for the upholstery and we would like to keep our options open so I am building a one piece fiberglass seat and tail section that will be separate from the tank. While we were talking we decided to mold the front of the seat to cover the rear of the fuel tank so I have been designing and building the rear mount for the past couple of days as I need the tank to be sitting in its final position before I start molding the seat pan.
From the factory the RD350 fuel tank does not have an actual rear mount. The factory design has the tank sitting on a single rubber underneath and a single rubber on each side so that it can not move from side to side, the seat is what holds the tank down. I designed the new bolt down rear mount to have all of the same factory contact points and to be fully rubber mounted as well.
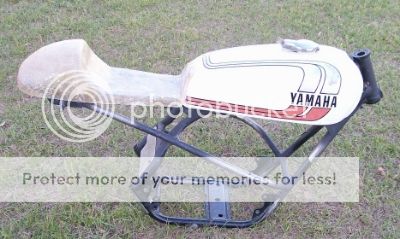
On the bottom of the fuel tank I removed the rubber from the side cups and I also removed the bottom half of the cup on each side so that I could drop a length of tubing that I cut into the cups and weld it in, once I had the tubing welded into place I drilled two holes into it and welded in two nuts. For the center mount I made a tab and welded it to the tubing.
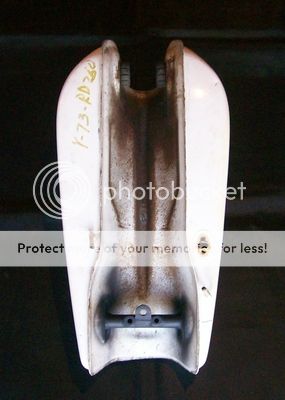
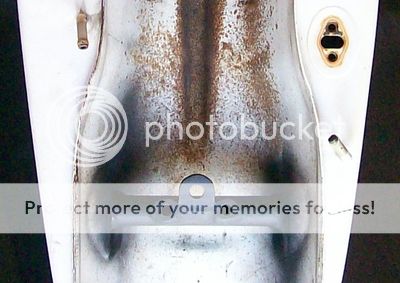
I wanted the rubber to be replaceable on the center mount so I built a bolt in shouldered post and threaded the middle of it so that it mounts to the tab that I welded onto the center of the tubing I added on the bottom of the fuel tank. The rubber is a factory RD350 front fuel tank mount with an additional rubber insert for added cushion. The rubber shown in the photo is a old one that I used for test fitting and it will be replaced with a new rubber for final assembly of the motorcycle.
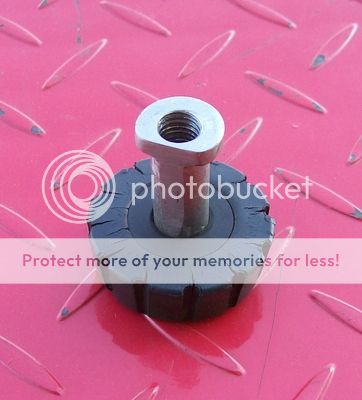
This photo shows the center mount bolted to the new tubing I added to the bottom of the fuel tank.

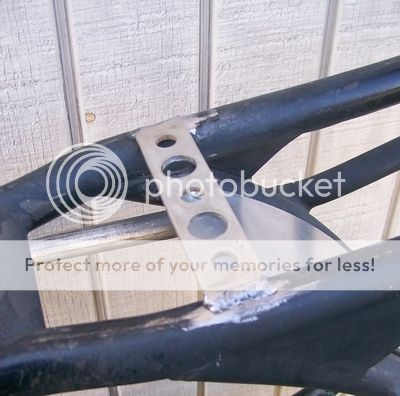
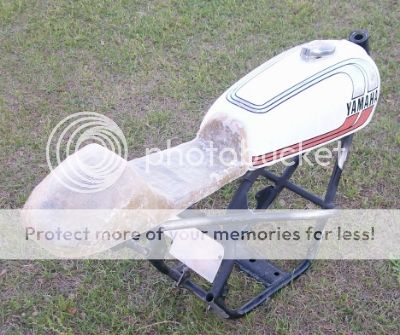
For the frame mount I made a cross brace and welded it to the frame, I drilled two large holes in the brace to hold the shouldered rubber isolators that the fuel tank sits on and the tank mounting bolts run through so that they are fully rubber mounted.
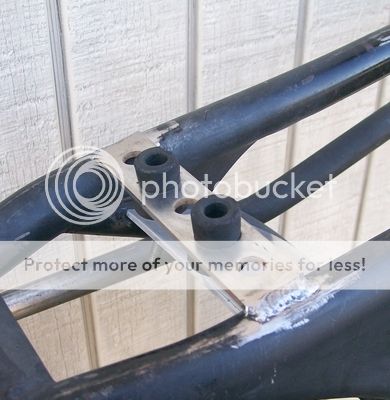
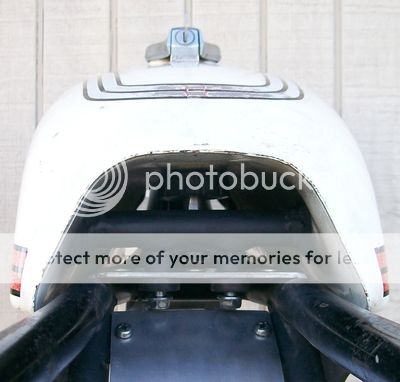
This photo shows the tank mounted to the frame, there will be a couple more washers and I will also install a set of rubber collars around the center rubber mounts between the new tubing on the tank and the frames cross brace for final assembly.
Thank You Brothers, as always your kind words mean more to me than you will ever know!
Brother axeugene27 when I originally designed the new side frame rails I left enough room to install the complete bottom end and then assemble the pistons, cylinders, and heads onto the engine once it was in the frame, now that I have the new frame rails on it looks like there may be enough room to install the complete engine however I am going to stay with the original plan to make sure I do not scratch the paint on the engine or the frame during final assembly.
After talking with Brother Bluesmokey some more about the design of the body work we decided not to build a one piece body for this bike as we had originally planned as he has a couple of different ideas for the upholstery and we would like to keep our options open so I am building a one piece fiberglass seat and tail section that will be separate from the tank. While we were talking we decided to mold the front of the seat to cover the rear of the fuel tank so I have been designing and building the rear mount for the past couple of days as I need the tank to be sitting in its final position before I start molding the seat pan.
From the factory the RD350 fuel tank does not have an actual rear mount. The factory design has the tank sitting on a single rubber underneath and a single rubber on each side so that it can not move from side to side, the seat is what holds the tank down. I designed the new bolt down rear mount to have all of the same factory contact points and to be fully rubber mounted as well.
On the bottom of the fuel tank I removed the rubber from the side cups and I also removed the bottom half of the cup on each side so that I could drop a length of tubing that I cut into the cups and weld it in, once I had the tubing welded into place I drilled two holes into it and welded in two nuts. For the center mount I made a tab and welded it to the tubing.
I wanted the rubber to be replaceable on the center mount so I built a bolt in shouldered post and threaded the middle of it so that it mounts to the tab that I welded onto the center of the tubing I added on the bottom of the fuel tank. The rubber is a factory RD350 front fuel tank mount with an additional rubber insert for added cushion. The rubber shown in the photo is a old one that I used for test fitting and it will be replaced with a new rubber for final assembly of the motorcycle.
This photo shows the center mount bolted to the new tubing I added to the bottom of the fuel tank.
For the frame mount I made a cross brace and welded it to the frame, I drilled two large holes in the brace to hold the shouldered rubber isolators that the fuel tank sits on and the tank mounting bolts run through so that they are fully rubber mounted.
This photo shows the tank mounted to the frame, there will be a couple more washers and I will also install a set of rubber collars around the center rubber mounts between the new tubing on the tank and the frames cross brace for final assembly.
bluesmokey74
New Member
Re: DWMS Racing RD350 Build! I Finished Building The New Rear Tank Mount Today!
Yep! Consider that tank mounted!! lol That thing is not going anywhere! Nice job Joe!
Yep! Consider that tank mounted!! lol That thing is not going anywhere! Nice job Joe!
Habanero52
The Race......is only with yourself!
Re: DWMS Racing RD350 Build! I Finished Building The New Rear Tank Mount Today!
Sweet!!!
Sweet!!!
50gary
Under the Limelight
Re: DWMS Racing RD350 Build! I Finished Building The New Rear Tank Mount Today!
Humm, is it just me or does the fourth picture and the last (seventh) show the center mount rubber to be somewhat redundant? Once the two added rubbers suspend the rear of the tank what else is needed? It appears as if the center mount rubber is just damping the floor of the tank tunnel? Not meant as a criticism just wondering what am I missing, probably a lot?
I like your idea of separating the tank and the seat, more freedom I think? I have a "fill" piece between my tank and the seat on my Rt conversion. Go Joey, this is better than TV, enjoy watching you work.
Cheers, 50gary
joeyputt
The green flag sets me free
Re: DWMS Racing RD350 Build! I Finished Building The New Rear Tank Mount Today!
I am very happy that you like the new rear tank mount Brother, I tried to keep it simple however it does not always work out that way! Hahahaha!
Brother Habanero it is always good to see you here, DWMS Racing would not be what it is today without all of your support! Thank You for everything my friend!
Brother the center mount most likely does not have to be there, when I first designed and built the new mount I did not have the center mount there at all however on the factory design all of the weight on the back of the tank is in that location so I added the center mount to the new mounts design hoping that it would relieve some of the weight and stress from the side mounts. I am also hoping that the center mount will dampen and absorb some of the vibration instead of it all being transferred to the side mounts.
I know that you mean well my friend, you have always been a supportive Brother and I have seen the kind things you have wrote about me and my work here as well as other places and that truly means a lot to me! I know some other builders do not like to be asked questions however I enjoy them and I always like to hear other peoples thoughts and opinions as well, I remember when I first joined here a couple years ago it seemed like every time I posted a photo there would be a page of questions or comments afterwards however I do not seem to get that as much anymore so I am not sure if most people have more trust in me now or if they are all just getting used to my work being a little different! Hahahaha!
As far as this being better than tv I am just a regular guy with a few basic hand tools that enjoys building just like everyone else here however it truly is an honor to know that you enjoy watching me build! Thank You for always being such a supportive Brother!
bluesmokey74 said:Yep! Consider that tank mounted!! lol That thing is not going anywhere! Nice job Joe!
I am very happy that you like the new rear tank mount Brother, I tried to keep it simple however it does not always work out that way! Hahahaha!
Habanero52 said:Sweet!!!
Brother Habanero it is always good to see you here, DWMS Racing would not be what it is today without all of your support! Thank You for everything my friend!
50gary said:Humm, is it just me or does the fourth picture and the last (seventh) show the center mount rubber to be somewhat redundant? Once the two added rubbers suspend the rear of the tank what else is needed? It appears as if the center mount rubber is just damping the floor of the tank tunnel? Not meant as a criticism just wondering what am I missing, probably a lot?
I like your idea of separating the tank and the seat, more freedom I think? I have a "fill" piece between my tank and the seat on my Rt conversion. Go Joey, this is better than TV, enjoy watching you work.
Cheers, 50gary
Brother the center mount most likely does not have to be there, when I first designed and built the new mount I did not have the center mount there at all however on the factory design all of the weight on the back of the tank is in that location so I added the center mount to the new mounts design hoping that it would relieve some of the weight and stress from the side mounts. I am also hoping that the center mount will dampen and absorb some of the vibration instead of it all being transferred to the side mounts.
I know that you mean well my friend, you have always been a supportive Brother and I have seen the kind things you have wrote about me and my work here as well as other places and that truly means a lot to me! I know some other builders do not like to be asked questions however I enjoy them and I always like to hear other peoples thoughts and opinions as well, I remember when I first joined here a couple years ago it seemed like every time I posted a photo there would be a page of questions or comments afterwards however I do not seem to get that as much anymore so I am not sure if most people have more trust in me now or if they are all just getting used to my work being a little different! Hahahaha!
As far as this being better than tv I am just a regular guy with a few basic hand tools that enjoys building just like everyone else here however it truly is an honor to know that you enjoy watching me build! Thank You for always being such a supportive Brother!
joeyputt
The green flag sets me free
Re: DWMS Racing RD350 Build! We Are Building The New Fiberglass Tail Section!
Thank You Brother oldskool, I am very happy that you are enjoying this build! We decided not to build a one piece body for this bike as Brother Bluesmokey has a couple different really cool ideas on how we may finish the tail section so we are building it as a separate piece from the tank to keep our options open for the upholstery.
I wanted to lay the fiberglass right on the the bike so that we could mold the front of the seat over the rear of the gas tank and match the frame perfectly so I taped the back of the tank and the frame and added strips of cardboard to the sides of the frame for a nice flat surface, after I taped the tank and the frame I added the foam that we shaped for the rear cowl and taped it in place as well.

Today I started to lay the fiberglass on the frame and I was able to finish the first layer, I am going to shape the front where we molded the tail section over the rear of the fuel tank some more and trim the bottom some more as well before I start to add the additional layers of fiberglass however I wanted to go ahead and share a couple photos of how she looks this evening!
Thank You Brother oldskool, I am very happy that you are enjoying this build! We decided not to build a one piece body for this bike as Brother Bluesmokey has a couple different really cool ideas on how we may finish the tail section so we are building it as a separate piece from the tank to keep our options open for the upholstery.
I wanted to lay the fiberglass right on the the bike so that we could mold the front of the seat over the rear of the gas tank and match the frame perfectly so I taped the back of the tank and the frame and added strips of cardboard to the sides of the frame for a nice flat surface, after I taped the tank and the frame I added the foam that we shaped for the rear cowl and taped it in place as well.
Today I started to lay the fiberglass on the frame and I was able to finish the first layer, I am going to shape the front where we molded the tail section over the rear of the fuel tank some more and trim the bottom some more as well before I start to add the additional layers of fiberglass however I wanted to go ahead and share a couple photos of how she looks this evening!
Re: DWMS Racing RD350 Build! We Are Building The New Fiberglass Tail Section!
Joey, nice work as always, but I was expecting to see a tail that accentuated the Side rails and preferably is a one piece at least integrate the tank and seat or tie them together and wrap the lot in carbon for a super sleek, in your face piece of art.
The seat is nice enough. It just doesn't go the extra style mile that I know is in there. That's a sort of backhanded compliment. What it means is that if most people created that seat, we'd think they did well, but we know you can go further than that. Stretch the imagination a little further .")
I would avoid a Fuller stand it on its nose type job, but there's something in there that needs to be released.
Joey, nice work as always, but I was expecting to see a tail that accentuated the Side rails and preferably is a one piece at least integrate the tank and seat or tie them together and wrap the lot in carbon for a super sleek, in your face piece of art.
The seat is nice enough. It just doesn't go the extra style mile that I know is in there. That's a sort of backhanded compliment. What it means is that if most people created that seat, we'd think they did well, but we know you can go further than that. Stretch the imagination a little further .
I would avoid a Fuller stand it on its nose type job, but there's something in there that needs to be released.
joeyputt
The green flag sets me free
Re: DWMS Racing RD350 Build! We Are Building The New Fiberglass Tail Section!
Brothers I absolutely love how honest you are with me! I am sure that you were expecting a lot more artistic creativity when it came to the tank and tail section shapes however after a lot of discussion with Brother bluesmokey we decided to stay with a more traditional look for the body work so that the frame would be one of the main focal points.
As I previously posted we were planning on building a one piece body however we decided to keep the tank and tail section separate so that we have more options for the upholstery. Brother bluesmokey also wanted a nice smooth tank without knee dents, etc. so we thought it was more important for the tail section to be symmetrical with the tank and to shape it to match the frame rails and rear hoop so we designed it with a nice classic shape instead of going too modern with the design.
In my opinion less is more as far as the body work design goes on this bike and how we finish it off will be the key to the success of the design so to hear that you both think it needs more style confirms that we accomplished what we actually set out to do! Hahahaha!
Brother Teazer to hear you say "if most people created that seat, we'd think they did well, but we know you can go further than that." truly is a compliment my friend and I thank you for that! I think you will really enjoy how we are going to finish it!
Brother oldskool I am happy that you are still enjoying the build!
Swagger
Putting boot to ass since 1967!
Re: DWMS Racing RD350 Build! We Are Building The New Fiberglass Tail Section!
Joey, forgive me for not knowing (up to my neck in projects here) but are there plans for this to be a premix bike or will it be injected? T'would be rather spiff in my lame and useless opinion if the oil tank was incorporated into the seat cowl. Matching Monza caps for the fuel and oil tanks.....blah blah blah.....you know.....opinions haha. You'd still have room for it to snuggle over a compact battery if one is planned I'd think..
Joey, forgive me for not knowing (up to my neck in projects here) but are there plans for this to be a premix bike or will it be injected? T'would be rather spiff in my lame and useless opinion if the oil tank was incorporated into the seat cowl. Matching Monza caps for the fuel and oil tanks.....blah blah blah.....you know.....opinions haha. You'd still have room for it to snuggle over a compact battery if one is planned I'd think..
Bozz
Coast to Coast
Re: DWMS Racing RD350 Build! We Are Building The New Fiberglass Tail Section!
Awesome as usual, Joey.
And may I just point out what a wonderful example of constructive criticism Teazer gave, and Joey's equally textbook example of the perfect way to receive it.
No one was in any way disrespectful, and all part friends.
Folks, here are two gentlemen who truly understand what DTT is all about.
Re: DWMS Racing RD350 Build! We Are Building The New Fiberglass Tail Section!
As always, nice work. I'm lovin' the old style seat/tank combo. Not super original, or over the top, but I love the way you integrated the tank and seat! Smooooooth!! 8)
I'm a big fan of the melding of old and new, both components and style. You prove, once again, that it can be done and look like it belongs! 8)
As always, nice work.
I'm lovin' the old style seat/tank combo. Not super original, or over the top, but I love the way you integrated the tank and seat! Smooooooth!! 8)I'm a big fan of the melding of old and new, both components and style. You prove, once again, that it can be done and look like it belongs! 8)


