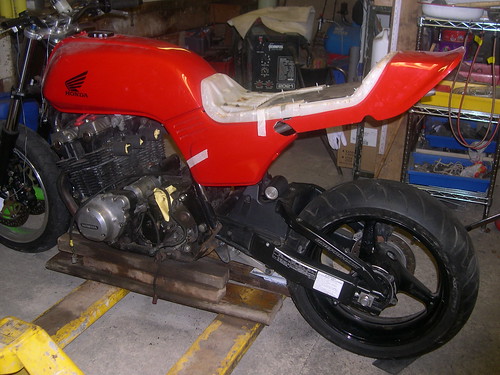
CB900 Big & Beefy Moto

BobaChris said:
I have a cb900 supersport I'm building and putting GSXR carbs as well. Curious to know if you put any copper piping in the marine tube. I know the guys on CB1100f forum put inserts when using radiator hose.
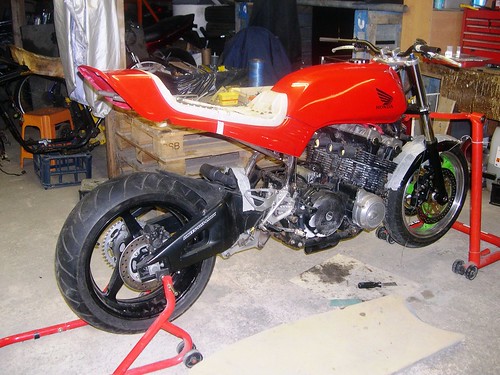
Like the build so far and can't wait to see the outcome.

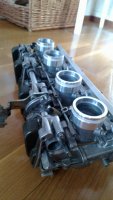
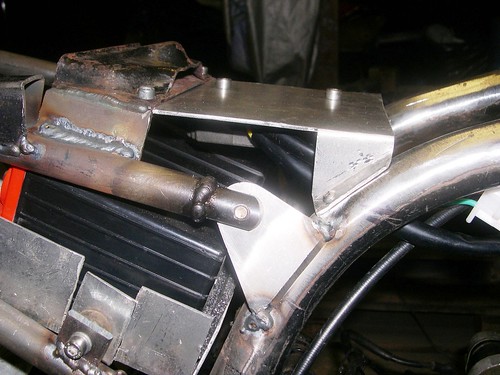
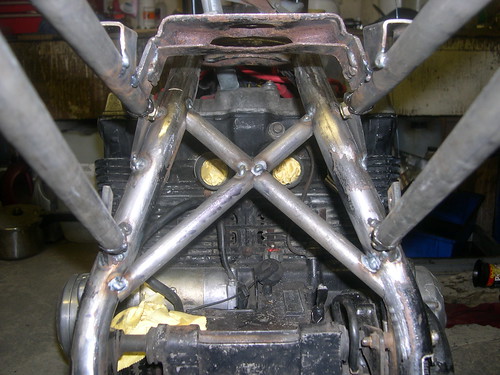
I'm on the cb1100f site as well but dont post alot. These carbs are direct lift flatslides not the CV semi flatslides. Therefore I don't think I'll need the copper inserts. Usually they are needed to support the carbs and to minimise the narrowing and flexing due to the high vacuum created by the CV carbs. On these the vacuum wont be as great as the slide opens as you turn the throttle and so the vacuum is not as great. Also I'm going to support the carbs as well.

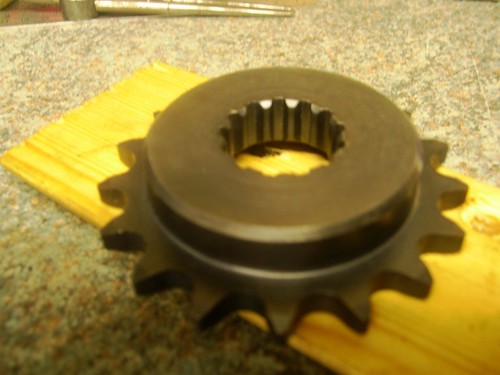
I used GSXR CV carbs on my last build a CB750 but I used 1980-82 GS1000 carb boots not rad hose.
 
Had bit of a spurt on so heres a few updates.

Cut up the original seat base, removed the iron work and shortened it 50mm. Going to use an aluminium plate to join it back up together again

8704647663_6abe933cce.jpg


The 3/4 tube for the subframe finally arriived so made the weld in spigots to attach it to the main frame. Wish I had a lathe and milling machine, I made these with a pillar drill, hacksaw and files.

8705770738_e413ed3608.jpg


Everything lined up before tacking the spigot in place, same with the frame brackets.

8704648925_6afe762d99.jpg


8705773418_e39d3be7cc.jpg


8704650361_d7865f1612.jpg


I reused the original tank rear mount and made some supports for the front of the seat unit.

8705775452_7513d73a81.jpg


8705776966_0bc08df024.jpg


Tack welded in some cross bracing for the rear of the frame. Took me ages to get the profile of the tubes correct, used an online program for the tube profiles but it cant do multiple angles need for the top pieces.

8704657499_593e602aee.jpg


Need to profile the side panels and make some mounting brackets to hold it all together.

8704657107_39b892cc60.jpg


I'm on with making a battery tray and tool / storage box to fit under the seat in the subframe in the next update.
 
Good job on the progress. Mine will be going under the knife soon. Debating if I should weld the new subframe directly or have it removable. Any reason why you chose the latter?
Looking forward to seeing yours completed. I'll eventually make my own build thread.
 
Looking slick! That engine is as beefy as that front end..


Beef...its whats for dinner!
 
BobaChris said:
Debating if I should weld the new subframe directly or have it removable. Any reason why you chose the latter?

As I had never done a subframe before it allowed me to adjust the angles and get it how I wanted it. It will also allow me to change it later if I ever decided I wanted something different.
 
Another update is due.
Had to get a offset front sprocket made up. Used these guys http://krueger-junginger.de/index.html after seeing plenty of good references for them. Not cheap though at £101 ($160)
8731228711_dabc9fea3a.jpg


Got around to making some adjustable rear set plates, I have CBR600r rear sets and needed to make them adjustable. Started off with some 10mm aluminium plate and after some drilling and hacksawing got to these

8731215929_3a283de250.jpg


Test fitting
8732339528_f217d165db.jpg

8731220843_b561b9d683.jpg


Shape roughed out

8731221593_8e9bc32ff4.jpg


A bit more filing and ended up here, still not 100% finished need the edges squaring of properly but that will wait till I have a drum sander for the drill.

8732347004_73bfa86995.jpg


showing the range of adjustment

8732350630_fb262cd694.jpg

8731228257_2535e35c65.jpg


Will also need to weld a boss on the frame for the gear change side to bold up to

8731226917_672546c019.jpg
 
To get the chain alignment correct I had 2mm skimmed of the sprocket carrier and reversed the sprocket on the carrier. I forgot to take a photo of the carrier. But now I have perfect chain alignment no contact withe the frame rails or swingarm
 
Hey, very cool project you have!
I've been following this thread for a while with great interest since I have the same bike myself and also the same carbs been waiting for more tuning and re-installing. I don't have so good knowledge of carbs so I'm pretty interested what size of jets are you going to use with them. Do you have some insight what kind of idle and main jets would be good for CB900F? My Mikuni's has 37,5 idle and 115 main and I managed to get the bike running with them, but since the revs was kind of unstable and the accelaration pumps didn't seem to work properly I switched back to Keihin's. I suspect that the idle jets should be bigger, but not sure.

PS. I also planned using marine fuel hose for insulators, but then I end up asking my coworker to lathe 4 aluminium adapter's for the carbs, so I could use the original insulators with them. Works great and looks almost like an original fit.
 
I have these settings for the VM29ss from someone who used them on a CB900.

8972525280_06eebc3be4.jpg


I'd be interested in seeing the adapter you made, I thought of doing something similar but I thought I might have difficulty sealing the carb spigot to an aluminium adapter. Also how did the carbs line up with the petcock and and the oil feed bolt on the back of the cylinder head. I found that when test fitting they needed to be further out than stock boots to clear the bolt head and petcock.

Just to be sure we are talking about the same carbs, you have the Mikuni VM29ss from the 1985 GSXR750 and not the Mikuni BST36ss from later GSXR's

The accelerater pump piston can seize up at the float chamber, have you checked that?
 
Yeah, I have the same carbs, Mikuni VM29SS's. They seem to be very rare, so I'm pretty glad that I got them with the bike. :)

And actually that chart is the carburetor setup of the 750 GSX-R. In case you didn't know the manual is downloadable here: http://www.mediafire.com/download/fgzdfgbwxwn/GSXR750-carb.pdf
I kind of feel that the jets should be bigger in CB900 than in GSXR750, since the ccm's is bigger. Although I know that the Suzuki has actually little bit more power than Honda. Of course the type of air filter's and exhaust pipe affects on it also. I actually have Marving exhaust and K&N RC2282 filter's, so it should flow better now than in original setup.

I've been disassembled the whole carburetor bank and the carbs itself and did a proper clean up in the ultra sonic washer and rebuild them with new seals, O-rings and float needles. The acceleration pumps should be Ok and work in theory, but I didn't manage to get any fuel out of them. I have small doupts about the home-made throttle shaft that links the carbs together, because the motion of the little cam that pushes the pump seems very short. The accelartion pumps rod that goes down to the float chamber is moving only like 2 mm, so I'm not sure is that enough.

My bike's fuel tank is from the CB650 so the petcock's location might differ a little bit, but anyway it was in way with the Keihin's original carbs too, so I had to make a new place for it. Co-worker of mine welded a new muff for the petcock in about 10 cm back of the tank. The oil feed bolt wasn't a problem because I desinged the adaptors 7mm longer so that the bolt wouldn't hit to the carbs and the adapters has a nice collar that helps glueing them to the carbs. I used a chemical metal bond to glue them on.
 

Attachments

  • 13040010.jpg
    13040010.jpg
    1 MB · Views: 591
I like those adapters, would he like to make some more?
How did the fit with the original manifolds as the spacing is different to the Honda?
I have the manual thanks and when I first glanced at that chart I thought is wasn't to far from stock GSXR settings but I had not checked as I'm a little way of that part of the build.

As for the accelerator pump mine is the same it only moves a few mm and the actuating arm on the throttle shaft only just connects with the rod. I thought about replacing the throttle shaft but I replaced the fibre seals with viton ones, only a couple of euros each. I haven't tested my carbs with fuel in them yet so don't know if the pumps work.
 
My co-worker did those adapters alongside with real job and it took him allmost two months to get them finished, so I doupt he would be willing to make more. But if you want I can give you the drawing of the adapters, it's not very professional or anything like that, but there's all the needed measurements and should be enough for any machinist to get the idea what's it about. I have the drawing in my work computer, so I can attach it here next week if needed.

When I bought the bike and the carbs came with it the last owner (propably) had done a new throttle shaft and connecting rods out of aluminium profile for the carbs, so that the spacing fit to Honda. I wasn't actually so pleased with quality of the throttle shaft, so I made a new one myself. It actually turned out that it's not so easy to drill holes to a round bar, so I'm not so sure was it worth it, but at least I can say it's home-made. :D By the way, the shaft's diameter is annoyingly about 9,9mm, so it had to be sanded to get some of from the 10mm aluminium bar. I think I should of have also replace the fibre seals of the shaft, but I didn't get around to find out where I could have find new ones..

It's comforting to hear that the accelaration pumps motion is propably right and isn't the problem. One thing that I've been suspecting for the problem about the acc.pumps is that it might be that the fuel lines didn't get filled up enough with gasoline when I tried the carbs on. I pumped gas like a hundred times when I saw that there wasn't anything coming out the acceleration jets, but since the motion is so small it could be that the fuel lines didn't get filled up and pressurized enough.. At the spring I was so hurry to get the bike running that I just bored to fight with it and replaced the old carbs back. Your project definately gives me the boost to want to try those carbs on again and use more time to figure out what is going on in there, so keep up the good work! :)
 
I used these seals, Rotary shaft oil seal 10 x 14 x 3 WAO NBR just checked the ebay seller and h has none listed cost me 15Euros for 10.

I used a vernier to measure the shaft and not a micrometer but from what I remember it was very close to 10mm. I decided again a new shaft a re spacing as at the time I couldn't get the fuel connections and the top vents in the right size, well not without getting some made up.

I hope my accel pumps work when I come to try them out. I've also been looking for the rubber grommet that seals the accel pump nozzle in the carb body but cant find any, one of mine is damaged.

As mine carbs are still on the standard suzuki spacing I dont think your adapters will work for me. The concept will be ok but would need some with an angle on them to match up with honda spacing.

Interesting on the fuel starvation, maybe you float heights are too low. I think over weekend I'll fill mine with fuel and test out the accel pumps.
 
http://www.ebay.com/itm/Rotary-shaft-oil-seal-10-x-14-x-3-WAO-NBR-VC-without-spring-/280869386106
I think that I visit a local bearing shop next week and ask there, but that's good option.

I'm not absolutely sure about the diameter of the shaft, but the aluminium bar that I bought was suppose to be 10,0mm and that didn't fit through the bearings of the carbs.

When I rebuild the carbs I bought this kit:
http://www.power-barn.com/servlet/the-688/Mikuni-TM33-Carburetor-Rebuild/Detail
The kit included also the nozzles grommet's, so I have all four old grommet's as a spare and I can easily send couple of them to you if needed, just PM or mail me your postal address. Just to be clear is that the right part in the front of the picture?

I didn't realize your carbs are still in suzuki's spacing. The new connecting bars for Honda's sapcing would be easy to make, but the throttle shaft is a bit more challenging. It's definately a good idea to use the marine piping for the insulator's, so the different spacing wont matter.

The float height's is one thing that I've been considering of, mostly because I'm not sure is the mounting position of the carbs correct. In suzuki the carbs are more inclined towards than in honda, so it has an affect to the float level.
 

Attachments

  • 13060015.jpg
    13060015.jpg
    1.1 MB · Views: 427
Those are the ones, I'll PM you my address.

Thats the ebay seller, when I looked I couldn't find the right size listed.

Is your throttle linkage between 2 &3 or between 3&4 as per Suzuki?
 
Actually I also couldn't find it, but when I googled it I got that as a result.

The throttle linkage is still between 3&4. I actually tried to relocate it to between 2&3 and made the needed holes/threads for throttle adjusting screw and the linkage's installing frame, but then I realized that it would be very difficult to do new actuator for the acc. pumps cam (I don't what you might call it), so I gave up the idea and kept the linkage between 3&4. The throttle wire's will get to pretty tight spot between the bike's frame ant the tank when carbs are in place, but at least with honda spacing it didn't prevent them to work.

Ok, when I get your address I will post couple of them grommet's to you.
 
Just a notice, I got my carbs installed and now everything seems working fine. :D
The problem with the acceleration pumps was that the plunger chamber and the fuel line didn't filled up by itself, but it needed some "seed gasoline" in so that the pump could get the fuel flowing.

As I said the mixture for the low range revs seemed a little bit lean, so I switched the idle jet to 45 and moved the needle clip to it's lowest postion. It's now bit on the rich side, but I figured it's safer that way. I haven't synchronized them yet, but will do that when I get the synchronizer.

And oh boy it's a fun ride! :D The idle is a little bit annoying at first because it's pretty high and volatile and kind of difficult to drive slow, but when you turn the handle there's definately a nice kick that compensates all that. ;) And the clattering sound that the throttle valve's makes in idle speed is just so funny, it makes me smile every time. :)
 

Attachments

  • 13060022.jpg
    13060022.jpg
    1.5 MB · Views: 535
Good to hear Timo. I cant wait to get mine on.
I see what you mean with the relocation of the fuel petcock, mine will be between the cylinerhead and carb top, it just fits in there.
With those adapter you made and the stock manifolds give it a factory look.
I like those air filters as well, are they K&N for a Suzuki Bandit with adapters to go from 54mm to 50mm.
 
I'm also pretty pleased how it looks. The bike itself is so far from factory look that it's good thing that at leats a little part of it still looks like it. :D

The air filters are these: http://www.knfilters.com/search/product.aspx?prod=rc-2282
They are meant for Honda CB so the inside diameter is 54mm, but I superglued a slices 2mm thick rubber mat to the carbs flange's so now they fit for both Mikuni's as well.

Your fuel petcock sits nicely between the cylinders and the carbs. Is that marine hose stiff enough to hold the weight of carbs or are you going to use some kind of installation rod for the the carbs? I was just thinking cause the hose that I was planning was pretty loose.

By the way, i've noticed that somehow the flatslide's causes the start clutch to slip when starting the engine. Otherwise it's an easy starting, but the clutch just wont stick for couple of the first starts. Before starting with the original carbs it was very rare that the clutch would slip but now it does it at least few times when the engine is cold. With the warm engine there's no problem and the clutch sticks to the shaft. I think it has something to do with the vacuum caused by the closed carbs and hence the need of more torque, so maybe I'll try to open a throttle just a liltle when starting and see if it starts any better.
 
Looks like I'm due an update.

I made a bracket to mount some of the electrics on.
9196168938_769943eb3f.jpg


The reg/rec is mounted underneath and the ignitors and possible an RFID ignition switch ontop.

9196168804_5881a7d16c.jpg


I also made one to fit in front of this one between the frame rails to hold the starter solenoid and fuse box but forgot to take a photo.


I cut down the side panels and tape together to get the look. Not to enamored with it at present will probably have to shape it a bit more with fiberglass.

9193377193_3235b0bffd.jpg


9196167922_9fd00d7c52.jpg


9196167142_c54df27273.jpg


Here it is with the original seat foam shortened to fit and the side panels plastic welded to the tail section.


I want to shape the seat so the riders part is scalloped and the pillion more level with the tail section.
Something similar to this seat shape.

SuperF4of8-2.jpg


For now though I have removed the engine so I can finish the welding of the subframe mounts, cross bracing, shock lower bracket and a new kickstand location.

9193372789_fb074e2e11.jpg


9193372263_91af80a5be.jpg


9193371961_577ddaaebf.jpg


Heres the bracing of the lower shock mount. The cross tube which originally supported the main stand is not designed for the twisting torque that will be applied to it by the shock linkage. so I have welded braces at a tangent to the tube to prevent twisting. Excuse the amateur mig welding

9193380029_06df65240e.jpg


9193379733_be82149370.jpg


9196170020_2ffc1e9458.jpg


Uncovered another rusty tube that needs a repair.

9196169478_c825afe12a.jpg


I've repositioned the kickstand mount and finished welding the the cross bracing, just need to take and upload photos.
 
Back
Top Bottom