
We noticed you are blocking ads. DO THE TON only works with community supporters. Most are active members of the site with small businesses. Please consider disabling your ad blocking tool and checking out the businesses that help keep our site up and free.
You are using an out of date browser. It may not display this or other websites correctly.
You should upgrade or use an alternative browser.
You should upgrade or use an alternative browser.
Nixon - '72 CL450 - Updates and Upgrades
- Thread starter Flugtechnik
- Start date
Flugtechnik
My bike is not transportation, it is a respite
Nixon - '72 CL450 - She Runs!
If this was an old tank I would agree, but this is a brand new custom tank. The guy should not build it with pinholes so I expect him to fix them.
On a brighter note, he fixed almost all of the pinholes. There are two left at the top that barely weep when the tank is full. I am going to wait until after the GTG to have him fix those.
Also, I now have 66 miles on her. I was having some idling problems and after reading through some threads on hondatwins.net I realized I had assembled the idle mixture screws incorrectly. I got that fixed but now need to sync the carbs again as the revs don't want to settle back down.
I am still hoping to get a long shakedown ride in tonight. Despite the maladjusted carbs I think she will make it to TN.
Flugtechnik
My bike is not transportation, it is a respite
Nixon - '72 CL450 - She Runs!
Just wanted to post an update here. In case you didn't see the GTG thread, I did get her running and rode her up to TN, around the mountains and back again. Good times. However, I took her up there before she was quite finished. Now that the cafe show at Barber is coming up, I have to get her cleaned up and finished. That means:
Cleaning and sealing the tank
Sanding and applying the brushed finish to the tank
Fix the crack in the seat
Clean and rebuild the carbs
A couple things happened on the trip. During the long trip, I put my weight on the tank to give my arms a rest and the force caused the front tank mounts to spread apart. So I need to squeeze them back together or modify the mounts. Also, my seat got a small crack in it because I didn't have it properly supported under my bum. So I need to add a block of rubber to support the back and get the crack rewelded and the finish fixed. Also my carbs never did get dialed in (I think I was running rich) and one of the bowls is leaking. I got some gasket sets from DCC and will rebuild them while I work on the tank. Should have everything done before Barber.
Oh, and here are some pics of her since I never did post any. I will get some proper pics for the Show and Shine when the tank is done.
Hoosier Daddy
Earache my eye...
Re: Nixon - '72 CL450 - She Runs!
Posting for future referance.
Posting for future referance.
Flugtechnik
My bike is not transportation, it is a respite
Since I am still "building" Nixon, I figured I would add some updates to her progress.
The two main leaks in the tank were at weld seems that I sanded down when I was finishing the tank. After a long ride one day, they really started leaking. These were just above the petcock bungs. I put the tank on its side and made little funnels out of aluminum foil and poured a little more sealer into the tank through the hole. I did this about 8 times for each hole with about an hour between each time, building up a nice thick layer of sealer over the affected area. BTW, I did clean the tank out before I did this. Seems to have worked as the tank no longer leaks.
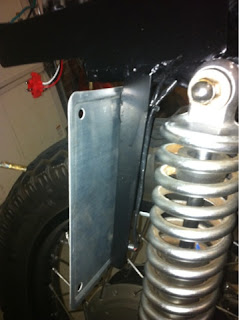
Then the other day when I was getting ready to go for a ride, I noticed my license plate was moving in the wind. The bracket had cracked where it was welded to the frame and was barely hanging on. I ripped it off and rode the bike over to the welders house. He made up a new thicker bracket and welded it on.
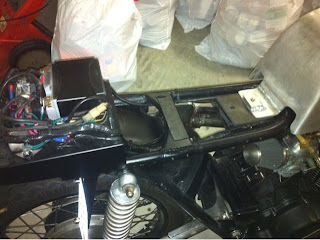
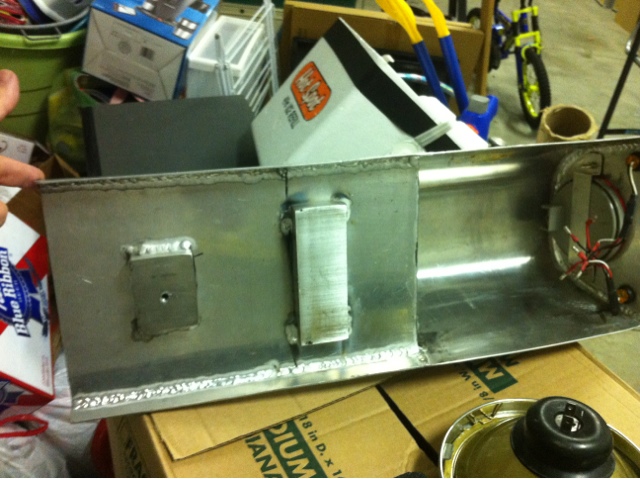
While I was there I had him fix my seat as well. Some of you may have seen at Barber that it was cracked. This is because when we first made it, it basically had one support at the front where it bolts to the frame and then towards the back, it was supposed to sit on the frame rails. In reality, in the back, it actually hit the battery box on the electronics tray under the hump. My weight then caused it to bend in the middle and crack at the transition to the hump where it was welded. While we were looking at this, I noticed that the force the seat was imparting on the battery box had caused the weld along one side of the electronics tray to break. We decided to add another spacer under the seat part where another frame cross member was so that all of my weight was supported directly under me.
He made all the mods and I rode the bike home. I added some rubber strips to the frame and along the edge of the seat to keep things from rattling. I redid the brushed finish on the seat and got everything mounted back up. It now feels very sturdy and secure.

The two main leaks in the tank were at weld seems that I sanded down when I was finishing the tank. After a long ride one day, they really started leaking. These were just above the petcock bungs. I put the tank on its side and made little funnels out of aluminum foil and poured a little more sealer into the tank through the hole. I did this about 8 times for each hole with about an hour between each time, building up a nice thick layer of sealer over the affected area. BTW, I did clean the tank out before I did this. Seems to have worked as the tank no longer leaks.
Then the other day when I was getting ready to go for a ride, I noticed my license plate was moving in the wind. The bracket had cracked where it was welded to the frame and was barely hanging on. I ripped it off and rode the bike over to the welders house. He made up a new thicker bracket and welded it on.

While I was there I had him fix my seat as well. Some of you may have seen at Barber that it was cracked. This is because when we first made it, it basically had one support at the front where it bolts to the frame and then towards the back, it was supposed to sit on the frame rails. In reality, in the back, it actually hit the battery box on the electronics tray under the hump. My weight then caused it to bend in the middle and crack at the transition to the hump where it was welded. While we were looking at this, I noticed that the force the seat was imparting on the battery box had caused the weld along one side of the electronics tray to break. We decided to add another spacer under the seat part where another frame cross member was so that all of my weight was supported directly under me.
He made all the mods and I rode the bike home. I added some rubber strips to the frame and along the edge of the seat to keep things from rattling. I redid the brushed finish on the seat and got everything mounted back up. It now feels very sturdy and secure.

Flugtechnik
My bike is not transportation, it is a respite
I also made some electrical upgrades.
My bike has two small LED turn signals on the back. The left and right side circuits are connected by the indicator bulb in the tach. This worked fine with incandescent bulbs, but with LEDs both sides flash at the same time. To temporarily fix this, I just removed the indicator bulb. The turns then worked fine, but I never knew when they were on (until someone pulled up next to me and yelled or made spastic hand gestures at me).

To fix this, I made a new connector for the indicator bulb that has two diodes in it to isolate the two sides of the circuit. Below is a pic of it before soldering and heat shrinking.
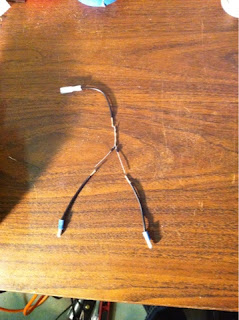
I will get detailed for a moment for anyone else that needs to make this mod on their similarly wired bike. I first disconnected the light blue and orange wires from the bulb. I then plugged the light blue wire from the bulb into a spare green (ground) connector. I made the wire shown. I plugged the orange wire from the bulb into the female end and plugged the two male ends into the light blue and orange connectors from the harness. Done.
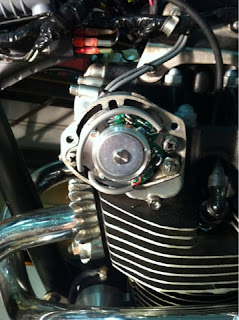
Next up, I installed the electronic ignition I got for Christmas. It is a PAMCO unit. It was fairly straightforward to install. It took a bit of work to get the rotor onto the mechanical advance with the electronics plate in the way, but I got it on there and got it installed. Since I had already installed a relay to switch power to my coils, I already had some wires close by that I could tap into for the power and ground needed by the unit. It is all installed and wired, but I haven't started the bike yet. I am waiting for a warmer day when I am off of work so I can get it timed. Hopefully this weekend.
The next task is to get my clipons installed and then try to work out something for front turn signals. I've got some cool ideas.
My bike has two small LED turn signals on the back. The left and right side circuits are connected by the indicator bulb in the tach. This worked fine with incandescent bulbs, but with LEDs both sides flash at the same time. To temporarily fix this, I just removed the indicator bulb. The turns then worked fine, but I never knew when they were on (until someone pulled up next to me and yelled or made spastic hand gestures at me).
To fix this, I made a new connector for the indicator bulb that has two diodes in it to isolate the two sides of the circuit. Below is a pic of it before soldering and heat shrinking.

I will get detailed for a moment for anyone else that needs to make this mod on their similarly wired bike. I first disconnected the light blue and orange wires from the bulb. I then plugged the light blue wire from the bulb into a spare green (ground) connector. I made the wire shown. I plugged the orange wire from the bulb into the female end and plugged the two male ends into the light blue and orange connectors from the harness. Done.
Next up, I installed the electronic ignition I got for Christmas. It is a PAMCO unit. It was fairly straightforward to install. It took a bit of work to get the rotor onto the mechanical advance with the electronics plate in the way, but I got it on there and got it installed. Since I had already installed a relay to switch power to my coils, I already had some wires close by that I could tap into for the power and ground needed by the unit. It is all installed and wired, but I haven't started the bike yet. I am waiting for a warmer day when I am off of work so I can get it timed. Hopefully this weekend.

The next task is to get my clipons installed and then try to work out something for front turn signals. I've got some cool ideas.
JustinLonghorn
No Purple Hearts, No Blue Ribbons
Increasing the cool factor on an already gorgeous scoot. I can definitely dig it, Flug.
Flugtechnik
My bike is not transportation, it is a respite
So I couldn't get the pamco ignition to work. I tried everything I could think of and some suggestions from Pete. So I'm send the unit back to him so he can test it.
In other news, I took my bars off in preparation for putting my clipons on. Pulling the wires out was almost as hard as putting them in in the first place. This time I am going to run them externally since I plan on changing out the controls down the road.

In other news, I took my bars off in preparation for putting my clipons on. Pulling the wires out was almost as hard as putting them in in the first place. This time I am going to run them externally since I plan on changing out the controls down the road.
Big R
Heaven is so far away.
JustinLonghorn said:Increasing the cool factor on an already gorgeous scoot. I can definitely dig it, Flug.
I'll just plagarize Justin's post.........+1! This is a great bike you have man.
Except when I was behind you and Chris at Barbers. It's like a red laser beam blasting you in the eyes...........but I can understand that.
Flugtechnik
My bike is not transportation, it is a respite
I borrowed my dad's jack tonight and raised the front end so I could slide the forks down and get the clipons on. I loosened up the bottom clamps and then stuck some "shims" in there to hold them open. Loosened up the top clamps and slid the forks down.

It went pretty smoothly and I got the forks back up in place with minimal scratching (my forks are painted). Only real problem is that I got the cheap clipons from DCC and the clamp bolts hit my tank so I am going to have to make my steering stops bigger.


I already notched my controls but forgot to take pics. I need to get some heatshrink for the wires and then I can reassemble. Gotta hurry since I am supposed to ride up to Speedfiend's bike show on Saturday.
It went pretty smoothly and I got the forks back up in place with minimal scratching (my forks are painted). Only real problem is that I got the cheap clipons from DCC and the clamp bolts hit my tank so I am going to have to make my steering stops bigger.
I already notched my controls but forgot to take pics. I need to get some heatshrink for the wires and then I can reassemble. Gotta hurry since I am supposed to ride up to Speedfiend's bike show on Saturday.
OneWheelDrive
Active Member
sub SCRIBED!
goodfornothing
Spicey!
Updates. Now! Unless you already started a new thread and I'm late. lol.
Maritime
Over 10,000 Posts
goodfornothing said:Updates. Now! Unless you already started a new thread and I'm late. lol.
He crashed, now this bike is going to be built in the barber bike build. New thread:
http://www.dotheton.com/forum/index.php?topic=36857.0
Cheers
Flugtechnik
My bike is not transportation, it is a respite
Yes, I guess I meant to close this thread.
After taking about 3 years to build, I rode her for about 8 months before I wrecked it. Went off the side of a mountain.
See here:
http://www.dotheton.com/forum/index.php?topic=36724.0
So now I get to start over. We are rebuilding it at the Barber Vintage Festival this weekend in Alabama. Should be a great time. See here:
http://www.dotheton.com/forum/index.php?topic=36857.0


